manualshive.com logo in svg
background image

7

WEAK BATTERY PACKS: 

Chargers can also detect a weak battery. Such batteries 

are still usable but should not be expected to perform as much work. In such cases, 

about 10 seconds after battery insertion, the charger will beep rapidly 8 times to 

indicate a weak battery condition. The charger will then go on to charge the battery 

to the highest capacity possible.

Important Charging Notes

  1.  Longest life and best performance can be obtained if the battery pack is charged 

when the air temperature is between 18°- 24°C (65°F and 75°F). DO NOT charge 

the battery pack in an air temperature below +4.5°C (+40°F), or above +40.5°C 

(+105°F). This is important and will prevent serious damage to the battery pack.

  2.  The charger and battery pack may become warm to touch while charging. This 

is a normal condition, and does not indicate a problem. To facilitate the cooling 

of the battery pack after use, avoid placing the charger or battery pack in a warm 

environment such as in a metal shed, or an uninsulated trailer.

  3.  If the battery pack does not charge properly:

a.   Check current at receptacle by plugging in a lamp or other appliance
b.   Check to see if receptacle is connected to a light switch which turns power 

off when you turn out the lights. 

c.   Move charger and battery pack to a location where the surrounding air 

temperature is approximately 18° - 24°C (65°F - 75°F). 

d.   If charging problems persist, take the tool, battery pack and charger to your 

local service center.

  4.  The battery pack should be recharged when it fails to produce sufficient power 

on jobs which were easily done previously. DO NOT CONTINUE to use under 

these conditions. Follow the charging procedure. You may also charge a partially 

used pack whenever you desire with no adverse affect on the battery pack.

  5.  Under certain conditions, with the charger plugged into the power supply, the 

exposed charging contacts inside the charger can be shorted by foreign material. 

Foreign materials of a conductive nature such as, but not limited to, steel wool, 

aluminum foil, or any buildup of metallic particles should be kept away from 

charger cavities. Always unplug the charger from the power supply when there 

is no battery pack in the cavity. Unplug charger before attempting to clean.

  6.  Do not freeze or immerse charger in water or any other liquid.

WARNING:

 Shock hazard. Don’t allow any liquid to get inside charger. Electric 

shock may result. To facilitate the cooling of the battery pack after use, avoid placing 

the charger or battery pack in a warm environment such as in a metal shed, or an 

uninsulated trailer. 

CAUTION:

 Never attempt to open the battery pack for any reason. If the plastic 

housing of the battery pack breaks or cracks, return to a service center for recycling.

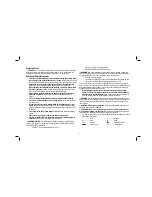
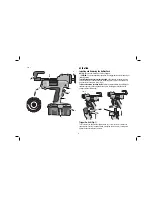
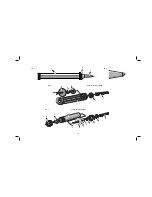
COMPONENTS (FIG. 1–4)

  A. Plunger rod release trigger 

G. Plunger rod

 B. Trigger switch 

H. Plunger

  C. Trigger switch lock-off 

I. Release buttons

 D. Battery pack 

J. Cartridge holder

  E. Variable speed dial 

K. Poker  

  F. Plunger rod handle 

L. Sausage holder

Electronic Force Control 

The tool is designed to dispense a wide range of adhesive and caulk, and to detect 

when material is not dispensing or dispensing slowly. In certain cases, the tool may 

not dispense material properly due to solidified adhesive, puncture holes, frozen 

materials and the like. Always follow the manufacturer’s recommendations regarding 

solidified adhesive, puncture holes, frozen materials, etc. to reduce the risk of 

damaging the tube or casing. 
Remove the battery pack and replace material tube/casing following the manufacturer’s 

instructions and the instructions under 

To Insert Material

. Take the tool to a D

E

WALT 

service center if the tool continues to shut down.

Electronic Auto-reverse 

This tool has an auto-reverse feature that reverses the plunger in certain situations 

depending on material used and speed of tool. 

ASSEMBLY 

The DC545, DC546 and the DC547 cordless adhesive guns come fully assembled.
The DC545 accepts 300-310 ml. cartridges. The DC546 accepts 1100 ml cartridges. 

The DC547 accepts 600 ml. sausage packs and 310 ml cartridges.

Содержание DC545-XE

Страница 1: ...DC545 XE DC546 XE DC547 XE HEAVY DUTY 18V CORDLESS ADHESIVE GUN INSTRUCTION MANUAL ...

Страница 2: ......

Страница 3: ...ons Water entering a power tool will increase the risk of electric shock d Do not abuse the cord Never use the cord for carrying pulling or unplugging the power tool Keep cord away from heat oil sharp edges or moving parts Damaged or entangled cords increase the risk of electric shock e When operating a power tool outdoors use an extension cord suitable for outdoor use Use of a cord suitable for o...

Страница 4: ...wer tool taking into account the working conditions and the work to be performed Use of the power tool for operations different from those intended could result in a hazardous situation 5 BATTERY TOOL USE AND CARE a Ensure the switch is in the off position before inserting battery pack Inserting the battery pack into power tools that have the switch on invites accidents b Recharge only with the ch...

Страница 5: ... glasses Also use face or dust mask if cutting operation is dusty ALWAYS WEAR CERTIFIED SAFETY EQUIPMENT ANSI Z87 1 eye protection CAN CSA Z94 3 ANSI S12 6 S3 19 hearing protection NIOSH OSHA MSHA respiratory protection WARNING Some dust created by power sanding sawing grinding drilling and other construction activities contains chemicals known to cause cancer birth defects or other reproductive h...

Страница 6: ...ride batteries Help protect our environment and conserve natural resources by returning the spent nickel cadmium and nickel metal hydride batteries to an authorized DEWALT service center or to your local retailer for recycling You may also contact your local recycling center for information on where to drop off the spent battery RBRC is a registered trademark of the Rechargeable Battery Recycling ...

Страница 7: ...nless it is absolutely necessary Use of improper extension cord could result in risk of fire electric shock or electrocution An extension cord must have adequate wire size AWG or American Wire Gauge for safety The smaller the gauge number of the wire the greater the capacity of the cable that is 16 gauge has more capacity than 18 gauge When using more than one extension to make up the total length...

Страница 8: ...be indicated by the red light remaining ON continuously The pack is fully charged and may be used at this time or left in the charger Indicator Light Operation Charge Indicators Some chargers are designed to detect certain problems that can arise with battery packs Problems are indicated by the red light flashing at a fast rate If this occurs reinsert battery pack into the charger If the problem p...

Страница 9: ...rial Foreign materials of a conductive nature such as but not limited to steel wool aluminum foil or any buildup of metallic particles should be kept away from charger cavities Always unplug the charger from the power supply when there is no battery pack in the cavity Unplug charger before attempting to clean 6 Do not freeze or immerse charger in water or any other liquid WARNING Shock hazard Don ...

Страница 10: ...ry pack firmly into the handle until you hear the lock snap into place Fig 2 To remove the battery pack from the tool press the release buttons I and firmly pull the battery pack out of the tool handle Insert it into the charger as described in the charger section of this manual I D FIG 2 Trigger Switch Fig 1 To turn the tool on squeeze the trigger switch B To turn the tool off release the trigger...

Страница 11: ... 1 1 To manually adjust plunger rod G press and hold the plunger rod release trigger A 2 Push or pull plunger rod handle F to desirable position 3 Release plunger rod release trigger To Insert Material NOTE Material left in the cartridge sausage holder may dry if left unattended Follow manufacturer s recommendations when using caulk or adhesive material FIG 3 K J CARTRIDGE HOLDER FIG 3 1 Ensure th...

Страница 12: ...10 FIG 6 S J R Q G O P 600 ML SAUSAGE HOLDER FIG 7 M N L Q R U T G X V W L N M FIG 4 FIG 5 310 ML CARTRIDGE HOLDER ...

Страница 13: ...and push the plunger rod G forward to access the threads on rod Release the trigger 4 Thread the sausage holder L onto the rear cap U 5 Thread the plunger washer V barrel plunger W and handle screw X onto the plunger rod G in the order shown in Figure 3 Tighten securely 6 Press and hold the plunge rod release trigger A and pull the plunger rod handle F back before loading material 7 Place the nozz...

Страница 14: ...or three years from the date of purchase Please return the complete unit transportation prepaid to any DEWALT Service Centre or any authorised service station For warranty repair information call AUS 1800 654 155 or NZ 09 259 1111 This warranty does not apply to Accessories Damage caused where repairs have been made or attempted by others Damage due to misuse neglect wear and tear alteration or mo...

Страница 15: ...13 ...

Страница 16: ...40 XJ 24 2 0 X X X X X X X X X X X X X 60 60 X X DW0240 24 1 7 X X X X X X X X X X X X X 60 60 X X DW9096 18 2 4 X X X X 60 X 60 20 X 60 X 60 60 X X X 60 DE9095 XJ 18 2 0 X X X X 60 X 60 20 X 60 X 60 60 X X X 60 DE9091 XJ 14 4 2 0 45 45 45 45 45 15 45 15 90 45 90 45 45 X X X 45 DW9091 14 4 1 7 45 45 45 45 45 15 45 15 90 45 90 45 45 X X X 45 DC9071 12 2 4 60 60 60 60 60 15 60 15 60 60 60 60 60 X X ...

Отзывы: