background image

LBB Series Oven Owner

’s Manual 


A

BOUT 

T

HIS 

M

ANUAL


Version 13 


Copyright © 2011 by Despatch Industries. 

All rights reserved. No part of the contents of this manual may be reproduced, copied or transmitted in any form or by any 
means  including  graphic,  electronic,  or  mechanical  methods  or  photocopying,  recording,  or  information  storage  and 
retrieval systems without the written permission of Despatch Industries, unless for purchaser's personal use. 

ULTRAFLEX DRYING AND FIRING 
FURNACE 

MODELS 1000, 3615, 3630, 3640 

OWNERS MANUAL 

C-204 
VERSION 12 
10/2008 

LBB SERIES OVEN 

OWNER’S MANUAL 


C-188 
PN 146230 
VERSION 13 
9/2011 


Содержание LBB Series

Страница 1: ...manual may be reproduced copied or transmitted in any form or by any means including graphic electronic or mechanical methods or photocopying recording or information storage and retrieval systems wit...

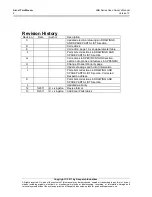
Страница 2: ...Revision Date Author Description C Updated electrical drawings in DRAWINGS AND SPARE PARTS LISTS section D Corrections E Correction page 19 set up parameter table F Parts lists corrections in DRAWING...

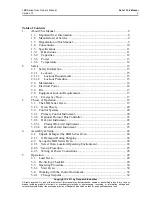
Страница 3: ...y Information 15 2 1 1 Lockout 15 2 1 1 1 Lockout Requirements 15 2 1 1 2 Lockout Procedure 15 2 2 Maintenance 16 2 3 Electrical Power 16 2 4 Fire 17 2 5 Equipment Lockout Requirements 17 2 5 1 Emerge...

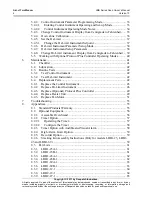
Страница 4: ...Change Hi Limit instrument Display from Centigrade to Fahrenheit 39 5 5 Working with Optional Protocol Plus Controller Operating Modes 40 6 Maintenance 41 6 1 Checklist 41 6 2 Lubrication 42 6 3 Rout...

Страница 5: ...rol Instrument 44 Figure 13 Providing easy access to the Control instrument 44 Figure 14 Remove Old Control and Hi Limit Instruments and Wiring Rear view 45 Figure 15 Prepare to remove control instrum...

Страница 6: ...eproduced copied or transmitted in any form or by any means including graphic electronic or mechanical methods or photocopying recording or information storage and retrieval systems without the writte...

Страница 7: ...No part of the contents of this manual may be reproduced copied or transmitted in any form or by any means including graphic electronic or mechanical methods or photocopying recording or information...

Страница 8: ...urchaser s personal use Printed and bound in the United States of America The information in this manual is subject to change without notice and does not represent a commitment on the part of Despatch...

Страница 9: ...thermal processing for over 100 years Technical expertise gained over those years helps provide innovative solutions to critical applications in vertical markets and cutting edge technology worldwide...

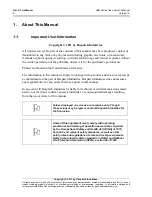
Страница 10: ...Failure to heed warnings in this instruction manual and on the oven could result in personal injury property damage or death 1 4 Conventions This icon signifies important information This icon signif...

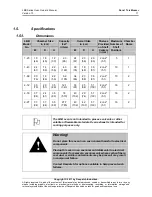
Страница 11: ...12 30 2 3 65 24 61 23 58 26 66 2 on 2 5 1 5 1 1 43 24 61 14 36 22 56 4 3 122 30 76 19 48 36 91 2 on 2 5 1 10 1 1 69 30 76 18 46 22 56 6 9 195 34 86 23 58 36 91 2 on 2 5 1 10 2 2 12 30 76 20 51 35 89 1...

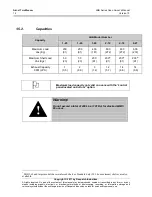
Страница 12: ...tch Industries unless for purchaser s personal use 1 5 2 Capacities Capacity LBB Model Number 1 23 1 43 1 69 2 12 2 18 2 27 Maximum Load Lbs Kg 200 91 200 91 400 181 600 272 600 272 600 272 Maximum Sh...

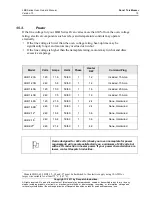
Страница 13: ...or run hot If the line voltage is higher than the nameplate rating motors may run hot and draw excessive amperage Model Volts Amps Hertz Phase Heater KW Cord and Plug LBB 1 23A 120 11 6 50 60 1 1 2 I...

Страница 14: ...Number 1 23 1 43 1 69 2 12 2 18 2 27 Time to temperature approximate minutes with no load 40 C 150 C 17 17 15 15 17 17 40 C 204 C 30 30 26 30 33 33 Recovery time with door open 1 minute approximates...

Страница 15: ...state and prevents accidental machine start up Always follow the Lockout Procedure described in this Section before cleaning maintaining or repairing the LBB Series Oven An accidental start up while...

Страница 16: ...epair 2 3 Electrical Power Only qualified and trained personnel should perform electrical maintenance or electrical repair Danger Contact with energized electrical sources may result in serious injury...

Страница 17: ...tomer supplied disconnect 4 Shut off fuel 5 Call the fire department or extinguish the fire Danger Always disconnect all power before extinguishing a fire Attempting to extinguish a fire in a machine...

Страница 18: ...art of the contents of this manual may be reproduced copied or transmitted in any form or by any means including graphic electronic or mechanical methods or photocopying recording or information stora...

Страница 19: ...are effectively used in testing preheating sterilizing drying aging and curing as well as other production applications The LBB Series Ovens incorporate forced circulating airflow with precision digi...

Страница 20: ...at the sensing point The temperature sensor is located to optimize control action for the entire chamber for various load conditions While the control display may fluctuate a few degrees around the s...

Страница 21: ...ion of Despatch Industries unless for purchaser s personal use Table 1 Control Instrument Explanations Display Description Main PV Display Typically displays actual oven temperature Press SET ENT to d...

Страница 22: ...ovides information on control status high limit temperature and allows changes to be made to the control settings Review the Protocol Plus Controller Owner s Manual for more information 3 2 3 Hi Limit...

Страница 23: ...instrument Set the Hi Limit instrument to a temperature somewhat below the temperature at which the product could be damaged 3 2 3 2 Oven Hi Limit Instrument If the product being processed does not ha...

Страница 24: ...s and lenses Check the door and latch for smooth operation 4 1 1 If Damaged During Shipping If damage occurred during shipping 1 Contact the shipper immediately and file a written damage claim 2 Conta...

Страница 25: ...power supply meets Despatch specifications If the facility power supply is not stable Despatch recommends a line conditioner 4 2 2 Set up Procedure 1 Place oven on bench top or optional cabinet base...

Страница 26: ...r purchaser s personal use 4 2 3 Wiring Power Connections Read the Model LBB nameplate top of oven or top of control area under the door for proper power requirements before proceeding with wiring and...

Страница 27: ...or information storage and retrieval systems without the written permission of Despatch Industries unless for purchaser s personal use To wire the LBB Series Oven for units requiring hardwiring 1 Remo...

Страница 28: ...tion 86 of 1990 5 1 Load Oven Despatch Industries cannot be responsible for either the process or process temperature used or for the quality of the product being processed The purchaser and operator...

Страница 29: ...or liquid in this oven because they may explode under heat Know the system Read this manual carefully Make use of its instructions and explanations Safe continuous satisfactory trouble free operation...

Страница 30: ...circulating fan will start 2 Set exhaust vent to desired opening by adjusting the damper at the rear of the oven Figure 11 a Adjust the vent for maximum performance at various operating temperatures...

Страница 31: ...ieval systems without the written permission of Despatch Industries unless for purchaser s personal use a When the process value on the Control instrument reaches setpoint OUT cycles ON and OFF to mai...

Страница 32: ...sted and the controls have been factory set for normal operating conditions In most applications it is not necessary to alter the oven s settings except for Setpoint This section contains information...

Страница 33: ...et up Mode parameters The Control Instrument will not allow the display to be altered improperly The Control Instrument will automatically exit the Parameter Programming mode if no keys are pressed fo...

Страница 34: ...all parameters except setpoint 2 Prevents all parameters from being changed including the setpoint 1 Set to enter the Set up parameter setting display 1 nr Manual Reset Only when I d are OFF Expresse...

Страница 35: ...Change Control Instrument Display from Centigrade to Fahrenheit Warning Program parameter changes will alter the function of the Control instrument Proceed carefully and fully understand each paramete...

Страница 36: ...t to Centigrade repeat the steps in Section 5 4 3 using In 5 SPH 204 SPL 0 5 4 4 Oven Zone Calibration The Control instrument has been factory tested and calibrated Under normal operating conditions r...

Страница 37: ...and on the oven could result in personal injury property damage or death The oven has been factory tested with the Hi Limit instrument factory preset for normal operating conditions In most applicati...

Страница 38: ...ers using the Operating and Set up modes Section 5 4 2 1 In most applications it is not necessary to alter the oven settings The following instructions describe how to access view and if desired chang...

Страница 39: ...e input signal 0 out1 Output 1 function Function of the output Must be set to Hi for Hi Limit control Hi o1 Hy Output 1 hysteresis value Amount of degrees the temperature must be below the setpoint te...

Страница 40: ...llowing steps to change Hi Limit instrument from displaying C to F and for changing back 1 If on the Hi Limit instrument is lit press an hold for four 4 seconds to enable and 2 Press and hold for four...

Страница 41: ...work chamber reduced heating capacity reduced production overheated components and the like Keep the walls floor and ceiling of the oven work chamber free of dirt and dust Floating dust or accumulated...

Страница 42: ...al and on the oven could result in personal injury property damage or death Test LBB Series Oven functions regularly and carefully for best performance Safety of personnel and maintenance of your equi...

Страница 43: ...ntative will provide an MRA Material Return Authorization number Attach the MRA number to the returned part for identification When ordering parts expedite the process by giving the model number seria...

Страница 44: ...or mechanical methods or photocopying recording or information storage and retrieval systems without the written permission of Despatch Industries unless for purchaser s personal use Figure 12 Remove...

Страница 45: ...trol Instrument Mounting Bracket Figure 15 Prepare to remove control instrument by removing the mounting bracket 5 Move the Control instrument mounting bracket back and off Figure 15 6 Remove old Cont...

Страница 46: ...es unless for purchaser s personal use 6 4 2 Replace Hi Limit Instrument Danger Do not attempt any service on this oven before opening the main power disconnect switch Tools needed One quarter 1 4 inc...

Страница 47: ...se 6 Disconnect the thermocouple wires Figure 14 7 Press and hold down the tabs holding the Hi Limit instrument to the control panel and slide it out Figure 18 8 Install new Hi Limit instrument into t...

Страница 48: ...eproduced copied or transmitted in any form or by any means including graphic electronic or mechanical methods or photocopying recording or information storage and retrieval systems without the writte...

Страница 49: ...re opening the main power disconnect switch Tools needed 3 8 inch wrench One quarter 1 4 inch socket set T20 Torx bit driver 1 Disconnect power 2 Remove shelves Figure 21 3 Remove left and right side...

Страница 50: ...part of the contents of this manual may be reproduced copied or transmitted in any form or by any means including graphic electronic or mechanical methods or photocopying recording or information sto...

Страница 51: ...the written permission of Despatch Industries unless for purchaser s personal use 6 4 5 Replace Fan Motor Danger Do not attempt any service on this oven before opening the main power disconnect switch...

Страница 52: ...p cover to reveal fan motor Figure 23 7 Remove fan motor a Disconnect motor leads from circuit board b Unscrew screws 4 holding motor mounts to body c Lift fan motor from oven body 8 After running at...

Страница 53: ...Low line voltage Supply sufficient power and proper connections Check for circuit overload 1 or 2 heating elements burned out Check heater amperage on the nameplate Replace burned out element see war...

Страница 54: ...t Air friction of recirculation fan Open exhaust air vent Unit will not control at minimum operating temperature with vent s closed Heater does not shutdown until temp reaches the Hi Limit setting Con...

Страница 55: ...s of this manual may be reproduced copied or transmitted in any form or by any means including graphic electronic or mechanical methods or photocopying recording or information storage and retrieval s...

Страница 56: ...s unless for purchaser s personal use 8 2 Optional Equipment 8 2 1 Assemble Oven Stand 1 Install four rubber grommets into holes in the stand Figure 24 a For LBB1 69 stands the rear grommets mount int...

Страница 57: ...the Timing LED blinks slowly When the preset value is reached and the timing cycle is complete the Timing LED blinks rapidly and the delayed contact opens and shuts off the heater The heater remains...

Страница 58: ...move top cover 3 Remove socket from rear of timer 4 Remove timer panel mounting bracket and remove timer from panel 5 Using a small screwdriver insert it the Range and Decimal Point Switch slots for t...

Страница 59: ...allowing the oven chamber to cool slightly or by setting the Hi Limit Instrument by several degrees and pushing Each oven schematic Section 0 shows the wiring for this option 8 2 5 Recorder Option Th...

Страница 60: ...of this manual may be reproduced copied or transmitted in any form or by any means including graphic electronic or mechanical methods or photocopying recording or information storage and retrieval sys...

Страница 61: ...L91 144749 1 Control Des2000 007818 1 Heater 1 2kw 120 240v 145858 1 Door Seal 148048 1 Door Pull 008199 2 Latch Ay 145828 2 Standard Shelf 007281 1 Fan Wheel 008333 1 Motor 00 04hp 110 220v 006049 1...

Страница 62: ...749 1 Control Des2000 054353 1 Heater 1 6kw 120 240v 145920 1 Door Seal 148048 1 Door Pull 008199 2 Latch Ay 146025 2 Standard Shelf 007281 1 Fan Wheel 008333 1 Motor 00 04hp 110 220v 006049 1 Control...

Страница 63: ...145725 1 Door Seal 008057 3 Center Door Seal 148048 1 Door Pull 008199 2 Latch Ay 146024 2 Standard Shelf 094717 2 Reinforced Shelf 007281 1 Fan Wheel 008333 1 Motor 00 04hp 110 220v 006049 1 Control...

Страница 64: ...145773 1 Door Seal 008057 4 Center Door Seal 148048 1 Door Pull 008199 2 Latch Ay 145779 2 Standard Shelf 146023 2 Reinforced Shelf 015876 1 Fan Wheel 145783 1 Motor 00 25hp 110 220v 015229 1 Control...

Страница 65: ...unless for purchaser s personal use 8 3 9 LBB2 27 1 Table 15 LBB2 27 1 Parts Part Number Quantity Description 144755 1 Thermocouple 140097 2 Switch For Power And Heater 057345 1 Relay Heater SSR 16505...

Страница 66: ...e and retrieval systems without the written permission of Despatch Industries unless for purchaser s personal use 8 4 Electrical Schematics The following pages provide electrical schematics for these...

Страница 67: ...part of the contents of this manual may be reproduced copied or transmitted in any form or by any means including graphic electronic or mechanical methods or photocopying recording or information sto...

Страница 68: ...tents of this manual may be reproduced copied or transmitted in any form or by any means including graphic electronic or mechanical methods or photocopying recording or information storage and retriev...

Страница 69: ...part of the contents of this manual may be reproduced copied or transmitted in any form or by any means including graphic electronic or mechanical methods or photocopying recording or information sto...

Страница 70: ...tents of this manual may be reproduced copied or transmitted in any form or by any means including graphic electronic or mechanical methods or photocopying recording or information storage and retriev...

Страница 71: ...tents of this manual may be reproduced copied or transmitted in any form or by any means including graphic electronic or mechanical methods or photocopying recording or information storage and retriev...

Страница 72: ...tents of this manual may be reproduced copied or transmitted in any form or by any means including graphic electronic or mechanical methods or photocopying recording or information storage and retriev...

Страница 73: ...tents of this manual may be reproduced copied or transmitted in any form or by any means including graphic electronic or mechanical methods or photocopying recording or information storage and retriev...

Страница 74: ...tents of this manual may be reproduced copied or transmitted in any form or by any means including graphic electronic or mechanical methods or photocopying recording or information storage and retriev...

Страница 75: ...ntents of this manual may be reproduced copied or transmitted in any form or by any means including graphic electronic or mechanical methods or photocopying recording or information storage and retrie...

Страница 76: ...ntents of this manual may be reproduced copied or transmitted in any form or by any means including graphic electronic or mechanical methods or photocopying recording or information storage and retrie...

Страница 77: ...ntents of this manual may be reproduced copied or transmitted in any form or by any means including graphic electronic or mechanical methods or photocopying recording or information storage and retrie...

Страница 78: ...part of the contents of this manual may be reproduced copied or transmitted in any form or by any means including graphic electronic or mechanical methods or photocopying recording or information sto...

Страница 79: ...for purchaser s personal use 3rdDraft GLOBAL HEADQUARTERS Despatch Industries 8860 207th Street West Minneapolis MN 55044 USA US toll free 1 888 337 7282 international main 1 952 469 5424 fax 1 952 46...

Отзывы: