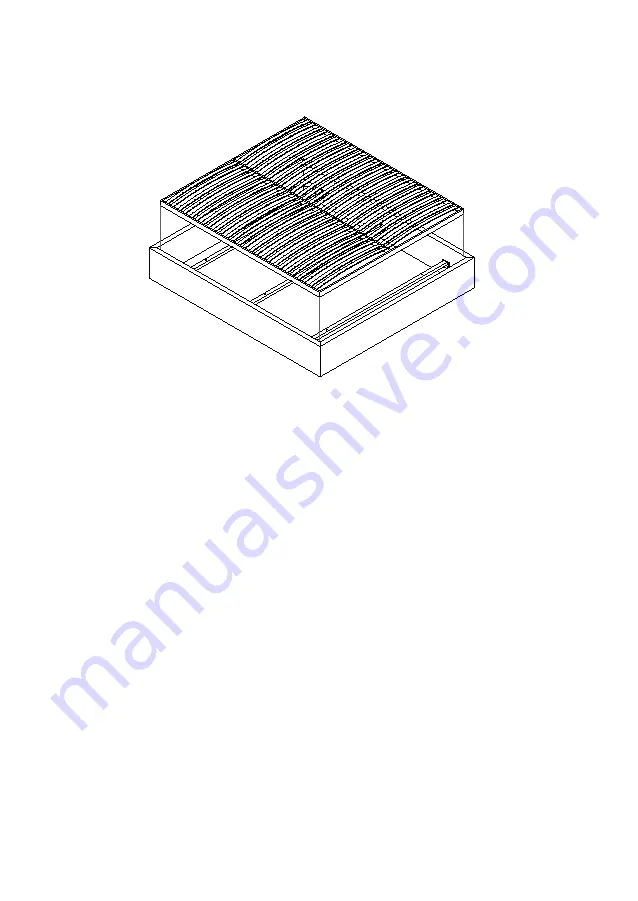
5.1 Put on the bed surround cover, starting top-down.
5.2 Lay the slatted base inside the surround.
E
Sommier bed 31
Страница 1: ...HOME SOFT HOME ISTRUZIONI DI MONTAGGIO ASSEMBLY INSTRUCTIONS LUDWIG...
Страница 2: ......
Страница 3: ...Testiera da aggancio a parete Sommier Up Sommier Sommier Box MA Headboard to be attached to the wall Sommier Up bed Sommier bed Sommier Box MA bed PAG 2 PAG 6 PAG 10 PAG 14 PAG 22 PAG 24 PAG 28 PAG 32...
Страница 4: ...rsonale qualificato utilizzando gli appositi tasselli in dotazione idonei alla parete Prima di procedere al fissaggio importante con trollare l idoneit della parete di resistere alle forze generate da...
Страница 5: ...deve essere uguale a quello dei tasselli Inserire i tasselli ad espansione sui fori 1 3 Fissare la barra di aggancio a parete mediante le apposite viti 110 cm testiera 225 300 cm barra 150 200 cm Tes...
Страница 6: ...2 Ancorare la barra presente sul retro della testiera alla barra di aggancio a parete A barra di aggancio a parete 4 Testiera da aggancio a parete barra retro testiera...
Страница 7: ......
Страница 8: ...he optional collo a parte in aggiunta F n 2 traversi in metallo G n 1 traverso in metallo posteriore a n 2 staffe angolari b n 4 piedini c n 32 viti 8Ma L 25 mm d n 4 viti 10Ma L 50 mm e n 4 rondelle...
Страница 9: ...ttenzione di non serrarle completamente 2 1 Fissare i due traversi in metallo ai giroletti laterali tramite otto viti 8Ma L 25 mm 2 2 Fissare il traverso in metallo posteriore ai giroletti laterali me...
Страница 10: ...posteriore alle staffe del traverso mediante le rimanenti quattro viti 8Ma L 25 mm 3 3 Avvitare completamente tutte le viti 4 Avvitare i piedini sui traversi mediante le viti 10Ma L 50 e le rondelle...
Страница 11: ...5 1 Rivestire con la fodera il giroletto partendo dall alto verso il basso 5 2 Adagiare la rete a doghe all interno del giroletto E Sommier Up 9...
Страница 12: ...riore D n 1 fodera giroletto E n 1 rete a doghe collo a parte in aggiunta F n 3 traversi in metallo a n 4 staffe angolari b n 4 piedini PVC c n 32 viti 8Ma L 20 mm d n 12 viti 8Ma L 25 mm e n 10 feltr...
Страница 13: ...giroletti in corrispondenza dei fori indicati in figura 2 1 Avvitare i piedini sotto le staffe angolari 2 2 Applicare le staffe angolari sui giroletti laterali inserendo le viti nei fori asolati delle...
Страница 14: ...riore ai giroletti laterali inserendo le viti nei fori asolati delle staffe angolari 4 2 Avvitare completamente tutte le viti 3 Fissare i tre distanziali sui giroletti laterali mediante le viti 8Ma L...
Страница 15: ...5 1 Adagiare la rete a doghe dentro il giroletto 5 2 Rivestire con la fodera il giroletto partendo dall alto verso il basso E Sommier 13...
Страница 16: ...stanziali H n 2 meccanismi alzarete manuali I n 3 pistoni a gas L n 2 tondini ferma materasso a n 4 staffe angolari b n 6 staffe per distanziali c n 4 piedini d n 6 viti 6Ma L 15 mm e n 44 viti 8Ma L...
Страница 17: ...letti in corrispondenza dei fori indicati in figura 2 1 Avvitare i piedini sotto le staffe angolari 2 2 Applicare le staffe angolari sui giroletti laterali inserendo le viti nei fori asolati delle sta...
Страница 18: ...e staffe angolari 4 2 Avvitare completamente tutte le viti 3 1 Fissare le staffe sulle estremit dei distanziali mediante le viti 6Ma L 15 mm 3 2 Fissare i distanziali sui giroletti laterali mediante l...
Страница 19: ...5 Fissare i meccanismi di apertura sui giroletti laterali con le viti 8Ma L 25 mm 6 Agganciare i pistoni a gas ai meccanismi di apertura come indicato in figura f I I I H H H H Sommier Box MA 17...
Страница 20: ...i ferma materasso nella parte anteriore della rete a doghe come indicato in figura 8 3 Rivestire con la fodera il giroletto partendo dall alto verso il basso 7 Inserire i pannelli contenitore all inte...
Страница 21: ......
Страница 22: ...using the special dowels supplied suitable for the wall Before proceeding with fixing it is important to check the suitability of the wall to withstand the forces generated by the weight of the headbo...
Страница 23: ...the holes must be the same as that of the anchors Insert the expansion dowels on the holes 1 3 Fix the wall attachment bar using the appropriate screws 110 cm headbord 225 300 cm metal bar 150 200 cm...
Страница 24: ...2 Anchor the bar on the back of the headboard to the wall hooking bar A 22 Headboard to be attached to the wall headboard bar wall hooking bar...
Страница 25: ......
Страница 26: ...ed base in an additional separate package F qty metal spacers G qty rear metal spacer a qty 2 corner brackets b qty 4 feet c qty 32 screws 8Ma L 25 mm d qty 4 screws 10Ma L 50 mm e qty 4 washers M10X3...
Страница 27: ...eing careful not to tighten them completely 2 1 Fasten the two metal spacers to the side bed surrounds using eight 8Ma L 25 mm screws 2 2 Fasten the rear metal spacer to the side bed surround using fo...
Страница 28: ...r bed surround to the metal spacer brackets using the remaining four 8Ma L 25 mm screws 3 3 Fully tighten all screws 4 Screw the feet into the metal spacers using the 10Ma L 50 screws and the M10X30 w...
Страница 29: ...5 1 Put on the bed surround cover starting top down 5 2 Lay the slatted base inside the surround E Sommier Up bed 27...
Страница 30: ...surround cover E qty 1 optional slatted base in an additional separate package F qty metal spacers a qty 4 corner brackets b qty 4 PVC feet c qty 32 screws 8Ma L 20 mm d qty 12 screws 8Ma L 25 mm e q...
Страница 31: ...unds in corre spondence with the holes shown in the figure 2 1 Screw the feet under the corner brackets 2 2 Apply the corner brackets on the side bed surrounds inserting the screws in the slotted hole...
Страница 32: ...o the side bed surrounds inserting the screws in the slotted holes of the corner brackets 4 2 Fully tighten all screws 3 Fix the three spacers on the side bed surrounds using the 8Ma L 25 mm screws B...
Страница 33: ...5 1 Put on the bed surround cover starting top down 5 2 Lay the slatted base inside the surround E Sommier bed 31...
Страница 34: ...s H qty 2 manual slatted base lift up mechanisms I qty 2 gas pistons L qty 2 mattress retaining rods a qty 4 corner brackets b qty 6 punched plates c qty 4 feet d qty 6 screws 6Ma L 15 mm e qty 44 scr...
Страница 35: ...s in correspondence with the holes shown in the figure 2 1 Screw the feet under the corner brackets 2 2 Apply the corner brackets on the side bed surrounds inserting the screws in the slotted holes of...
Страница 36: ...holes of the corner brackets 4 2 Fully tighten all screws 3 1 Fix the punched plates on the ends of the spacers using the 6Ma L 15 mm screws 3 2 Fix the spacers on the side bed surrounds using the rem...
Страница 37: ...slatted base lift up mechanisms on the side bed surrounds with the 8Ma L 25 mm screws 6 Hook the gas pistons to the manual slatted base lift up mechanisms as shown in the figure f I I I H H H H Sommi...
Страница 38: ...nuts 8 2 Hook the mattress retaining rods into the front part of the slatted base as shown in the figure 8 3 Put on the bed surround cover starting top down 7 Insert the storage base panels inside the...
Страница 39: ......
Страница 40: ...100 Made in Italy d sir e spa Via Piave 25 31028 Tezze di Piave TV Italy Tel 39 04382817 info desiree com desiree com IMC3L 0420...