
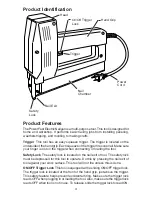

7
Figure 7
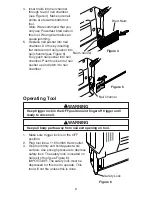
4. Slide trigger lock to the ON
position.
5. Place palm of free hand firmly
on head of tool (see Figure 7).
6. Squeeze trigger to fire.
7.
IMPORTANT:
Do not repeat-
edly fire this tool when empty
of nails. This may damage tool.
!
WARNING ICON
G 001
Do not alter this tool in any way. Only use accessories designed
for this tool.
WARNING
Maintenance
WARNING
!
WARNING ICON
G 001
Never perform steps listed below while tool is plugged in.
Accidental discharge may occur. Move trigger lock to the OFF
position and unplug tool.
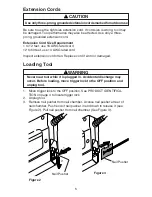
Tool Jam
1. If tool jams, move trigger lock to the OFF position and unplug tool.
2. Remove nail pusher (see LOADING TOOL, page 5).
3. Remove unused nails.
4. Remove nail(s) causing jam.
5. If unable to clear jam, remove two screws at front of tool above nail exit to
remove plates at front of tool. Remove nail(s) causing jam. Reassemble
plates at front of tool.
6. Reload tool (see LOADING TOOL, page 5).
Cleaning
Use a clean cloth to remove dirt from tool. Do not use solvents when cleaning
plastic parts.
Lubrication
Do not oil or grease any part of tool. This may damage tool.
IMPORTANT:
Do not attempt to repair tool or replace broken parts. Any
servicing, except what is listed above, should be done by factory service center.


