background image

¼ò ½é

¼ò ½é

SETUP

6

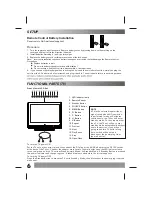
 Remote Control Battery Installation

4.   If you cause a static discharge when touching the unit, and the unit fails to function, simply unplug the 
unit from the AC outlet, wait a few minutes, and plug it back in. The unit should return to normal operation.    

 Requires two AAA batteries(supplied).

 Procedure

1.   Turn the remote control face down. Remove battery cover by pressing down on the marking on the   
      cover and sliding it off in the direction indicated.
2.   Install batteries ma) and(-) polarity signs.
3.   Replace the battery cover by sliding in reverse until the lock snaps.
Note:    Incorrect installation can cause battery leakage and corrosion that will damage the Remote control.
Precautions
             Replace batteries in pair.
             Do not mix battery types(zinc carbon with alkaline).
             Do not recharge, heat, short-circuit, disassemble, or burn batteries.

To turn the TV power ON
Put the TV set on the correct place, then connect the DC plug of the AC-DC adaptor to the DC 12V socket
at the back of the TV set. Connect the adaptor main cord to the wall outlet ,then the LED indicator lamp  
turns  red/green  and the TV set is at Standby/work  Mode. At Standby Mode, if Standby Button is pressed
the power indicator will change to green. It takes a few seconds before the  picture appears.
To turn the TV power OFF
Press the Standby Button to make the TV set in Standby  Mode, then disconnect the power plug from the 
wall outlet.

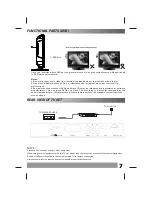
 FUNCTIONAL PARTS(TV)

Front View of LCD Set 

NOTE

If TV is the selected input without 
signal received and NO operation 
is performed for about 5 minutes  
continuously, the TV set will enter 
standby mode. For any inputs other 
than TV, the TV set will not  enter 
standby mode automatically without 
users  instruction. If you are not 
going to use this TV set for a long 
time, switch off the set and 
disconnect the power plug from 
the wall  outlet.

2.   Remote Sensor

1.   LED indicator lamp

3.   Standby Button

4.   SOURCE  Button

5.   MENU Button
6.   P+ Button
7.   P-  Button
8.   V+Button
9.   V- Button
10.  Repeat

11.  Preview
12.  Next
13.  Play/Pause

14.  Stop

15.  Open/Close

1

3

2

9

8

7

6

5

4

10

11

12

13

14

15

V- 

V+ 

P- 

P+ 

MENU  SOURCE

Содержание TFD-1513

Страница 1: ...TV DVD COMBO Operating Instructions TFD 1923WHITE AC 110 240V 50 60Hz SCART IN PC IN TELETEXT NTSC PLAYBACK INSIDE DVD SUPPORT FORMAT SVCD VCD WMA HDCD KODAK PICTURE CD DVD MPEG4 PAL SECAM B G D K I L...

Страница 2: ...batteries should not be disposed of with other household waste but should be disposed of separately As the end user it is important that you submit your used batteries to the approriate and designated...

Страница 3: ...6 8 9 Setup Functional Parts TV Remote Control unit TELETEXT Operations 10 Warnings and Cautions 4 5 7 Functional Parts DVD Rear view of TV set Remote Control Operation DVD 11 12 MENU Screens 13 14 I...

Страница 4: ...t Weight W480X D195 8X H398 mm 5 5KG 3W x 2 Note Design and specifications are subject to change without prior notice B G D K l L L Optional PAL SECAM optional Power Supply AC 110 240V 50 60Hz Power c...

Страница 5: ...t CAUTION Never tamper with any components inside your set or any other adjustment controls not mentioned in this manual The LCD panel used in this product is made of glass Therefore it can break When...

Страница 6: ...eceiver WARNINGS AND CAUTIONS Caution Do not throw anything at the set The screen glass may explode by impact and cause serious injury Caution Never stand on lean on or suddenly push the television or...

Страница 7: ...CAUTIONS 5 Take care not to connect many appliances to the same mains socket as this could result in fire or electric shock Warning High voltages are used in the operation of this television receiver...

Страница 8: ...o the DC 12V socket at the back of the TV set Connect the adaptor main cord to the wall outlet then the LED indicator lamp turns red green and the TV set is at Standby work Mode At Standby Mode if Sta...

Страница 9: ...ed by software manufacturers This unit plays DVDS and Video CDs according to disc content designed by the software manufacturer therefore some playback features may not be available or other functions...

Страница 10: ...OL to enter AV mode DIGIT Button 0 9 This TV allows you to select channels from 1 to 254 Press this button to select one digit two digit or three digital channels input options To select a one digit c...

Страница 11: ...swap menu will displayed as shown below E g to swap channel 1 and 7 press SWAP button press PROG to choose FROM and press VOL to set the channel number as 0 and as the same way to set the TO as 7 las...

Страница 12: ...the Teletext screen display mode among the following Upper half screen enlarged Lower half screen enlarged Normal screen state STOP Button Press this button to hold the Teletext page ondisplay to prev...

Страница 13: ...PROGRAM will appear on TV screen now you can press and ENTER button to select START option and enjoy the desired tracks SUBTITLE Button To press this button you can change the subtitle language from o...

Страница 14: ...If the disc contains scenes recorded at different camera angles you can change to a different camera angle during playback Press ANGLE repeatedly during playback to select a desired angle Note that th...

Страница 15: ...ting sub menu PROGRAM LIST To edit program COUNTRY Select correct before auto searching then you can get right program order CHANNEL The number is the current channel and you can also change channel f...

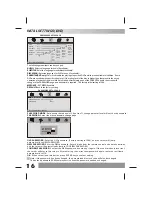
Страница 16: ...ver this will have no impact oreffect on the monitor performance Do not press the LCD screen with your finger for a long time as it may incursome damage to the screen MENU SCREENS 14 SETUP MENU TXT LA...

Страница 17: ...the disc contains closed captions information and your TV set also has this function Dolby The following menu items can be changed DUAL MONO Reproduction mode used only when the input consists of two...

Страница 18: ...e Japanese Korean Russian English French Spanish Chinese Japanese Korean Russian Dolby Eng PASSWORD MODE Set password mode on off If set to off change parental level will not check password PASSWORD S...

Страница 19: ...ntrol sensor and operate Remove the obstacles between the remote control and the remote control sensor Operate the remote control unit at a distance of not more than 8 meters from the remote control s...

Страница 20: ...ingbone pattern and partial picture loss can result from the operation of diathermy equipment from a nearby doctor s surgery or hospital SNOW Weak TV signals from long distant stations result in an in...

Страница 21: ......
Отзывы: