background image

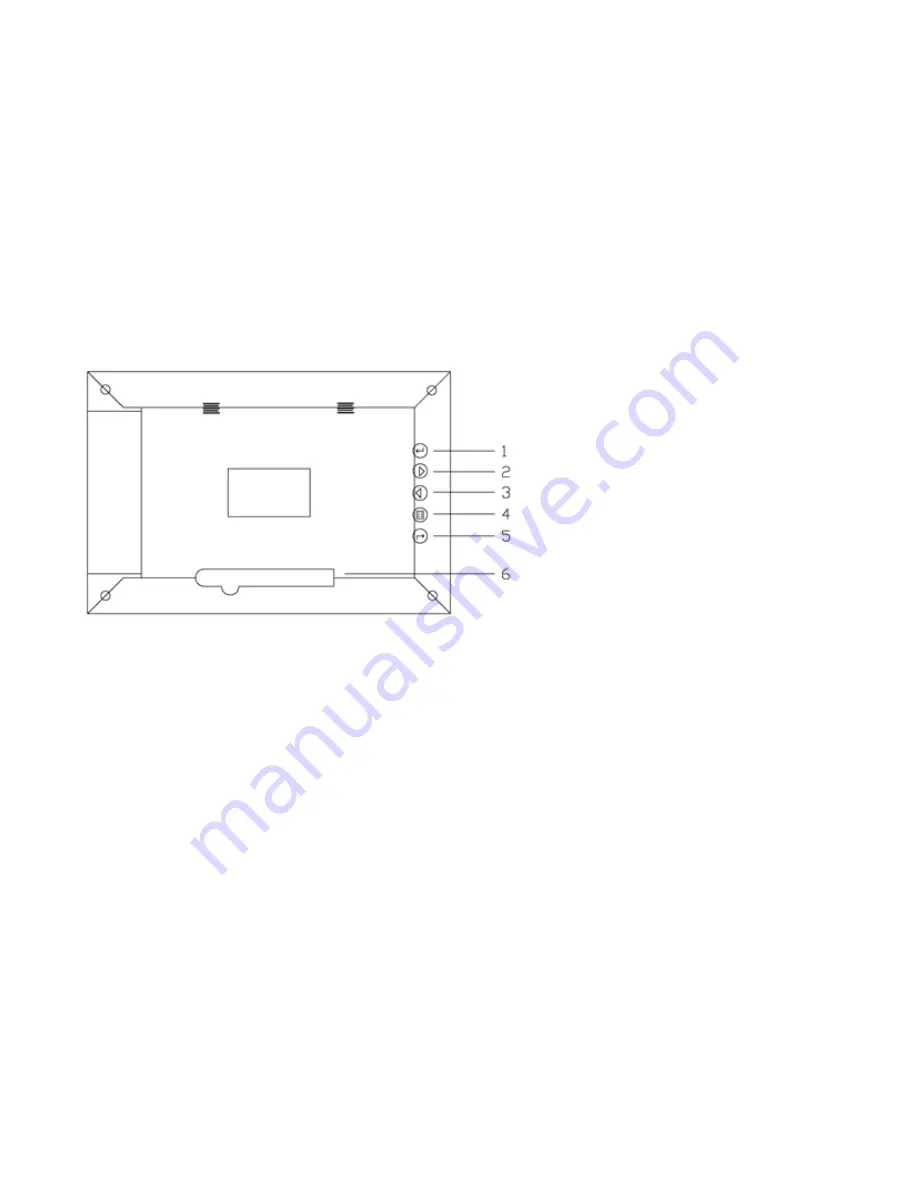
Key control and Key function: 

1.  ENTER Button:

 Confirms your selection, and pause or play.

2.     LEFT   SHIFT   Button:  

Left  or  Up  cursor  select  function  and  to  view  the

previous photo.

3.  RIGHT SHIFT Button: 

Right or Down cursor select function and to view the

next photo.

4.  MENU Button:  

Press and hold button for two seconds to Displays the photo

frames menu options, Press once to go back to the previous menu.

5

Содержание DPF-741

Страница 1: ...DENVER DPF 741 User Manual Digital Photo Frame WARNING The power adapter cable disconnect device shall remain easy to operate disconnect 1 ...

Страница 2: ...iew more enjoyable The Digital Photo Frame enables you to view digital pictures directly from your camera s memory card You can also create a slide show with multiple transition effects No computer digital camera or internet connection is required Play back of photo files stored in data stored devices through USB 2 0 port or various card reader port or internal memory Supports SD MMC MS card Compa...

Страница 3: ...F Digital Photo Frame Precautions and Maintenance For indoor use only To avoid risks of file or electric shock do not expose this appliance to moisture To avoid overheating do not block the ventilation holes on the back of the DPF at any time Keep your Digital Photo Frame out of sunlight Direct sunlight may cause damage Do not dismantle the DPF There is a risk of electric shock and there are no us...

Страница 4: ...4 ...

Страница 5: ...FT Button Left or Up cursor select function and to view the previous photo 3 RIGHT SHIFT Button Right or Down cursor select function and to view the next photo 4 MENU Button Press and hold button for two seconds to Displays the photo frames menu options Press once to go back to the previous menu 5 ...

Страница 6: ...ame bracket to prop the unit up Insert adapter DC plug into the DPF player first then plug the power cord to a standard wall outlet If you insert your memory card or USB flash drive into the frame the images stored on the memory card or USB flash drive will begin to appear automatically on your screen 6 DPF ...

Страница 7: ...tions SELECT CARD In the slide show model Press Menu button three times to show device select menu Press arrow buttons to select Card U Disc or inside memory Press Enter button confirm Fig1 7 DPF Fig1 Fig2 ...

Страница 8: ...ons such as Slide Show Photo and Calendar Fig2 Press Enter button into the selected function mode 1 Slide Show This function menu allows you press Enter button to enter slide show mode the player will auto show photo 2 Photo This function allows you to preview photos in single window or six 8 ...

Страница 9: ... function mode Fig 3 1 Press arrow buttons to select photos preview in six windows 2 Press Enter button to display pictures 3 Press Menu button two seconds to show Setup menu in the pause situation of slide show 4 Press Menu button to exit to the main function mode CALENDAR FUNCTION 9 Fig3 ...

Страница 10: ...tup your DPF Press Menu button two seconds to enter into setup menu In the Setup menu you can use the arrow buttons to select one item to setup or operate When the item is show in gray color you cannot deal with it at that moment Fig 5 1 Image Size Setup display mode for slide show Include Auto Fit Optimal and Panel Scan three modes 2 Slide Show Effect Special effects shown to transition one photo...

Страница 11: ...n just do zoom or exit operation In the pause situation of slide show 8 Save Picture Copy selected files or current file from a memory card to built in memory In the pause situation of slide show 9 Delete File Delete selected files or current file In the situation of six windows 10 Format memory Formatted in memory all the files 11 Reset Setting Reset all settings to factory default values 12 Lang...

Страница 12: ... the internal clock and date Specification Resolution 480 3 RGB 234 16 10 Power adapter Input 100 240V AC Output DC5V 1A Working Temperature 10 to 50 File Format JPEG Cards supported SD MMC MS USB Accessories Power adapter User s manual 12 ...

Страница 13: ...the crossed out trash can symbol seen below This symbol signifies that electric and electronic equipment should not be disposed of with other household waste but should be disposed of separately All cities have established collection points where electric and electronic equipment can either be submitted free of charge at recycling stations and other collection sites or be collected from the househ...

Страница 14: ...ALL RIGHTS RESERVED COPY RIGHT DENVER ELECTRONICS A S www denver electronics com 14 ...

Отзывы: