background image

EN10

Displaying information (OSD)

During playback, you can see all DVD disc information and current play settings. Display will show related 

playback time, elapse time, title number, chapter number and other information.

1.  Press 

OSD 

on the remote control once. Unit will display the play time and the disc elapse time.

2.  Press it once more and all other settings information will be displayed.

LISTENING TO CD/MP3/WMA

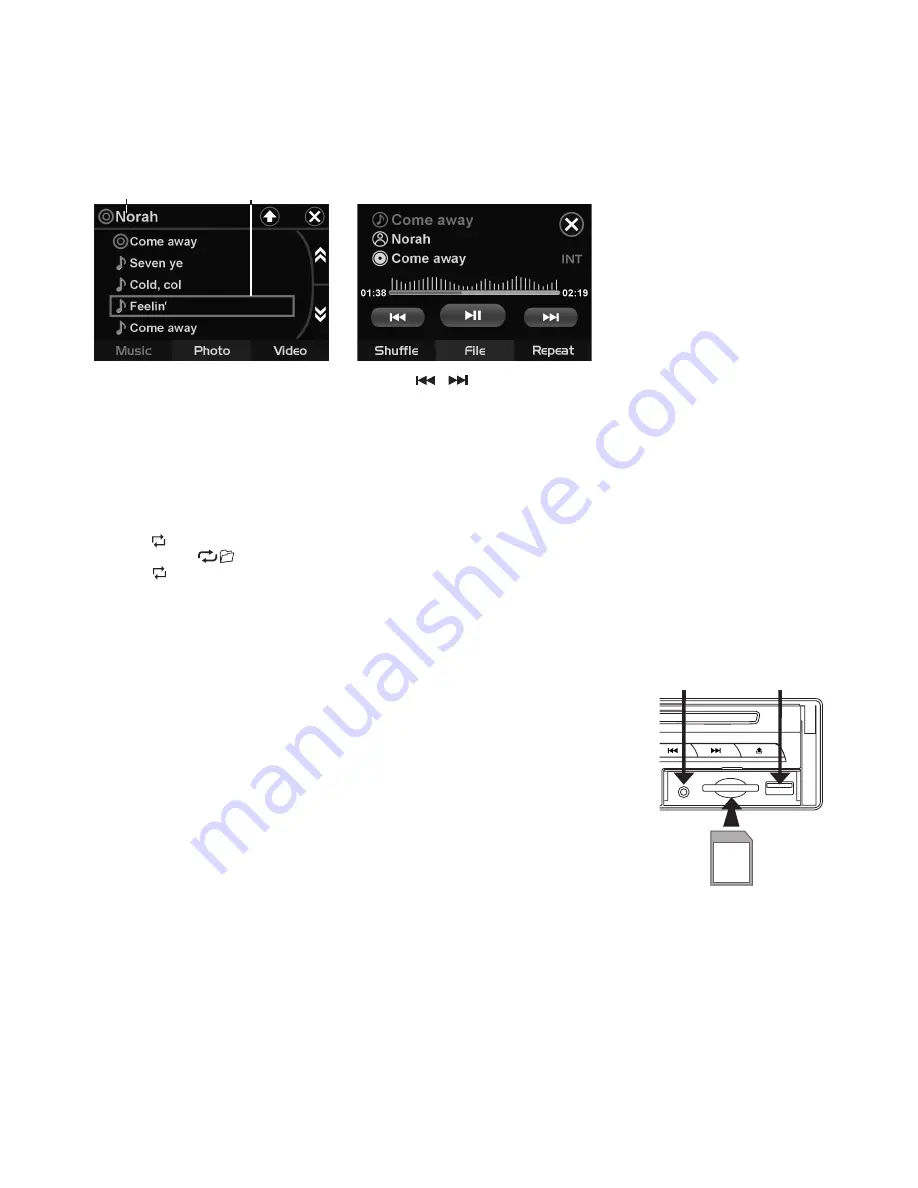
Folder Name

Track file names

Player File Info

Tips: When folder menu is activated, pressing

/

button on front panel will toggle between MUSIC / 

PHOTO / VIDEO options while pressing SEEK-/SEEK+ on remote will display the files found on next page.

Intro Playback (Audio CD only)

Press 

INT

 during playback to play the first 10 seconds of each track.

Repeat tracks

You can choose between repeat playback of a single track or all tracks.

1.  Press 

RPT 

on the remote control during playback.

2.  Every time you press this button, the unit switches to the following settings: 

Repeat

1

ALL

– Repeat the current playback track. 

Repeat Folder 


- Repeat the currently played folder. 

Repeat

1

ALL

– Repeat all folders and tracks. 

Repeat 

- Turn off repeat.

TITLE

During music playback, press 

TITLE

 on remote to return to audio file lists.

AUX IN

An external audio source (e.g. portable MP3 player) can be connected to the AUX 

IN socket to be played back by the vehicle loudspeakers.

1. Connect the AUX IN socket with the audio output of the external device.

USB/SD/MMC Memory Card 

The device is equipped with a USB interface and a memory card reader for SD/

MMC cards. MP3 or WMA files stored on these media can be played.

Note:

-  Due  to the great variety of devices with USB and SD/MMC card interfaces that 

sometimes  have  manufacturer-specific  functions,  we  cannot  guarantee  that  all 

media will be recognized and that all operational functions will be available with 

this device.

-  You cannot operate USB hard drives on the device.

-  It maybe necessary to turn the flash memory ON so that it can be read.

1. Plug your USB storage medium into the USB port.

2. If you use a memory card, insert it into the memory card reader.

3. The player automatically switches to the input used and starts playback.

4. See the section on operations common for audio / video files on how to control USB or memory card playback.

PLAYING DVD/VIDEO CD/MP4

Playback

1.  Insert a disc. When the disc offers a menu, the menu is displayed. When a disc already inserted, press 

MODE

 to switch to disc mode.

2.  On  DVDs  and  video  CDs  with  playback  control  (PBC),  menu  screens  may  appear  automatically.  If  this 

happens, perform the operation described below to start playback.

USB PORT

AUX IN

Содержание CAT-730

Страница 1: ...MANUAL Car Stereo DVD SVCD VCD CD MP3 MP4 Player with PLL FM Stereo Radio Radio Data System 7 17 8cm TFT LCD Display Touch Screen Control Front AUX IN USB SD MMC Card Input Detachable Front Panel CAT 730 12 7 inch ...

Страница 2: ...C playback control CD playback Music CD CD R CD RW playback is possible MP3 WMA file playback It is possible to play back MP3 WMA files recorded on CD ROM CD R CD RW MP4 file playback It is possible to play back MP4 files PAL NTSC compatibility This unit is PAL NTSC system compatible When connecting other components to this unit be sure components are compatible with the same video system or else ...

Страница 3: ...l by pulling it towards you as illustrated Notes Do not press the front panel hard against the unit when attaching it It can be easily attached by pressing it lightly against the unit When you carry the front panel with you put it in the supplied front panel case Do not press hard or give excessive pressure to the display window of the front panel when attaching it to the unit Detaching and attach...

Страница 4: ...EASE CASE 3 DASH BOARD 4 HEX NUT 5 LOCK WASHER 6 PLAIN WASHER 7 CAR BODY 8 REAR SUPPORT STRAP 9 TAPPING SCREW 10 M5 X 15 HEX BOLT TO SUPPORT THE UNIT Dashboard 10 7 1 2 3 4 4 4 5 5 6 6 8 9 WIRE CONNECTION IN OUT CONNECTOR DVD Audio Out White L Red R Connect this wire to rear seat A V monitor system to enjoy DVD movie Audio Out Front White L Red R Audio Out Rear White L Red R Video Out 1 2 Yellow C...

Страница 5: ...center Warning Use the specified amperage fuse for each lead Use of a higher amperage fuse may cause serious damage Steps Connect the GRAY wire to the WHITE wire To rear camera video out To reverse gear control switch To Hand brake switch ANTENNA CONNECTOR FRONT REAR AUDIO OUT CAMERA IN VIDEO IN VIDEO OUT 1 VIDEO OUT 2 R L L R L R ISO CONNECTOR B A 1 2 3 4 5 6 7 8 4 5 7 8 REAR OUT CAMERA IN VIDEO ...

Страница 6: ...8 1 9 4 6 5 3 2 17 7 8 15 10 11 16 12 14 7 inch 1 8 14 25 17 4 24 2 3 23 VOL 10 11 18 16 9 19 22 13 31 5 20 26 27 21 12 15 28 32 30 29 7 6 LOCATIONS OF PARTS REMOTE CONTROL 1 POWER ON OFF 2 MODE 3 PLAY PAUSE 4 TITLE PLAYBACK CONTROL 5 SELECT 6 SEEK SEEK CD TRACK SEARCH 7 VOL VOL 8 GOTO 9 AUDIO 10 ENTER 11 NAVIGATION 12 AUTO SEEK PRESET SCAN REPEAT 13 RANDOM BAND LOUDNESS 14 DUAL 15 INTRO 16 SUBTIT...

Страница 7: ...med under the brake or accelerator pedal GENERAL OPERATIONS Turning the unit ON OFF Press button to turn on unit To turn off press and hold the button again MAIN MENU This is root of the screen hierarchy and you can simply access all features by tapping on the touch screen buttons Press MODE on the remote control to show the MAIN MENU Selecting a source MODE Press MODE repeatedly to switch between...

Страница 8: ...en all wiring is completed All the function buttons does not operate Error symbol on the display LISTENING TO RADIO Band BD Pressing this key repeatedly will toggle cyclically between each band FM1 FM2 FM3 Automatic or Manual tuning SEEK UP SEEK DN When pressed short these keys are operated as MANUAL tuning mode When pressed longer than 1 sec they are operated as AUTOMATIC tuning mode Auto Seek Pr...

Страница 9: ...10 2 times follow by 3 Random Playback Press RDM during playback to play the tracks in random shuffle order Press it again to cancel Tips RDM is SHUFFLE on screen Stopping Playback 1 Press Stop on remote control during playback to stop playback That position is stored in memory 2 Press to continue Playback starts from the position at which it was stopped 3 To permanently stop playback press Stop b...

Страница 10: ...le lists AUX IN An external audio source e g portable MP3 player can be connected to the AUX IN socket to be played back by the vehicle loudspeakers 1 Connect the AUX IN socket with the audio output of the external device USB SD MMC Memory Card The device is equipped with a USB interface and a memory card reader for SD MMC cards MP3 or WMA files stored on these media can be played Note Due to the ...

Страница 11: ...gs Repeat Title Repeat the current playback title Press and hold RPT button Repeat Chapter Repeat the current playback chapter Repeat All Repeat all folders and tracks Repeat Off Turn repeat off Searching for particular track using GOTO You can use the GOTO function to search for a desired track number or particular point of a track to play 1 Press GOTO on the remote control during playback Time a...

Страница 12: ...Every time you press this button the unit will zoom 2 3 4 1 2 1 3 1 4 times and OFF Frame by frame playback This lets you move ahead one frame at a time during playback 1 Each time you press and hold Step button on remote control you move ahead one frame To return to normal playback press PAL NTSC P N Press and hold P N button to switch between PAL NTSC system CUSTOMIZING AUDIO VIDEO SETTINGS AUDI...

Страница 13: ...nter new 4 digit password and press Enter The unlock logo will switch to lock indicating password has been set Note The default password is 0000 In case you forgot your password you can use the master password 0000 to unlock and reset the password Master password will only work while SETUP button is press during playback Settings System Setup Language Setup Video Setup Category TV System Auto Play...

Страница 14: ...onic equipment and batteries is not handled correctly Electric and electronic equipment and batteries is marked with the crossed out trash can symbol seen below This symbol signifies that electric and electronic equipment and batteries should not be disposed of with other household waste but should be disposed of separately As the end user it is important that you submit your used batteries to the...

Отзывы: