background image

4

Part names and functions

Preparations

Connection

MIDI Control

Playback

Troubleshooting

Specifications

Index

Others

Settings

Getting started

Discs

Discs playable on this unit

Music CDs

Discs marked with the logo at right can be 
played in this unit.

CD-R/CD-RW

NOTE

• Discs in special shapes 

(heartshaped discs, octagonal 
discs, etc.) cannot be played. Do 
not attempt to play them, as 
doing so can damage the unit.

• Some discs and some recording formats cannot be played.
• Non-finalized discs cannot be played.


z  

What is finalization?

Finalization is the process that makes recorded CD-R/CD-RW discs 
playable on compatible players.

Holding discs

Do not touch the signal surface.

Loading discs

• Only load one disc at a time. Loading two or more discs can damage 

the unit or scratch the discs.

• When the disc is drawn into the unit, be careful not to trap your 

fingers.

• Do not insert anything other than discs into the disc loading slot.
• Do not use cracked or warped discs or discs that have been repaired 

with adhesive, etc.

• Do not use discs on which the sticky part of cellophane tape or labels 

is exposed or on which there are traces of where labels have been 
removed. Such discs can get caught inside the player and damage it.

• If the label side of the disc is dirty, wipe it clean before use. If the 

disc loading/ejection roller becomes dirty, discs may not load or eject 
correctly.

Cautions on loading discs

• Do not get fingerprints, oil or dirt on discs.
• Take special care not to scratch discs when removing them from 

their cases.

• Do not bend or heat discs.
• Do not enlarge the hole in the center.
• Do not write on the labeled (printed) surface with ball-point pens, 

pencils, etc., or stick new labels on discs.

• Water droplets may form on discs if they are moved suddenly from 

a cold place (outdoors for example) to a warm place, but do not try to 
dry them off using a hair-dryer, etc.

Cautions on storing discs

• Be sure to remove discs after using them.
• Be sure to store discs in their cases to protect them from dust, 

scratches, warping, etc.

• Do not store discs in the following places:

• Places exposed to direct sunlight for long periods of time
• Dusty or humid places
• Places exposed to heat from heaters, etc.

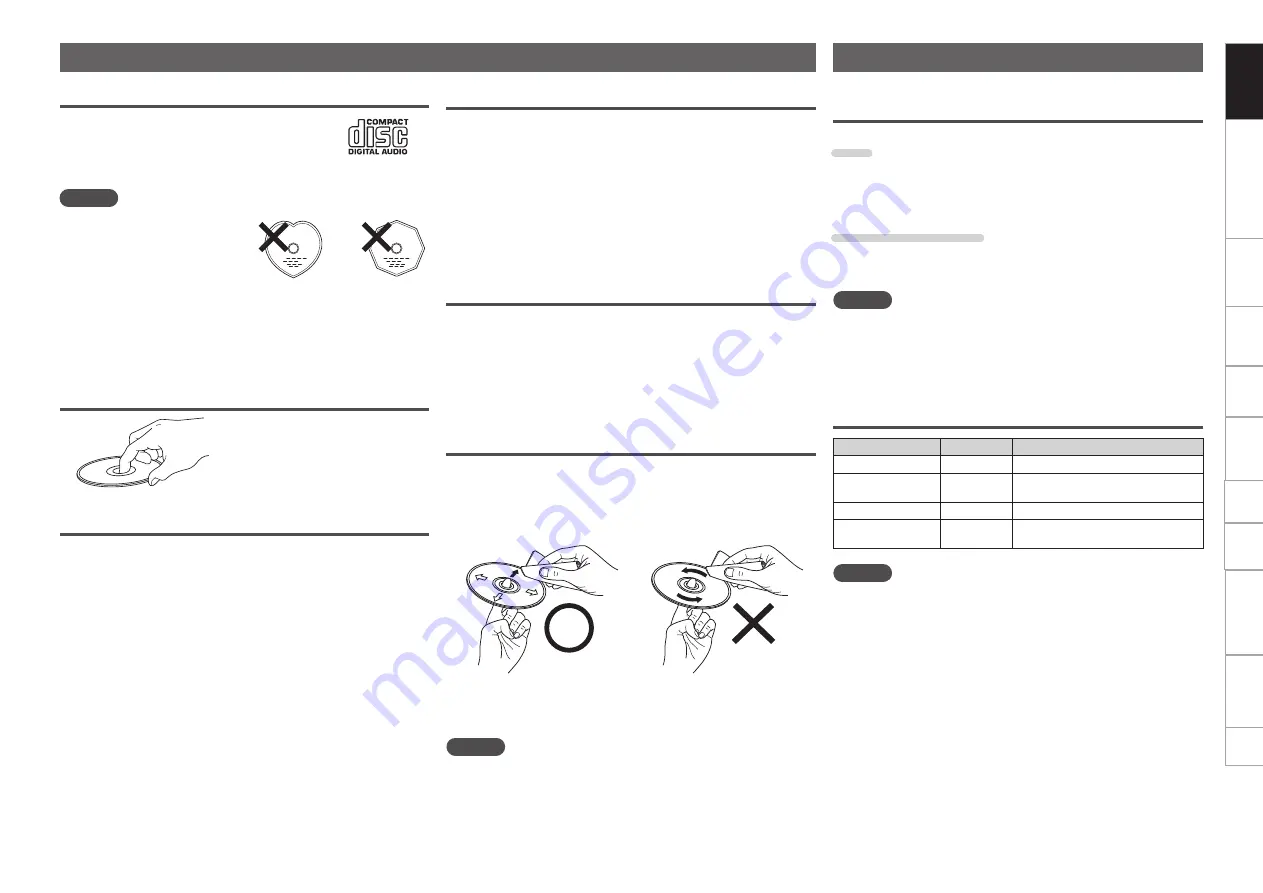
Cleaning discs

• If there are fingerprints or dirt on a disc, wipe them off before using 

the disc. Fingerprints and dirt can impair sound quality and cause 
interruptions in playback.

• Use a commercially available disc cleaning set or a soft cloth to clean 

discs.

Gently wipe the disc from the 

inside towards the outside.

Do not wipe in a circular 

motion.

NOTE

Do not use record spray, antistatic agents, benzene, thinner or other 
solvents.

Supported media and files

The following media and files can be played back on this unit.

Supported media

Disc

Disc type

: CD, CD-R, CD-RW, CD-ROM

Format

: CD-DA (CD-TEXT compatible), 

CD-ROM (ISO9660/Joliet format)

USB memory device

Media type

: FLASH, HDD

Format

: FAT16/FAT32, HFS+ (Read only)

NOTE

• When a multisession disc is used, the more sessions there are, the 

more time will be required to read the disc.

• When HFS+ is used, this unit may not be able to recognize the file 

name if characters other than ISO8859-1 registered characters or 
character codes other than Japanese are used.

Playable files

File formats 

Extension

Details

MP3

.mp3

CBR/VBR 44.1kHz Stereo

AAC 

.m4a

.aac

CBR/VBR 44.1kHz Stereo

WAV

.wav

44.1kHz 16/24bit Stereo

AIFF 

.aif

.aiff

44.1kHz 16/24bit Stereo

NOTE

DRM protected files cannot be played back. 

Содержание DN-SC2900

Страница 1: ...Digital Controller and Media Player DN SC2900 Owner s Manual...

Страница 2: ...2 Keep these instructions 3 Heed all warnings 4 Follow all instructions 5 Do not use this apparatus near water 6 Clean only with dry cloth 7 Do not block any ventilation openings Install in accordanc...

Страница 3: ...umber of your set shown on the rating label Model No DN SC2900 Serial No CLASS 1 LASER PRODUCT n nLaser Class IEC60825 1 2007 CLASS 1 LASER PRODUCT LUOKAN 1 LASERLAITE KLASS 1 LASERAPPARAT ADVARSEL US...

Страница 4: ...on utilizzare l unit per un lungo periodo di tempo Non coprite i fori di ventilazione Non inserite corpi estranei all interno dell unit Assicuratevi che l unit non entri in contatto con insetticidi be...

Страница 5: ...gende normen EN60065 EN55013 EN55020 EN61000 3 2 en EN61000 3 3 Volgens de voorzieningen van lage spanningsrichtlijn 2006 95 EC en EMC richtlijn 2004 108 EC de EU richtlijn 1275 2008 en de kaderrichtl...

Страница 6: ...ative o le leggi locali in vigore Non gettare le batterie n incenerirle ma smaltirle conformemente alla normativa locale sui rifiuti chimici Questo prodotto e gli accessori inclusi nell imballaggio so...

Страница 7: ...for USB memory device or HDD playback 22 Preparing for playback from a network connected device 23 Searching tracks 24 Searching tracks by category 24 Searching tracks by crate 25 Searching tracks by...

Страница 8: ...p guide for MAC OS X r DJ software TRAKTOR LE 2 disc 1 t Power cord For use with this unit only 1 y RCA cable 1 u USB cable 1 y u t About this manual n nSymbols v This symbol indicates a reference pag...

Страница 9: ...l as the computer 4 Supports CD DA playback CD ROM AAC AIFF MP3 WAV playback and audio playback from USB memory device and external HDDs mass storage class 5 Built in USB audio interface High sound qu...

Страница 10: ...beled printed surface with ball point pens pencils etc or stick new labels on discs Water droplets may form on discs if they are moved suddenly from a cold place outdoors for example to a warm place b...

Страница 11: ...buttons 30 Q1AUTO LOOP button 30 Q2USB port Insert a USB memory device or connect a HDD Q3USB DRIVE indicator 22 Q4USB eject button USB 5 23 Q5EXIT RELOOP button 29 Q6Clear button CLR 30 Q7Source sele...

Страница 12: ...2 The rotation torque of the jog wheel can be adjusted to one of 5 levels by sliding this switch Slide toward the LIGHT direction to reduce rotation torque and the HEAVY direction to increase rotation...

Страница 13: ...playback the sample Hold down W1 SHIFT and press this button to playback the sample slot trigger Hold down Q3 CLR and press this button to switch mute for the sample slot ON or OFF Press and hold W1...

Страница 14: ...3 filter ON OFF Hold down W0 MEMO UTIL and press this button to switch the sample slot4 filter ON OFF W5Jog wheel Performs the search operation or bend operation Hold down W1 SHIFT and turn to scroll...

Страница 15: ...Elapsed time of the track or file is displayed REMAIN Remaining time of the track or file is displayed T ELAPSED When in CD mode the elapsed time from the first file of the CD is displayed T REMAIN W...

Страница 16: ...e Scrolled rPITCH display This indicator displays the playback speed pitch tPITCH mode indicator This indicates the pitch in the PITCH display yMinute second and frame displays This displays times suc...

Страница 17: ...imum of 4 DN SC2900 units can be connected via the network to 1 computer tFADER jack 17 18 Terminal for connecting to a DJ mixer and receiving various control signals playback pause cue etc for contro...

Страница 18: ...n using a Mac no installation is required Preparations 1 Insert the supplied DN SC2900 Resource disc into the computer The browse screen for the disc drive is displayed If the browse screen is not dis...

Страница 19: ...computer Everyone Next Cancel Browse Disk Cost The installer will install DENON DJ ASIO Driver to the following folder To install in this folder click Next To install to a different folder enter it b...

Страница 20: ...units When you set multiple devices to enable as ASIO devices the same setting values apply to all ASIO devices r OK Cancel buttons OK Enters the setting changes Cancel Cancels the setting changes t...

Страница 21: ...r computer The TRAKTOR LE 2 disc icon is displayed on the desktop 2 Double click the TRAKTOR LE 2 disc icon Files contained in the TRAKTOR LE 2 disc are displayed for browsing 3 Double click Traktor I...

Страница 22: ...gine for iPad from the App Store within the iTunes Store Automatic driver installation When this unit is connected to the computer drivers for the unit are automatically installed on the computer When...

Страница 23: ...eft right with right Connect the cables to the correct input and output terminals Insert the plugs securely Loose connections will result in the generation of noise Do not bundle power cords together...

Страница 24: ...hat has a DHCP server function for network connections When a switching hub is used it may take a few minutes to determine the network address after connection NOTE Always connect DN SC2900 to a compu...

Страница 25: ...puter or NOTE DJ MIDI Software is not supplied with this unit When using a MIDI control connection install separate DJ software on the computer For details on the installation method see the instructi...

Страница 26: ...jecting a disc Doing so may damage the operating part of the CD and may cause the unit to malfunction Preparation for playback This section explains how to operate each type of media Preparing for CD...

Страница 27: ...es are in the selected state 3 Turn SEL to select the folder that contains the track you want to play 4 Press SEL The folder names or track names within the folder are shown in the display 5 Turn SEL...

Страница 28: ...witch the source to USB 4 Turn SEL to select TITLE 5 Press SEL Titles of the tracks that are registered to the database are shown in the display 6 Turn SEL to select the track you want to play You can...

Страница 29: ...ill not work via a USB hub When HFS is used this unit may not be able to recognize the file name if characters other than ISO8859 1 registered characters or character codes other than Japanese are use...

Страница 30: ...rn SEL to select the track you want to play from the list 7 Press SEL The title of the selected track is shown in the display The cue standby mode is set at the start of the selected tracks n nSearchi...

Страница 31: ...ub crates within the selected crate is shown in the display Press BACK to go back 1 crate level 4 Press Tracks within the selected crate are searched The search top menu is shown in the display 5 Turn...

Страница 32: ...de is forcibly changed to SINGLE mode Playback Press 13 13 lights green and playback starts Operations during playback 6 7 VINYL SINGLE CONT CUE 13 Jog wheel Pause Press 13 during playback 13 flashes...

Страница 33: ...e start of the track when the track is loaded The cue point lights purple on the jog wheel indicator However you can change the color settings For details see Utility Preset Setting Jog Ind Color vpag...

Страница 34: ...ng the PITCH BEND buttons Press PITCH BEND PITCH BEND PITCH BEND Playback speed is increased while the button is being pressed Playback speed is decreased while the button is being pressed n nUsing th...

Страница 35: ...yback position passes the A point start point manual loop playback starts automatically n n If the current playback position is after the A B positions Moves the playback point to the A point start po...

Страница 36: ...is cleared from the pressed button Auto loop playback This function automatically repeats playback in time with the beat n nSetting auto loop playback Press AUTO LOOP AUTO LOOP lights and the A and B...

Страница 37: ...asured and displayed n nAuto BPM counter Press and hold TAP The auto BPM counter switches on and the tempo BPM is shown in the display If the track changes when the BPM is locked the lock is removed a...

Страница 38: ...k the track in reverse During playback press REVERSE Reverse playback starts from the playback point where the button was pressed Each time REVERSE is pressed playback switches between normal and reve...

Страница 39: ...re searched and played using the unit set as Network ID 1 1 Press LINK on the unit set as Network ID 1 and select engine The unit set as Network ID 1 is displayed on the engine control panel The unit...

Страница 40: ...f the first track starts on the player registered with the next Network ID Network playback operations Automatically adjusting BPM When multiple DN SC2900 units are connected on the network the BPM va...

Страница 41: ...can connect more than one DN SC2900 to a computer to control DJ software Switch MIDI channels as needed Set a MIDI channel for each connected device The default setting is 1 Select a MIDI channel to s...

Страница 42: ...e 66 F 4 31 Play 67 G4 32 SLIP 69 A4 33 REVERSE 70 A 4 34 Jog wheel touch 81 A5 35 Utility mode 82 A 5 Press and hold MEMO The unit switches to utility mode When the utility mode is OFF All of the dis...

Страница 43: ...MIDI BANK2 50 27 HOT2 MIDI BANK2 51 28 HOT2 Dimmer MIDI BANK2 52 29 HOT3 MIDI BANK2 53 30 HOT3 Dimmer MIDI BANK2 54 31 HOT4 MIDI BANK2 55 32 HOT4 Dimmer MIDI BANK2 56 Items Others MIDI command Notes C...

Страница 44: ...original LSB 28 Segment 1 2 LSB 34 29 Segment 1 3 LSB 35 30 Segment 1 4 LSB 36 31 Segment 1 5 LSB 37 32 Segment 1 6 LSB 39 33 Segment 1 7 LSB 40 34 Segment 1 8 LSB 41 35 Segment 1 9 LSB 42 36 Segment...

Страница 45: ...Top right Only use 77 78 34 35 Scratch Position 2 35 36 Scratch Position 3 36 37 Scratch Position 4 37 38 Scratch Position 5 38 39 Scratch Position 6 39 40 Scratch Position 7 40 41 Scratch Position 8...

Страница 46: ...USB memory device or HDD Before using the memo function create the memo area For details on creating the memo area see Memo Area vpage 46 Details that can be saved as memo data Cue point Manual loop p...

Страница 47: ...hat has memo data stored is selected the MEMO indicator lights in the display 2 Press MEMO UTIL Call is shown in the display 3 Press SEL The saved memo data is called When memo data call is complete t...

Страница 48: ...mo Area Memo Delete vpage 46 in the utilities n nOverwrite Overwrites the memo data with the setting details 1 In cue standby mode press MEMO UTIL Call is shown in the display 2 Turn SEL to select Ove...

Страница 49: ...relay playback on or off 45 Auto Loop Cnt Sets the space between point A start point and point B end point for auto loop playback 45 Beat Point Selects whether to use the beat grid created by engine...

Страница 50: ...h sensor sensitivity of the Jog wheel vpage 32 Min 1 2 3 Max Fader Mode Switches the operation for fader start for the mixer connected to this unit Switch this setting to match the connected mixer 1L...

Страница 51: ...transmission interval for the JOG pulses from MIDI output 1ms 3ms 10ms Jog Ind Color Sets the color of the jog wheel indicator light vpage 27 Positive BLUE On the jog wheel indicator the playback poin...

Страница 52: ...mware version is being displayed press SEL to return to the previous screen Preset I O Presets are saved and read from a USB memory device or HDD connected to this unit Setting items Setting details P...

Страница 53: ...Check the connections for all devices Check that the volume settings for the connected devices and DJ software on the computer are properly adjusted Match the settings on the unit to those on DJ soft...

Страница 54: ...alog output Output level 2 0 Vrms Digital output Output level 0 5 Vp p 75 n n Functions Instant start Within 20 msec Variable pitch 6 0 02 pitch 10 0 05 pitch 16 0 05 pitch 100 0 5 pitch Pitch bend Pi...

Страница 55: ...k 30 Hot list 31 v v I Information 46 Initialize 46 iPad Connect 45 v v J Jog Contrast 44 Jog Ind Color 27 45 Jog Trans Int 45 v v L Loop point 29 v v M Manual loop playback 29 Memo Area 46 Memo funct...

Страница 56: ...names and functions Preparations Connection MIDI Control Playback Troubleshooting Specifications Index Others Settings Dimensions Unit mm 326 0 250 0 55 0 38 0 38 0 90 0 44 0 280 0 42 0 123 8 74 0 16...

Страница 57: ...V00 3525 10117 00AS...

Отзывы: