background image

Getting Started

Connections

Playback

Remote Control

Information

Troubleshooting

ENGLISH

Specifications

n


Operating conditions for each function

  •  

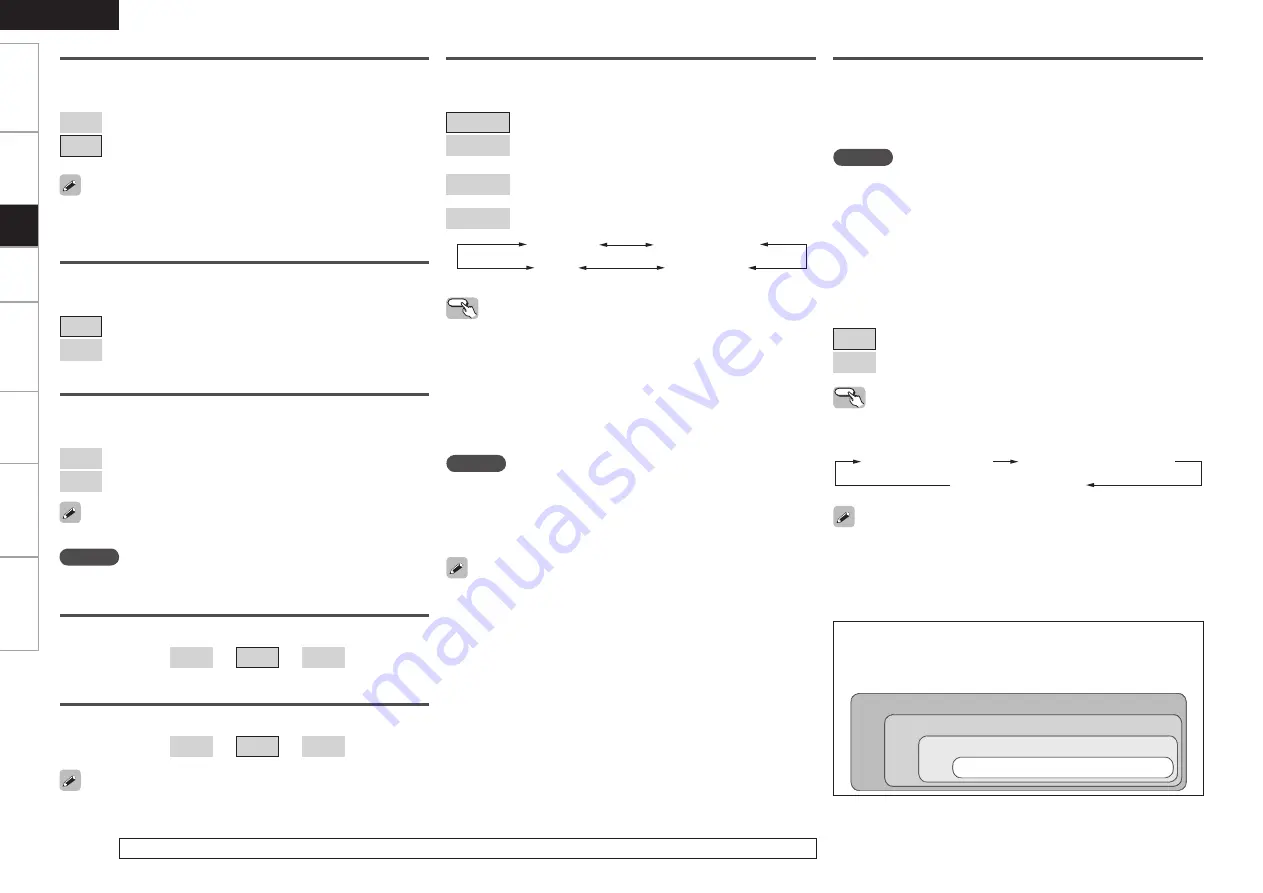
Dynamic EQ

 : When “MultEQ” is set to “ON”

  •  

Dynamic Volume

 : When “Dynamic EQ” is set to “ON”

  •  

DV setting

 : When “Dynamic Volume” is set to “ON”

A7 

MultEQ

A8 

Dynamic EQ

A9 

Dynamic Volume

S0 

DV Setting

A4 

Tone Control

Turn tone adjustments on and off.

[Selectable items]

ON

 :    Allow tone adjustment (treble, bass).

OFF

 :  Playback without tone adjustment.

The tone cannot be adjusted when in the DIRECT mode.

A5 

Bass

Adjust low frequency range (bass).

[Variable range] 

–6dB


~


0dB


~


+6dB

A6 

Treble

Adjust high frequency range (treble).

[Variable range] 

–6dB


~


0dB


~


+6 dB

“Bass” and “Treble” can be set when “Tone Control” is set to “ON”.

A2 

SW ATT 

(Subwoofer Attenuation)

Attenuate subwoofer level when using EXT. IN mode.

[Selectable items]

ON

 :   The input from the subwoofer channel is attenuated.

OFF

 :   The  input  from  the  subwoofer  channel  is  not  attenuated. 

Usually use in this mode.

Set this to “ON” if the subwoofer channel level seems too high when 
playing audio signal.

A3 

Subwoofer

Turn subwoofer output on and off.

[Selectable items]

ON

 :   The subwoofer is used.

OFF

 :   The subwoofer is not used.

For details on adjusting individual parameters, see “Adjusting the Parameters” (

v

page 29).

• If the settings of speakers for which “None” has been determined 

at “Auto Setup” are changed, “Audyssey”, “Audyssey Byp. L/R” and 
“Audyssey  Flat”  cannot  be  selected.  Either  perform  Auto  Setup 
again, or return to the setting after running Auto Setup with “System 
Setup” – “Speaker Setup” – “Restore”.

• When using headphones, “MultEQ” is set to “OFF”.

A7 

MultEQ

Select the type of room correction desired from the following list:

[Selectable items]

Audyssey

 :   Optimize frequency response of all speakers.

Byp. L/R

 :   Optimize frequency response of speakers except front 

L and R speakers.

Flat

 :   Optimize  frequency  response  of  all  speakers  to  flat 

response.

OFF

 :   Turn equalizer off.

NOTE

• “MultEQ” can only be set when Auto Setup has been performed.
• “MultEQ” cannot be set in the following situations.
 

 If “Auto Setup” fails to be completed.


 After running Auto Setup, when the number of used speakers has 

increased from the number of measured speakers.

  Operating from the main unit or remote control 

unit

Press 

MULTEQ

.

• When  “Audyssey”,  “Audyssey  Byp.  L/R”  or  “Audyssey  Flat”  is 

selected, the Audyssey MultEQ indicator lights green.

• After  running  Auto  Setup,  if  the  Speaker  Configuration,  Distance, 

Channel  Level  and  Crossover  Frequency  have  changed  without 
increasing the number of speakers measured, the Audyssey MultEQ 
indicator lights red.

OFF

Audyssey

Audyssey Byp. L/R

Audyssey Flat

NOTE

When the “Dynamic EQ” setting is “ON”, setting is not possible.

Setup

A8 

Dynamic EQ

Audyssey  Dynamic  EQ  solves  the  problem  of  deteriorating  sound 
quality as volume is decreased by taking into account human perception 
and  room  acoustics.  Audyssey  Dynamic  EQ  works  in  tandem  with 
Audyssey  MultEQ  to  provide  well-balanced  sound  for  every  listener 
at any volume level.

NOTE

•  “Dynamic  EQ”  can  only  be  set  when  auto  setup  has  been 

performed.

•  “Dynamic EQ” cannot be set in the following situations.
 

 If “Auto Setup” fails to be completed.


 After running Auto Setup, when the number of used speakers has 

increased from the number of measured speakers.

•  When “MultEQ” is set to “OFF”, “Dynamic EQ” is automatically set 

to “OFF”.

•  “Night Mode” and “Tone Control” cannot be used jointly.

[Selectable items]

ON

 :   Use Dynamic EQ function.

OFF

 :   Do not use Dynamic EQ function.

  Operating  from  the  unit  or  remote  control 

unit

Press 

<DYN VOL>

 or 

[DYNAMIC VOLUME]

.

Dynamic EQ / Volume : ON

Dynamic EQ : ON / Volume : OFF

Dynamic EQ / Volume : OFF

Before running Auto Setup and after running Auto Setup, if the number 
of speakers has increased or you pressed 

<DYN VOL>

 or 

[DYNAMIC 

VOLUME]

, “Run Audyssey” is displayed. In this case, either perform 

Auto Setup again, or return to the setting after running Auto Setup with 
“System Setup” – “Speaker Setup” – “Restore”.

Содержание DHT-589BA

Страница 1: ...AV SURROUND RECEIVER AVR 589 Owner s Manual Manuel de l Utilisateur...

Страница 2: ...ly to be walked on or pinched by items placed upon or against them paying particular attention to cords at plugs convenience receptacles and the point where they exit from the product 15 Outdoor Anten...

Страница 3: ...st accept any interference received including interference that may cause undesired operation 2 IMPORTANT NOTICE DO NOT MODIFY THIS PRODUCT This product when installed as indicated in the instructions...

Страница 4: ...lation Playback 28 e Direct Playback 28 r Stereo Playback 28 Getting Started Connections Operations Preparations 17 Auto Setup 18 a Auto Setup 18 s Error Messages 19 System Setup Operation 20 Example...

Страница 5: ...uipment 35 Basic Operation 35 Listening to FM AM Broadcasts 36 Basic Operation 36 Presetting Radio Stations Preset Memory 36 Listening to Preset Stations 36 Listening to SIRIUS Satellite Radio Program...

Страница 6: ...t sunlight strong artificial light from an inverter type fluorescent lamp or infrared light About the Remote Control Unit Before turning the power switch on Check once again that all connections are c...

Страница 7: ...ER knob on the main unit operates in the same way as the cursor o and p buttons on the remote control unit The control functions in the same way as the cursor o button when turned counterclockwise as...

Страница 8: ...TICAL COAXIAL 10 12 14 wVIDEO S VIDEO connectors 11 13 eAnalog audio connectors AUDIO 10 13 rEXT IN connectors 14 tPRE OUT connector 9 yAC OUTLETS 15 uPower cord 15 iSpeaker terminals SPEAKERS 9 oFM A...

Страница 9: ...AUDIO DELAY button 24 uCursor buttons uio p 20 iDYNAMIC VOLUME button 32 oRESTORER button 32 Q0SOURCE CONTROL switches 36 Q1Remote control signal transmitter Q2Master volume control buttons 35 Q3MUTIN...

Страница 10: ...l Output Input Input Output Output Input Input Output Cables Used for Connections Select the cables according to the equipment being connected Preparations Connections NOTE Do not plug in the power co...

Страница 11: ...peaker Installation Subwoofer Center speaker Surround speakers Front speakers Place the front speakers to the sides of the monitor or screen and as flush with the screen surface as possible The table...

Страница 12: ...uit may be activated if the core wires touch the rear panel or if the and sides touch each other v Protection circuit Never touch the speaker terminals while the power supply is connected Doing so cou...

Страница 13: ...n connecting to a monitor etc equipped with a DVI D connector connection is possible using an HDMI DVI converter cable but depending on the combination of components in some cases the video signals wi...

Страница 14: ...o interconnect correctly DVD Player Select the terminal to use and connect the device Connecting the Playback Components 4 7 0 065 6 0 7 0 0 10 5 7 0 1 13 7 0 065 065 6 0 3 065 065 065 0 9 R L R L DVD...

Страница 15: ...For instructions on the control dock for iPod settings refer to the control dock for iPod s operating instructions 4 7 0 065 6 0 7 0 0 10 5 7 0 1 13 7 0 065 065 6 0 3 065 065 015 065 R L R L TV CABLE...

Страница 16: ...Example TV IN S Video cable VCR OUT S Video cable TV IN Video cable VCR OUT Video cable Connecting the Recording Components 4 7 0 4 7 0 065 3 3 065 065 6 0 7 0 6 0 7 0 6 0 6 0 7 0 7 0 R L R L R L R L...

Страница 17: ...en making connections also refer to the operating instructions of the SiriusConnect Home Tuner SiriusConnect Home Tuner b When connecting digital audio NOTE Keep the power cord unplugged until the Sir...

Страница 18: ...oise Only use the AC outlets to plug in audio equipment Do not use them as power supplies for hairdryers or anything other than audio equipment Wait until all connections have been completed before co...

Страница 19: ...guration Subwoofer Mode Setup Distance Crossover Frequency Test Tone Restore n Input Setup vpage 23 25 HDMI In Assign Digital In Assign iPod Assign Audio Delay EXT IN Subwoofer Level Auto Preset Memor...

Страница 20: ...olarity and the optimum crossover value for the subwoofer M M Example q Example w Measuring positions 1Press SPEAKERS to select the front speakers Front A Front B or Front A B 2Connect the included ca...

Страница 21: ...five or fewer positions use i to display Calculate After completing a measurement position move the microphone to the next position Measure at 6 positions the main listening position and 5 other surro...

Страница 22: ...ements to be made Either turn off any device generating noise or move it away Try again when the surroundings are quieter Check the speaker installation and the direction in which the speakers are fac...

Страница 23: ...n lists of selectable items or adjustable ranges the item surrounded by a border is the default value uiop ENTER AUDIO DELAY ENTER op ui SYSTEM SETUP uiop ENTER SYSTEM SETUP TEST Front Rear Button loc...

Страница 24: ...gnal of all channels Large Select this when using large speakers with ample low frequency reproduction capabilities Small Select this when using small speakers without ample low frequency reproduction...

Страница 25: ...TER or i w Press o p to set the crossover frequency of each speaker The preset speaker changes each time you press i Selectable items 40Hz 60Hz 80Hz 90Hz 100Hz 110Hz 120Hz 150Hz 200Hz 250Hz b In the c...

Страница 26: ...nesH q Press TEST Test tones are output from the various speakers w Use o p to adjust so that the volume is equal for all speakers e When the adjustments are completed press TEST A8 Restore After the...

Страница 27: ...e source for example adjust so that the movement of the actors lips is synchronized with the sound Operating from the remote control unit Press AUDIO DELAY Display 1 Sp 2 In 3 Op W Input Setup W 8A De...

Страница 28: ...4 digit is displayed and input again with a 4 digit password While listening to the channel being played you can also set parental lock vpage 38 NOTE Parental Lock is displayed when input source is SI...

Страница 29: ...o Surround Mode Make setting for memorizing surround mode setting for each input signal type Selectable items ON Memorize settings Most recently stored surround mode is automatically selected OFF Do n...

Страница 30: ...or music sources Select the Cinema Music Game and PL modes at Surround Parameter Mode vpage 30 Input signal Display Dolby Digital Source DOLBY DIGITAL other than 2ch DOLBY DIGITAL DTS Surround Source...

Страница 31: ...suited to your tastes w DSP Simulation Playback The desired mode according to the program source and viewing situation can be selected from among 7 DENON original surround modes The surround parameter...

Страница 32: ...ng conditions Whether an input signal is present when playing or not when stopped etc The type of input signal The type of surround mode For details of which parameters can be adjusted in each surroun...

Страница 33: ...o front left and right channels for wider sound Variable range 0 0 0 3 1 0 For proper playback of the different program sources we recommend setting to the values below Dolby Digital sources 0 dB DTS...

Страница 34: ...response of all speakers to flat response OFF Turn equalizer off NOTE MultEQ can only be set when Auto Setup has been performed MultEQ cannot be set in the following situations If Auto Setup fails to...

Страница 35: ...balance and surround impression that remain constant despite changes in volume Dynamic EQ combines information from incoming source levels with actual output sound levels in the room a prerequisite fo...

Страница 36: ...program sources The correction value can be checked using STATUS OFFSET 4dB The figure is the correction value when the standard level is corrected The items displayed will differ depending upon the c...

Страница 37: ...or the input source press SOURCE before turning SOURCE SELECT Setting the Input Mode Set the input mode for this source When a digital signal is properly input the indicator lights on the display If t...

Страница 38: ...ngs are indicated on the display For details refer to Information vpage 33 Checking the currently playing program source etc Switching the brightness of the display Press DIMMER Bright Dim Dark OFF Ei...

Страница 39: ...1 MHz B1 B8 520 600 1000 1400 1500 1710 kHz 90 1 90 1 MHz C1 C8 90 1 MHz D1 D8 90 1 MHz E1 E8 90 1 MHz F1 F8 90 1 MHz G1 G8 90 1 MHz Listening to Preset Stations 1Either turn SOURCE SELECT or press TU...

Страница 40: ...0 SIRIUS ID b Write your own SIRIUS ID for storage use SIRIUS ID What is SIRIUS Satellite Radio SimplyThe Best Radio on RadioTM with all your favorite entertainment including 100 commercial free music...

Страница 41: ...ock for iPod refer to the respective manual to operate 1Make the necessary preparations qSet the iPod in the DENON control dock for iPod vSee the control dock for iPod s operating instructions wAssign...

Страница 42: ...ding or fast reversing During playback press and hold 6 to fast reverse or 7 to fast forward n To cue to the beginning of a track During playback press 8 or 9 n To stop During playback either press an...

Страница 43: ...om the REC OUT CDR TAPE and VCR connector Audio and video signals input from the VCR IN connector are not output from the VCR OUT connector Audio signal input from the CD R TAPE IN connector are not o...

Страница 44: ...the individual surround modes Last Function Memory This stores the settings as they were directly before the standby mode was set When the power is turned back on the settings are restored to as they...

Страница 45: ...y To avoid accidental operation cover the remote control unit s transmitting window while setting the preset memory Depending on the model and year of manufacture this function cannot be used for some...

Страница 46: ...ast forward Manual search fast reverse fast forward Tuning down up Manual search fast reverse fast forward Manual search fast reverse fast forward Manual search fast reverse fast forward Manual search...

Страница 47: ...isplay Switching the display Switching the display Switching the display Switching the display RETURN Return Return Return Return Return Default setting Preset code DENON 111 DENON 111 b2 DENON 121 HI...

Страница 48: ...Dolby Laboratories Regular music such as that on CDs is encoded into 5 channels to achieve an excellent surround effect The surround channel signals are converted into stereo and full band signals wit...

Страница 49: ...udyssey MultEQ is a registered trademark of Audyssey Laboratories Audyssey Dynamic EQ is a trademark of Audyssey Laboratories Audyssey DynamicVolume is a trademark of Audyssey Laboratories Audyssey Mu...

Страница 50: ...K ARENA S D D D S OFF S 0 dB A A S Medium S 10 A A JAZZ CLUB S D D D S OFF S 0 dB A A S Medium S 10 A A MONO MOVIE S D D D S OFF S 0 dB A A S Medium S 10 A A VIDEO GAME S D D D S OFF S 0 dB A A S Medi...

Страница 51: ...OFF NOTE9 S ON NOTE9 S OFF NOTE9 S Midnight NOTE8 S OFF NOTE10 JAZZ CLUB A A A A A S 0 dB S OFF S OFF NOTE9 S ON NOTE9 S OFF NOTE9 S Midnight NOTE8 S OFF NOTE10 MONO MOVIE A A A A A S 0 dB S OFF S OFF...

Страница 52: ...A A A A A S DOLBY PLg GAME S S A A A A A S DOLBY PRO LOGIC S S A A A A A S DIRECT DIRECT S S A S S S S S DSP SIMULATION 5CH STEREO S S A S S S S S ROCK ARENA S S A S S S S S JAZZ CLUB S S A S S S S S...

Страница 53: ...the power after the body temperature has fallen sufficiently Please re install AVR 589 in a place having good ventilation 9 GGeneralH Troubleshooting Symptom Cause Countermeasure Page Power switches...

Страница 54: ...terminal of the monitor are not of the same type Check the connections Because video signals are output from the AVR 589 s monitor output terminal in the same format as the video input signals the mon...

Страница 55: ...Surround 75 W 75 W 8 ohms 20 Hz 20 kHz with 0 08 T H D 110 W 110 W 6 ohms 1 kHz with 0 7 T H D Output connectors Front A or B 16 16 ohms A B 12 16 ohms Center Surround 16 16 ohms Analog Input sensitiv...

Страница 56: ...087 Realistic 009 021 031 033 049 053 081 087 088 091 094 097 098 Ricoh 055 S Salora 033 041 Samsung 007 011 051 059 070 083 087 089 113 Sanky 081 Sansui 005 026 029 045 061 085 114 Sanyo 032 033 053...

Страница 57: ...011 Jerrold 009 016 017 026 032 M Magnavox 018 Movie Time 019 N NSC 019 O Oak 000 006 020 P Panasonic 001 005 Philips 011 012 013 018 021 Pioneer 002 003 022 R RCA 029 Regency 015 S Samsung 014 023 S...

Страница 58: ...Denon Brand Company D M Holdings Inc Printed in China 5411 10042 105D www denon com...

Страница 59: ...Safety Instructions Compliance Information HORIZON MCS 90 5 1 Surround Speaker System Espa ol MCS 90 Sistema Multicanal Boston Francais MCS 90 Haut parleur multivoix Boston A Boston P O P Product Mak...

Страница 60: ...the obsolete outlet 10 Protect the power cord from being walked on or pinched particularly at plugs convenience receptacles and the point where they exit from the apparatus 11 Only use attachments acc...

Страница 61: ...televisions picture Unpacking the System Carefully unpack the system If there is any sign of damage from transit report it immediately to your dealer and or delivery service Keep the shipping carton a...

Страница 62: ...cquire the appropriate type of fasteners If you re not sure what type of fastener to use take the mounting bracket to a friendly hardware store tell them about the wall you re mounting the speaker on...

Страница 63: ...for each source or surround mode e g CD stereo videotape Dolby Digital Pro Logic In each case follow your equipment s instructions to ensure that the subwoofer output is turned on and that the speaker...

Страница 64: ...has been removed or defaced This warranty gives you specific legal rights and you may also have other rights which vary from state to state If Service Seems Necessary First contact the dealer from who...

Страница 65: ...parato durante las tormentas el c tricas o cuando no vaya a utilizarse durante largos periodos de tiempo 13 Remita todo el servicio al personal de servicio cuali ficado Se requiere servicio cuando el...

Страница 66: ...fiera con las im genes de televisi n Desembalaje del Sistema Desembale cuidadosamente el sistema Si hay alguna se al de da os debidos al transporte informe de ello inmediatamente a su distribuidor y o...

Страница 67: ...en cuenta la superficie en la cual se va a montar el altavoz Si no est seguro del tipo de sujeci n que debe utilizar lleve el soporte de montaje a una ferreter a de confianza h bleles de la pared en l...

Страница 68: ...onfiguraci n para cada fuente o modo su rround envolvente p ej CD est reo videocasete Dolby Digital Pro Logic En cada caso siga las instruc ciones de su equipo para ase gurarse de que la salida del su...

Страница 69: ...ero de serie Esta garant a le proporciona derechos legales espec ficos y puede tener tambi n otros derechos que pueden variar seg n el pa s Si parece necesario el servicio Primero p ngase en contacto...

Страница 70: ...t les orages ou lorsqu il n est pas utilis pendant de longues p riodes 13 Faites r aliser les op rations d entretien par du personnel qualifi L entretien est requis lorsque l appareil a t ab m et que...

Страница 71: ...mages de t l vision D baller le syst me D baller soigneusement le syst me Si vous constatez le moindre signe de d g ts ayant eu lieu lors du transit signalez le imm diatement votre distributeur et ou...

Страница 72: ...liser rendez vous chez un magasin de bricolage accueillant avec votre support de montage et demandez au personnel de vous recommander une fixation appropri e N oubliez pas de mentionner le poids du ha...

Страница 73: ...urce ou mode surround par ex CD st r o cassette vid o Dolby Digital Pro Logic Dans chaque cas suivez les instructions de votre quipement pour assurer que la sortie du caisson de grave est allum e et q...

Страница 74: ...us donne des droits l gaux sp cifiques et vous pouvez galement avoir d autres droits qui varient d un tat un autre S il semble n cessaire d effectuer une r vision Tout d abord veuillez contacter le di...

Страница 75: ...17...

Страница 76: ...18...

Страница 77: ...19...

Страница 78: ...Kortec and the Boston Acoustics logo are registered trademarks of Boston Acoustics Inc Dolby Digital and Dolby Pro Logic are registered trademarks of Dolby Laboratories DTS is a registered trademarks...

Отзывы: