background image

Specifications

Get
ting Star

ted

Connections

Set
up

Pla
ybac

k
Remot

e Contr

ol

Multi-z

one

Inf
or

mation

Tr

oubleshooting

ENGLISH

A1 

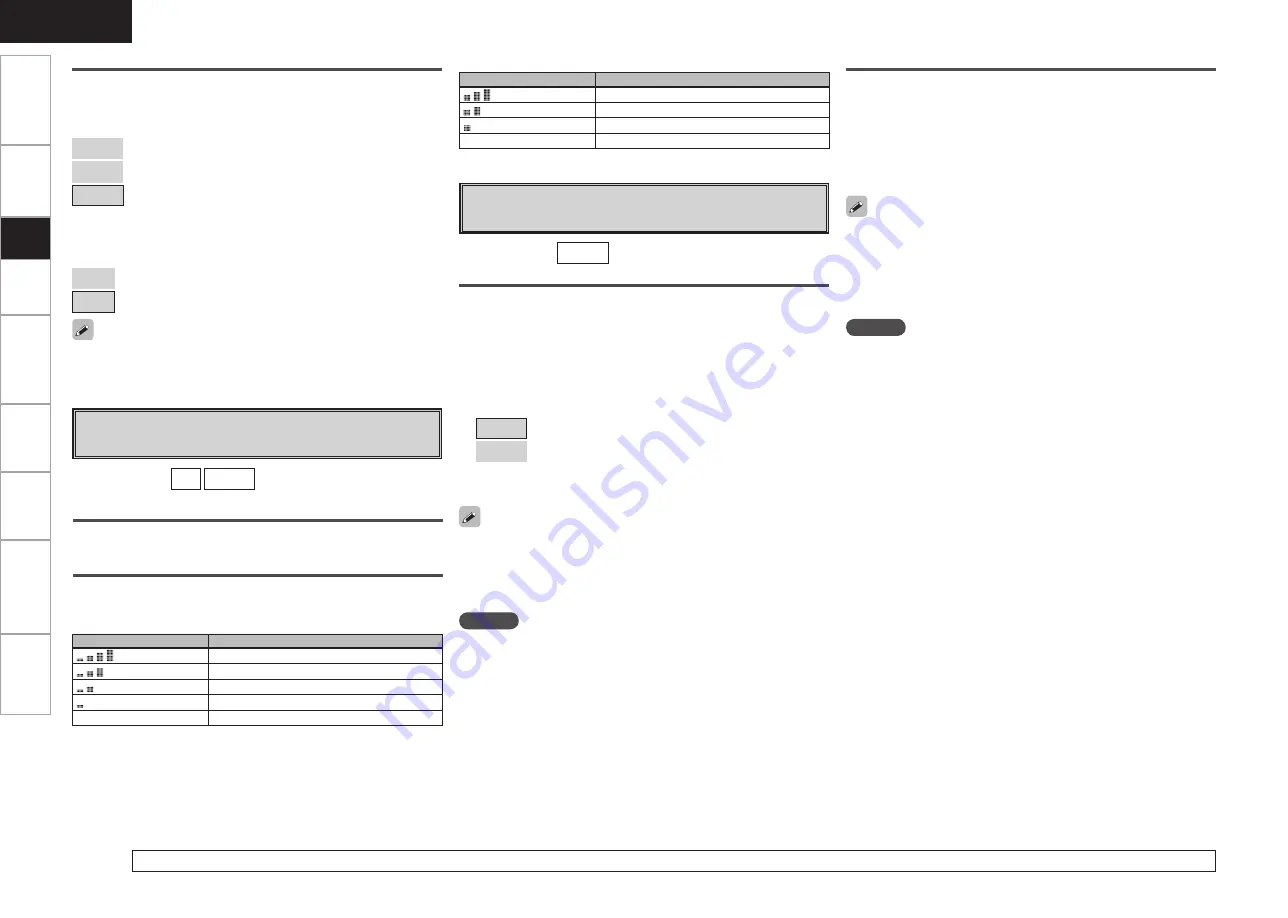
Parental Lock

For any channel, set the radio reception limits. 

[Input source] 

SIRIUS

Lock Setting

Set the channel radio reception limits. 

q  

Press 

ENTER

.

w


Using 

uio


p

, input the password (4 digits number) and press 

ENTER

.

e  

Select channel by pressing 

ui

, and set the lock by pressing 

o


p

.

[Selectable items]

Unlock

 :  Do not lock selected channel(s).

Lock

 :   Lock selected channel(s).

b

  When  a  Parental  Locked  channel  is  tuned, “Code  :  [                ]”  is 

displayed, then input the password.

• The default password is “0000”.
• If the password is wrong, “Incorrect Code” is displayed. Input the 

correct password.

• While listening to the channel being played, you can also set parental 

lock (

v

page 55).

NOTE

You can set “Parental Lock” when the input source is “SIRIUS”.

•  If the old password is incorrectly input, “Incorrect Code” is displayed, 

and proceed again from step 

q

.

• If the password input is 3 digits or less, “Input 4-digit” is displayed, 

and input again with a 4 digit password. 

• If the new password is not correctly input, “Input Error” is displayed 

and the password does not change.

Edit Lock Code

Change the password.

q  

Press 

ENTER

.

w  

Input old password (4 digits) using 

uio


p

, and press 

ENTER

.

e  

Input new password (4 digits) using 

uio


p

, and press 

ENTER

.

r  


Input  new  password  (4  digits)  again  using 

uio


p

,  and  press 

ENTER

. If the correct password is input, “Completed” is displayed, 

and the new password is modified.

NOTE

You can set “Edit Lock Code” when the input source is “SIRIUS”.

A0 

Antenna Aiming

Check the XM and SIRIUS radio reception sensitivity.

Satellite

Indicate satellite signal strength.

[Input source] 

XM


SIRIUS

Terrestrial

Indicate terrestrial signal strength.

Display

Condition

Signal strength is strong
Signal strength is good
Signal strength is marginal
Signal strength is weak
No signal

Display

Condition

Signal strength is excellent
Signal strength is good
Signal strength is weak
No signal

n


XM Antenna Aiming

n


SIRIUS Antenna Aiming

Shuffle Mode

Make settings for shuffle mode.

n


When DENON control dock for iPod ASD-1R is connected

[Selectable items]

Songs

 :   Shuffle all songs.

Albums

 :   Shuffle songs from current album only.

OFF

 :   Cancel shuffle mode.

n


When  DENON  control  dock  for  iPod  ASD-3N/3W  is 

connected

[Selectable items]

ON

 :   Shuffle mode on.

OFF

 :   Cancel shuffle mode.

This can be selected for input sources for which “Assign” is assigned 
at the “iPod Dock” setting.

For details on how to select, set and cancel settings for each menu, see “Menu Operations” (

v

page 18).

Содержание AVR-789

Страница 1: ...AV SURROUND RECEIVER AVR 789 Owner s Manual Manuel de l Utilisateur ...

Страница 2: ...ely to be walked on or pinched by items placed upon or against them paying particular attention to cords at plugs convenience receptacles and the point where they exit from the product 15 Outdoor Antenna Grounding If an outside antenna or cable system is connected to the product be sure the antenna or cable system is grounded so as to provide some protection against voltage surges and built up sta...

Страница 3: ...must accept any interference received including interference that may cause undesired operation 2 IMPORTANT NOTICE DO NOT MODIFY THIS PRODUCT This product when installed as indicated in the instructions contained in this manual meets FCC requirements Modification not expressly approved by DENON may void your authority granted by the FCC to use the product 3 NOTE This product has been tested and fo...

Страница 4: ...er Frequency 27 h Front Speaker Setup 27 HDMI Setup 28 a Color Space 28 s RGB Range 28 d Auto Lipsync 28 f HDMI Audio Out 28 g HDMI Control 28 h Power Off Control 28 Audio Setup 29 a EXT IN Subwoofer Level 29 s 2ch Direct Stereo 29 d Dolby Digital Setup 29 f Auto Surround Mode 29 g EQ Preset 30 ZONE2 Setup 30 a Level Lch 30 s Level Rch 30 d Volume Limit 31 f Power On Level 31 g Mute Level 31 Opera...

Страница 5: ...et Memory 53 Listening to Preset Channels 53 Searching Categories 53 Listening to SIRIUS Satellite Radio Programs 53 Basic Operation 54 Checking the SIRIUS Signal Strength and Radio ID 54 Presetting Radio Stations Preset Memory 54 Listening to Preset Stations 54 Searching Categories 55 Parental Lock 55 iPod Playback 55 Basic Operation 55 Listening to Music 56 Viewing Still Pictures or Videos on th...

Страница 6: ... Unit Point the remote control unit at the remote sensor when operating it NOTE The set may function improperly or the remote control unit may not operate if the remote control sensor is exposed to direct sunlight strong artificial light from an inverter type fluorescent lamp or infrared light Before turning the power switch on Check once again that all connections are correct and that there are n...

Страница 7: ...EY DYNAMIC VOLUME indicator 46 Q7HD AUDIO indicator 41 Q8Master volume indicator Q9Display W0Remote control sensor 3 W1ZONE2 REC SELECT button 57 68 W2SOURCE SELECT knob 50 W3SOURCE button 50 W4STATUS button 48 52 W5DIMMER button 33 W6RESTORER button 47 W7BAND button 51 W8SHIFT button 51 W9PRESET buttons 51 E0TUNING buttons 51 E1MULTEQ button 45 E2DYNAMIC VOLUME button 46 b About Dynamic Volume Au...

Страница 8: ...ndicator This lights when the MultEQ is selected oInput mode indicators Q0Recording output source indicator This lights when the REC OUT mode is selected Q1NIGHT indicator This lights when the night mode is selected Q2RESTORER indicator This lights when the RESTORER mode is selected Q3HDMI indicator This lights when playing using HDMI connections Q4Decoder indicators These light when the respectiv...

Страница 9: ... VIDEO connectors 12 14 eAnalog audio connectors AUDIO 12 14 rEXT IN connectors 14 tREMOTE CONTROL jacks 17 yPRE OUT connector 10 uZONE2 connectors 17 iAC OUTLETS 17 oPower cord 17 Q0Speaker terminals SPEAKERS 10 Q1FM AM antenna terminals TUNER ANTENNA 16 Q2COMPONENT VIDEO connectors 12 13 Q3HDMI connectors 11 13 Q4XM connector SAT TU2 15 Q5SIRIUS connector SAT TU1 15 Q6DOCK CONTROL jack 13 Rear P...

Страница 10: ...mitter 3 Q2Master volume control buttons 50 Q3MUTING button 50 Q4NIGHT button 47 Q5MULTEQ button 45 Q6Channel select CH SEL ENTER button 55 59 q w r e t y u o b Q2 Q1 i Q0 q ZONE2 power buttons 68 w Source select buttons 50 b To select SIRIUS XM as the input source use the SAT TU1 2 button e Video select button V SEL 35 r Tuner system buttons 51 t Test tone button TEST 27 y MAIN ZONE power buttons...

Страница 11: ...deo signal Output Input Input Output Output Input Input Output Cables Used for Connections Select the cables according to the equipment being connected Preparations NOTE Do not plug in the power cord until all connections have been completed When making connections also refer to the operating instructions of the other components Be sure to connect the left and right channels properly left with lef...

Страница 12: ...e video conversion function might not operate When not using this function connect a monitor output with the same type of connector as the video input connector The resolution of the HDMI input compatible monitor connected to the AVR 789 can be checked at menu Information HDMI Information vpage 49 When viewing HDMI or component video signals via the AVR 789 the on screen display appears when the M...

Страница 13: ... the banana plug NOTE Use speakers with an impedance of 6 to 16 Ω ohms When using front A and B speakers simultaneously use speakers with an impedance of 12 to 16 Ω ohms Connect the speaker cables in such a way that they do not stick out of the speaker terminals The protection circuit may be activated if the core wires touch the rear panel or if the and sides touch each other v Protection circuit ...

Страница 14: ...ng to a monitor etc equipped with a DVI D connector connection is possible using an HDMI DVI converter cable but depending on the combination of components in some cases the video signals will not be output When connecting using an HDMI DVI converter adapter the video signals may not be output properly due to poor connections with the connected cable etc By default the HDMI audio signals are outpu...

Страница 15: ...nputs and outputs and be sure to interconnect correctly Connecting the Playback Components Blu ray Disc player DVD player Select the terminal to use and connect the device Blu ray Disc player DVD player NOTE The component video connectors may be indicated differently on your monitor For details see the monitor s operating instructions The audio signals output from the HDMI connectors are only the ...

Страница 16: ...ner When using a coaxial cable for the digital audio connection make the settings at menu Input Setup Assign Digital In vpage 38 Carefully check the left L and right R channels and the inputs and outputs and be sure to interconnect correctly Connecting the Recording Components R L R L R L R L 015 4 7 0 4 7 0 3 3 065 7 0 6 0 7 0 065 6 0 015 6 0 7 0 7 0 065 065 065 Video Cassette Recorder Select the...

Страница 17: ...Console Video camera Game console Carefully check the left L and right R channels and the inputs and outputs and be sure to interconnect correctly Connections to Other Devices R L R L R L R L R L R L 46 800 3 5 3 463306 3 463306 3 30 5 3 6 0 Component with Multi channel Output connectors Blu ray Disc player DVD player External decoder To play the analog input signals input to the EXT IN connectors...

Страница 18: ...riusConnect Home Tuner and subscribing to the SIRIUS service Plug the SIRIUS connector on the rear panel Position the Home Tuner antenna near a south facing window to receive the best signal For details see Listening to SIRIUS Satellite Radio Programs vpage 53 55 When making connections also refer to the operating instructions of the SiriusConnect Home Tuner SiriusConnect Home Tuner 2006 SIRIUS Sa...

Страница 19: ...d in particular specifies that the cable ground shall be connected to the grounding system of the building as close to the point of cable entry as practical n AM loop antenna assembly Remove the vinyl tie and take out the connection line Connect to the AM antenna terminals Bend in the reverse direction a With the antenna on top of any stable surface Mount b With the antenna attached to a wall Inst...

Страница 20: ...g and operating separately sold devices refer to the respective devices operating instructions To conduct multi zone playback see Amp Assign Multi zone Connections and Operations vpage 65 68 NOTE Insert the AC plugs securely Incomplete connections could cause noise Only use the AC outlets to plug in audio equipment Do not use them as power supplies for hairdryers or anything other than audio equip...

Страница 21: ...e item you want to set then press ENTER 4To change the setting Press ui to select the item you want to change then press o p to change the setting b To return to the previous item press RETURN b Select Default Yes then press o to reset to the default setting 5Press ENTER to enter the setting 6Press MENU or A MENU to finish Operations The same operation is possible on the main unit or remote contro...

Страница 22: ...rt Cancel Please place microphone main listening position 3 1 Assign Digital In OPT1 iPod Dock None Assign Digital OPT1 Screen title Submenu title Press o to execute Press op to change the setting Current setting Currently selected line Some typical examples are described below Rename DVD Rename Clear Default DVD DV 3 4 Rename Yes Default DVD DVD 3930 3 4 Rename Yes Rename DVD DV When highlighted ...

Страница 23: ...round Mode EQ Preset n ZONE2 Setup vpage 30 31 Level Lch Level Rch Volume Limit Power On Level Mute Level n Option Setup vpage 31 33 Amp Assign Volume Control Source Delete On Screen Display Quick Select Name Remote ID Setup Display Setup Lock Parameter vpage 42 47 n Surround Parameter Mode Cinema EQ DRC Dynamic Range Compression LFE Center Image Panorama Dimension Center Width Delay Time Effect L...

Страница 24: ... 27 About the main listening position M The main listening position refers to the most central position where one would normally sit within the listening environment MultEQ uses the measurements from this position to calculate speaker distance level polarity and the optimum crossover value for the subwoofer M M Example q Example w Measuring positions 1Connect the included calibrated setup micropho...

Страница 25: ...ll cancel the measurements Auto Setup Optimize settings for speakers in use Step 1 Speaker Detection NOTE Do not change the speaker connections or subwoofer volume after Step 1 The speaker connection and polarity are detected at the first measurement position main listening position The following attributes are also determined at this time Speaker Size Speaker Distance Channel Level Crossover Freq...

Страница 26: ...Q solution For instance if the location or direction of a speaker is altered the Auto Setup should be performed again to ensure the correct EQ solution for the new room configuration F Menu screen F q q Auto Setup Step2 Measurement Audyssey MultEQ Please place microphone Cancel Next Calculate 2nd listening position at ear height at Auto Setup Step2 Measurement Audyssey MultEQ Now measuring 2nd Can...

Страница 27: ...e Auto Setup Caution Audyssey MultEQ Included setup microphone is not connected Not all speakers could be detected The front L speaker was not properly detected Connect the included setup microphone to the SETUP MIC jack on the main unit Check the speaker connections too high or Retry Cancel Ambient noise is Level is too low Auto Setup Caution Audyssey MultEQ Too much noise in the room for accurat...

Страница 28: ...configuration and size bass reproduction capability Front Speaker Select front speaker size Selectable items Large Small Subwoofer Select subwoofer use Selectable items Yes No Center Speaker Select center speaker use and size Selectable items Large Small None 2 Manual Setup 2 HDMI Setup 1 Speaker Setup 4 ZONE2 Setup 5 Option Setup 3 Audio Setup For details on how to select set and cancel settings ...

Страница 29: ...ound back speakers with MAIN ZONE change the Amp Assign setting to 7 1ch vpage 31 s Subwoofer Setup Select low range signal to be reproduced by subwoofer This can be set when menu Speaker Configuration Subwoofer is set to Yes Play music or a movie source and select the mode offering the strongest bass Select LFE Main if you want the bass signals to always be produced from the subwoofer Selectable ...

Страница 30: ...CH A B A B NOTE When set to Custom SPEAKERS does not operate g Crossover Frequency Select crossover frequency from which subwoofer handles low range signal Selectable items 40Hz 60Hz 80Hz 90Hz 100Hz 110Hz 120Hz 150Hz 200Hz 250Hz Only the portion of the bass sound of the various speakers output from the subwoofer that has a frequency below the frequency set here is output Set this according to the ...

Страница 31: ... avoid black washout When YCbCr is selected under Color Space RGB Range will have no effect s RGB Range Make settings for RGB output range f HDMI Audio Out Select HDMI audio output device d Auto Lipsync Automatic compensation for timing shift in audio and video output Selectable items ON OFF g HDMI Control Make settings for HDMI control function Selectable items ON OFF Selectable items ON OFF This...

Страница 32: ...ayback of Dolby Digital sources Set this to ON if the sound from the front speakers seems distorted When not using the center speaker or surround speakers the playback sound is down mixed and output from the front speakers f Auto Surround Mode Make setting for memorizing surround mode setting for each input signal type The auto surround mode function lets you store in the memory the surround mode ...

Страница 33: ...djust CH q Select speaker adjustment method Selectable items Each CH Adjust tonal quality for each speaker separately L R CH Adjust tonal quality for each L R speaker pair All CH Adjust tonal quality for all speakers together w Select the speaker and frequency band and adjust the level Selectable items 63Hz 125Hz 250Hz 500Hz 1kHz 2kHz 4kHz 8kHz 16kHz Variable range 20dB 0dB 6dB ZONE2 Setup Make se...

Страница 34: ...P ASSIGN terminals FrontA Bi Amp The Front A channel for Bi Amp use is output from the speakers connected to the SURR BACK AMP ASSIGN terminals FrontB Bi Amp The Front B channel for Bi Amp use is output from the speakers connected to the SURR BACK AMP ASSIGN terminals For details see Amp Assign Multi zone Connections and Operations vpage 65 68 2 Vol Control 3 Source Delete 4 On Screen Display 5 Qu...

Страница 35: ... 10sec Show display for 10 seconds after operation OFF Turn display off Display Mode Select the on screen display s display mode Selectable items Mode1 If there is no video signal flickering of the on screen display is not prevented Mode2 Prevents flickering of the on screen display when there is no video signal Use this mode if the on screen display does not appear in the Mode 1 as may happen acc...

Страница 36: ...inadvertent change When Setup Lock is set to ON the settings listed below can no longer be changed Also SETUP LOCKED is displayed if you attempt to operate related settings RESTORER Night Mode MultEQ Dynamic EQ Dynamic Volume Channel Level Audio Delay To cancel the setting press MENU or A MENU to re display the Setup Lock screen then change the setting to OFF Selectable items ON Turn protection on...

Страница 37: ...elow can be made for these input sources when iPod Dock is set to Assign 1 Assign 3 Input Mode 2 Video 4 Rename 5 Source Level 6 iPod 3 Input Setup VCR VCR iPod Repeat Mode All Shuffle Mode OFF 3 6 iPod Displayed when source name is changed with Rename Input Setup ENTER op VIDEO SELECT INPUT MODE ui uiop INPUT MODE ENTER VIDEO SELECT Rear Button located on both the main unit and the remote control...

Страница 38: ... for the same input source are played Operating from the main unit or remote control unit Press VIDEO SELECT until the desired picture appears b To cancel press VIDEO SELECT to select Source NOTE It is not possible to select HDMI input signals When playing HDMI video input signals the analog video signal of another input source cannot be selected for the HDMI video output Input sources for which D...

Страница 39: ... Output at 480p 576p resolution 1080i Output at 1080i resolution 720p Output at 720p resolution 1080p Output at 1080p resolution Progressive Mode Select optimum progressive mode for video material Input source DVD HDP TV CBL VCR V AUX Selectable items Auto Automatically detect video material type Video1 Select mode suitable for video playback Video2 Select mode suitable for video and 30 frame film...

Страница 40: ...aining up to 8 characters can be input Characters that can be input A Z a z 0 9 space Variable range 12dB 0dB 12dB For input sources for which HDMI In and Digital In are set at the menu Assign setting the analog input level and digital input level can be set separately j Source Level Corrects the playback level of the selected input source s audio input g Input Mode Make input mode and decode mode...

Страница 41: ...lect digital input connector to assign to this source Input source CD CDR TAPE DVD HDP TV CBL VCR V AUX SIRIUS Selectable items COAX1 Assign COAXIAL 1 input connector COAX2 Assign COAXIAL 2 input connector OPT1 Assign OPTICAL 1 input connector OPT2 Assign OPTICAL 2 input connector None No digital input connector assigned Input source CD CDR TAPE DVD HDP TV CBL VCR V AUX SIRIUS Default setting COAX...

Страница 42: ...ode Change the password q Press ENTER w Input old password 4 digits using uio p and press ENTER e Input new password 4 digits using uio p and press ENTER r Input new password 4 digits again using uio p and press ENTER If the correct password is input Completed is displayed and the new password is modified NOTE You can set Edit Lock Code when the input source is SIRIUS A0 Antenna Aiming Check the X...

Страница 43: ...de for playing sources recorded in XM HD Surround vpage 71 z DOLBY PLgx can be selected when surround back speakers are being used DOLBY PLg can be selected when surround back speakers are not being used Select the mode to suit the source Select the Cinema Music Game and Pro Logic modes at menu Parameter Surround Parameter Mode vpage 43 n DOLBY PLgx or DOLBY PLg Cinema This mode is suited for movi...

Страница 44: ...f the surround modes in the Display column in the following table The mode changes depending upon factors such as the Input signal Whether or not surround back speakers are being used For details see page 75 e Direct Playback Selecting the mode Select by turning SELECT ENTER or pressing D ST Selectable items DIRECT In this mode the signals bypass the tone adjustment circuitry for high quality soun...

Страница 45: ... n To exit adjustment Press MENU or A MENU during adjustment 42 Getting Started Connections Playback Remote Control Multi zone Information Troubleshooting ENGLISH Operating from the main unit Use SELECT ENTER to select the surround mode nDuring PCM 2ch Analog DOLBY DIGITAL 2ch DIRECT STEREO DTS NEO 6 7CH STEREO 5CH STEREO MATRIX VIRTUAL DOLBY PRO LOGIC gx DOLBY PRO LOGIC g VIDEO GAME neuralz MONO ...

Страница 46: ...lectable items ON Cinema EQ is used OFF Cinema EQ is not used The Music mode is also effective for movie sources including a lot of stereo music a Mode Select the mode to match the source cinema source music source etc n In the PLgx or PLg mode Selectable items Cinema This is the mode for cinema source Music This is the mode for music source Game This is the mode for game source PL Dolby Pro Logic...

Страница 47: ...be selected when Surround Back Speaker is set to 2spkrs or 1spkr at the menu Manual Setup Speaker Setup Speaker Configuration setting z3 This can be selected when playing DTS sources z4 This can be selected when playing DTS sources including a discrete 6 1 channel signal identification signal Settings can also be made when STD is pressed When using surround back speakers adopt the following settin...

Страница 48: ...e adjustments off Selectable items ON Allow tone adjustment treble bass OFF Playback without tone adjustment The tone cannot be adjusted when in the DIRECT mode A8 Bass Adjust low frequency range bass Variable range 6dB 6dB A9 Treble Adjust high frequency range treble Variable range 6dB 6dB Bass and Treble can be set when Tone Control is set to ON NOTE When the Dynamic EQ setting is ON setting is ...

Страница 49: ...un Audyssey is displayed In this case either perform Auto Setup again or return to the setting after running Auto Setup with Auto Setup Parameter Check Restore Operating from the main unit or remote control unit Press DYNAMIC VOLUME Dynamic EQ Volume ON Green Red Dynamic EQ ON Volume OFF Dynamic EQ Volume OFF S3 Setting Dynamic Volume Setting Can be set when Dynamic Volume is set to ON Set Dynamic...

Страница 50: ...Night Mode Optimized setting for late night listening Audio Delay Compensate for mismatched timing between video and audio This cannot be adjusted when playing in the EXT IN DIRECT or STEREO mode with Front Speaker set to Large Tone Control to OFF and MultEQ RESTORER and Night Mode to OFF When the Auto Lipsync Correction function is operating you can set within the range 0 100 ms Store Audio Delay...

Страница 51: ...vidual program sources The correction value can be checked using STATUS The figure is the correction value when the standard level is corrected Items to be checked Surround Mode The currently set surround mode is displayed SIGNAL The input signal type is displayed fs The input signal s sampling frequency is displayed Format The number of channels in the input signal front surround LFE is displayed...

Страница 52: ... source TUNER XM SIRIUS Items to be checked A1 G8 480p Color Space RGB 4 4 4 Pixel Depth 8bits Resolution 5 3 HDMI Signal Info 5 6 Preset Station A1FM 87 50MHz A2FM 89 10MHz A3FM 98 10MHz A4FM107 90MHz A5FM 90 10MHz A6FM 90 10MHz A7FM 90 10MHz A8FM 90 10MHz Items to be checked Analog PCM 2CH Digital 2CH Digital 5 1CH Multi ch Quick Select Shows information about quick select settings For instructi...

Страница 53: ...press MASTER VOLUME Variable range 80 0dB 18 0dB Operations During Playback Adjusting the Master Volume Press MUTING The sound is reduced to the level set at menu Manual Setup Option Setup Volume Control Mute Level To cancel press MUTING again Muting can also be canceled by adjusting the master volume Plug the headphones into the PHONES jack on the main unit The sound from the speakers and pre out...

Страница 54: ... MODE MEMORY TUNER SAT TU1 2 BAND Front Rear Button located on both the main unit and the remote control unit BUTTON Button only on the main unit BUTTON Button only on the remote control unit BUTTON Symbols used to indicate buttons in this manual 51 Getting Started Connections Setup Playback Remote Control Multi zone Information Troubleshooting ENGLISH The remote control unit can be used to operat...

Страница 55: ...46 Activate your XM Satellite Radio service in Canada online at https activate xmradio ca or call 1 877 GET XMSR 1 877 438 9677 You will need a major credit card XM will send a signal from the satellites to activate the full channel lineup Activation normally takes 10 15 minutes but during peak busy periods you may need to keep your XM Ready audio system on for up to an hour When you can access th...

Страница 56: ... 2Press PRESET or CHANNEL to select the desired preset channel 1 to 8 Listening to Preset Channels Searching Categories 1Press o p 2Use o p to select the category then use ui to select the desired channel Channel category LOADING is displayed while channels or data are being received Refer to Troubleshooting XM Satellite Radio regarding other messages vpage 81 Listening to SIRIUS Satellite Radio P...

Страница 57: ... the name of the track and artist are displayed The channel switches continuously when TUNING is pressed and held SIRIUS Radio stations can be preset using the same procedure as for FM AM stations vpage 51 Presetting Radio Stations Preset Memory and Listening to Preset Stations b You cannot perform Auto Preset The track name artist name composer name category and reception level can be checked by ...

Страница 58: ...2Use o p to select the category then use ui to select the desired station Channel category UPDATING is displayed while the encording code is being updated SIRIUS UPDATING is displayed when updating SIRIUS tuner firmware Refer to Troubleshooting SIRIUS Satellite Radio regarding other messages vpage 81 Parental Lock 1Tune to the channel you want to lock 2Press ENTER for at least 3 seconds Code is di...

Страница 59: ...show or video functions When using an ASD 1R 1Press and hold MODE to set the Remote mode 2Watching the iPod s screen use ui to select Photos or Videos 3Press ENTER until the image you want to view is displayed TV Out at the iPod s Slideshow Settings or Video Settings must be set to On in order to display the iPod s photo data or videos on the monitor For details see the iPod s operating instructio...

Страница 60: ... RECOUT Source 3Turn SOURCE SELECT to choose the input source to be recorded 4Play the program source For operating instructions refer to the respective equipment s operating instructions To record FM or AM broadcasts select the broadcast vpage 51 5Start recording For operating instructions refer to the respective equipment s operating instructions Other Operations NOTE Digital signals are not out...

Страница 61: ...isten to TV audio by AVR 789 connect optical digital or analog If the TV you are using has both connection jacks use the optical digital connection When using these functions set as follows menu Manual Setup HDMI Setup HDMI Control set to ON vpage 28 AVR 789 power off can be linked to the TV power off step When you set Output audio from amp in theTV audio output setup operation you can switch the ...

Страница 62: ...k 1Connect the HDMI to the AVR 789 with equipment compatible with the HDMI control function vpage 58 2Put the power on for all the equipment connected to the HDMI 3Check the settings for all the equipment connected to the HDMI and make HDMI available to them b Please consult the operating instructions for the connected equipment to check the settings b Steps 1 3 do not have to be repeated once sta...

Страница 63: ...on the currently playing input source input mode surround mode MultEQ settings and volume can be stored in the memory 1Set the input source surround mode MultEQ Dynamic EQ Dynamic Volume Front Speaker settings and volume to the conditions you want to store 2Press and hold the desired QUICK SELECT until Memory appears on the display The current settings will be memorized To call out the settings pr...

Страница 64: ...ing on the model and year of manufacture this function cannot be used for some models even if they are of makes listed in the list of preset codes Some manufacturers use more than one type of remote control code Refer to the included list of preset codes to change the number and verify correct operation The preset memory can be set for one component only among the following DVD HDP and SAT CABLE V...

Страница 65: ...Pause Pause 0 SKIP FAVORITE Disc skip b Favorites Direct Disc skip TUNING 6 7 Manual search fast reverse fast forward Manual search fast reverse fast forward Tuning down up Manual search fast reverse fast forward Manual search fast reverse fast forward Manual search fast reverse fast forward Manual search fast reverse fast forward 8 9 CH Auto search cue Auto search cue Tuner Channel Auto search cu...

Страница 66: ...ling out the menus Calling out the menus Calling out the menus SETUP Setup Setup uio p Cursor operation Cursor operation Cursor operation Cursor operation Cursor operation AUDIO Audio Audio BAND PICTURE ADJUST b1 Top menu AM FM switching Picture adjust Picture adjust ENTER Enter setting Enter setting Enter setting Enter setting Enter setting MEMORY SUBTITLE b1 Favorite memory Preset memory Subtitl...

Страница 67: ...same time The indicator starts flashing 4Input the number of the component you want to set No CD 1 iPod NETWORK 2 TUNER 3 DVD HDP 4 VCR 5 No setting 0 NUMBER RETURN MEMORY Front Rear 64 Getting Started Connections Setup Playback Multi zone Information Troubleshooting ENGLISH Remote Control PunchThrough Function Punch Through is a function allowing you to operate 1 2 3 0 6 7 8 and 9 on CD iPod NETW...

Страница 68: ...sign mode at menu Manual Setup Option Setup Amp Assign vpage 31 Connect the speakers as described at Amp Assign mode setting and speakers connected to the various speaker terminals Z2L Z2R FL SW C FR SL SR MAIN ZONE ZONE2 Stereo 5 1ch ZONE2 Setting 1 FMulti zone playback Default Setting 5 1 channel playback ZONE2 stereo playback Amp Assign mode Default 65 Getting Started Connections Setup Playback...

Страница 69: ...minal Amp Assign mode FRONT A FRONT B CENTER SURROUND SURROUND BACK AMP ASSIGN R L R L R L R L Front A Bi Amp FR A FL A FR B FL B C SR SL FR FL Front B Bi Amp FR FL FL A FR A Bi Amp connection FL B FR B Bi Amp connection The Front A or Front B channel for Bi Amp use is output from the speakers connected to the SURR BACK AMP ASSIGN terminals Multi zone SBL SBR FL SW C FR SL SR MAIN ZONE 7 1ch Setti...

Страница 70: ...ne Settings and Operations with Zone Output 48 3 4 43 4 3 4 y MAIN ZONE 7 1 channel system Monitor ZONE2 Blu ray Disc player DVD player Input ZONE2 audio output AVR 789 Pre main amplifier Multi zone audio cable Connectors for audio output Audio signals ZONE2 ZONE2 OUT Stereo Prepare pre main amplifiers for ZONE2 Remote control unit ...

Страница 71: ... value set at menu Manual Setup ZONE2 Setup Volume Limit vpage 31 The ZONE2 volume can be adjusted only when ZONE2 is selected at menu Manual Setup Option Setup Amp Assign vpage 31 Turning off the Sound Temporarily q Set SOURCE CONTROL 1 to AUDIO and SOURCE CONTROL 2 to ZONE2 w Press MUTING The sound is reduced to the level set at menu Manual Setup ZONE2 Setup Mute Level vpage 31 To cancel either ...

Страница 72: ...e them G1H Using surround back speaker s q When mainly playing movies Recommended when your surround speakers are single or 2 way speakers Surround back speakers Subwoofer Surround speakers Monitor Center speaker Front speakers 60 60 Surround speaker Surround back speaker Front speaker Point slightly downwards GAs seen from aboveH GAs seen from the sideH 2 to 3 feet 60 to 90 cm About Speaker Insta...

Страница 73: ...rround sound DTS ES Discrete 6 1 DTS ES Discrete 6 1 is a 6 1 channel discrete digital audio format adding a surround back SB channel to the DTS digital surround sound Decoding of conventional 5 1 channel audio signals is also possible according to the decoder DTS ES Matrix 6 1 DTS ES Matrix 6 1 is a 6 1 channel discrete digital audio format inserting a surround back SB channel to the DTS digital ...

Страница 74: ...riorating sound quality as volume is decreased by taking into account human perception and room acoustics Audyssey Dynamic EQ works in tandem with Audyssey MultEQ to provide well balanced sound for every listener at any volume level Audyssey Dynamic Volume Audyssey Dynamic Volume solves the problem of large variations in volume level between television programs commercials and between the soft and...

Страница 75: ... A A A A A DOLBY TrueHD S D D D D S OFF S 0dB S ON S S OFF A A A A A S Auto DTS SURROUND S D D D D S OFF S 0dB S ON S S OFF A A A A A A DTS 96 24 S D D D D S OFF S 0dB S ON S S OFF A A A A A A DTS HD S D D D D S OFF S 0dB S ON S S OFF A A A A A A neural S D D D D A A A S A A A A A A A 5CH 7CH STEREO S D D D D S OFF S 0dB A S A A A A A A S Auto ROCK ARENA S D D D D S OFF S 0dB A S A A S Medium S 10...

Страница 76: ...OFF S OFF S DOLBY DIGITAL A A A A A S 0dB S OFF S OFF S OFF S OFF A DOLBY DIGITAL Plus A A A A A S 0dB A S OFF S OFF S OFF A DOLBY TrueHD A A A A A S 0dB A S OFF S OFF S OFF A DTS SURROUND A A A A A S 0dB S OFF S OFF S OFF S OFF A DTS 96 24 A A A A A S 0dB S OFF S OFF S OFF S OFF A DTS HD A A A A A S 0dB A S OFF S OFF S OFF A neural A A A A A S 0dB S OFF S OFF S OFF S OFF S 5CH 7CH STEREO A A A A ...

Страница 77: ...NEMA S A S A A A A A A A A A A A A S DTS NEO 6 MUSIC S A S A A A A A A A A A A A A S DOLBY SURROUND DOLBY TrueHD A A A A A A A A A F A A A A A A DOLBY DIGITAL A A A A A A A A A A F A A A A A DOLBY DIGITAL EX z1 z3 A A A A A A A A A A A S S S S A DOLBY D HD EX z1 z3 A A A A A A A A A S S A A A A A DOLBY DIGITAL A A A A A A A A A A A S F F F A DOLBY D D HD PLgx CINEMA z2 z3 A A A A A A A A A S S F D...

Страница 78: ...MUSIC z1z3 A S A A A A A A A A A A A A A A M DIRECT 7 1 z3 A S A A A A A A A A A A A A A A PURE DIRECT PURE DIRECT S A S S S S S S S S S S S S S S MULTI CH PURE DIRECT A S A A A A A A A A A A A A A A M PURE D PLgx CINEMA z2 z3 A S A A A A A A A A A A A A A A M PURE D PLgx MUSIC z1 z3 A S A A A A A A A A A A A A A A M CH PURE DIRECT 7 1 z3 A S 7 1 A A A A A A A A A A A A A A DSP SIMULATION 5CH 7CH ...

Страница 79: ...NTz2 S VIDEO S VIDEO S S Other than 480i 576i S S HDMIz2 COMPONENTz2 S VIDEO S VIDEO S S 480i 576i S S HDMIz2 COMPONENTz2 S VIDEO S VIDEO S Signal input A No signal 480p 720p 480p 576p 1080i 720p A Not output z1 On screen display superimposed on video signal and output z2 On screen display superimposed on S Video signal and output COMPONENT or HDMI On screen display only displayed for the MENU but...

Страница 80: ...A HDMI A S VIDEO A Used S A S S HDMI A S VIDEO VIDEOz2 Not used S A S S HDMI A VIDEO S S A A HDMI COMPONENT A A S S A S HDMI COMPONENTz1 A VIDEO S S S A HDMI COMPONENTz2 S VIDEO A Used S S S S HDMI COMPONENTz2 S VIDEO VIDEOz2 Not used S S S S HDMI COMPONENTz1 VIDEO S Signal input A No signal A Not output z1 On screen display superimposed on video signal and output z2 On screen display superimposed...

Страница 81: ... something other than OFF Set a surround mode other than the PURE DIRECT mode 33 42 GGeneralH 78 Getting Started Connections Setup Playback Remote Control Multi zone Information ENGLISH Symptom Cause Countermeasure Page DOLBY DIGITAL indicator does not appear on display Blu ray Disc player DVD player s digital audio output setting is not proper Check the Blu ray Disc player DVDplayer saudiooutputs...

Страница 82: ... TV AM radio broadcast etc in the STANDARD Dolby DTS Surround mode The mode is set to something other than STANDARD Dolby DTS Surround 41 No sound is produced from surround speakers The surround mode is set to STEREO DIRECT or PURE DIRECT Set to a surround playback mode 41 42 No sound is produced from surround back speaker The surround back speaker s power amplifier is assigned to a different chan...

Страница 83: ... signals are input to the AVR 789 the characters of the on screen display are not displayed over the picture Set Manual Setup Option Setup On Screen Display Text to ON Set Manual Setup Option Setup On Screen Display Master Volume to ON Set when Manual Setup On Screen Display Tuner Information is not OFF Set when Manual Setup On Screen Display iPod Information is not OFF 9 9 32 32 32 32 GVideoH Sym...

Страница 84: ...the XM satellite signal for at least 5 minutes and then try to select the channel again CH UNAVAILABLE is displayed Channel is not present Select another channel CH UNAUTHORIZED is displayed You selected an XM channel that is blocked or cannot be receive with your XM subscription package Consult the latest channel guide at www xmradio com or www xmradio ca for the current list of channels For info...

Страница 85: ...Vp p 75 Ω ohms C color signal 0 286 Vp p 75 Ω ohms Frequency response 5 Hz 10 MHz 1 3 dB when video convert set to OFF Color component video connector Input output level and impedance Y brightness signal 1 Vp p 75 Ω ohms PB CB signal 0 7 Vp p 75 Ω ohms PR CR signal 0 7 Vp p 75 Ω ohms Frequency response 5 Hz 60 MHz 0 3 dB when video convert set to OFF n Tuner section FM AM note µV at 75 Ω ohms 0 dB...

Страница 86: ...tic 009 021 031 033 049 053 081 087 088 091 094 097 098 Ricoh 055 S Salora 033 041 Samsung 007 011 051 059 070 083 087 089 113 Sanky 081 Sansui 005 026 029 045 061 085 114 Sanyo 032 033 053 087 091 115 116 SBR 042 Scott 017 020 086 089 093 117 Sears 013 023 028 031 033 053 054 088 091 098 099 115 Sentra 055 Sharp 001 002 021 097 Shogun 087 Sony 075 076 077 078 079 121 122 STS 023 Sylvania 009 015 ...

Страница 87: ...17 026 032 M Magnavox 018 Movie Time 019 N NSC 019 O Oak 000 006 020 P Panasonic 001 005 Philips 011 012 013 018 021 Pioneer 002 003 022 R RCA 029 Regency 015 S Samsung 014 023 Scientific Atlanta 004 024 025 Signal 014 SL Marx 014 Starcom 009 Stargate 014 T Teleview 014 Tocom 007 016 TV86 019 U Unika 011 United Artists 006 Universal 010 011 V Viewstar 018 019 Z Zenith 027 028 Satellite Receiver A ...

Страница 88: ...Denon Brand Company D M Holdings Inc Printed in China 5411 10050 007D www denon com ...

Страница 89: ...Owner s Manual Safety Instructions Compliance Information HORIZON MCS 100 5 1 Surround Speaker System A Boston P O P Product Make it your own ...

Страница 90: ...the obsolete outlet 10 Protect the power cord from being walked on or pinched particularly at plugs convenience receptacles and the point where they exit from the apparatus 11 Only use attachments accessories specified by the manufacturer 12 Unplug this apparatus during lightning storms or when unused for long periods of time 13 Refer all servicing to qualified service personnel Servicing is requi...

Страница 91: ...isions picture Unpacking the System Carefully unpack the system If there is any sign of damage from transit report it immediately to your dealer and or delivery service Keep the shipping carton and packing materials for future use Open the package and verify the following contents 4 Satellite speakers 1 Center Channel speaker 1 Subwoofer 2 40 12m speaker wires 3 15 4 6m speaker wires 1 15 4 6m sub...

Страница 92: ...he appropriate type of fasteners If you re not sure what type of fastener to use take the mounting bracket to a friendly hardware store tell them about the wall you re mounting the speaker on and ask them to recommend an appropriate fastener Keep in mind the weight of the speaker Speaker Connections After your speakers are properly placed you are ready to wire your system First turn off all system...

Страница 93: ...ons for each source or surround mode e g CD stereo videotape Dolby Digital Pro Logic In each case follow your equipment s instructions to ensure that the subwoofer output is turned on and that the speakers are set to Small in each mode If your receiver has adjustable crossover settings we recommend the subwoofer crossover be set at 150Hz Refer to the owner s manual for your AV receiver for any add...

Страница 94: ... has been removed or defaced This warranty gives you specific legal rights and you may also have other rights which vary from state to state If Service Seems Necessary First contact the dealer from whom you purchased the product If that is not possible write to Boston Acoustics Inc 300 Jubilee Drive Peabody MA 01960 USA Or contact us via e mail at support bostona com We will promptly advise you of...

Страница 95: ... Kortec and the Boston Acoustics logo are registered trademarks of Boston Acoustics Inc Dolby Digital and Dolby Pro Logic are registered trademarks of Dolby Laboratories DTS is a registered trademarks of DTS Inc Specifications are subject to change without notice 2007 Boston Acoustics Inc 142 002699 1 ...

Отзывы: