


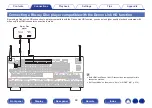


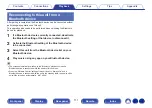


TRIGGER OUT jacks
When a device with TRIGGER IN jack is connected, the connected device’s power on/standby can be controlled through linked operation to this unit.
The TRIGGER OUT jack outputs a maximum 12 V DC/150 mA electrical signal.
.
1 CBL/SAT
PHONO
2 DVD
1 CBL/SAT
2 CD
1 TV
AUDIO
6 CD
2 DVD
3 Blu-ray
5 MEDIA
PLAYER
4 GAME
1 CBL/SAT
1 CBL/SAT
2 DVD
2 DVD 3 Blu-ray
4 GAME
RS-232C
7.1CH IN
REMOTE CONTROL
PRE OUT
(ASSIGNABLE)
VIDEO
VIDEO
(ASSIGNABLE)
(ASSIGNABLE)
COMPONENT VIDEO
COMPONENT VIDEO
MONITOR
MONITOR/ZONE3
ZONE2
3 Blu-ray
COAXIAL
OPTICAL
STRAIGHT CABLE
IR
ZONE2
ZONE3
FRONT
FRONT
SURROUND
CENTER
SUBWOOFER
SURROUND BACK
CENTER
SURROUND BACK
SURROUND
HEIGHT2
HEIGHT4/FRONT WIDE
1
AUDIO
(ASSIGNABLE)
AUDIO
DIGITAL AUDIO
(ASSIGNABLE)
2
ASSIGNABLE
ASSIGNABLE
ASSIGNABLE
ASSIGNABLE
ASSIGNABLE
Bluetooth/Wi-Fi
ANTENNA
Bluetooth/Wi-Fi
ANTENNA
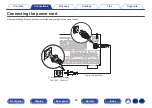
AC IN
Y
P
B
/
C
B
P
R
/
C
R
SPEAKERS
SUBWOOFER
HEIGHT1
HEIGHT3
FRONT
HEIGHT4/FRONT WIDE
HEIGHT3
HEIGHT3
FRONT
CENTER
SURROUND
SURROUND
SURROUND BACK
SURROUND BACK
HEIGHT1
HEIGHT1
HEIGHT2
HEIGHT2
HEIGHT4/FRONT WIDE
1
2
TRIGGER OUT
DC12V 150mA MAX.
12 V DC/150 mA trigger-compatible device
NOTE
0
Use a monaural mini-plug cable for connecting the TRIGGER OUT jacks. Do not use a stereo mini-plug cable.
0
If the permissible trigger input level for the connected device is larger than 12 V DC/150 mA, or has shorted, the TRIGGER OUT jack cannot be used. In this case, turn off the
power to the unit, and disconnect it.
98


