background image

ESPAÑOL

32

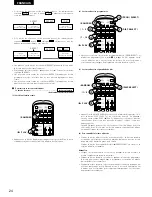
APERTURA Y CIERRE DEL CAJON, Y CARGA DE UN DISCO

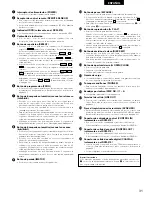
Apertura y cierre del cajón 

(esta operación sólo podrá ser efectuada mientras

la unidad esté activada)
1. Presione el interruptor de alimentación (POWER) para activar la unidad.
2. Presione el botón de apertura/cierre (

5

OPEN/CLOSE).

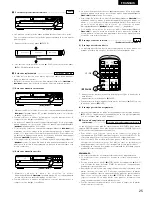
Cómo cargar un disco

• Asegúrese de que el cajón esté totalmente abierto.
• Tome el disco por los bordes y colóquelo sobre la bandeja portadisco. (No

toque la superficie que contiene las señales grabadas - el lado brillante.)

• Coloque el disco correctamente en la bandeja según su tamaño.

Coloque los discos de 8 cm en la circunferencia central.
Coloque los discos de 12 cm en la circunferencia exterior.

• Cuando se abre la unidad de disco mientras se está en el modo stop, se

pueden introducir discos en las bandejas de 3 discos. Si se pulsa el botón
DISC SKIP (salto de disco), el carrusel gira y se puede introducir un disco en
la otra bandeja de discos.
Cuando se abre el cajón durante el modo de reproducción, resulta posible
cargar y descargar discos en todas las bandejas de disco a excepción de
aquella bandeja cuyo disco se esté reproduciendo. Se pueden sustituir 3
discos y pulsar el botón DISC SKIP (salto de disco) para acceder a la otra
bandeja de discos que se pueden sustituir.

• Presione el botón de apertura/cierre (

5

OPEN/CLOSE) para cerrar el cajón. 

Precaución:

• El reproductor no funcionará correctamente y los discos podrán resultar

dañados si no son cargados en forma correcta.

• Si sus dedos se atascasen en el cajón mientras éste se cierra, presione el

botón de apertura/cierre (

5

OPEN/CLOSE).

• No coloque objetos extraños en la bandeja portadisco ni cargue más de un

disco a la vez, pues de lo contrario podrá producirse mal funcionamiento. 

• No empuje con la mano la bandeja portadisco cuando la unidad esté

desactivada, ya que esto podrá causar mal funcionamiento y daños al
reproductor de discos compactos.

• No toque el carrusel mientras esté girando. No toque tampoco el carrusel

con la mano cuando esté parado. Dichas acciones podrían dañarlo.

• No inserte disco alguno allí donde se indique mediante una flecha.

Ello podría dañar el mecanismo interno de la unidad. 

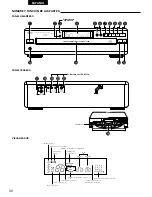
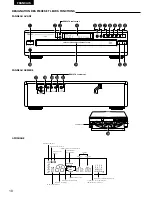
OPEN/CLOSE

DISC SKIP

STOP

PAUSE

PLAY

PROG

PHONES

REPEAT

5 DISC AUTOMATIC DISC LOADING SYSTEM 

DCM-370

PCM AUDIO TECHNOLOGY / CD AUTO CHANGER

REMOTE
SENSOR

HDCD

£

¢

ON

OFF

TRACK

1
5

2 3 4
6 7 8

9 101112

13141516

DISC

MIN

SEC

¤

‚⁄

‚‹ fi‚

1
2
3
4
5

OPEN/CLOSE

DISC SKIP

STOP

PAUSE

PLAY

PROG

PHONES

REPEAT

5 DISC AUTOMATIC DISC LOADING SYSTEM 

DCM-370

PCM AUDIO TECHNOLOGY / CD AUTO CHANGER

REMOTE
SENSOR

HDCD

£

¢

ON

OFF

TRACK

1
5

2 3 4
6 7 8

9 101112

13141516

DISC

MIN

SEC

¤

‚⁄

‚‹ fi‚

1
2
3
4
5

OPEN/CLOSE

DISC SKIP

STOP

PAUSE

PLAY

PROG

PHONES

REPEAT

5 DISC AUTOMATIC DISC LOADING SYSTEM 

DCM-370

PCM AUDIO TECHNOLOGY / CD AUTO CHANGER

REMOTE
SENSOR

HDCD

£

¢

ON

OFF

TRACK

1
5

2 3 4
6 7 8

9 101112

13141516

DISC

MIN

SEC

¤

‚⁄

‚‹ fi‚

1
2
3
4
5

OPEN/CLOSE

DISC SKIP

STOP

PAUSE

PLAY

PROG

PHONES

REPEAT

5 DISC AUTOMATIC DISC LOADING SYSTEM 

DCM-370

PCM AUDIO TECHNOLOGY / CD AUTO CHANGER

REMOTE
SENSOR

HDCD

£

¢

ON

OFF

TRACK

1
5

2 3 4
6 7 8

9 101112

13141516

DISC

MIN

SEC

¤

‚⁄

‚‹ fi‚

1
2
3
4
5

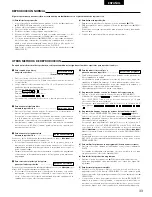
LADO ETIQUETADO
MIRANDO HACIA
ARRIBA

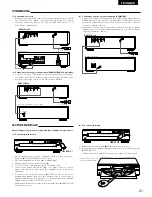
CONEXIÓN 

(1) Conexión de los conectores de salida 

• Conecte un extremo del cable de conexión proporcionado junto con el

reproductor CD, a los terminales de salida izquierdo (L) y derecho (R) del
reproductor CD, y el otro extremo a los terminales de entrada CD, AUX o
TAPE PLAY, izquierdo (L) y derecho (R) del amplificador.

(2) Conexión del conector de salida digital (COAXIAL) 

(solamente en el DCM-370)

• Use un cable de 75 

/ohmios con clavija de espiga para conectar el

conector de salida digital (COAXIAL) del DCM-370, al conector de entrada
digital (COAXIAL) de un procesador digital o lector MD, a la venta en
tiendas del ramo.

(3) Conexión del conector de sincronización (SYNCHRO)

• Conecte el conector de sincronización (SYNCHRO) a un magnetófono de

cassettes DENON equipado con un conector SYNCHRO, y realice luego
una grabación sincronizada. Emplee el cable de conexión proporcionado
con el magnetófono de cassettes.

• Para hacer uso de esta función, conecte también los conectores de salida,

y efectúe los ajustes necesarios para poder realizer la grabación desde el
reproductor CD al magnetófono de cassrttes.

Содержание 270

Страница 1: ...OR HDCD ON OFF OPEN CLOSE DISC SKIP 5 DISC AUTOMATIC DISC LOADING SYSTEM STOP PAUSE PLAY PROG PHONES REPEAT DCM 270 PCM AUDIO TECHNOLOGY CD AUTO CHANGER REMOTE SENSOR ON OFF TRACK 1 5 2 3 4 6 7 8 9 101112 13141516 DISC MIN SEC fi 1 2 3 4 5 TRACK 1 5 2 3 4 6 7 8 9 101112 13141516 DISC MIN SEC fi 1 2 3 4 5 DCM 370 DCM 270 FOR ENGLISH READERS PAGE 05 PAGE 16 POUR LES LECTEURS FRANCAIS PAGE 17 PAGE 28 P...

Страница 2: ...ructions in the literature accompanying the appliance FOR U S A CANADA MODEL ONLY CAUTION TO PREVENT ELECTRIC SHOCK DO NOT USE THIS POLARIZED PLUG WITH AN EXTENSION CORD RECEPTACLE OR OTHER OUTLET UNLESS THE BLADES CAN BE FULLY INSERTED TO PREVENT BLADE EXPOSURE POUR LES MODELES AMERICAINS ET CANADIENS UNIQUEMENT ATTENTION POUR PREVENIR LES CHOCS ELECTRIQUES NE PAS UTILISER CETTE FICHE POLARISEE A...

Страница 3: ... likely to be walked on or pinched by items placed upon or against them paying particular attention to cords at plugs convenience receptacles and the point where they exit from the appliance 14 Cleaning The appliance should be cleaned only as recommended by the manufacturer 15 Power Lines An outdoor antenna should be located away from power lines 16 Outdoor Antenna Grounding If an outside antenna ...

Страница 4: ... this happens turn off the power unplug the power cord from the power outlet and remove the shipping screws Retain these screws as they will be needed when the player is transported Before transporting the player take out the discs close the disc tray turn off the power after 0 00 00 00 is displayed and unplug the power cord from the power outlet Then install the shipping screws by turning them cl...

Страница 5: ... is fast 6 Wireless Remote Control Accessory In addition to general operations such as Play Stop and Pause this remote control unit enables direct selection direct programming and other functions Use of the remote control unit adds greatly to the operating ease of the DCM 370 270 enhancing its outstanding features CAUTIONS DURING USE This compact disc player is capable of playing discs which have ...

Страница 6: ...8 0 1 9 OPEN CLOSE DISC SKIP STOP PAUSE PLAY PROG PHONES REPEAT 5 DISC AUTOMATIC DISC LOADING SYSTEM DCM 370 PCM AUDIO TECHNOLOGY CD AUTO CHANGER REMOTE SENSOR HDCD ON OFF TRACK 1 5 2 3 4 6 7 8 9 101112 13141516 DISC MIN SEC fi 1 2 3 4 5 6 DISPLAY PROGRAM RANDOM TRACK R 1 5 2 3 4 6 7 8 9 101112 13141516 DISC MIN SEC REPEAT ALL 1 DISC REMAIN 1 2 3 4 5 CAROUSEL Play Indicator Pause Indicator Disc Ind...

Страница 7: ...rward search becomes approximately 4 times faster o Stop Button 2 STOP Press this button to stop play DISC ALL DISC ALL REPEAT DISC ALL REPEAT 1 DISC REPEAT 1 REPEAT REPEAT 0 Pause Button 3 PAUSE Press this button to stop play temporarily Pressing the Pause button during play stops play temporarily The indicator goes off and the indicator lights up To cancel the Pause state press either the Play b...

Страница 8: ... button 5 OPEN CLOSE Do not place any foreign objects on the disc tray and do not place more than one disc on the tray at a time Otherwise malfunction may occur Do not push in the disc tray manually when the power is off as this may cause malfunction and damage the CD player Do not touch the carousel while it is turning Also do not turn the carousel by hand when it is stopped Doing so could damage...

Страница 9: ... number track number and elapsed time etc for the disc currently playing appear on the display window 6 If the open close 5 OPEN CLOSE button is pressed while a disc is playing playback continues but the drawer opens and four discs can be replaced The disc that can be replaced switches when the DISC SKIP button is pressed Press the open close 5 OPEN CLOSE button again to close the drawer 1 Startin...

Страница 10: ...rd button 7 9 for less than 0 5 seconds during playback The pickup will advance to the beginning of the next track and playback will continue Pressing the button several times will forward the pickup the corresponding number tracks OPEN CLOSE DISC SKIP 5 DISC AUTOMATIC DISC LOADING SYSTEM STOP PAUSE PLAY PROG PHONES REPEAT DCM 370 PCM AUDIO TECHNOLOGY CD AUTO CHANGER REMOTE SENSOR HDCD ON OFF TRAC...

Страница 11: ...TOMATIC DISC LOADING SYSTEM STOP PAUSE PLAY PROG PHONES REPEAT DCM 370 PCM AUDIO TECHNOLOGY CD AUTO CHANGER REMOTE SENSOR HDCD ON OFF TRACK 1 5 2 3 4 6 7 8 9 101112 13141516 DISC MIN SEC fi 1 2 3 4 5 1 PLAY 1 PLAY Press the Play 1 PLAY button to play the programmed selections in the order in which they were programmed 5 To clear the entire program Pressing the PROG DIRECT button once more erases th...

Страница 12: ...G DIRECT button and inputting a program See item t on page 10 and 11 press the Random button then the Play button The microcomputer will then select tracks from the program at random and play them 3 Disc Sequential Random Play 1 3 4 2 1 PLAY RANDOM DISC SELECT 1 5 Press the RANDOM button and specify the disc numbers 1 to 5 with the DISC SELECT button and the number buttons A press of the PLAY 1 PL...

Страница 13: ...ent for practicing vocals with background music 1 2 3 PAUSE 1 10 1 Press the Track Number buttons to set the number of the desired track 2 Press the Pause 3 PAUSE button To start play press the Play 1 PLAY button or the Pause 3 PAUSE button 2 Cuing by Program Selection After setting the desired track selections in a program press the Pause 3 PAUSE button The player will advance to the beginning of...

Страница 14: ... has passed replace the dry batteries with new ones Be sure to follow polarity indications inside the case of the remote control unit inserting the end and end of each battery in the directions indicated Batteries may become damaged or leak under the following conditions Using new batteries together with old ones Using different types of batteries together Do not short batteries take them apart su...

Страница 15: ...w 10 simply press the corresponding button For track numbers of 11 and greater press the 10 then the number buttons For example for track number 22 press 10 twice then 2 Volume The volume control on the unit will operate when the volume buttons are pressed The volume can be checked by looking at the position of the control Skipping Discs The Disc Skip button DISC SKIP will not function in the rand...

Страница 16: ...Time min sec Play Pause Repeat Random etc Other Headphone Jack Level Variable REMOTE CONTROL UNIT RC 258 Remote Control Method Infrared Pulse system Power Supply 3 V DC Two R6P standard SIZE AA External Dimensions 50 W x 175 H x 18 D mm 1 31 32 x 6 57 64 x 45 64 Weight 100g approx 3 oz Includes batteries HDCD and High Definition Compatible Digital are registered trademarks of Pacific Microsonics I...

Страница 17: ...iorant sa souplesse d emploi IMPORTANT Uniquement modèle pour le marché Canada Le présent appareil numérique n émet pas de bruites radioélectriques dépassant les limites applicables aux appareils numériques de la Class B prescrites dans le Réglement sur le brouillage redio électrique édicté par le ministére des Communications du Canada NOTE Ce lecteur CD utilise un laser semi conducteur Il est rec...

Страница 18: ...OAXIAL DIGITAL OUT LINE OUT VARIABLE CONTROL OUT IN SYNCHRO 7 8 0 1 9 OPEN CLOSE DISC SKIP STOP PAUSE PLAY PROG PHONES REPEAT 5 DISC AUTOMATIC DISC LOADING SYSTEM DCM 370 PCM AUDIO TECHNOLOGY CD AUTO CHANGER REMOTE SENSOR HDCD ON OFF TRACK 1 5 2 3 4 6 7 8 9 101112 13141516 DISC MIN SEC fi 1 2 3 4 5 6 AFFICHAGE CARROUSEL Indicateur de lecture Indicateur de pause Indicateur de disc Numéro de disque N...

Страница 19: ...aux musicaux sont lus plus rapidement qu en cas normal Maintenez votre doigt sur cette touche pendant plus de 5 secondes la recherche avant devient approximativement 4 fois plus rapide o Touche d arrêt 2 STOP Appuyer sur cette touche pour arrêter la lecture DISC ALL DISC ALL REPEAT DISC ALL REPEAT 1 DISC REPEAT 1 REPEAT REPEAT 0 Touche de pause 3 PAUSE Appuyer sur cette touche pour arrêter proviso...

Страница 20: ...s le tiroir de disque celui ci se ferme appuyez sur la touche d ouverture fermeture 5 OPEN CLOSE Ne placez pas des objets sur le plateau de disque ni n y placez plus d un disque à la fois sans quoi vous risquez d obtenir un fonctionnement défectueux Ne poussez pas sur le disque à la main pour l introduire lorsque l alimentation n est pas branchée étant donné que ceci pourrait entraîner un fonction...

Страница 21: ...e disque numéro de plage et le temps écoulé etc pour le disque actuellement en cours de lecture apparaissent sur la fenêtre de l affichage 6 Si la touche d ouverture fermeture 5 OPEN CLOSE est enfoncée pendant qu un disque est lu la lecture continue mais le tiroir s ouvre et quatre disques peuvent être remplacés Le disque pouvant être remplacé change lorque le touche DISC SKIP est pressé Appuyer d...

Страница 22: ...cherche en avant automatique manuelle 7 9 pendant moins de 0 5 seconde pendant la lecture L endroit de reproduction sera avancé jusqu au commencement de la plage suivante et la reproduction continuera Si vous appuyez sur la touche plusieurs fois l endroit de reproduction sera avancé d autant de plages OPEN CLOSE DISC SKIP 5 DISC AUTOMATIC DISC LOADING SYSTEM STOP PAUSE PLAY PROG PHONES REPEAT DCM ...

Страница 23: ...oncée 4 Pour effectuer une lecture programmée OPEN CLOSE DISC SKIP 5 DISC AUTOMATIC DISC LOADING SYSTEM STOP PAUSE PLAY PROG PHONES REPEAT DCM 370 PCM AUDIO TECHNOLOGY CD AUTO CHANGER REMOTE SENSOR HDCD ON OFF TRACK 1 5 2 3 4 6 7 8 9 101112 13141516 DISC MIN SEC fi 1 2 3 4 5 1 PLAY 1 PLAY Appuyer sur la touche de lecture 1 PLAY pour reproduire les sélections programmées dans l ordre où elles ont ét...

Страница 24: ...OG DIRECT et introduit un programme Voir le point t à la page 22 23 appuyer sur la touche aléatoire puis sur la touche de lecture Le micro ordinateur sélectionne alors les plages du programme en ordre aléatoire et les lit 3 Lecture aléatoire séquentielle de disc 1 3 4 2 1 PLAY RANDOM DISC SELECT 1 5 Appuyer sur la touche RANDOM et spécifier le nombre de disques de 1 à 5 avec la touche DISC SELECT ...

Страница 25: ...r sélection programmée Après avoir programmé les pistes désirées appuyer sur la touche de pause 3 PAUSE Le capteur avance jusqu au début de la 1ère piste programmée et le lecteur passe dans le mode de pause 1 Fonction d enregistrement synchronisé Fonction d enregistrement synchronisé Le fait de connecter une prise de synchronisation SYNCHRO à une platine cassette DENON équipée d une prise de synch...

Страница 26: ... lecteur CD même avant l écoulement d une année remplacer les piles sèches par des neuves Prendre soin d observer les indications de polarité inscrites à l intérieur de l unité de télécommande en dirigeant l extrémité et de chaque pile dans le sens indiqué Les piles risquent d être endommagées et de fuire dans les cas suivants Utilisation mélangée de piles neuves avec d anciennes Utilisation mélan...

Страница 27: ... 5 enfoncer PROG DIRECT 3 10 et 1 5 Pour annuler le programme enfoncer la touche PROG DIRECT Sélection des numéros de plage Pour les numéros de plage inférieurs à 10 enfoncer simplement la touche correspondante Pour des numéros de plage supérieurs et égale à 11 enfoncer 10 puis enfoncer les touches numérotées Par exemple pour le numéro de plage 22 enfoncer deux fois 10 puis 2 Volume La commande de...

Страница 28: ...sc No de piste durée mn s lecture pause répétition lecture aléatoire etc Autre Jack de casque niveau variable UNITE DE TELECOMMANDE RC 258 Méthode de télécommande Système à impulsions infrarouges Alimentation 3 V CC deux piles R6P tamaño standard AA Dimensions extérieures 50 W x 175 H x 18 D mm 1 31 32 x 6 57 64 x 45 64 Poids 100 g 3 oz y compris les piles Includes batteries HDCD et High Definitio...

Страница 29: ...l funcionamiento cuando se use Cuando lo retire del enchufe de la pared asegurese de retirarlo tomandolo del cuerpo de la clavija y no lo jale del cordón 2 No abra la cubierta superior A fin de prevenir choques eléctricos no abra la cubierta superior Si ocurren problemas comuníquese a su distribuidor DENON 3 No coloque ningún objeto en el interior No coloque objetos metálicos o derrame líquido den...

Страница 30: ...SC AUTOMATIC DISC LOADING SYSTEM DCM 370 PCM AUDIO TECHNOLOGY CD AUTO CHANGER REMOTE SENSOR HDCD ON OFF TRACK 1 5 2 3 4 6 7 8 9 101112 13141516 DISC MIN SEC fi 1 2 3 4 5 6 VISUALIZADOR PROGRAM RANDOM TRACK R 1 5 2 3 4 6 7 8 9 101112 13141516 DISC MIN SEC REPEAT ALL 1 DISC REMAIN 1 2 3 4 5 CARROUSEL Indicador de reproducción Indicador de pausa Indicador de disco Número de disco Número de pista Hora ...

Страница 31: ...busqueda hacia adelante se hace 4 veces más rápida aproximada mente o Botón de parada 2 STOP Presione este botón para detener la reproducción DISC ALL DISC ALL REPEAT DISC ALL REPEAT 1 DISC REPEAT 1 REPEAT REPEAT 0 Botón de pausa 3 PAUSE Presione este botón para detener temporalmente la reproducción Si se presiona este botón durante el modo de reproducción la repro ducción se detendrá temporalment...

Страница 32: ...ichas acciones podrían dañarlo No inserte disco alguno allí donde se indique mediante una flecha Ello podría dañar el mecanismo interno de la unidad OPEN CLOSE DISC SKIP STOP PAUSE PLAY PROG PHONES REPEAT 5 DISC AUTOMATIC DISC LOADING SYSTEM DCM 370 PCM AUDIO TECHNOLOGY CD AUTO CHANGER REMOTE SENSOR HDCD ON OFF TRACK 1 5 2 3 4 6 7 8 9 101112 13141516 DISC MIN SEC fi 1 2 3 4 5 OPEN CLOSE DISC SKIP S...

Страница 33: ... al principio de la siguiente pista arbitraria o programada Omisión de disco Búsqueda automática r Para retroceder al principio de la pista que está siendo reproducida Búsqueda automática Presione el botón de búsqueda automática manual en retroceso 8 6 por menos de 0 5 segundos durante la reproducción El fonocaptor retrocederá hasta el principio de la pistaque esté siendo reproducida y la reproduc...

Страница 34: ...ia es presionado durante la reproducción normal todas las pistas de todos los discos serán reproducidas en forma arbitraria Si el botón de reproducción arbitraria es presionado durante la operación de reproducción programada todas las pistas programadas serán reproducidas en forma arbitraria incluyendo aquellas pistas que ya hayan sido reproducidas Durante la operación de reproducción arbitraria e...

Страница 35: ...del compartimiento de las pilas ubicada en la parte posterior de la unidad de control remoto 2 Inserte dos pilas R6P en la unidad RC 258 siguiendo las indicaciones impresas en el compartimiento de las pilas 3 Coloque la tapa del compartimiento de las pilas ubicada en la parte posterior de la unidad de control remoto Notas acerca de las pilas Use pilas R6P AA en la unidad de control remoto RC 258 L...

Страница 36: ...ción directo PROG DIRECT Para especificar números de pista Para números de pista inferiores a 10 simplemente presione el botón correspondiente al número deseado Para números de pista mayores o iguales a 11 presione primero el botón 10 y luego los botones numéricos Por ejemplo para la pista número 22 presione el botón 10 dos veces y luego el botón 2 Volumen El control de volumen de la unidad funcio...

Страница 37: ... 6 lbs 5 7 kg 12 6 lbs DCM 270 DCM 370 FUNCIONES E INDICACIÓN Funciones Se puede emplear cinco discos Selección directa de pista Selección de programa Reproducción arbitraria etc Visualizadores Número de disco Número de pista Tiempo min y seg Reproducción Pausa Repetición Reproducción arbitraria etc Otros Toma para audífonos nivel variable UNIDAD DE CONTROL REMOTO RC 258 Sistema de control remoto ...

Страница 38: ...Printed in Taiwan R O C 511 3431 008 901 14 14 AKASAKA 4 CHOME MINATO KU TOKYO 107 8011 JAPAN Telephone 03 3584 8111 Cable NIPPON COLUMBIA TOKYO Telex JAPANOLA J22591 ...

Отзывы: