background image

4

A - GENERAL INFORMATION

TO THE PURCHASER

Congratulations! You are the owner of one of the fi nest 
pumps on the market today. These pumps are products 
engineered and manufactured of high quality components. 
With years of pump building experience along with a con-
tinuing quality assurance program combine to produce a 
pump which will stand up to the toughest applications.

Check local codes and requirements before installation. 
Servicing should be performed by knowledgeable pump 
service contractors or authorized service stations.

RECEIVING

Upon receiving the pump, it should be inspected for dam-
age or shortages. If damage has occurred, fi le a claim 
immediately with the company that delivered the pump. 
If the manual is removed from the crating, do not lose or 
misplace.

STORAGE

Short Term - 

Pumps are manufactured for effi cient 

performance following long inoperative periods in storage.
For best results, pumps can be retained in storage, as 
factory assembled, in a dry atmosphere with constant 
temperatures for up to six (6) months.

Long Term -

 Any length of time exceeding six (6) months, 

but not more than twenty four (24) months. The units 
should be stored in a temperature controlled area, a roofed 
over walled enclosure that provides protection from the 
elements (rain, snow, wind blown dust, etc..), and whose 
temperature can be maintained b40 deg. F and 
+120 deg. F. Pump should be stored in its original shipping 
container and before initial start up, rotate impeller by hand 
to assure seal and impeller rotate freely.

SERVICE CENTERS

For the location of the nearest Deming Service Center, 
check your Deming representative or Crane Pumps & 
Systems Service Department in Piqua, Ohio, telephone 
(937) 778-8947 or Crane Pumps & Systems Canada, Inc., 
Bramton, Ontario, (905) 457-6223.

B- INSTALLATION

1. FOUNDATION

The pump foundation should be suffi ciently substantial 
to form a level, rigid support for the combined weight 
of the pump and driver and maintain alignment of the 
installed unit. Foundation bolts, of the proper size, should 
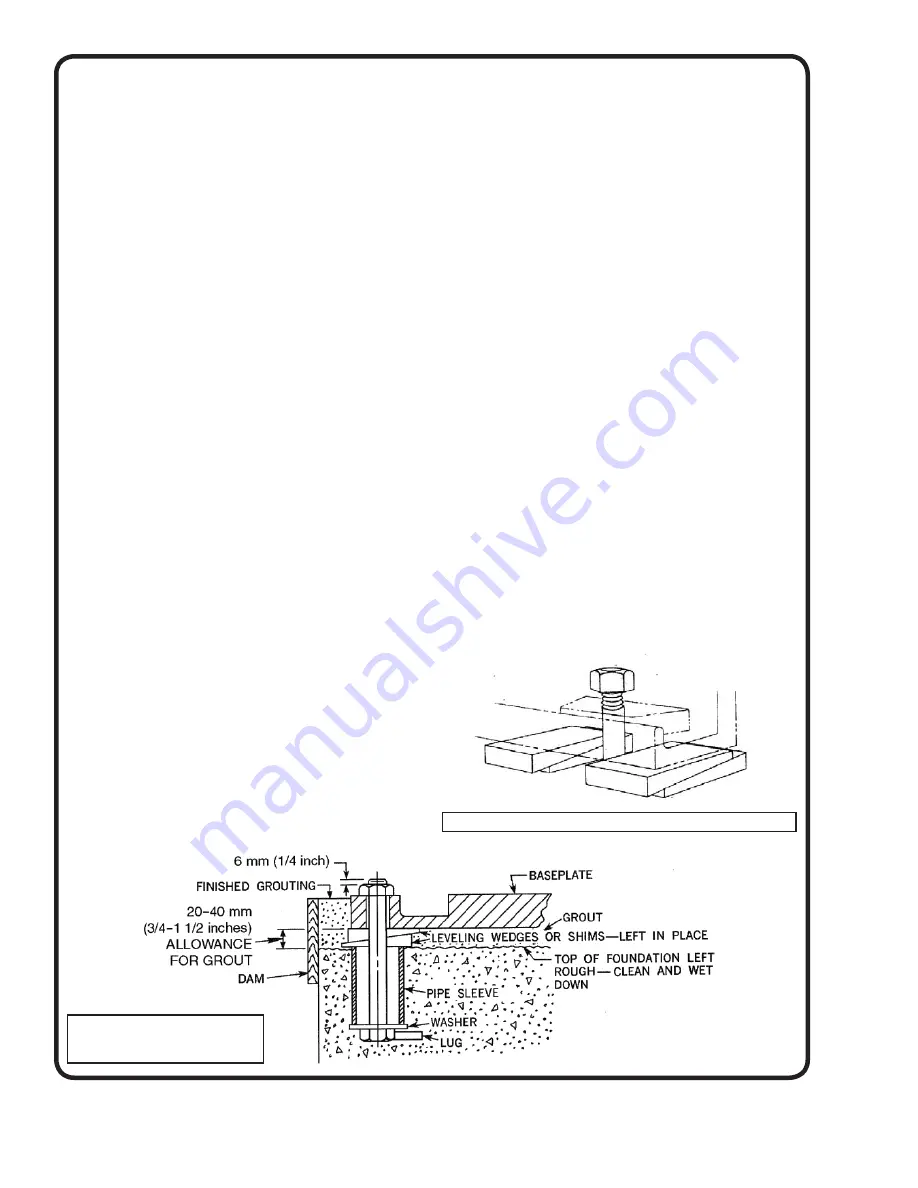
be imbedded in the concrete. A pipe sleeve, about 2½” 
diameters larger than the bolt, should be used to allow for 
fi nal positioning of the bolts. See Figure 1.

2. MOUNTING - Fig. 7150 and Fig. 7190:

Position the unit on the foundaton and level the pump base, 
using metal shims, so that the pump shaft is in vertical 
alignment and the pump suction and discharge fl anges are 
level in both vertical and horizontal plane. Base may be 
grouted following alignment. Fig. 7150 Series - Use a plumb 
line from fl oor above to establish centerline of pump and 
fl exible drive shaft and bearings.

Fig. 7160:

Pumps and drivers that are received from the factory
with both machines mounted on a common baseplate, 
were accurately aligned before shipment. All baseplates 
are fl exible to some extent and, therefore, must not be 
relied upon to maintain the factory alignment. Preliminary 
alignment is necessary after the complete unit has been 
leveled on the foundation, and again, after the unit is 
piped, and rechecked periodically as outlined in the 
following paragraphs.

Position unit on foundation and level the baseplate,
using rectangular metal blocks and shims, or wedges 
having a small taper as shown in Figure 2.  A gap of 3/4” 
to 1½” should be allowed between the baseplate and 
foundation for grouting.

Figure 1. Foundation Bolt 

Location and Anchorage

Figure 2. Adjusting Wedges for Mounting

Содержание 7150 Series

Страница 1: ...nge product without prior written notification 420 Third Street 83 West Drive Bramton Piqua Ohio 45356 Ontario Canada L6T 2J6 Phone 937 778 8947 Phone 905 457 6223 Fax 937 773 7157 Fax 905 457 2650 ww...

Страница 2: ...erved CONTENTS SAFETY FIRST 3 A GENERAL INFORMATION 4 Receiving Storage Service Centers B INSTALLATION 4 6 Foundation Mounting Field Alignment Grouting Dowelling Piping Wiring Rotation C OPERATION 6 P...

Страница 3: ...not wear loose clothing that may become entangled in moving parts WARNING Keep clear of suction and discharge openings DO NOT insert fingers in pump with power connected Always wear eye protection whe...

Страница 4: ...check your Deming representative or Crane Pumps Systems Service Department in Piqua Ohio telephone 937 778 8947 or Crane Pumps Systems Canada Inc Bramton Ontario 905 457 6223 B INSTALLATION 1 FOUNDAT...

Страница 5: ...ment when the straight edge rests evenly on the coupling rim at all positions Allowance may be necessary for temperature changes and for coupling halves that are not of the same outside diameter Care...

Страница 6: ...n arrow on the pump casing Separate the coupling halves then start motor to see that it rotates in the direction required by the pump If it does not reverse any two main leads of the 3 phase wiring to...

Страница 7: ...ouble seals and Crane Type B 1 double seal in pumps with Fi No ending in 9 must be lubricated as in item 1 above 3 Pumps with Fig No ending in 3 5 6 and 6H seal chamber may be pressurized with Shell A...

Страница 8: ...sleeve mounted on the pump shaft 6 by means of heat shrink fit To remove shaft sleeve dismantle power frame as below place shaft in a vise and proceed as follows 1 With a hand grinder and a thin grin...

Страница 9: ...lace capscrews 219 where used SHAFT SLEEVE 14 a Pumps having Fig No ending 3 5 6 6H having shrink fit sleeve 1 After old sleeve has been removed clean shaft with emery cloth and wipe thoroughy to remo...

Страница 10: ...moved laterally on the shaft sleeve the drive ball can be inserted in the shaft sleeve recess After drive ball is inserted move seal rotating assembly on the shaft sleeve until compression ring is ce...

Страница 11: ...Cover O B Shaft Sleeve Gasket 40 46 51 53 57 59 69 73 204 206 207 208 209 210 211 212 213 215 Deflector Coupling Key Grease Retainer Base Suction Elbow Handhole Cover Lockwasher Brg Casing Gasket Adj...

Страница 12: ...49 51 53 57 59 69 73 203 204 206 207 208 209 210 211 212 213 214 215 216 Lip Seal Inboard Lip Seal Outboard Grease Retainer Base Suction Elbow Handhole Cover Bearing Lockwasher Casing Gasket Nameplate...

Страница 13: ...o Name Of Part 37 38 40 46 51 59 69 73 203 204 206 207 208 209 210 211 212 Bearing Cover O B Shaft Sleeve Gasket Deflector Coupling Key Grease Retainer Handhole Cover Lockwasher Brg Casing Gasket Name...

Страница 14: ...B Item No Name Of Part 37 38 40 46 47 49 51 59 69 73 203 204 206 207 208 209 210 211 212 213 Bearing Cover O B Shaft Sleeve Gasket Deflector Coupling Key Seal Inboard Seal Outboard Grease Retainer Ha...

Страница 15: ...49 51 53 57 59 69 73 203 204 206 207 208 209 210 211 213 214 215 216 217 218 Lip Seal Outboard Grease Retainer Base Suction Elbow Handhole Cover Lockwasher Brg Casing Gasket Nameplate Adjusting Lockn...

Страница 16: ...44 46 47 48 49 51 57 59 69 71 73 204 206 207 209 210 212 213 215 216 217 Deflector Coupling Half Pump Coupling Half Motor Coupling Key Seal Inboard Coupling Spider Seal Outboard Grease Retainer Suctio...

Страница 17: ...ormance specifications must be in writing and such writing must be signed by our authorized representative Due to inaccuracies in field testing if a conflict arises between the results of field testin...

Страница 18: ...t To Insure That Employees Will Not Be Exposed To Health Hazards In Handling Said Material All Applicable Laws And Regulations Shall Apply IMPORTANT WARRANTY REGISTRATION Your product is covered by th...

Страница 19: ..._ Type _________________________________ Number and size of short circuit device s ___________ Amp rating ___________________ Overload Type _____________ Size ______________ Amp rating _______________...

Страница 20: ...alled away from turbulence YES___ NO___ Is level control operating properly YES___ NO___ Is pump fully submerged during operation YES___ NO___ Follow up Corrective Action Required YES___ NO___ Additio...

Отзывы: