


4
[email protected] | 1.877.502.3434
94 Brockport Drive, Toronto, Ontario M9W 7J8
www.delviro.com
delviro energy
1
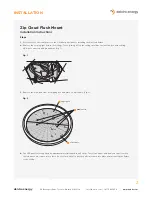
7.
Find the orange luminaire disconnect (Fig. 9) and remove (disconnect) the male portion. Now set the LED panel upside
down on a piece of cardboard and ensure the board does not get scratched by anything. The female portion should be
left in the fixture.
8.
Pull the existing 18-3 AWG wire from the top of the Zip Cloud into the junction box. Connect the appropriate wires
using wire nuts (Black to Black, White to White and Green to Ground wire). Ensure the ground wire is also grounded to
junction box using a ground screw.
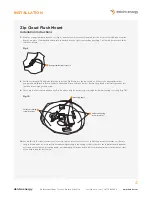
9.
There are four holes pre drilled on the Zip Cloud housing for screws to go through for flush mounting to ceiling (Fig. 10).
10.
Use a #10 or #12 screw (wood screw for wood, tapcon screw for concrete or self drilling screws for metal, etc.) Ensure
the pre drilled holes do not interfere with anything existing in the ceiling. If that is the case the installer should drill new
holes and ensure that no mounting angles gets damaged. Wipe any debris left from drilling/screw from inside the sides
of the fixture and the bottom lip.
Zip Cloud Flush Mount
Installation Instructions
Fig. 9
Fig. 10
Orange luminaire disconnect
Mounting angle
INSTALLATION
LOWER
UPPER
Surface mounting
screw locations
Surface mounting
screw locations


