background image

10

ADJUSTING BLADE
TENSION

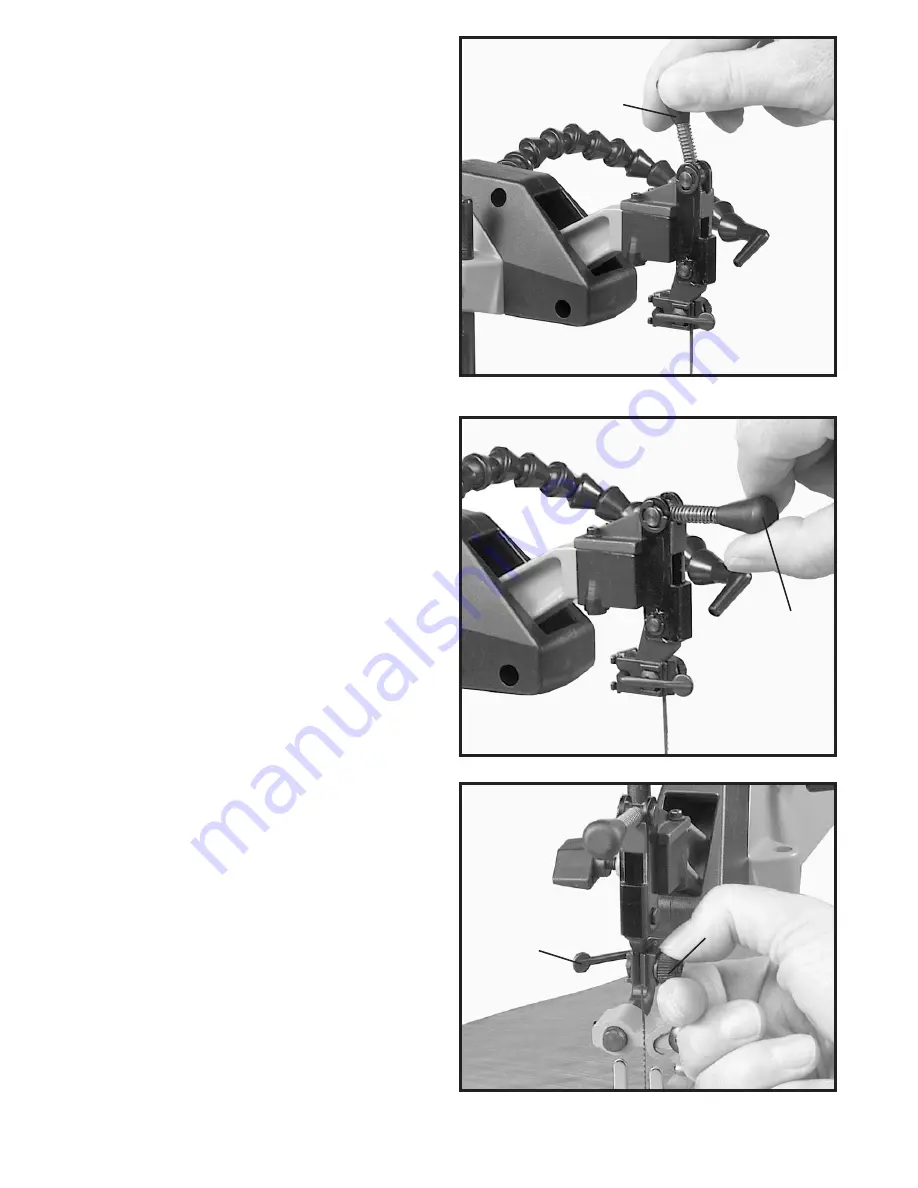
Tension is applied to the blade when the blade tension
lever (A) Fig. 7, has been adjusted and is in the vertical
position as shown. When the blade tension lever (A) is
moved to the horizontal position, as shown in Fig. 8,
blade tension is released.

To adjust blade tension, position lever (A) in the vertical
position, as shown in Fig. 7. To increase tension, turn
lever (A) clockwise and to decrease tension turn lever (A)
counterclockwise. When adjusting tension, turn lever
one-quarter of a turn at a time.

NOTE:

It is necessary to

adjust the blade tension only when the blade is removed
from both the upper and lower blade holders and a new
or different type of blade is used. It is not necessary to
adjust blade tension when the blade is removed and
replaced in only the upper blade holder as in performing
inside cutting operations. After desired tension is
obtained, position tension lever (A) in the horizontal
position, as shown in Fig. 7.

Adjusting the blade for proper tension is usually
accomplished by trial and error. One method is to pull
back on the blade tension lever (A) Fig. 8, the blade
should start to have tension (resistance) when the blade
tension lever is half way between open Fig. 8, and closed
Fig. 7 positions. Finer blades require more tensioning
while thicker blades require less tension.

ADJUSTING CLAMPING
ACTION OF UPPER AND
LOWER BLADE HOLDER
CHUCK

Different widths of scroll saw blades will make it
necessary to adjust the clamping action of the upper and
lower blade holders. It should be noted, however, that
very little adjustment is necessary and very little
clamping force is required to hold the blade satisfactorily.
As a rule of thumb, looking down at the table with the
table insert slot in the 6 o’clock position, resistance on
the blade locking lever should be felt when the upper
blade locking lever reaches the 7 o’clock position, or
when the lower blade locking lever reaches the 5 o’clock
position.

1.

Move the blade locking lever (A) Fig. 9, to the rear

(open) position, as shown.

2.

Turn chuck clamping knob (B) Fig. 9, clockwise to

tighten and counterclockwise to loosen the clamping
action of the blade holder chuck. Very little movement of
knob (B) will be necessary.

NOTE:

Only the upper chuck

is shown. Clamping action of the lower chuck is adjusted
in the same manner and can be accessed by removing
dust cup shown in Fig. 24.

Fig. 7

A

Fig. 8

A

Fig. 9

A

B

Содержание SS350

Страница 1: ...s SS350 SS350LS PART NO 912425 08 25 03 Copyright 2003 Delta Machinery ESPA OL P GINA 19 To learn more about DELTA MACHINERY visit our website at www deltamachinery com For Parts Service Warranty or o...

Страница 2: ...UNDERSTAND ALL WARNINGS AND OPERATING INSTRUCTIONS BEFORE USING THIS EQUIPMENT Failure to follow all instructions listed below may result in electric shock fire and or serious personal injury or prop...

Страница 3: ...nd other debris can be thrown at high speed causing injury 12 USE THE RIGHT MACHINE Don t force a machine or an attachment to do a job for which it was not designed Damage to the machine and or injury...

Страница 4: ...ts and accessories not recommended by Delta may result in the risk of injuries 20 ALWAYS hold the work firmly against the table 21 DO NOT feed the material too fast while cutting Only feed the materia...

Страница 5: ...with a metal screw NOTE In Canada the use of a temporary adapter is not permitted by the Canadian Electric Code IN ALL CASES MAKE CERTAIN THE RECEPTACLE IN QUESTION IS PROPERLY GROUNDED IF YOU ARE NO...

Страница 6: ...ES THE CURRENT PRODUCTION MODEL ALL OTHER ILLUSTRATIONS ARE REPRESENTATIVE ONLY AND MAY NOT DEPICT THE ACTUAL COLOR LABELING OR ACCESSORIES AND MAY BE INTENDED TO ILLUSTRATE TECHNIQUE ONLY Use proper...

Страница 7: ...Brace 22 Long 2 5 Lower Back Brace 18 Long 1 1 2 3 4 5 6 7 MODEL SS350LS ONLY MODEL SS350LS ONLY 8 9 10 11 12 13 6 Upper Back Brace 12 Long 1 7 Stand Leg Foot 3 8 5 16 18x1 Hex Head Screw 3 9 5 16 Fla...

Страница 8: ...s Insert the M8x1 25x16mm carriage head screws through legs and braces then secure with the M8x1 25 flange hex nuts Loosely tighten hardware at this time NOTE MAKE SURE THAT THE DIMPLES ON THE LEGS A...

Страница 9: ...position To turn the saw OFF move the switch A down to the OFF position The scroll saw is equipped with a variable speed control B Fig 5 The variable speed range is 600 to 1650 strokes per minute Whe...

Страница 10: ...ig 8 the blade should start to have tension resistance when the blade tension lever is half way between open Fig 8 and closed Fig 7 positions Finer blades require more tensioning while thicker blades...

Страница 11: ...4 B C ADJUSTING THE TABLE 1 Loosen table lock knob as shown in Fig 10 and move the table all the way to the right until angle indicator shown in Fig 11 is on 0 2 Using a square that includes a level c...

Страница 12: ...osening set screw B Fig 16 and positioning the holddown in the desired location Once the holddown is in the desired location tighten set screw B Fig 16 Fig 15 B C A D Fig 16 A B Fig 17 B A ADJUSTING D...

Страница 13: ...ations the insert A should be positioned as shown in Fig 19 This allows for clearance of the blade when tilting the table A blank table insert B Fig 20 is supplied as standard equipment with your scro...

Страница 14: ...ill release the blade E and allow you to thread the blade through the next hole in the pattern Replace blade in upper blade holder and move blade tension lever to the vertical position to re apply bla...

Страница 15: ...E Fig 23 E C D 3 Remove the dust collection cup A by rotating knob B 90 as shown in Fig 24 Slide dust cup out of the guides C by pulling it toward the front NOTE DO NOT OPERATE THE UNIT WITH THE DUST...

Страница 16: ...own toward the table Push upper blade chuck locking lever L to the front Insert new blade into the lower blade holder Fig 25 in the same manner 6 Apply blade tension by referring to the following sect...

Страница 17: ...ww deltamachinery com for a catalog or for the name of your nearest supplier Since accessories other than those offered by Delta have not been tested with this product use of such accessories could be...

Страница 18: ...days Delta may require that electric motors be returned prepaid to a motor manufacturer s authorized station for inspection and repair or replacement Delta will not be responsible for any asserted def...

Страница 19: ...ern Avenue Suite 105 Phone 602 437 1200 Fax 602 437 2200 CALIFORNIA Ontario 91761 Los Angeles 3949A East Guasti Road Phone 909 390 5555 Fax 909 390 5554 San Leandro 94577 Oakland 3039 Teagarden Street...

Отзывы: