background image

Primary 
Heating

Primary

Temperature/Pressure

Domestic

Heating

TriangleTube

Hot Water Specialists

Pu

sh Button

To

Res

etSwitch

Phas

e

III

-

P

ha

se

III

-

Pha

se

III

-

P

ha

se

III -

c i t s

e

m

o

D

Sp

ace

he

atin

g

Phas

e

III

-

P

ha

se

III

-

Pha

se

III

-

P

ha

se

III -

c i t s

e

m

o

D

Sp

ace

he

atin

g

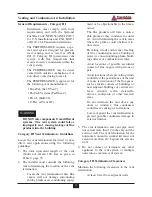
Refer to vent

manufacturer’s

recommended

clearances

Refer to vent manufacturer’s

recommended clearances

To drain

dispose of condensate

according to local codes

Condensate

 Drain with

 trap loop

Storm
Collar

Rain Cap

Adjustable

Flashing

Roof Jack

Firestop

Support

Clamp

Combustion

Air Inlet

2 Ft.

Max.

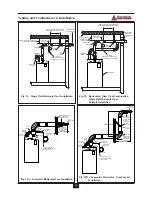
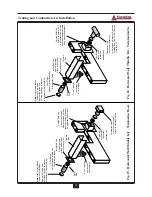
Fig. 19: Single Wall Vertical Vent Installation

Hose

Clamps

Flexible

Air Hose

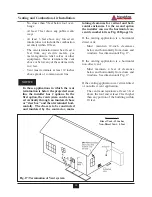
Combustion
Air Inlet

Appliance
Adapter

Spring
Clip

Flue 
Outlet

Condensate
Drain Hose

3" Diameter
Trap Loop

Cable Ties

Fire Stop/Support

Tall Cone
Flashing

5" Storm
Collar

Vertical
Termination 
Adapter

Rain Cap

Primary 

Heating

Primary

Temperature/Pressure

Domestic

Heating

TriangleTube

Hot Water Specialists

Pu

sh Button

To

Res

et Switc

h

Phas

e

III

-

P

ha

se

III

-

Pha

se

III

-

P

ha

se

III -

c i t s

e

m

o

D

Sp

ace

he

atin

g

Phas

e

III

-

P

ha

se

III

-

Pha

se

III

-

P

ha

se

III -

c i t s

e

m

o

D

Sp

ace

he

atin

g

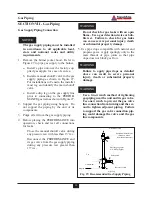
Fig. 20: Concentric Vertical Vent Installation 

35

Venting and Combustion Air Installation

For Delta PERFORMANCE applica-
tions that may exceed the 100 feet maxi-
mum allowable equivalent length for the
venting system, contact Triangle Tube
Engineering Department for additional
information on how the appliance can be
adjusted to the application. 

-

For each elbow included in the system,
the maximum allowable linear length
must be reduced as follows:

• Each 90º elbow within the system is

the equivalent of 10 linear feet. 

• Each  45º elbow within the system is

the equivalent of 5 linear feet.

It is recommended that the installer uses the
same number of elbows and length of piping
on the venting system and the combustion air
inlet.

NOTICE

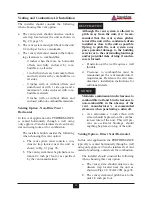
Table 2- Allowable Equivalent Length (Combined Vent and Combustion Air)

Maximum

Allowable for Linear

Length Combined

2

3

4

5

6

7

PERFORMANCE

180

170

160

150

140

130

Total Elbows within the Venting / Combustion Air System

Содержание PG-25

Страница 1: ... manual is not followed exactly a fire or explosion may result causing property damage personal injury or death FOR YOUR SAFETY Do not store or use gasoline or other flammable vapors and liquids in the vicinity of this or any other appliance WHAT TO DO IF YOU SMELL GAS Do not try to light any appliance Do not touch any electrical switch do not use any phone in your building Immediately call your g...

Страница 2: ......

Страница 3: ...mbustion Air Requirements 8 Outside Combustion Air 8 Air Openings 8 Methods of Accessing Combustion Air into a Space 8 10 Vent System 10 Removal of an Existing Category I Appliance from a Common Vent System 11 SECTION III UNIT PREPARATION Handling Instructions 12 Hydrostatic Pressure Test Hydrostatic Test Preparation 12 Hydrostatic Test Procedures 12 13 Completion of Hydrostatic Test and Draining ...

Страница 4: ...ping Zone Valves 21 System Piping Radiant Heating with Mixing Valves 22 System Piping Multiple Units Installation 22 Primary Piping Diagrams 23 26 SECTION VI VENT COMBUSTION AIR INSTALLATION General Requirements Category I 27 Masonry and Metal Chimneys 27 Type B Vent Systems 27 Vent Connectors 28 Common Venting Category I 28 General Requirements Category III 29 Category III Vent Termination Guidel...

Страница 5: ...iring Diagrams 42 44 SECTION IX EXTERNAL WIRING Installation Compliance 45 Line Voltage Connections 45 Thermostat Wiring 45 Outdoor Temperature Limit 45 External Control Wiring Diagrams 46 48 SECTION X START UP PREPARATION Check System and Domestic Water Chemistry Water pH Level 6 0 to 8 0 49 Water Hardness Less Than 7 Grains 49 Chloride Concentration Less Than 80 mg L 49 Chlorinated Water 49 Flus...

Страница 6: ...justment of Secondary Thermostat Limit 56 Setting the Thermostatic Mixing Valve 57 SECTION XIII CHECK OUT PROCEDURES Check out Procedures 58 SECTION XIV INSTALLATION RECORD Installation Record 59 SECTIONS XV MAINTENANCE SCHEDULE Service Technician General 60 Owner Maintenance 60 SECTION XVI MAINTENANCE PROCEDURES Maintenance Procedures Reported Problems 61 Check Surrounding Area 61 Inspect Burner ...

Страница 7: ...trode 63 Check Ignition Wiring and Ground Wiring 63 Check Control Wiring 63 Check Thermostat Limit Settings 63 Perform Start Up and Checkout Procedure 63 Check Burner Flame 64 Check Flame Signal 64 Check Combustion Levels 64 Review with Owner 64 SECTION XVII REPLACEMENT PARTS Replacement Parts 65 69 PRODUCT SPECIFICATIONS Specifications 70 71 ...

Страница 8: ...cial instructions on installa tion operation or maintenance which are important to equipment but not related to personal injury hazards Indicates recommendations made by Triangle Tube for the installers which will help to ensure optimum operation and longevity of the equipment BEST PRACTICES NOTICE CAUTION WARNING DANGER The following terms are used throughout this manual to bring attention to the...

Страница 9: ...ption or codes require spe cific water temperatures at hot water faucet we recommend a ensure the factory installed thermosta tic mixing valve is working properly b to set the thermostatic mixing valve for the lowest temperature which sat isfies your hot water need Protection must be taken against excessive temperature and pressure TO PROTECT AGAINST EXCESSIVE TEMPERATURE AND PRESSURE Check if the...

Страница 10: ...nk installer must Fill inner tank prior to outer tank during start up Relieve primary system pressure below 15 psig prior to draining inner tank CAUTION WARNING DANGER DANGER Qualified Installer Prior to installing this product read all instructions included in this manual Perform all installation steps required in this manual in the proper order given Failure to adhere to the guidelines within th...

Страница 11: ... National Standard Plumbing Code provided that Outer tank water including additives is practically non toxic having toxicity rating or Class of 1 as listed in Clinical Toxicology of Commercial Products Outer tank pressure is limited to maxi mum 30 psig by approved relief valve Single wall heat exchangers are permitted under the Uniform Plumbing code Paragraph L3 2 if they satisfy all of the follow...

Страница 12: ...ping or spraying water during normal operation or service The PERFORMANCE should be installed in a location so that any water leaking from the tank or piping connections or relief valves will not cause damage to the area surrounding the unit or any lower floors in the structure When such a location is unavoidable a suitable drain pan with adequate drainage should be placed under the unit The drain...

Страница 13: ... causing severe personal injury death or substan tial property damage Installer should provide a solid brick or con crete foundation pad at least 2 inches above the floor level if There is a potential for the floor to become flooded The height of the foundation should be such to sufficient ly elevate the unit The floor is dirt sand gravel or other loose material The flooring is severely uneven or ...

Страница 14: ...spillage or water leakage into the sur rounding area Please read the information listed below If contaminating chemicals are located near the location of the combustion air inlet the installer should pipe the com bustion air inlet to an outside area per SECTION VI of this installation manual Potential contaminating products Spray cans containing chloro fluorocar bons Permanent Wave Solutions Chlor...

Страница 15: ...e sealed with sealant or mechanical fasteners Do not use tape as it is not considered a sealing material Air Openings Air openings to the PERFORMANCE are always required even if the combustion air is obtained indoors or outdoors These air open ings provide ventilation to prevent overheating of the PERFORMANCE and its control as well as providing combustion air The air openings must be sized to han...

Страница 16: ...nt shall have clearances of at least 1 inch from the sides and back and 6 in from the front of the appliance The opening shall direct ly communicate with the outdoors or shall com municate through a vertical or horizontal duct to the outdoors or spaces that freely communicate with the outdoors and shall have a minimum free area of the following 1sq in 3000 Btu hr of the total input rating of all e...

Страница 17: ...ll be 1 minus the ratio of interior spaces The minimum size of outdoor open ing s calculated in accordance with the above outdoor air section multiplied by the reduction factor The minimum dimension of air openings shall not be less than 3 in Vent System The PERFORMANCE is designed to vent as a Category I appliance using standard gas vent or as a Category III appliance which requires a special ven...

Страница 18: ...e remaining appliances connected to the common vent system and other areas of the building Turn on any clothes dryers and any other gas appli ance not connected to the common vent system Turn on all exhaust fans i e range hoods and bathroom exhaust fans preferably at maximum speed Close any fireplace dampers 4 Place in operation the first appliance being inspected that is connected to the common v...

Страница 19: ...pe sparingly to allow removal of the plugs upon comple tion of the test 3 On the outlet flange of the circulator pipe install a 1 NPT nipple and shut off valve Use pipe dope sparingly to allow removal of the fittings upon completion of the test To avoid getting water onto the unit and or surrounding area additional pip ing from the shut off to a catch bucket or drain may be required 4 Connect a ho...

Страница 20: ... damage 8 Check continuity using a voltmeter across the terminals of the LWCO device The contacts on the LWCO should be closed See item 6 Figure 40 page 66 for location of the LWCO Completion of Hydrostatic Test and Draining 1 Disconnect the fill hose from the fresh water source and direct the hose to a suit able place of drainage 2 Open the primary drain valve and complete ly drain the unit To ai...

Страница 21: ...ressure of the tank is equal to the cold water supply pressure at the point of installation Consult the ther mal expansion tank manufacturer s instruc tions for further information on installation and sizing The Temperature Pressure relief valve is not intended for constant duty such as relief of pressure due to normal thermal expansion Water Hammer Water hammer is the effect of sudden pres sure c...

Страница 22: ...The discharge piping is subject to freez ing DO NOT install any valves between the T P relief valve and the discharge pip ing DO NOT plug the T P relief valve or the discharge piping Improper place ment and piping of the T P relief valve can cause severe personal injury death or substantial property damage Thermostatic Mixing Valve The PERFORMANCE contains a factory installed thermostatic mixing v...

Страница 23: ... tank Multiple Units Installation For applications using multiple units the domestic piping should be piped using a bal anced manifold arrangement The installer should remove the thermostatic mixing valve from the units and install a single thermostatic mixing valve at the outlet of the hot water manifold The thermostatic mixing valve should be sized according to the required flow rate and pressur...

Страница 24: ...tional devices may be required by local Codes TR SMART Series Application For applications requiring large volumes of domestic hot water over an extended period the installer may include a Triangle Tube TR SMART Indirect Water Heater in conjunc tion with the PERFORMANCE See Fig 10 page 19 The domestic system recirculation if used is directed to the TR SMART Series Tank The circulator should be con...

Страница 25: ...heck valve 3 Shut off valve 4 Backflow preventer or pressure reducing valve 6 Thermal expansion tank 7 Circulator controlled by aquastat 8 Domestic drain valve 9 Vacuum breaker Note All shut off valves shown in this figure must be closed when siphon draining the PERFORMANCE Optional devices may be required by local Codes 12 Heat trap 8 1 Cold water inlet 4 3 3 6 9 7 2 3 Fig 8 Multiple Units Instal...

Страница 26: ...ed by codes Optional recirculation line Fig 10 PERFORMANCE with TR SMART Indirect Water Heater Fig 9 PERFORMANCE with Storage Tank 1 Mixing valve with check valve 2 Flow check valve 3 Shut off valve 4 Backflow preventer or pressure reducing valve 6 Thermal expansion tank 7 Circulator controlled by aquastat 8 Domestic drain valve 9 Vacuum breaker Domestic Piping Diagram Optional devices may be requ...

Страница 27: ...iping must be a closed loop sytem to avoid any oxygen contamination of the boiler water Expansion Tank and Makeup Water Ensure the expansion tank is properly sized for the outer tank volume 20 gallons and the system volume and temperature Undersized expansion tanks will cause sys tem water to be lost through the pressure relief valve and cause additional makeup water to be added to the system Even...

Страница 28: ...mended piping arrangements based on various applications In all diagrams the space heating system is isolated from the PERFORMANCE using primary sec ondary piping connections Size the piping and system components required in the space heating system using recognized design methods System Piping Zone Circulators Connect the PERFORMANCE to the sys tem piping as shown in Fig 12 page 24 when zoning wi...

Страница 29: ... prevent low return water temperature to the unit could cause premature failure of the unit and it s burner system resulting in severe personal injury death or substantial property damage Size the heating system piping and circula tor to provide the flow needed for the radiant system To control the zone circulators reference Figure 34 page 47 To ensure adequate flow rate through the PERFORMANCE ma...

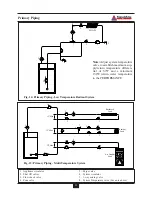
Страница 30: ...Shut Off valve 3 Expansion tank 4 Auto fill valve 5 Tank fitting 6 Automatic air vent 7 Air Separator 8 Plug by others To system From system Supply flow Return flow Cold Water fill supply 2 1 7 6 8 2 12 Max 3 4 2 2 2 Fig 11 Near Appliance Primary Piping with a Diaphragm Type Expansion Tank Fig 11A Near Appliance Primary Piping with Closed Type Expansion Tank Fig 11B Near Appliance Primary Piping w...

Страница 31: ...Appliance circulator 2 Shut off valves 3 Flow check valve 4 Zone valve 5 System purge valve 6 System circulator Note See page 23 for near appliance piping Install balancing valves to adjust flow to distribute heat to all zones Size primary piping for total flow of all circula tors Size each circulator to individual circuit require ments Install balancing valves to adjust flow to distribute heat to...

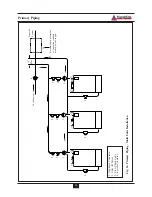
Страница 32: ...ial of 30ºF and a minimum 130ºF return water temperature to the PERFORMANCE 1 Appliance circulator 2 Shut Off valves 3 Flow check valve 4 Zone valve 5 Purge valve 6 System circulator 7 3 way mixing valve 8 System Temperature valve See note above 1 6 Baseboard Load 3 6 6 2 2 8 7 Radiant Load Air Handler Load 3 3 2 2 2 H C M 2 2 12 Max 12 Max 12 Max 2 Fig 15 Primary Piping Multi Temperature System ...

Страница 33: ...ating TriangleTube Hot Water Specialists P u s h B u t t o n To R e s e t S w i t c h P h a s e III Phas e I I I P h a s e I I I P h a s e I I I cit s e m o D S p a c e he a t i n g P h a s e III Phas e I I I P h a s e I I I P h a s e I I I cit s e m o D S p a c e he a t i n g Primary Heating Primary Temperature Pressure Domestic Heating TriangleTube Hot Water Specialists P u s h B u t t o n To R ...

Страница 34: ... manufacturer s instruc tions Masonry and Metal Chimneys The NFPA code book severely limits the installation of the PERFORMANCE into a masonry chimney For applications using either interior or exterior masonry chimney a listed approved metal chim ney lining system should be used For any applications using an exterior chimney it is recommended that an insu lated or stainless steel chimney lining sy...

Страница 35: ...sets in the vertical vent The entire length of a vent connector shall be readily accessible for inspec tion cleaning and replacement The diameter of the vent connector should not be upsized more than two sizes greater than the flue outlet diameter The minimum recommended vent con nector given in Table 1 is only a general guideline The vent system must be designed and installed in compliance with a...

Страница 36: ...ors will not damage surrounding shrubs plants or air conditioning equip ment or be objectionable to the home owner The flue products will form a notice able plume as they condense in colder air Avoid terminating the vent in areas where the plume could obstruct win dow views Prevailing winds could cause freezing of flue condensation and a buildup of water ice on surrounding plants build ing surface...

Страница 37: ... or riser box and then terminated hori zontally The chase is to be constructed and insulated by the contractor main taining clearances for vertical and hori zontal enclosures In the second option the installer can use the horizontal con centric snorkel kit see Fig 22B page 36 If the venting application is a horizontal direct vent Must maintain 12 inch clearances below and horizontally from doors a...

Страница 38: ...rect venting applications using the Horizontal Wall Thimble kit See Fig 23 page 37 The combustion air inlet should not be located above the vent termination The combustion air inlet must be locat ed in the same pressure zone as the vent termination This does not apply when venting the appliance as Category I Venting Option Non Direct Vent Vertical In this vent application the PERFORMANCE is vented...

Страница 39: ...hough the vent system is allowed to pitch away from the unit it is recom mended that the vent system pitches toward the unit with a condensate drain installed as close to the unit as possible Opting to pitch the vent system away poses potential damage to the building exterior or to the surrounding landscape and or potential risks of icing if conden sate is formed c Penetration at the wall requires...

Страница 40: ...p arately with different terminations See Fig 23 page 37 The combustion air inlet and the vent termination must reside in the same pressure zone area of the building for proper operation of the appliance Combination The vent and combustion air ter minate at a single concentric point using the Horizontal Concentric Horizontal Single Wall Vent or Horizontal Wall Thimble Kit See Figs 22 22A and 22B p...

Страница 41: ...into the appliance flue ways causing prema ture failure of the appliance Condensate Drain Tube To prevent flue gases from entering into the building it is important the drain tube is fash ioned into a pigtail trap as shown in Figs 19 through 22B pages 35 36 The drain tube must be filled with water to pre vent flue gases from emitting into the building prior to operating the appliance Periodically ...

Страница 42: ...ater Specialists Push Butto n T o Reset Switch Phas e I I I P h a s e I I I P h a s e I I I P h ase III c i t semoD S p a c e h e a t i n g Phas e I I I P h a s e I I I P h a s e I I I P h ase III c i t semoD S p a c e h e a t i n g Fig 20 Concentric Vertical Vent Installation 35 Venting and Combustion Air Installation For Delta PERFORMANCE applica tions that may exceed the 100 feet maxi mum allow...

Страница 43: ...ion Single Wall Horizontal Vent Thimble Installation Hose Clamps Flexible Air Hose Combustion Air Inlet Appliance Adapter Spring Clip Flue Outlet Condensate Drain Hose 3 Diameter Trap Loop Cable Ties To Drain Dispose of Condensate According to Local Codes Horizontal Termination Adapter With AIr Holes Facing Down Tee Termination Wall Thimble Seal Around Thimble Pipe With Silcone 1 Foot Maximum Prim...

Страница 44: ...tal Plate Caulk opening 2 Min clearance Vent Termination Fig 24A Vent Termination Combustible Wall Vent Termination Tee Location of Air Inlet Not recommended for Vertical Tee or Hooded Vent Termination Location of Air Inlet Not recommended for Horizontal Tee Vent Termination or horizontal straight out screened termination Air Inlet Elbow 12 Recommended minimum clearance Fig 23 Location of Air Inle...

Страница 45: ...y be used to provide addition seal 3 to 4 reducer combustion air inlet piping Inside End Cap Apply high temp silicon bead to seal around vent pipe Vent Piping extend through thimble box to termination fitting Termination Tee must vent horizontally must extend a minimum 6 beyond Outside End Cap DO NOT extend more than 12 Vent Piping extend through thimble box to termination fitting Split Ring Note ...

Страница 46: ...than 13 w c Disconnect the PERFORMANCE and its gas valve from the gas supply piping during any pressure test greater than 13 w c Do not check for gas leaks with an open flame Use a gas detection device or bub ble test Failure to check for gas leaks can cause severe personal injury death or substantial property damage 5 Use pipe dope compatible with natural and propane gases Apply sparingly only to...

Страница 47: ...o ANSI Z223 1 For Canadian installations refer to B149 1 or B149 2 Natural Gas Supply Pressure Requirements 1 Pressure required at the gas valve inlet supply pressure port Maximum 13 w c at flow or no flow conditions to the burner Minimum 5 w c during flow condi tions to the burner Must be verified during start up and with all gas appli ances operating 2 Install 100 lockup gas pressure regulator i...

Страница 48: ...and with all gas appli ances operating DO NOT adjust or attempt to measure gas valve outlet pressure The gas valve is factory set for the correct outlet pres sure This setting is suitable for natural gas and propane and requires no field adjustment Attempts by the installer to adjust or measure the gas valve outlet pressure could result in damage to the valve causing potential severe personal inju...

Страница 49: ...t electrical power supply to the unit before servicing or making any electrical connections to avoid possible electric shock hazard Failure to do so can cause severe person al injury or death All electrical contacts shown in Figures 30 31 pages 43 44 do not have elec trical power applied Shown as off shelf condition General Requirements Wiring must be N E C Class 1 If original wiring installed in ...

Страница 50: ... B B B B G G G G G G W 14 13 12 11 10 9 8 7 6 5 4 3 2 1 2 C 1 2 C 1 2 C 1 OR R P P Manual Reset Safety Limit Auto Reset Safety Limit Primary T Stat On Off Switch Burner Snap Set T1 T2 Secondary T Stat 120 V Incoming Supply Wiring G N H 120V Field Wiring By Others 120V Factory Wiring 24V Factory Wiring B Black BL Blue P Pink V Violet Y Yellow R Red OR Orange T Tan W White Fig 30 Factory Wiring Sche...

Страница 51: ...Auto Reset Limit Burner Control Factory Jumper R2B Air Switch Blower Alarm Equipment Ground On Off Switch 120 VAC R2 B B B B B B B B B B B R B B R R R R W W BL BL BL BRN T T V V V P P Y Y OR Y V BL BL Primary T Stat CDM C C PS1 PS2 MV IND L1 B Black BL Blue P Pink V Violet Y Yellow R Red OR Orange T Tan W White Fig 31 Factory Internal Wiring ...

Страница 52: ...el 2 Remove the snap set cover and connect the thermostat wiring to terminals C and 1 per Figure 32 3 For proper operation install the room ther mostat on an inside wall away from influ ences of heat and cold i e water pipes areas of draft lighting fixtures and fire places 4 Set the thermostat anticipator if applica ble as follows Set for 0 2 amps when wired directly to the Room Thermostat Snap se...

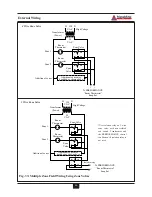
Страница 53: ...hermostat Snap Set H N High Voltage 120 V A C 24 V A C Room Thermostat Room Thermostat Zone 1 Zone 2 Additional zones Additional zones may be added as shown above Transformer Power Zone Valve Zone Valve Isolation relay 1 C 46 4 Wire Zone Valve Fig 33 Multiple Zone Field Wiring Using Zone Valves 3 Wire Zone Valve Use isolation relay on 3 wire zone valve with non isolated end switch Transformer and ...

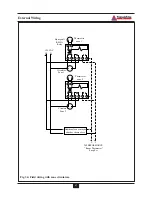
Страница 54: ...ermostat Snap Set Circulator Zone 1 Thermostat zone 1 Honeywell R845A Relay 120 H VAC N Circulator Zone 2 Thermostat zone 2 Additional zones may be added as shown above C 1 6 2 1 4 3 5 6 2 1 4 3 5 T T T T Fig 34 Field wiring with zone circulators ...

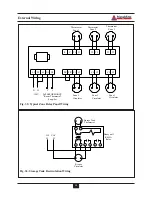
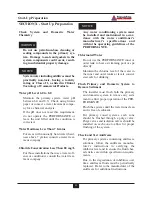
Страница 55: ...2 Circulator Zone 3 Circulator Thermostat Zone 2 Thermostat Zone 3 R C T1 T1 T2 T2 T3 T3 C3 C3 C2 C2 C1 C1 PR PR X2 X1 L1 L2 ZC H C 1 Fig 35 Typical Zone Relay Panel Wiring T T Bronze Circulator Storage Tank Thermostat Honeywell R845A Relay 120 H VAC N 6 2 1 4 3 5 T T Fig 36 Storage Tank Recirculation Wiring ...

Страница 56: ...must be installed and maintained in accor dance with the water conditioner s manufacturer s specifications and within the operating guidelines of the PERFORMANCE Chlorinated Water Do not use the PERFORMANCE inner or outer tank to heat a swimming pool or spa directly Maintain the chlorine level of the water in the inner and outer tanks at levels consid ered safe for drinking Flush Primary and Domes...

Страница 57: ...d in Clinical Toxicology of Commercial Products Filling the Inner Domestic Tank and System Proceed with filling instructions for the inner and outer tanks only after ensur ing the water meets the requirements listed in this installation manual Failure to comply could result in damage and improper operation of the unit Never operate the PERFORMANCE unless both the inner and outer tanks are complete...

Страница 58: ... Do not proceed with the start up if there is any indication of a gas leak Any leaks found must be repaired immediately DO NOT adjust or attempt to measure gas valve outlet pressure The gas valve is factory set for the correct outlet pres sure This setting is suitable for natural gas and propane and requires no field adjustment Attempts by the installer to adjust or measure the gas valve outlet pr...

Страница 59: ... the male half of the Room Thermostat Snap set Close each thermostat zone valve and relay in the external circuit one zone at a time and check the voltage reading across the plug There should NEVER be voltage mea sured at the plug If voltage is measured at the plug under any condition check and correct the external wiring In systems using 3 wire zone valves backfeed of voltage to the unit is a com...

Страница 60: ...Turn the ON OFF switch located on the front control panel to the OFF position Turn the electrical supply or any external service switch to the unit in the ON position 2 Read and follow the Operating Instructions outlined on page 54 to start the appliance If PERFORMANCE Does Not Start Correctly 1 Check for loose electrical connections blown fuse or open service switch 2 Check continuity across the ...

Страница 61: ...ce technician or gas supplier WARNING The following instructions must be followed exactly a fire or explosion may result causing property damage personal injury or loss of life 1 Set the system thermostat to lowest setting 2 Turn the unit s ON OFF switch to OFF 3 Turn manual shut off valve on the gas supply line clockwise to Close A This appliance is equipped with an electron ic ignition system Do...

Страница 62: ...tion level open or close the air shutter by a 1 2 setting Closing the air shutter will decrease the O2 level and increase the CO2 level Opening the air shutter will increase the O2 level and decrease the CO2 level A combustion test must be performed after any adjustments are made Allow the unit to operate for approximately 10 minutes after adjustment before measur ing any combustion levels Failure...

Страница 63: ... the Secondary Thermostat Adjustment of SecondaryThermostat Limit The Secondary Domestic Thermostat located on left side of the control panel maintains the minimum domestic water storage temperature Set the thermostat knob as shown in Figure 38 Maximum limit setting is 140ºF To adjust the thermostat settings Turn thermostat knob clockwise to increase water temperature Turn thermostat knob counter ...

Страница 64: ...temperature allow the water to run for approximately 2 minutes and measure the water with a thermometer To adjust the valve setting rotate the knob clockwise to decrease the water temperature or counter clockwise to increase the water temperature Once the desired temperature is achieved remove the knob and refit the lock ring onto the valve aligning the ring indicator mark with the valve s Mix mar...

Страница 65: ... Natural Gas as outlined on page 55 Check the incoming gas pressure to ensure a minimum pressure of 5 w c during flow conditions to all appliances and a maximum pressure of 13 w c during non flow conditions for Natural and Propane Primary and Secondary Thermostat properly set as shown in Figure 38 and 39 page 56 The thermostatic mixing valve adjusted to the desired domestic hot outlet tem perature...

Страница 66: ...leted Check out procedures have been followed and completed Information regarding the unit and installation received and left with owner maintenance personal Installer Information Company Address Address Phone Number Btu hr ____________________________________________________________________ ____________________________________________________________________ ______________________________________...

Страница 67: ...if combustion or performance is poor Clean baffles and flue ways Remove burner assembly and clean burner head using compressed air only Once the maintenance items are completed review the service with the owner Owner Maintenance Daily Check the area around the unit Check the combustion air inlet and ven tilation openings for blockage Check the temperature pressure gauge Monthly Check vent piping C...

Страница 68: ... the area surrounding the PER FORMANCE is free of combustible flam mable materials or flammable vapors or liquids Remove immediately if found is free of any contaminates Refer to the list of potential materials listed on page 7 of this manual If any of these products are in the room from which the unit takes its com bustion air they must be removed immedi ately or the combustion air intake must be...

Страница 69: ...n tank sizing is incorrect or system performance problems Inspect air vent and air separators in the system Remove the caps on automatic air vents and briefly depress the valve stem to flush vent Replace the cap when complet ed Ensure vents do not leak replace any leaking vents Check Domestic System Verify all system components are correctly installed and operating correctly Check the outlet domes...

Страница 70: ...e the cause of the weeping is the valve itself and not due to thermal expansion or a faulty or under pressurized thermal expansion tank Inspection of Ignition Electrode Remove the ignition electrode from the burner mounting plate Remove any white oxides accumulated on the electrode using fine grit sandpaper or steel wool If the electrode does not clean to a satisfactory condition replace the ignit...

Страница 71: ...turi gasket is in good condition and positioned correctly Re assemble the burner head onto the mounting plate Ensure the burner head gasket is in good condition and positioned correctly Re assemble the gas supply connection and open the manual gas valve placing the unit back into service Flame Signal The flame signal should be at least 0 6µ Α Refer to the PERFORMANCE Trouble shooting Guide for inf...

Страница 72: ...stributor When ordering parts spec ify the Model Number and Serial Number Include a description of the part and a replacement part number Using modified or other manufacturer parts will not be covered by warranty and may damage or cause improper function of the unit Refer to pages 66 and 69 for description and replacement part numbers NOTICE WARNING ...

Страница 73: ...omplete Jacket Set 1 HMJKT25F Jacket Front 1 HMJKT35F Jacket Front 1 HMJKT25L Jacket Left side 1 HMJKT35L Jacket Left side 1 HMJKT25R Jacket Right side 1 HMJKT35R Jacket Right side 1 HMJKT25B Jacket Back 1 HMJKT35B Jacket Back 1 HMJKT25TOP Jacket Top cover 1 HMJKT35TOP Jacket Top cover 1 5 HMHOO06 Burner Jacket Hood 1 1 6 PGRKIT20 Low Water Cut Off Device LWCO 1 1 1 2 3 4 ...

Страница 74: ...g Thermostat Primary or Secondary Manual Reset Hight Limit Pre set at 205ºF Auto Reset High Limit Pre Set at 194ºF Temperature Pressure Gauge Control Panel PGRKIT21 PGRKIT 22 HMCS01 PGRKIT23 HMGAU01 7 11 8 9 10 11 9 8 10 7 7 Fig 41 Control Panel Components ...

Страница 75: ...19 12B PGRKIT 19 12A 12B 24V Circuit 13 120 V Circuit 14 13 1211 10 9 8 7 6 5 4 3 2 1 G Part No Description HMRLV01 Pressure Relief Valve 30 psi P3AVT01 Air Vent HMVLV07 Thermostatic Mixing valve 3 4 HNSNP02 Snap sets Male Female HMTPV01 Temperature Pressure Relief Valve PG 30 35 40 45 only HMTPV03 Temperature Pressure Relief Valve PG 25 only Fig 42 Electrical Panel Components ...

Страница 76: ...r replacement kit PG 40 PGRKIT06 PG 45 Blower motor replacement kit PG 45 PGRKIT09 Burner head replacement kit PG 25 30 35 PGRKIT10 Burner head replacement kit PG 40 45 PGRKIT11 Pressure switch replacement kit with 1 84 w c pressure switch PGRKIT12 Pressure switch replacement kit with 2 7 w c See Table 4 pressure switch Page 51 PGRKIT13 Pressure switch replacement kit with 3 35 w c pressure switch...

Страница 77: ...rimary circuit pressure relief valve 30 psi ø 1 NPT 5 Domestic cold water inlet ø 3 4 NPT 6 Hot water outlet secondary thermostat sensor ø 3 4 NPT 7 Manual reset safety sensor pressure indicator sen sor ø 3 4 NPT 8 Primary thermostat sensor temperature indicator sensor and automatic reset safety sensor ø 1 2 NPT 9 L W C O pressure sensor ø 1 2 NPT shown as item 6 on page 66 10 Primary circuit air ...

Страница 78: ... 67 B 54 54 54 62 5 62 5 C 54 5 54 5 54 5 63 5 63 5 Vent outlet size 3 3 3 3 3 TP Valve domestic ø 3 4 3 4 3 4 3 4 3 4 Domestic water ø 3 4 3 4 3 4 3 4 3 4 Primary connection ø 1 1 1 1 1 Drain ø 1 2 1 2 1 2 1 2 1 2 Empty weight lb 345 345 345 485 485 Heatexchangersurface Sq Ft 17 17 17 26 5 26 5 Model 10 Min Peak 1st Hour Continuous Flow Combustion AFUE Heating Flow Rating 80ºF Rise Efficiency Cap...

Страница 79: ......

Страница 80: ... exchange Compact and light weight Available in 5 sizes that can accommodate any size pool or spa TTP Brazed Plate Heat Exchangers For domestic water snow melting radiant floor refrigeration Plates made of stainless steel with a 99 9 copper and brazed ensuring a high resistance to corrosion Self cleaning and self descaling Computerized sizing available from Triangle Tube Phase III Available in cap...

Отзывы: