background image

D e lt a   Em b e d d e d   S ys t e m   O p e r a t i o n   M a n u a l -   E 2 0 0   S e r i e s  


4 - 4  

_4 


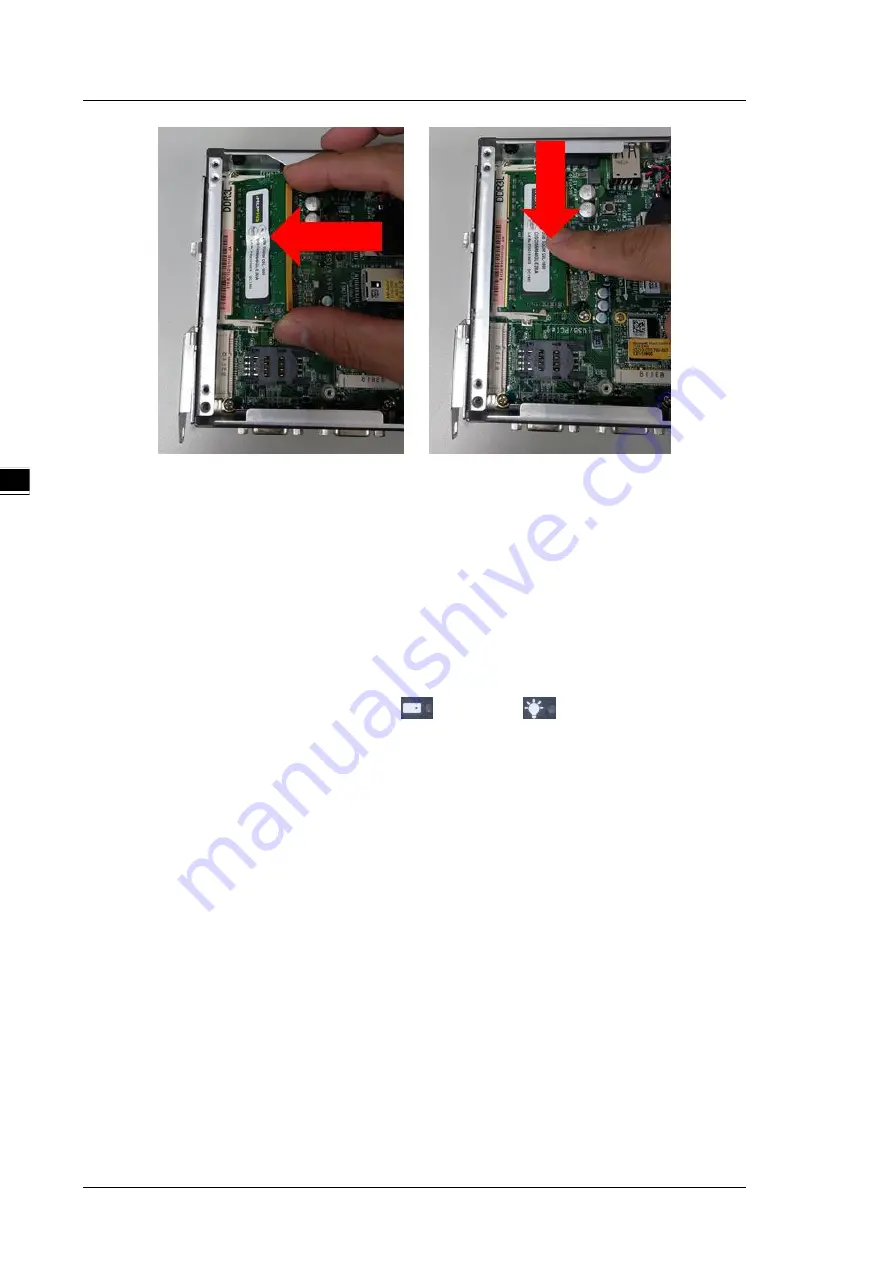
Step 6       

When RAM installation is complete, please attach the side covers back to the chassis 

and fasten all screws.   


4.2


Replace mSATA SSD 

    Any component replacement and repair of the host machine by users will lose the original product   

guarantees.     

 
The series uses half size mSATA SSD. To increase SSD capacity, please prepare the original OS as 
backup and restore the settings once SSD is been replaced. Please refer to the following steps for 
replacing the SSD:   
 

Step  1

          Turn  off  the  system.  When  HDD 


and  Power 

  lights  are  OFF,  disconnect 

from the DC power system. 

Step 2       

  Loosen all 4 screws to remove the side cover.   


Содержание IPC-E200 Series

Страница 1: ......

Страница 2: ...8 3015 3050 3052 We reserve the right to change the information in this catalogue without prior notice EMEA Headquarters Delta Electronics Netherlands B V Sales Sales IA EMEA deltaww com Marketing Mar...

Страница 3: ...mandatory provisions to the contrary Delta reserves the right to make changes to the user manual and the products described in the user manual without prior notice and afterwards Warranty Terms and C...

Страница 4: ...6 For device that needs power cords there must be an easy to reach power socket near the device 7 Do not use the product in a damp environment 8 Make sure the device is placed on a solid surface befo...

Страница 5: ...Delta Embedded System Operation Manual E200 Series Revision History Version Revision Date 1s t The first version was published 2019 08 05...

Страница 6: ...m of I O interface 2 2 2 2 Interface description 2 3 2 2 1 Serial port 2 3 2 2 2 USB 2 0 2 3 2 2 3 RJ 45 connector 2 4 2 2 4 VGA 2 4 2 2 5 DC24V power supply 2 5 2 2 6 DI DO 2 5 Chapter 3 AMI BIOS Uti...

Страница 7: ...rdware Replacement 4 1 Replace Memory RAM 4 2 4 2 Replace mSATA SSD 4 4 Chapter 5 Transportation Storage Requirements 5 1 Unpack and check the delivery package 5 2 5 2 Transportation 5 2 5 3 Storage r...

Страница 8: ...1 1 1 Chapter 1 Product Specification Table of Contents 1 1 Overview 1 2 1 2 Model description 1 2 1 3 Hardware specification 1 3 1 4 Dimensions 1 4...

Страница 9: ...system OS including Windows10 IoT and Linux The main CPU board contains a full size PCIe mini card slot that supports 3G 4G or Wi Fi wireless modules for expansion as well as a half size PCIe mini car...

Страница 10: ...detail USB 2 0 x 2 Display interface VGA output x1 Dimension 100mm L 31mm W 125mm H Weights Net weight 0 3Kg Gross weight 0 46Kg Temperature Operation temperature 20 C 70 C 4 F 158 F Storage temperat...

Страница 11: ...Delta Embedded System Operation Manual E200 Series 1 4 _1 1 4 Dimensions Unit mm...

Страница 12: ...O Interface Table of Contents 2 1 Diagram of I O interface 2 2 2 2 Interface description 2 3 2 2 1 Serial port 2 3 2 2 2 USB 2 0 2 3 2 2 3 RJ 45 connector 2 4 2 2 4 VGA 2 4 2 2 5 DC24V power supply 2...

Страница 13: ...elta Embedded System Operation Manual E200 Series 2 2 _2 2 1 Diagram of I O interface No Description No Description 1 DC24V power supply 4 RS 232 RS 422 RS 485 2 VGA 5 RJ 45 connector 3 USB 2 0 6 DI D...

Страница 14: ...escription 2 2 1 Serial port Serial port Pin Communication interface RS 232 RS 422 RS 485 1 DCD TX Data 2 RXD TX Data 3 TXD RX 4 DTR RX 5 GND GND GND 6 DSR 7 RTS 8 CTS 9 RI 2 2 2 USB 2 0 USB 2 0 Pin S...

Страница 15: ...6 BI_DB RX L7 BI_DD N C L8 BI_DD N C ACTLED Network acitivity LED indicator Flashing Data transmission Off No data acitivity LILED Speed indicator LEDs Orange 1000Mbps Green 100Mbps Off 10Mbps 2 2 4 V...

Страница 16: ...Chapter 2 I O Interface 2 5 2_ 2 2 5 DC24V power supply DC24V Pin Signal 1 V 2 N C 3 0V 2 2 6 DI DO DI DO Pin Signal 1 DIO 0 2 DIO 1 3 DIO 2 4 DIO 3 5 DIO 4 6 DIO 5 7 DIO 6 8 DIO 7 9 GND...

Страница 17: ...Delta Embedded System Operation Manual E200 Series 2 6 _2 MEMO...

Страница 18: ...able of Contents 3 1 Starting BIOS 3 2 3 2 Hotkey shortcuts 3 2 3 3 Main menu 3 2 3 4 Advanced menu 3 3 3 5 Chipset menu 3 4 3 6 Security menu 3 4 3 7 Boot menu 3 5 3 8 Save Exit menu 3 5 3 9 COM port...

Страница 19: ...to access the settings these keys include F1 F4 Enter ESC Arrow keys and so on Hotkey Description Left Right Use left and right Arrow keys to select from the BIOS setup page Up Down Use up and down A...

Страница 20: ...plays hardware parameters which includes CPU memory USB and COM CPU Configuration SATA Configuration PCIe mSata Mini Card Configuration mini PCIe card slot available USB Configuration Hardware Monitor...

Страница 21: ...al E200 Series 3 4 _3 3 5 Chipset menu The menu provides advanced settings for chipset modifications 3 6 Security menu The menu contains setting up administrator password to access BIOS Setup interfac...

Страница 22: ...Boot menu The menu provides settings include boot configuration and boot option priorities for SSD as defaults in the OS 3 8 Save Exit menu The menu contains resetting BIOS parameters but modificatio...

Страница 23: ...Delta Embedded System Operation Manual E200 Series 3 6 _3 3 9 COM port setting Enter Advanced menu and select F81804 Super IO Configuration For COM port type setting select Serial Port 1...

Страница 24: ...The default COM setting is RS232 Complete the setup by clicking F4 to save and exit 3 10 DIO setting The default setting of DIO is enabled Enable with pin 1 to 4 as Out and pin 5 to 8 as In To modify...

Страница 25: ...Delta Embedded System Operation Manual E200 Series 3 8 _3 Continue to select Onboard Device Configuration Onboard DIO Configuration...

Страница 26: ...MI BIOS Function 3 9 3_ When turning on the computer and DIO Modification is Disabled this does NOT mean that the function is closed Select from DIO port 1 to 8 and view each pin status with default s...

Страница 27: ...System Operation Manual E200 Series 3 10 _3 To modify DIO configuration first select Enable for DIO Modification Select from DIO port 1 to 8 for setting pin status Complete the setup by clicking F4 to...

Страница 28: ...4 1 4 Chapter 4 Hardware Replacement Table of Contents 4 1 Replace Memory RAM 4 2 4 2 Replace mSATA SSD 4 4...

Страница 29: ...memory slot to increase memory capacity Please refer to the following steps to replace RAM Step 1 Turn off the system When HDD and Power lights are OFF disconnect from the DC power system Step 2 Loos...

Страница 30: ...meantime the metal part of the clip is to be pulled outward and the RAM flicks up in a slope angle to be pulled out Step 5 Insert and press the RAM firmly into the slot until it is seated Then check...

Страница 31: ...of the host machine by users will lose the original product guarantees The series uses half size mSATA SSD To increase SSD capacity please prepare the original OS as backup and restore the settings on...

Страница 32: ...Chapter 4 Hardware Replacement 4 5 4_ Step 3 Remove the fixed screws for mSATA SSD and pull out the SSD once it flicks up in a slope angle...

Страница 33: ...edded System Operation Manual E200 Series 4 6 _4 Step 4 mSATA SSD is installed in CN5 the board is marked mSata USB PCIe Step 5 Tilt the SSD and insert it into the slot Then press the SSD and fasten t...

Страница 34: ...5 1 5 Chapter 5 Transportation Storage Requirement Table of Contents 5 1 Unpack and check the delivery package 5 2 5 2 Transportation 5 2 5 3 Storage requirements 5 2...

Страница 35: ...during transit Avoid transporting the products together with flammable explosive and corrosive items Keep the device dry and do not expose to rain snow or any liquid substances to avoid damage the dev...

Отзывы: