background image

5

U N PACKING

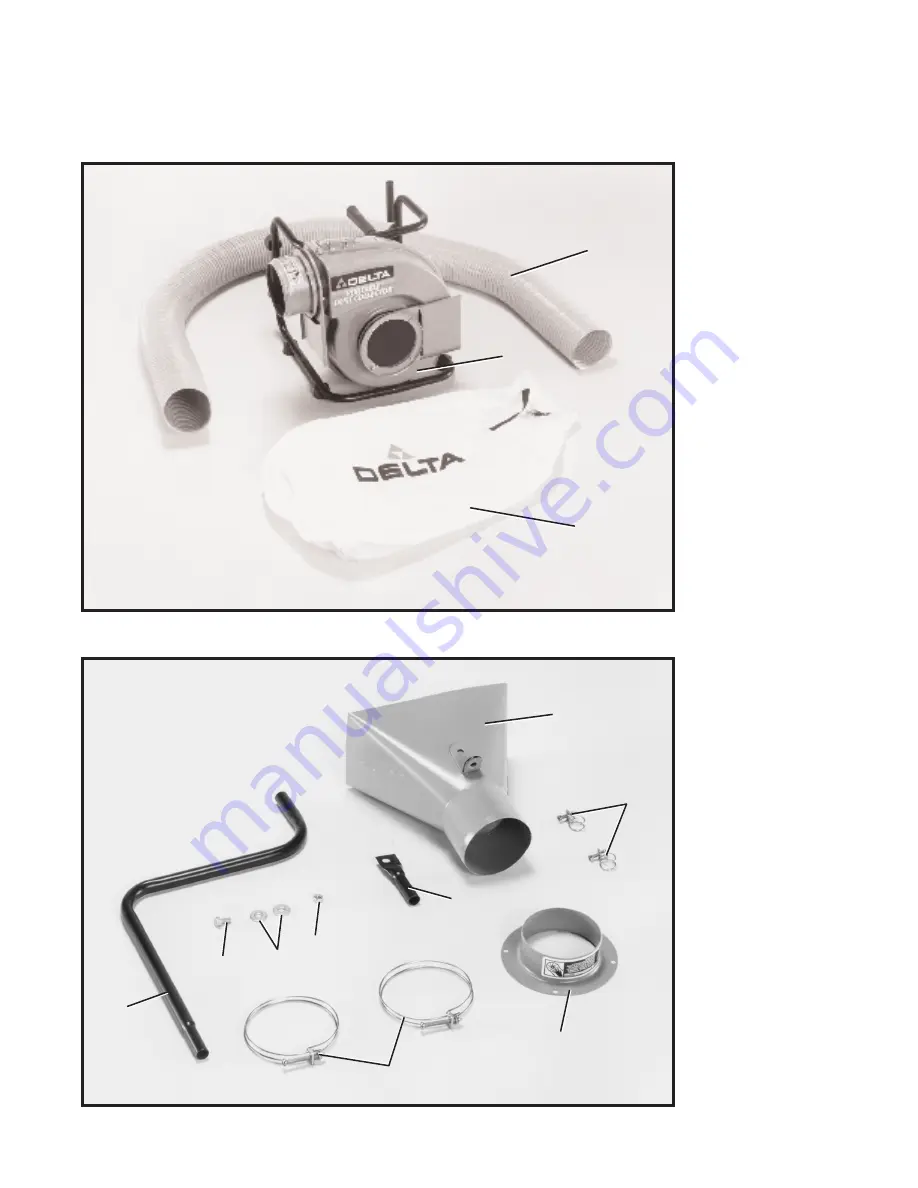
Your 50-820 Dust Collector is shipped complete in one container. Carefully remove the dust collector and all

loose parts from the container. Figs. 2 and 3 illustrate the components of the dust collector.W ARNING: D O N O T

C O N N E C T T H E D U S T C O L L E C TO R TO T H E P O W E R S O U R C E UNTIL T H E M A C H I N E IS C O M P L E T E LY

A S S E M B L E D A N D Y O U H AV E R E A D A N D U N D E R S TA N D T H E ENTIRE O W N E R S M A N U A L.

1 -Dust Collector

2 -10’ long, 4

Diameter

Vacuum Hose

3 -Dust Collector Bag

Fig. 2

Fig. 3

4 -Dust Collector Hood

5 -Clamps for Tubular

Supports (2)

6 -Intake Flange

7 -Hose Clamps (2)

8 -Angled Support Tube

9 -5/16-18 x 5/8

Hex Head Screw

10 -5/16

Flat Washers (2)

11 -5/16-18 Hex Nut

12 -Upper Support Tube

2

1

3

4

5

6

12

7

8

9

11

10

Содержание 50-820

Страница 1: ...INSTRUCTION M A N U A L Portable Single St age Dust Collector Model 50 820 D ATED 6 8 98 PA RT NO 1348468 Delta International Machinery Corp 1998...

Страница 2: ...he product prepaid to a Delta factory service center or authorized service station with proof of purchase of the product within two years and provides Delta with reasonable opportunity to ver ify the...

Страница 3: ...O P CHILDPROOF with padlocks master switches or by removing starter keys 1 0 DON T FORCE TO O L I t w i l l d o t h e j o b b e t t e r a n d b e safer at the rate for which it was designed 11 USE RI...

Страница 4: ...s cigarettes matches or hot ashes 9 USE only as described in this manual USE only ac cessories recommended by D e l ta 1 0 D O N O T pull the dust collector by the power cord NEVER allow the power cor...

Страница 5: ...LECTO R TO THE P O W E R SOURCE UNTIL THE MACHINE I S COMPLETELY ASSEMBLED A N D Y O U H AVE READ A N D UNDERSTA N D THE ENTIRE OWNER S MANUAL 1 Dust Collector 2 1 0 l o n g 4 Diameter Vacuum Hose 3 D...

Страница 6: ...fasten connector to dust collector as shown in Fig 5 with screws A removed in STEP 1 NOTE WARNING LABEL O N FLANGE ADAPTER C M U S T FA C E TO WA R D THE TO P O F DUST COLLEC TOR ASSEMBLING SUPPORT TU...

Страница 7: ...ach side of flange 3 Place the remaining small clamp D Fig 9 onto the split end of angle support tube F Insert upper support tube assembly G w i t h c o n n e c t o r J a t tached and tighten clamp D...

Страница 8: ...clamp A NOTE I f desired connector C can be rotated in the vertical posi tion as shown in F i g 1 3 ASSEMBLING DUST B A G TO DUST COLLECTO R Loosely thread end of dust bag strap A through clamp B as s...

Страница 9: ...nding conductor and grounding plug The plug must be inserted into an appropriate outlet that is properly installed and grounded in accordance with all local codes and ordinances W ARNING Improper conn...

Страница 10: ...DUST INTA K E P O R T A LW AY S F O L L O W THE SAFETY RULES DESCRIBED O N PAGES 3 A N D 4 OF THIS MANUAL STARTING A N D STOPPING DUST COLLECTO R The ON OFF power switch A Fig 19 is located on the sid...

Страница 11: ...d u s t c o l l e c t o r t o s i t s e c u r e l y on the floor or supporting shelf without creeping or walking across the supporting surface during operation A B B 2 Fig 23 illustrates the dust coll...

Страница 12: ...dust collector hood and vacuum hose B However t h e d u s t collector hood is shown clamped at C t o t h e ta b l e t o p f o r e ffective dust c o l l e c t i o n 4 The vacuum hose B Fig 25 can be fi...

Страница 13: ...o l l e c t o r a t tached to a portable bench top planer through an accessory dust connector hood 6 Cleaning out the truck bed is an other application for the dust collector as shown in Fig 27 howev...

Страница 14: ...upport i n g s u r f a c e IMPORTANT ALW AYS use safety gates to cover dust ports when the dust collector is not in use or mounted to a supporting surface for storage MAINTENANCE NOTE Before any maint...

Отзывы: