Delta Children Disney PIXAR Cars BB86609CR Скачать руководство пользователя страница 2

Содержание Disney PIXAR Cars BB86609CR

Страница 1: ......

Страница 2: ......

Страница 3: ...l parts before assembly unless otherwise specified DO NOT apply stickers to tires steering wheel or spoiler until AFTER the toddler bed is fully assembled For best results place individual parts on a...

Страница 4: ...C A9 A10 A11 A12 C A7 Align A11 sticker to A10 along dotted line Align A10 sticker to A9 along dotted line A11 A10 A9 Step 3 Apply A11 Step 2 Apply A10 Step 1 Apply A9 Overlap Overlap A9 A10 Dotted li...

Страница 5: ...C B12 B11 B10 B9 C Align B11 sticker to B10 along dotted line B11 Align B10 sticker to B9 along dotted line Step 3 Apply B11 A10 B10 B9 Step 2 Apply B10 Overlap Overlap Step 1 Apply B9 B10 B9 Dotted l...

Страница 6: ...3A 3B Apply D2 sticker beginning here K D1 Overlap D2 4 5 N D E1 E2 6 E3 E4 Match cut out in headlight sticker to holes on front bumper D 6...

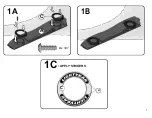
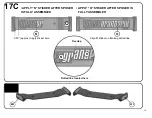
Страница 7: ...1A C 1B A 4 x 3 4 1C APPLY STICKERS C M 7...

Страница 8: ...2 2B B 4 x 3 4 C 2C APPLY STICKERS C M 8...

Страница 9: ...3 Turn both side panels and front bumper upside down to begin assembly D A B 4 x 3 4 4A Fold cover upwards into fully locked position 3A 4B Turn bed over If assembling twin bed ONLY skip to step 10 9...

Страница 10: ...Follow steps 5A through 9 for toddler bed 5A 5B E 2 x 3 4 F 6A 6B 6C APPLY STICKERS IJK G L 1 x 1 0 DIA G 1 x 1 2 10...

Страница 11: ...gn center wall with groove on left and right side 7B 7Apanels Slide down into a fully locked position E 2 x 1 2 DIA 2 x 3 4 7C Fold flap downward towards side panels 7D Screw down flap onto side panel...

Страница 12: ...h hooks into both left right side panel grooves 2 Slide downward into a fully 1locked position 2 J 10 9 Optional mattress support board assembly Dimensions 53 65 L x 30 5 W x 0 50 THICK 11 2 x 1 0 If...

Страница 13: ...A K Push windshield downward into groove on right side panel into a fully locked position 13 14 L Align hood tabs with holes on left and right side panels 15 Push into a fully locked position M 4 x 3...

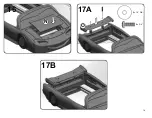
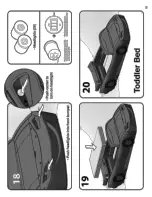
Страница 14: ...16 17A N O 17B 2 x 1 0 DIA 2 x 3 4 14...

Страница 15: ...CKER AFTER SPOILER APPLY O STICKER AFTER SPOILER IS IS FULLY ASSEMBLED FULLY ASSEMBLED O N O 2 50 approx Apply sticker here Align O sticker on N along dotted line Overlap O N Dotted line located here...

Страница 16: ......

Страница 17: ...els 3 Please keep and store all loose screws in a safe place when converting toddler bed to twin bed All loose screws will be used to assemble the toy box 6 x 3 4 2 x 1 2 DIA To remove windshield pull...

Страница 18: ...4 5 13 Twin Bed Remove mattress and left right mattress frames Works with standard boxspring and twin mattress 18...

Страница 19: ...Toy Box 1 APPLY STICKERS 2 F3 H F4 P R APPLY STICKERS G Q 3 4 R Q P S 2 x 1 0 19...

Страница 20: ...flap downward towards side panels 2 x 1 0 Align center wall with grooves on left and right side panels of toy box Slide down into a fully locked position 7 2 x 3 4 2 x 1 2 DIA Screw down flap onto sid...

Страница 21: ...20...

Страница 22: ...8A K 8C Push windshield downward into groove on side panel into a fully locked position 8B 9 21...

Страница 23: ...10 11 M L Align hood tabs with holes on left and right side panels Push into a fully locked position 12 13 Toy Box 4 x 3 4 22...

Страница 24: ...th The user s maximum weight shall not be greater than 50 LB 22 7 kg Guardrails are used as a mattress containment means Guardrails provided must be used to avoid the the formation of a gap between th...

Отзывы: