background image

3

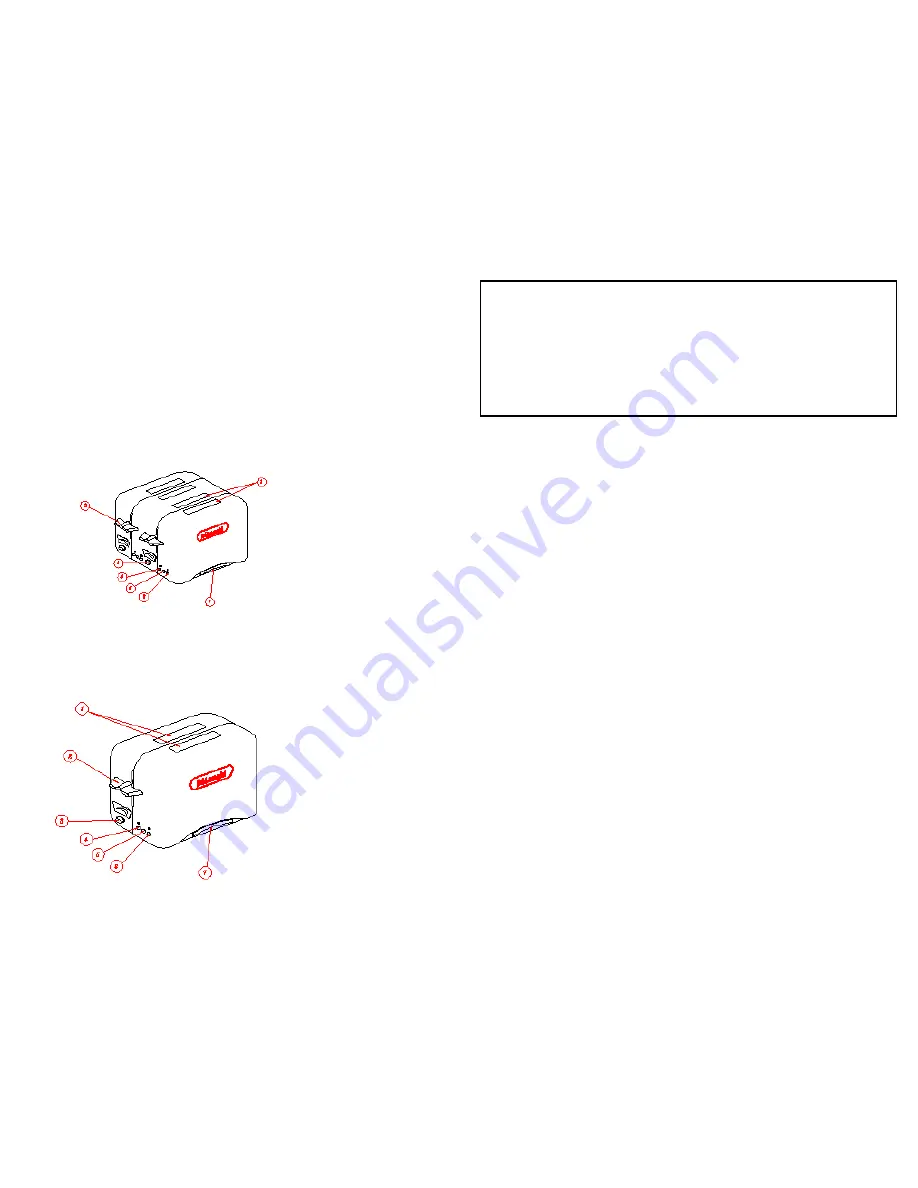
Model RT400 - 4 Slice toaster

1. Bread Slot
2. Loading Handle

3. Color Control Knob
4. Defrost Control
5. Stop/Cancel control
6. Bagel Control
7. Crumb Tray

Model RT200 - 2 Slice Toaster

1. Bread Slot
2. Loading Handle
3. Color Control Knob
4. Defrost Control
5. Stop/Cancel control
6. Bagel Control
7. Crumb Tray

4

!

Your product is equipped with a polarized alternating plug (a plug having one
bade wider than the other).  This plug will fit into the power outlet only one
way.  This is a safety feature.   If you are unable to insert the plug fully into the
outlet, try reversing the plug.  If the plug should still fail to fit, contact a
qualified electrician to replace your obsolete outlet.  Do not defeat the safety
purpose of the polarized plug.

!

Plug the cord into a 120 volt AC outlet

!

Handle the cord carefully for longer life; avoid jerking or straining the cord at
the plug and appliance connections.

NOTE:

The toaster elements may give off an unpleasant smell  during initial

heat-up due to dust which may have accumulated on them.   This is

normal for a new appliance.

BEFORE THE FIRST USE

Carefully unpack the product and remove all packaging materials. To remove

any dust that may have accumulated during packaging, simply wipe the toaster

exterior with a clean, damp cloth. Do not use abrasive cleaners. Do not put the

toaster, cord or plug in water.

USING YOUR RETRO TOASTER

1. Make sure you have read and understood the section on Important

Safeguards.

2. Ensure the loading handle is in the raised position, and the color setting level

are set in the middle. Unravel the power cord.  Check that the crumb tray is

in place and there is nothing in the toaster slot.  Plug the power cord into the

wall outlet.

3. Place the bread centrally into the slots. Press the loading handle fully down

until it latches. This starts the toasting cycle. Please note that the loading

handle will not lock down unless the toaster has power supplied to it. When

toasting is complete, the handle will return to the raised loading position.

4. Toasted bread can now be removed and more slices loaded. If the toast is

not dark enough, turn the browning control knob to a higher number,

indicating darker toasting. If the toast is too dark, turn the browning control

knob at a lower number, indicating lighter toasting, before inserting the next

slices of bread.   Making adjustments to the browning control while toasting

is in progress will not change the degree of browning originally selected.

DEFROST CONTROL

When toasting frozen bread, by depressing the defrost control, the toasting

cycle is lengthened without the need to adjust the browning control. The red

indicator light illuminates when defrost function is engaged.

BAGEL CONTROL

The bagel control on your toaster allows you to have perfectly toasted bagels

and English muffins, with the cut sides toasted and the bottoms warmed. To

Содержание RT200

Страница 1: ...fire electric shock or injury 8 Do not use outdoors 9 Do not let the cord hang over edge of a table or counter top or touch hot surfaces 10 Do not place toaster on or near a hot gas or electric burner or in a heated oven 11 Do not use this appliance for other than its intended use 12 OVERSIZE FOODS OR METAL FOIL PACKAGES OR UTENSILS MUST NOT BE INSERTED INTO THE TOASTER AS THEY MAY CREATE A FIRE O...

Страница 2: ... plug in water USING YOUR RETRO TOASTER 1 Make sure you have read and understood the section on Important Safeguards 2 Ensure the loading handle is in the raised position and the color setting level are set in the middle Unravel the power cord Check that the crumb tray is in place and there is nothing in the toaster slot Plug the power cord into the wall outlet 3 Place the bread centrally into the...

Страница 3: ...tive part or parts thereof other than parts damaged in transit which shall be returned to us transportation prepaid This warranty shall apply only if the appliance is used in accordance with the factory directions which accompany it and on an Alternating Current AC circuit How Long Does the Coverage Last This warranty runs for one year from the date of delivery and applies only to the original pur...

Страница 4: ...commandés ni vendus par le fabricant peut causer un incendie des chocs électriques ou des blessures 8 Ne pas utiliser à l extérieur 9 Ne pas laisser le cordon pendre par dessus le bord d une table ou d un comptoir ni venir en contact avec les surfaces chaudes 10 Ne pas placer le grille pain sur ou à proximité d un brûleur électrique ou à gaz chaud ni dans un four chauffé 11 Ne pas utiliser cet app...

Страница 5: ...qui peut s être accumulée durant l emballage il suffit d essuyer l extérieur du grille pain à l aide d un chiffon propre humide N utiliser aucun nettoyant abrasif Ne pas immerger le grille pain le cordon ou la fiche dans l eau UTILISATION DE VOTRE GRILLE PAIN RÉTRO 1 S assurer d avoir lu et de bien comprendre la section sur les Importantes consignes de sécurité 2 S assurer que la poignée de charge...

Страница 6: ...nt à un réglage plus bas IMPORTANT 1 Ne pas utiliser des tranches très minces ou brisées et ne pas faire fonctionner le grille pain sans pain 2 Ne jamais placer dans le grille pain des aliments dont la farce ou le glaçage peut couler durant le rôtissage En plus de rendre le nettoyage difficile ceci peut abîmer le grille pain et provoquer un risque d incendie 3 Ne jamais forcer des aliments surdime...

Страница 7: ... De même les dommages indirects et accessoires résultant de l utilisation de ce produit ou découlant de toute rupture de contrat ou rupture de cette garantie ne peuvent être recouvrés aux termes de cette garantie Certains états ne permettent pas l exclusion ou la limitation des dommages indirects ou accessoires il se peut donc que les dispositions qui précèdent ne s appliquent pas à vous Comment p...

Отзывы: