background image

USING THE ATTACHMENTS (con’t)

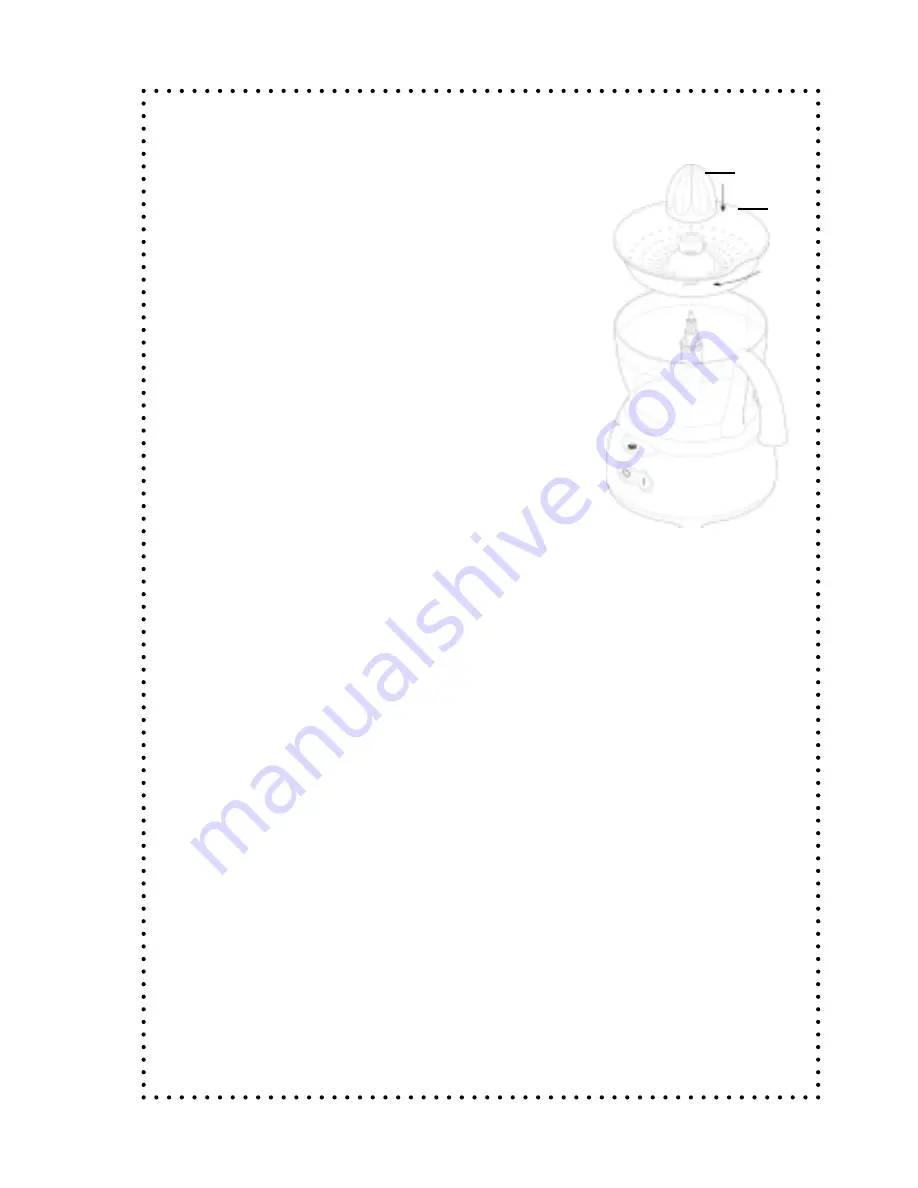
      Citrus Juicer: 

Figure 9

1) Use the citrus juicer to squeeze juice

from  citrus fruits (Ex. oranges,

lemons, limes and grapefruits).

2) Parts:

A) Juicing Cone

B) Strainer

3) Fit the detachable drive shaft and

bowl onto to the power unit.

4) Fit the strainer into the bowl,

      ensuring that the lip of the strainer is

locked into position directly over the

bowl handle.

5) Place the juicing cone over the drive

shaft turning it until it drops all the

way down.

6) Cut the fruit in half.  Then switch the

unit “on” and press the fruit onto the

juicing cone.

7) The citrus juicer will not operate if the

strainer is not locked correctly.

Figure 9

A

B

Содержание DFP880 Series

Страница 1: ...Instruction Manual Food Processors Mode D emploi Robots de cuisine DFP880 S ries DFP880 Series...

Страница 2: ...or plug or after the appliance malfunctions or has been damaged in any manner Return appliance to an authorized DeLonghi service center for examination repair or adjustment 6 To disconnect remove plug...

Страница 3: ...r from the blade assembly 18 Allow hot liquids to cool before putting them in the blender 19 Do not use the scraper while the unit is still running 20 Always operate blender with cover in place 21 If...

Страница 4: ...the appliance and 2 the longer cord should be arranged so that it will not drape over the counter top or table top where it can be pulled on by children or tripped over unintentionally The electrical...

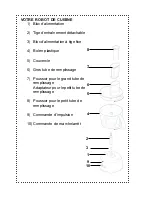
Страница 5: ...1 Power Unit 2 Detachable Drive Shaft 3 Power Unit Fixed Shaft 4 Plastic Bowl 5 Lid 6 Large Feed Tube 7 Stomper for Large Feed Tube Small Feed Tube Adapter 8 Stomper For Small Feed Tube 9 Pulse Contro...

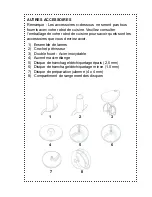
Страница 6: ...anopy 5 Thick Slicing Shredding Disc 2 5 mm 6 Thin Slicing Shredding Disc 1 5 mm 7 Julienne Disc 4x4 mm 8 Disc Storage Container Note Not all attachments below will be included with your food processo...

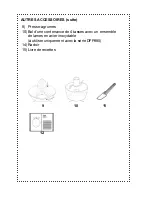
Страница 7: ...9 Citrus Juicer 10 4 Cup Capacity bowl with stainless steel blade 11 Spatula 12 Recipe Book ADDITIONAL ATTACHMENTS continued 9 10 11 12...

Страница 8: ...oroughly before using for the first time See Cleaning Your Food Processor and Parts section of this manual for detailed instructions OPERATING YOUR FOOD PROCESSOR 1 Fit the detachable drive shaft 2 ov...

Страница 9: ...s indicated by the letter P 6 Turn the unit off and unplug it before removing lid attachments and bowl To remove the bowl turn it in a counterclockwise direction To remove the detachable drive shaft f...

Страница 10: ...cubes approximately inch 1 9 cm thick 3 Take care not to over process Dough Hook Figure 5 1 Place the dry ingredients in the bowl and pour the liquid down the feed tube while the machine is running Pr...

Страница 11: ...room temperature Ensure that the bowl and whisks are clean and free from grease before whisking Maxi Blend Canopy Figure 7 1 When blending liquids use the maxi blend canopy with the blade assembly It...

Страница 12: ...onions 3 Thick disc 2 5 mm Thin disc 1 5 mm Julienne Disc 4x4 mm 1 Use it to cut potatoes for Julienne style French fries or ingredients for salads casseroles and stir frys Ex carrots cucumbers etc N...

Страница 13: ...bowl onto to the power unit 4 Fit the strainer into the bowl ensuring that the lip of the strainer is locked into position directly over the bowl handle 5 Place the juicing cone over the drive shaft t...

Страница 14: ...Bowl 3 Fit the main food processor bowl to the power unit Fit the 4 cup capacity bowl inside the main food processor bowl ensuring that the slots on the 4 cup capacity bowl align with the grooves on...

Страница 15: ...hites 2 Egg Sugar 1 8 2 8 Dough Hook 1 Yeast Mixtures 1 5 8 Slicing Shredding Discs 1 Hard Vegetables and Cheeses 2 Soft Vegetables 1 5 8 2 1 5 Citrus Juicer 1 Citrus Fruits 1 1 Juice Extractor 1 Frui...

Страница 16: ...inless Steel blade assy To make tasty oriental style fish balls try this recipe 600g fish 120g flour 12g vegetable oil Preparataion method 1 extract the fish meat discard the bones head and tail 2 cut...

Страница 17: ...laced in the top rack of your dishwasher CLEANING YOUR FOOD PROCESSOR AND PARTS con t Blender and Food Processor Chopper Empty the container of its contents before unscrewing the blade unit Wash the e...

Страница 18: ...lso consequential and incidental damage resulting from the use of this product or arising out of any breach of contract or breach of this warranty are not recoverable under this warranty Some states d...

Страница 19: ...u d en retirer des accessoires 5 N utilisez aucun appareil qui a t endommag dont la fiche ou le cordon lectrique est ab m ou dont le fonctionnement est anormal Retournez l appareil un centre de r para...

Страница 20: ...eil attendez que les l accessoire ou les lames soient compl tement arr t s et faites attention ne pas d visser le m langeur ou le hachoir de l ensemble lames 18 Laissez les liquides chauds refroidir a...

Страница 21: ...u de la table l o il pourrait tre tir par des enfants ou faire tr bucher quelqu un par accident Le r gime lectrique de la cafeti re est inscrit sur le panneau inf rieur de l appareil Cet appareil poss...

Страница 22: ...alimentation tige fixe 4 Bol en plastique 5 Couvercle 6 Gros tube de remplissage 7 Poussoir pour le grand tube de remplissage Adaptateur pour le petit tube de remplissage 8 Poussoir pour le petit tube...

Страница 23: ...r quels sont les accessoires que vous devriez avoir AUTRES ACCESSOIRES 1 Ensemble de lames 2 Crochet p trisseur 3 Double fouet Acier inoxydable 4 Auvent maxi m lange 5 Disque de tranchage d chiquetage...

Страница 24: ...esse agrumes 10 Bol d une contenance de 4 tasses avec un ensemble de lames en acier inoxydable utiliser uniquement avec la s rie DFP880 14 Racloir 15 Livre de recettes AUTRES ACCESSOIRES suite 9 10 11...

Страница 25: ...uvre les lames Soyez prudent lorsque vous retirez les prot ge lames les lames sont extr mement tranchantes Ces prot ge lames devraient tre jet s car ils servent prot ger l ensemble lames pendant la fa...

Страница 26: ...les lames car elles sont extr mement tranchantes Veillez installer d abord le bol et l accessoire sur l appareil avant d ajouter des ingr dients 3 Installez le couvercle 5 en veillant ce que le sommet...

Страница 27: ...rcle les accessoires et le bol Pour retirer le bol tournez le dans le sens inverse des aiguilles d une montre Pour retirer la tige d entra nement d tachable du bol tirez simplement la tige vers le bas...

Страница 28: ...ur de de pouce environ 3 Veillez ne pas trop d chiqueter les aliments Figure 4 Figure 5 Figure 6 Crochet p trisseur Figure 5 1 Placez les ingr dients secs dans le bol et versez le liquide par le tube...

Страница 29: ...par la poign e centrale 5 Installez le couvercle UTILISATION DES ACCESSOIRES suite Double fouet Figure 6 1 Utilisez le uniquement pour les m langes l gers comme les blancs d uf la cr me le lait conce...

Страница 30: ...e ou saut s ex carottes concombres etc Remarque Ne retirez jamais le couvercle avant que le disque n ait compl tement cess de tourner Manipulez les disques avec prudence ils sont extr mement tranchant...

Страница 31: ...t tube de remplissage 2 Lors du tranchage et du d chiquetage les aliments plac s verticalement donneront des morceaux plus courts que ceux plac s horizontalement 3 Il y aura toujours une petite quanti...

Страница 32: ...soire dans le bol en veillant ce que le bord de la passoire soit verrouill en position directement au dessus de la poign e du bol 5 Placez le c ne d extraction sur la tige d entra nement en le tournan...

Страница 33: ...alimentation Installez le bol d une capacit de 4 tasses dans le bol principal en veillant ce que ses fentes soient align es avec les rainures du bol principal 4 Placez l ensemble lames sur la tige d e...

Страница 34: ...hes et propres 2 Ajoutez toujours un peu de liquide lorsque vous m langez des ingr dients cuits pour pr parer des aliments pour b b 3 Coupez les aliments comme la viande le pain et les l gumes en d s...

Страница 35: ...bien teindre et d brancher cet appareil avant d en nettoyer le bo tier et ses accessoires Pour viter les lectrocutions ne plongez pas le cordon lectrique la fiche ou l appareil dans l eau ou dans un l...

Страница 36: ...irez et lavez la main l anneau d tanch it de la m me mani re que le contenant Remarque soyez prudent lorsque vous manipulez les lames elles sont extr mement tranchantes Nettoyez avec prudence les lame...

Страница 37: ...NSEIGNEMENTS SUR LE PRODUIT Conception et Ing nierie aux Etas Unis Fabriqu en RPC Caract ristiques lectriques 120 volts 60 Hz Site Web www delonghi com Garantie de 10 ans sur le moteur du DFP880 2002...

Страница 38: ...dommages indirects ou cons cutifs r sultant de l utilisation de ce produit ou d une rupture de contrat ou de la violation de cette garantie ne sont pas remboursables par cette garantie Certains tats o...

Страница 39: ...ach and fill out this form and mail with payment check or money order only Your Extended Service Plan certificate will be sent to you by return mail PLEASE PRINT Name _________________________________...

Страница 40: ...chez et remplissez ce formulaire et envoyez le avec votre paiement ch que ou mandat uniquement par la poste Votre certificat de programme de garantie prolong e vous sera envoy par retour du courrier E...

Отзывы: