background image

21

GB

maintenance

changing the internal LED light

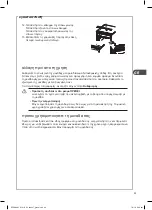
The internal light is an LED panel that cannot be changed by the user. Please contact a qualified 

service agent.

care when handling / moving your unit

Hold the unit around its sides or base when moving it. Under no circumstances should it be lifted by 

holding the edges of the top surface.

servicing

The unit should be serviced by an authorised engineer and only genuine spare parts should be 

used. Under no circumstances should you attempt to repair the unit yourself. Repairs carried out by 

inexperienced persons may cause injury or serious malfunction. Contact a qualified technician.

switching off for long periods of time

When the unit is not in use for a long period of time, disconnect it from the mains supply, empty all 

food and clean the appliance, leaving the door ajar to prevent unpleasant smells.

condensation

Condensation may appear on the outside of the unit. This may be due to a change in room 

temperature. Wipe off any moisture residue. If the problem continues, please contact a qualified 

technician for assistance.

disposal

Old units still have some residual value. An environmentally friendly method of disposal will ensure 

that valuable raw materials can be recovered and used again. The refrigerant used in your unit and 

insulation materials require special disposal procedures. Ensure that none of the pipes on the back 

of the unit are damaged prior to disposal.
Up to date information concerning options of disposing of your old unit and packaging from the new 

one can be obtained from your local council office.
When disposing of an old unit break off any old locks or latches and remove the door as a 

safeguard.

DFCD60W_X16_IB_2L_160407_grace.indb   21

7/4/16   6:26 pm

Содержание DFCD60W16

Страница 1: ...ns manual εγχειρίδιο εγκατάστασης οδηγιών Ψυγείο καταψύκτης τεχνολογίας αποτροπής σχηματισμού πάγου Frost Free 60cm με Διανομέα νερού 60cm Frost Free Fridge Freezer with Water Dispenser GB GR DFCD60W_X16_IB_2L_160407_grace indb 1 7 4 16 6 26 pm ...

Страница 2: ...DFCD60W_X16_IB_2L_160407_grace indb 2 7 4 16 6 26 pm ...

Страница 3: ...7 holiday mode 17 filling the water tank 18 receiving water from the water dispenser 18 noises inside the unit 19 tips for keeping food in the unit 19 preparations for freezing 19 defrosting frozen food 20 cleaning the interior and the exterior of the unit 20 cleaning the water tank and water dispenser 20 maintenance 21 changing the internal LED light 21 care when handling moving your unit 21 serv...

Страница 4: ...ς 31 λειτουργία διακοπών 31 πλήρωση της δεξαμενής νερού 32 τροφοδότηση με νερό από το διανομέα νερού 32 θόρυβοι στο εσωτερικό της μονάδας 33 συμβουλές για τη συντήρηση τροφίμων στη μονάδα 33 προετοιμασίες για κατάψυξη 33 απόψυξη κατεψυγμένων τροφίμων 34 καθαρισμός του εσωτερικού και του εξωτερικού της μονάδας 35 καθαρισμός της δεξαμενής και του διανομέα νερού 35 συντήρηση 36 αντικατάσταση της εσωτ...

Страница 5: ...t be replaced by the manufacturer its service agent or a qualified technician in order to avoid a hazard Choose a location for your unit away from heat sources such as radiators or fires as refrigerant and vesicant are burnable The unit must be manoeuvred by a minimum of 2 persons This appliance can be used by children aged from 8 years and above and persons with reduced physical sensory or mental...

Страница 6: ...s they are of the type recommended by the manufacturer Do not damage the refrigerant circuit The refrigerant is a very environmental friendly gas but is also combustible Take care when transporting or moving the unit to ensure that the refrigeration circuit is not damaged In the event of damage avoid naked flames or ignition sources and ventilate the room in which the unit is placed for a few minu...

Страница 7: ...Βεβαιωθείτε ότι το βύσμα είναι εύκολα προσβάσιμο για αποσύνδεση από την τροφοδοσία κύριου δικτύου Εάν το καλώδιο τροφοδοσίας από το κύριο δίκτυο καταστραφεί πρέπει να αντικατασταθεί από τον κατασκευαστή τον πράκτορα σέρβις ή τον εξειδικευμένο τεχνικό για την αποφυγή πρόκλησης κινδύνων Επιλέξτε για τη μονάδα σας μια θέση μακριά από πηγές θερμότητας όπως θερμαντικά σώματα ή φλόγες καθώς το ψυκτικό κ...

Страница 8: ...ύ φιλικό προς το περιβάλλον αέριο που όμως είναι εύφλεκτο Να είστε προσεκτικοί κατά τη μεταφορά ή μετακίνηση της συσκευής για να διασφαλιστεί ότι στο κύκλωμα ψυκτικού δεν έχει προκληθεί βλάβη Σε περίπτωση βλάβης αποφεύγετε τις γυμνές φλόγες ή πηγές ανάφλεξης και εξαερίστε το χώρο στον οποίο έχει τοποθετηθεί η μονάδα για λίγα λεπτά Τα παιδιά πρέπει να επιβλέπονται για να διασφαλιστεί ότι δεν παίζου...

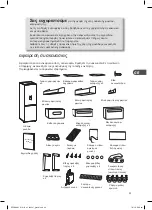
Страница 9: ... all the safety instructions carefully before use and keep this installation instruction manual for future reference The Main Unit Salad Bin Cover Shelf Upper Left Hinge Cover Wine Rack Fridge Glass Shelf x 3 Salad Bin Small Freezer Drawer x 2 Large Freezer Drawer Upper Fridge Door Shelf Egg Tray Bottle Stopper Instruction Manual Water Dispenser Ice Tray Lower Fridge Door Shelf Instruction Manual ...

Страница 10: ... this adjust the two levelling feet at the front of the unit If the unit is not level the doors and magnetic seal alignments will not be covered properly free space requirements When installing the unit ensure that 25 mm of free space is left at both sides 50 mm at the rear of the unit and 25 mm at the top of the unit The door can be opened to the right or the left depending on which best suits th...

Страница 11: ...iver Flat bladed screwdriver Hexagonal spanner installing the water tank Insert the valve of the water tank into the hole of the water dispenser and push down the water tank to attach securely with the water dispenser To remove the water tank hold firmly on the handle and bottom of the water tank then pull with the handle and push up from the bottom at the same time Be careful not to press on the ...

Страница 12: ...side use another stop block and screw tightly Upper corner cover has left and right side There is the letter L and R at the back to identify which side it belongs to The upper corner cover packed as an accessory is for the right side Upper door stop block has left and right side The upper door stop block packed as an accessory is for the left side Upper hinge cover has left and right side The uppe...

Страница 13: ...he levelling feet fix board with the bottom hinge On the bottom hinge move the position of the bottom hinge pin to the other hole Tighten the pin securely 8 Screw the levelling feet fix board bottom hinge and levelling feet tightly on their new position 9 Stand the unit Remove the middle hinge hole covers and swap their position with the middle hinge Reverse the middle hinge 13 installation DFCD60...

Страница 14: ...pin securely Screw the middle hinge tightly Cover the remaining holes with the hole covers 11 Move the magnet cord to the opposite side Reverse the upper hinge Place the bottom hole of the upper door onto the middle hinge pin Insert the upper hinge pin into the upper hole of the upper door Tighten the pin securely Screw the upper hinge tightly Cover the upper hinge with the upper hinge cover 12 At...

Страница 15: ...re using your unit Before placing any food in your unit turn it on and wait for 24 hours to make sure it is working properly and to allow it time to fall to the correct temperature Your unit should not be overfilled Before Plugging in YOU MUST Check that you have a socket which is compatible with the plug supplied with the unit Before Turning On Do not turn on until two hours after moving the unit...

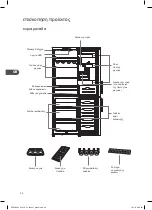
Страница 16: ...ne Rack Bottle Stopper Control Panel Fridge Glass Shelf Salad Bin Salad Bin Cover Shelf Fridge Door Shelf Freezer Drawer Water Tank Water Dispenser inside the fridge door LED Light Freezer Glass Shelf DFCD60W_X16_IB_2L_160407_grace indb 16 7 4 16 6 26 pm ...

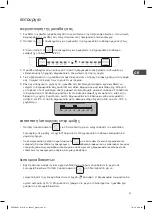
Страница 17: ...leave overnight The correct temperature for the fridge compartment should be at the recommended 0 8 C The correct temperature for the freezer compartment should be 18 C or lower super freeze mode Press and hold for 3 seconds to activate the super freeze mode will light up Temperature in the freezer compartment will be quickly lowered To switch off press and hold for 3 seconds and the freezer tempe...

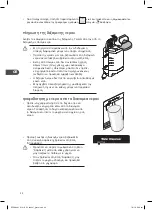
Страница 18: ... and damage Hot water must not be filled into the water tank directly Do not touch other parts of the unit when filling water it may lead to leakage receiving water from the water dispenser You should use the type of container that can fit under the water dispenser Place the container properly underneath and push on the lever for water to flow Before you dispense the water make sure the lock devic...

Страница 19: ... defrost and enables you to control the quantity you need better Leave cooked food to cool completely Chill food before freezing if possible Consider how you will want to cook the food before freezing it Don t freeze food in metal containers if you may want to microwave it straight from the freezer Use special freezer bags freezer film polythene bags plastic containers and aluminium foil heavy dut...

Страница 20: ...ter removing items This prevents drying or freezer burn and a build up of frost on any remaining food cleaning the interior and the exterior of the unit Remove all the shelves and drawers Wipe the inside of the unit with a weak solution of bicarbonate soda and then rinse with warm water using a sponge or cloth Wipe completely dry before replacing the shelves drawers and salad bin Use a damp cloth ...

Страница 21: ...mpty all food and clean the appliance leaving the door ajar to prevent unpleasant smells condensation Condensation may appear on the outside of the unit This may be due to a change in room temperature Wipe off any moisture residue If the problem continues please contact a qualified technician for assistance disposal Old units still have some residual value An environmentally friendly method of dis...

Страница 22: ... C Storage Temperature Freezer 18 C Fridge 0 8 C average 4 C Energy Consumption 0 85 kWh 24 hours Energy consumption 310 kWh per year based on standard test results for 24 hours Actual energy consumption will depend on how the appliance is used and where it is located Airborne Acoustical Noise 42 dB Energy Grading A Temperature Rise 16 hours Freezing Capacity 12 kg 24 hours Rated Voltage 220 240 V...

Страница 23: ... Διαβάστε όλες τις οδηγίες προσεκτικά πριν τη χρήση της μονάδας και κρατήστε τις για λόγους μελλοντικής αναφοράς Η Κύρια μονάδα Κάλυμμα ράφι κάδου λαχανικών Κάλυμμα επάνω αριστερού μεντεσέ Ράφι για φιάλες κρασιού Γυάλινο ράφι ψυγείου x 3 Κάδος λαχανικών Μικρό συρτάρι κατάψυξης x 2 Μεγάλο συρτάρι κατάψυξης Επάνω ράφι πόρτας ψυγείου Δίσκος αυγών Σύστημα συγκράτησης φιαλών Εγχειρίδιο χρήσης Water Dis...

Страница 24: ...Για να γίνει αυτό ρυθμίστε τα δύο πέλματα στάθμισης στο μπροστινό μέρος της μονάδας Εάν η μονάδα δεν είναι επίπεδη δεν θα υπάρξει κανονική επικάλυψη των θυρών με τα μαγνητικά λάστιχα απαιτήσεις ύπαρξης ελεύθερου χώρου Όταν εγκαθιστάτε τη μονάδα βεβαιωθείτε ότι αφήνετε ελεύθερο χώρο 25 mm και στις δύο πλευρές 50 mm στο πίσω μέρος της μονάδας και 25 mm στο επάνω μέρος της μονάδας Η πόρτα μπορεί να α...

Страница 25: ...τω μέρος Προσέξτε να μην ασκείτε πίεση στη βαλβίδα Βαλβίδα Βεβαιωθείτε ότι το ελαστικό παρέμβυσμα στο εσωτερικό της οπής βρίσκεται στην κατάλληλη θέση προτού εγκαταστήσετε τη δεξαμενή νερού Αυτό μπορεί να οφείλεται στο ότι το ελαστικό παρέμβυσμα μπορεί να αναποδογυρίσει κατά την αφαίρεση της δεξαμενής νερού Ένα πολύ μικρό κομμάτι από το ελαστικό παρέμβυσμα θα είναι σκισμένο Αυτό δεν είναι ένδειξη ...

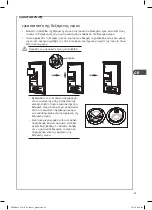
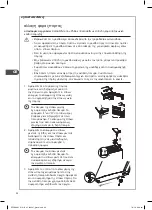
Страница 26: ...ιγξης 1 Αφαιρέστε όλα τα ράφια της πόρτας ψυγείου και τη δεξαμενή νερού από την επάνω πόρτα Αφαιρέστε το επάνω κάλυμμα το κάλυμμα της επάνω γωνίας και το συγκρατητήρα στην επάνω γωνία της πόρτας 2 Αφαιρέστε το κάλυμμα του επάνω μεντεσέ τις βίδες και τον επάνω μεντεσέ Ανασηκώστε την επάνω πόρτα και τοποθετήστε την σε μια επενδυμένη επιφάνεια ώστε να αποφευχθεί η πρόκληση αμυχών 3 Αφαιρέστε το στοπ ...

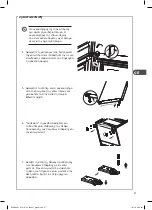
Страница 27: ... πέλματα στάθμισης την πλάκα προσάρτησης των πελμάτων στάθμισης και τον κάτω μεντεσέ 7 Αλλάξτε τη θέση της πλάκας προσάρτησης των πελμάτων στάθμισης με τον κάτω μεντεσέ Στον κάτω μεντεσέ μετακινήστε τη θέση του πείρου του κάτω μεντεσέ στην άλλη τρύπα Σφίξτε τον πείρο μέχρι να ασφαλίσει Ο συγκρατητήρας της επάνω πόρτας έχει αριστερή και δεξιά πλευρά Ο συγκρατητήρας της επάνω πόρτας που είναι συσκευ...

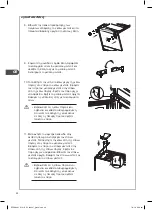
Страница 28: ...η τους με το μεσαίο μεντεσέ Αντιστρέψτε το μεσαίο μεντεσέ 10 Τοποθετήστε την οπή στο κάτω μέρος της κάτω πόρτας στον πείρο του κάτω μεντεσέ Εισάγετε τον πείρο του μεσαίου μεντεσέ στην επάνω οπή της κάτω πόρτας Σφίξτε τον πείρο μέχρι να ασφαλίσει Σφίξτε το μεσαίο μεντεσέ σφιχτά Καλύψτε τις υπόλοιπες οπές με τα καλύμματα οπών 11 Μετακινήστε το μαγνητικό καλώδιο στην αντίθετη πλευρά Αντιστρέψτε τον ε...

Страница 29: ...μένετε 24 ώρες για να βεβαιωθείτε ότι λειτουργεί κανονικά και δώστε της χρόνο μέχρι η θερμοκρασία να πέσει στη σωστή θερμοκρασία Μην παραγεμίζετε τη μονάδα σας Προτού τη συνδέσετε στο ρεύμα ΠΡΕΠΕΙ να ελέγξετε ότι έχετε μια πρίζα που είναι συμβατή με το βύσμα που παρέχεται μαζί με τη μονάδα Πριν την ενεργοποίηση Μην ενεργοποιήσετε τη μονάδα για έως δύο ώρες μετά τη μετακίνησή της Το ψυκτικό υγρό χρ...

Страница 30: ...στημα συγκράτησης φιαλών Πίνακας Ελέγχου Γυάλινο ράφι ψυγείου Κάδος λαχανικών Κάλυμμα ράφι κάδου λαχανικών Ράφι πόρτας ψυγείου Συρτάρι κατάψυξης Λυχνία LED Γυάλινο ράφι κατάψυξης Δεξαμενή νερού Διανομέας νερού στο εσωτερικό της πόρτας του ψυγείου DFCD60W_X16_IB_2L_160407_grace indb 30 7 4 16 6 26 pm ...

Страница 31: ... Τοποθετήστε το θερμόμετρο είτε στο θάλαμο ψυγείου είτε στο θάλαμο κατάψυξης και αφήστε το καθ όλη τη διάρκεια της νύχτας Συνιστάται η σωστή θερμοκρασία για το θάλαμο ψυγείου να κυμαίνεται μεταξύ 0 και 8 C Η σωστή θερμοκρασία για το θάλαμο κατάψυξης θα πρέπει να είναι 18 C ή χαμηλότερη κατάσταση λειτουργίας υπερ ψύξης Πατήστε παρατεταμένα το για 3 δευτερόλεπτα για να ενεργοποιήσετε την κατάσταση λ...

Страница 32: ...περιέχουν κόκκους ενδέχεται να προκληθεί έμφραξη και βλάβη Η δεξαμενή νερού δεν πρέπει να γεμίζεται απευθείας με καυτό νερό Μην αγγίζετε άλλα εξαρτήματα της μονάδας κατά την πλήρωσή της με νερό καθώς μπορεί να προκληθεί διαρροή τροφοδότηση με νερό από το διανομέα νερού Πρέπει να χρησιμοποιήσετε τύπο δοχείου που να είναι δυνατόν να χωρέσει κάτω από το διανομέα νερού Τοποθετήστε το δοχείο κατάλληλα ...

Страница 33: ...ρτες μόνο όταν χρειάζεται να τοποθετείτε ή να παίρνετε τρόφιμα από τη μονάδα Κρεμάστε το σύστημα συγκράτησης φιαλών ή οποιοδήποτε ράφι πόρτας για συγκράτηση φιαλών σταθερά στη θέση του προετοιμασίες για κατάψυξη Χρησιμοποιήστε ποιοτικά τρόφιμα και επεξεργαστείτε τα όσο το δυνατόν λιγότερο Καταψύξτε τρόφιμα σε μικρές ποσότητες καθώς καταψύχονται γρηγορότερα χρειάζεται λιγότερος χρόνος για την απόψυ...

Страница 34: ...ποτέ αποψυγμένα οστρακοειδή Επανασφραγίστε τις συσκευασίες κατάλληλα αφού αφαιρέσετε τα περιεχόμενά τους Με αυτόν τον τρόπο τα τρόφιμα που μένουν δεν ξεραίνονται χωρίς να προκαλείται κάψιμο κατάψυξης ή να δημιουργείται πάγος επάνω σε αυτά σε μια σακούλα πολυαιθυλενίου η οποία βρίσκεται σε έναν περιέκτη με τετράγωνες πλευρές Καταψύξτε το και στη συνέχεια αφαιρέστε το από τον περιέκτη και σφραγίστε ...

Страница 35: ...τε ότι οι πόρτες είναι κλειστές ώστε να μην εισχωρήσει το βερνίκι στα μαγνητικά λάστιχα της πόρτας ή στο εσωτερικό της μονάδας Για τον καθαρισμό της σχάρας του συμπυκνωτή στο πίσω μέρος της μονάδας και των παρακείμενων μερών μπορεί να χρησιμοποιηθεί ένα εξάρτημα με μαλακή βούρτσα καθαρισμός της δεξαμενής και του διανομέα νερού Αφαιρέστε τη δεξαμενή νερού Ξεπλύνετε τη δεξαμενή το κάλυμμα το καπάκι ...

Страница 36: ... όλα τα τρόφιμα και καθαρίστε τη συσκευή αφήνοντας την πόρτα μισάνοιχτη για να μην αναπτυχθούν δυσάρεστες μυρωδιές συμπύκνωση Στο εξωτερικό της μονάδας ενδέχεται να εμφανιστεί συμπύκνωση Αυτό μπορεί να οφείλετε σε αλλαγές στη θερμοκρασία δωματίου Σκουπίστε τυχόν κατάλοιπα υγρασίας Εάν το πρόβλημα παραμένει επικοινωνήστε με έναν εξειδικευμένο τεχνικό για βοήθεια απόρριψη Οι παλιές μονάδες μπορεί να...

Страница 37: ...θήκευσης Κατάψυξη 18 C Ψυγείο 0 8 C μέτρια 4 C Κατανάλωση ενέργειας 0 85 kWh 24 ώρες Κατανάλωση ενέργειας 310 kWh ανά χρόνο βάσει τυπικών αποτελεσμάτων ελέγχου για 24 ώρες Η πραγματική κατανάλωση ενέργειας εξαρτάται από τον τρόπο χρήσης της συσκευής και την τοποθεσία της Αερόφερτος ακουστικός θόρυβος 42 dB Ενεργειακή διαβάθμιση A Άνοδος θερμοκρασίας 16 ώρες Χωρητικότητα κατάψυξης 12 kg 24 ώρες Ονο...

Страница 38: ...DFCD60W_X16_IB_2L_160407_grace indb 38 7 4 16 6 26 pm ...

Страница 39: ...DFCD60W_X16_IB_2L_160407_grace indb 39 7 4 16 6 26 pm ...

Страница 40: ...ι αυτό το προϊόν δεν πρέπει να απορρίπτεται με τα υπόλοιπα οικιακά απορρίμματα Αντ αυτού είναι δική σας ευθύνη να απορρίψετε τον προς απόρριψη εξοπλισμό σας παραδίδοντάς τον σε ένα καθορισμένο σημείο συλλογής για την ανακύκλωση ηλεκτρικού και ηλεκτρονικού εξοπλισμού προς απόρριψη Η ξεχωριστή συλλογή και ανακύκλωση του προς απόρριψη εξοπλισμού σας τη στιγμή της απόρριψης θα συμβάλλει στη διατήρηση ...

Отзывы: