background image

-4-

English

Driver Installation

1. 

Switch on your computer.

2. 

The external drive will be recognized and you can start using the device 

immediately.


Support Delock

If you have further questions, please contact our customer support 

[email protected]


You can find current product information on our homepage: www.delock.com


Final clause

Information and data contained in this manual are subject to change without 

notice in advance. Errors and misprints excepted.


Copyright

No part of this user manual may be reproduced, or transmitted for any purpose, 

regardless in which way or by any means, electronically or mechanically, without 

explicit written approval of Delock.


Edition: 09/2022

Содержание 42018

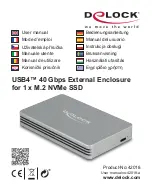
Страница 1: ...D Product No 42018 User manual no 42018 a www delock com User manual Mode d emploi U ivatelsk p ru ka Manuale utente Manual de utilizare Korisni ki priru nik Bedienungsanleitung Manual del usuario Ins...

Страница 2: ...ut tools The special feature of this enclosure is that no tools are required to install the M 2 SSD Note Due to the USB to NVMe controller the data transfer rate on a USB Gen 2x2 port is only 10 Gbps...

Страница 3: ...ple User manual Safety instructions Protect the product against moisture Protect the product against direct sunlight Avoid anti static electricity when installing the SSD Hardware Installation 1 Open...

Страница 4: ...lock de You can find current product information on our homepage www delock com Final clause Information and data contained in this manual are subject to change without notice in advance Errors and mi...

Страница 5: ...inbau der SSD Hardwareinstallation 1 ffnen Sie das Geh use Dazu m ssen Sie lediglich den Deckel an der hinteren Aussparung nach oben dr cken 2 Stecken Sie nun Ihre M 2 SSD in den Slot 3 Befestigen Sie...

Страница 6: ...re directe du soleil Eviter l lectricit statique au moment de l installation de votre SSD Installation mat rielle 1 Ouvrez le bo tier Vous devez pousser l arri re du capot vers le haut 2 Vous pouvez...

Страница 7: ...est tica cuando instale la unidad de estado s lido Hardware Instalaci n 1 Abra la carcasa Por ello es necesario empujar la tapa hacia arriba en el hueco trasero 2 Ahora enchufe la unidad de estado s l...

Страница 8: ...ed p m m slune n m sv tlem Vyhn te se anti statick elekt in p i instalaci SSD Instalace hardware 1 Otev te kryt PC Proto mus te v zadn m zahlouben zatla it kryt nahoru 2 Nyn p ipojte do slotu v M 2 S...

Страница 9: ...bezpo rednim wiat em s onecznym Podczas instalowania SSD nale y unika elektryczno ci statycznej Instalacja sprz tu 1 Otw rz obudow Dlatego nale y nacisn pokryw do g ry przy tylnym zag bieniu 2 Pod cz...

Страница 10: ...statica durante l installazione dell SSD Installazione dell hardware 1 Aprire l alloggiamento Pertanto necessario spingere il coperchio verso l alto nella rientranza posteriore 2 Collegare l SSD M 2 n...

Страница 11: ...antistatisk elektricitet n r du installerar SSD n H rdvaruinstallation 1 ppna h ljet D rf r m ste du trycka h ljet upp t vid den bakre f rdjupningen 2 Koppla in din M 2 SSD i facket 3 Fixera modulen...

Страница 12: ...relui Evita i electricitatea antistatic atunci c nd instala i SSD Instalarea componentelor hardware 1 Deschide i carcasa Prin urmare trebuie s mpinge i capacul n sus la ni a din spate 2 Acum pute i co...

Страница 13: ...st l Ker lje az elektrosztatikus kis l seket az SSD beszerel se k zben Hardvertelep t s 1 Nyissa ki a sz m t g ph zat Ez rt sz ks ges a fed t felfel nyomni a h ts m lyed sben 2 Csatlakoztassa az M 2...

Страница 14: ...jetlosti Izbjegavajte antistati ki elektricitet prilikom postavljanja SSD a Ugradnja hardvera 1 Otvorite ku i te Stoga biste trebali gurnuti poklopacprema gore na stra njem udubljenju 2 Sada ukop ajte...

Страница 15: ...Android 10 0 Chrome OS 90 0 iPad Air 4 Linux Kernel 5 13 Mac OS 12 4 Windows 8 1 8 1 64 10 10 64 11 USB Type C Thunderbolt 3 Thunderbolt 4 SSD 1 2 M 2 SSD 3 4 SSD SSD 5 6 Thunderbolt Thunderbolt USB C...

Страница 16: ...logo on the device and the package indicates that the device should not be disposed in the normal household garbage You are responsible for taking the disused electrical and electronical devices to a...

Отзывы: