background image

Back to Contents Page


Coin-Cell Battery 

Dell™ Vostro™ 3500 Service Manual


Removing the Coin-Cell Battery 


1.

Follow the procedures in 

Before Working Inside Your Computer

.  

2.

Remove the 

battery

.  

3.

Remove the 

base cover

.  

4.

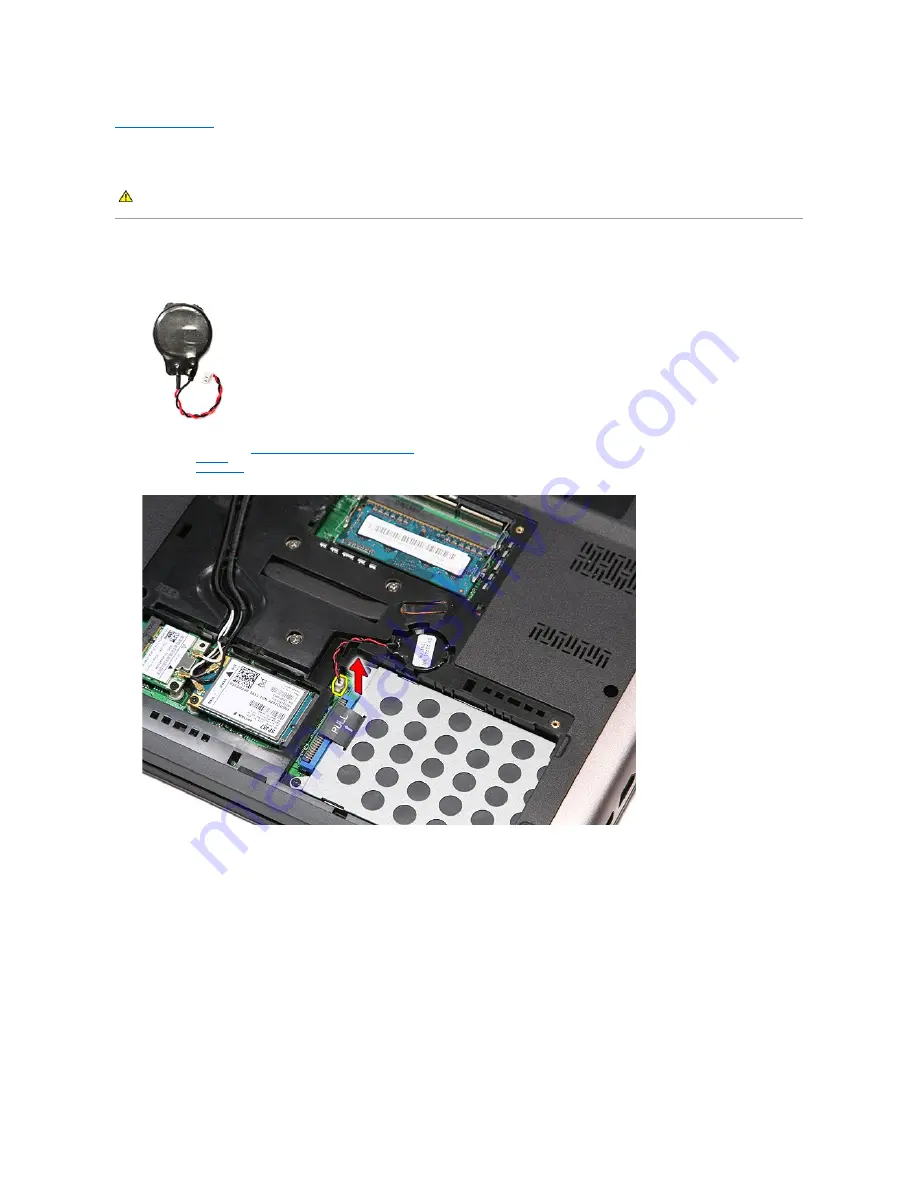
Disconnect the coin-cell battery cable from the system board. 


5.

Gently pry the tabs that secure the coin-cell battery to the system board away from the coin-cell battery. 

WARNING: 

Before working inside your computer, read the safety information that shipped with your computer. For additional safety best 

practices information, see the Regulatory Compliance Homepage at www.dell.com/regulatory_compliance. 

Содержание Vostro 3500

Страница 1: ... other than its own February 2010 Rev A00 Working on Your Computer Specifications Removing and Replacing Parts System Setup Diagnostics NOTE A NOTE indicates important information that helps you make better use of your computer CAUTION A CAUTION indicates potential damage to hardware or loss of data if instructions are not followed WARNING A WARNING indicates a potential for property damage person...

Страница 2: ... Remove the optical drive 6 Remove the keyboard 7 Remove the palm rest 8 Remove the screw that secures the audio board to the palm rest 9 Disconnect the speaker cable from its connector on the audio board WARNING Before working inside your computer read the safety information that shipped with your computer For additional safety best practices information see the Regulatory Compliance Homepage at ...

Страница 3: ...10 Lift the audio board up and away from the computer 11 Open the clip that secures the audio board data cable to the audio board ...

Страница 4: ...12 Disconnect the audio board data cable from its connector on the audio board Replacing the Audio Board To replace the audio board perform the above steps in reverse order Back to Contents Page ...

Страница 5: ... the battery 3 Remove the screws that secure the base cover to the computer 4 Lift up the base cover and remove it from the computer WARNING Before working inside your computer read the safety information that shipped with your computer For additional safety best practices information see the Regulatory Compliance Homepage at www dell com regulatory_compliance ...

Страница 6: ...Replacing the Base Cover To replace the base cover perform the above steps in reverse order Back to Contents Page ...

Страница 7: ... unlock position 4 Slide the other battery release latch to the unlock position WARNING Before working inside your computer read the safety information that shipped with your computer For additional safety best practices information see the Regulatory Compliance Homepage at www dell com regulatory_compliance NOTE You may need to install Adobe Flash Player from Adobe com in order to view the illust...

Страница 8: ...5 Slide the battery and remove it from the computer Replacing the Battery To replace the battery perform the above steps in reverse order Back to Contents Page ...

Страница 9: ... field provides a menu to access the System Setup options Press Left Arrow and Right Arrow keys to navigate As a Menu option is highlighted the Options List lists the options that define the hardware installed on your computer Options List Appears on the left side of the System Setup window The field lists features that define the configuration of your computer including installed hardware power c...

Страница 10: ...he model number of the drive in the fixed bay Video Controller Displays the model number of the video card installed on your computer Video BIOS Version Displays the BIOS version of the video card Video Memory Displays the video memory size Panel Type Displays the display panel type Native Resolution Displays the native resolution of the display Audio Controller Displays the type of the audio cont...

Страница 11: ...f test POST which decreases the amount of time needed to boot the computer Default Enabled Keyboard Click Enable or disable the keyboard sound Default Disabled Wireless Internal Bluetooth Enable or disable the Bluetooth module Default Enabled Internal WLAN Enable or disable the wireless LAN module Default Enabled Internal WWAN Enable or disable the wireless WAN module Default Enabled Security Serv...

Страница 12: ...e keyboard 7 Remove the palm rest 8 Remove the audio board 9 Lift the Bluetooth card up and away from the audio board Replacing the Bluetooth Card To replace the Bluetooth card perform the above steps in reverse order Back to Contents Page WARNING Before working inside your computer read the safety information that shipped with your computer For additional safety best practices information see the...

Страница 13: ...d 7 Remove the wireless wide area network WWAN card 8 Remove the keyboard 9 Remove the palm rest 10 Remove the display assembly 11 Remove the display bezel 12 Disconnect the camera cable from the display assembly 13 Lift the camera up and away from the computer WARNING Before working inside your computer read the safety information that shipped with your computer For additional safety best practic...

Страница 14: ...Replacing the Camera To replace the camera perform the above steps in reverse order Back to Contents Page ...

Страница 15: ...cover 4 Disconnect the coin cell battery cable from the system board 5 Gently pry the tabs that secure the coin cell battery to the system board away from the coin cell battery WARNING Before working inside your computer read the safety information that shipped with your computer For additional safety best practices information see the Regulatory Compliance Homepage at www dell com regulatory_comp...

Страница 16: ...6 Lift up the coin cell battery and remove it from the computer Replacing the Coin Cell Battery To replace the coin cell battery perform the above steps in reverse order Back to Contents Page ...

Страница 17: ...lights appear the battery is in good condition and more than 80 percent of its original charge capacity remains Each light represents incremental degradation If five lights appear less than 60 percent of the charge capacity remains and you should consider replacing the battery Keyboard Status Lights The green lights located above the keyboard indicate the following LED Error Codes The following ta...

Страница 18: ...nstalled remove one and test Try the other module in the same slot and test Test the other slot with both modules 3 Replace the memory 4 Replace the system board OFF FLASH FLASH Modem error 1 Reseat the modem 2 Replace the modem 3 Replace the system board FLASH FLASH FLASH System board error 1 Replace the system board FLASH FLASH OFF Option ROM error 1 Reseat the device 2 Replace the device 3 Repl...

Страница 19: ...ove the wireless wide area network WWAN card 8 Remove the keyboard 9 Remove the palm rest 10 Flip the computer over and release the antenna cables from their routing guides on the computer 11 With the right side of the computer facing up disconnect the display cable from the system board WARNING Before working inside your computer read the safety information that shipped with your computer For add...

Страница 20: ...antenna cables from their connectors on the system board 13 Disconnect the camera cable from its connector on the system board 14 Release the antenna cables and the camera cable from their routing guides on the computer ...

Страница 21: ...15 Remove the screws that secure the display assembly to the computer 16 Lift the display assembly up and away from the computer ...

Страница 22: ...Replacing the Display Assembly To replace the display panel perform the above steps in reverse order Back to Contents Page ...

Страница 23: ...ve 6 Remove the keyboard 7 Remove the palm rest 8 Remove the ExpressCard if applicable 9 Remove the screw that secures the ExpressCard cage to the computer 10 Open the clip that secures the ExpressCard cage cable to the computer WARNING Before working inside your computer read the safety information that shipped with your computer For additional safety best practices information see the Regulatory...

Страница 24: ...11 Disconnect the ExpressCard cage cable from its connector on the system board 12 Lift the ExpressCard cage up and away from the computer ...

Страница 25: ...Replacing the ExpressCard Cage To replace the ExpressCard cage perform the above steps in reverse order Back to Contents Page ...

Страница 26: ... Computer 2 Press in on the ExpressCard to release it from the computer 3 Slide the ExpressCard out of the computer WARNING Before working inside your computer read the safety information that shipped with your computer For additional safety best practices information see the Regulatory Compliance Homepage at www dell com regulatory_compliance ...

Страница 27: ...Replacing the ExpressCard To replace the ExpressCard perform the above steps in reverse order Back to Contents Page ...

Страница 28: ...the base cover 4 Remove the screws that secure the hard drive assembly to the computer 5 Slide the hard drive assembly towards the center of the computer WARNING Before working inside your computer read the safety information that shipped with your computer For additional safety best practices information see the Regulatory Compliance Homepage at www dell com regulatory_compliance ...

Страница 29: ...6 Lift the hard drive assembly up and away from the computer 7 Remove the screws that secure the hard drive bracket to the hard drive ...

Страница 30: ... drive adapter from the hard drive assembly 9 Lift the hard drive bracket up and away from the hard drive Replacing the Hard Drive To replace the hard drive perform the above steps in reverse order Back to Contents Page ...

Страница 31: ......

Страница 32: ...e the wireless wide area network WWAN card 8 Remove the keyboard 9 Remove the palm rest 10 Remove the display assembly 11 Remove the ExpressCard cage 12 Remove the system board 13 Disconnect the fan cable from the system board 14 Remove the screws that secure the heat sink and fan assembly to the system board WARNING Before working inside your computer read the safety information that shipped with...

Страница 33: ...the heat sink and fan assembly up and away from the system board Replacing the Heat Sink and Fan Assembly To replace the heat sink and fan assembly perform the above steps in reverse order Back to Contents Page ...

Страница 34: ...e the wireless wide area network WWAN card 8 Remove the keyboard 9 Remove the palm rest 10 Remove the display assembly 11 Remove the ExpressCard cage 12 Remove the system board 13 Remove the screw that secures the IO board the computer 14 Lift the IO board and turn it over WARNING Before working inside your computer read the safety information that shipped with your computer For additional safety ...

Страница 35: ...15 Disconnect the IO board cable from the IO board 16 Remove the IO board from the computer Replacing the IO Board To replace the IO board perform the above steps in reverse order Back to Contents Page ...

Страница 36: ...e right side facing up 4 Using a small plastic scribe press in on the release latches and pry the keyboard to release it 5 Flip the keyboard over and lay it on the palm rest WARNING Before working inside your computer read the safety information that shipped with your computer For additional safety best practices information see the Regulatory Compliance Homepage at www dell com regulatory_complia...

Страница 37: ...6 Carefully open the clip to release the keyboard cable 7 Disconnect the keyboard cable from its connector on the system board and remove the keyboard from the computer ...

Страница 38: ...Replacing the Keyboard To replace the keyboard perform the above steps in reverse order Back to Contents Page ...

Страница 39: ... the wireless wide area network WWAN card 8 Remove the keyboard 9 Remove the palm rest 10 Remove the display assembly 11 Using a plastic scribe gently pry under the display bezel to release it from the display assembly 12 Lift the display bezel and remove it from the display assembly WARNING Before working inside your computer read the safety information that shipped with your computer For additio...

Страница 40: ...Replacing the Display Bezel To replace the display bezel perform the above steps in reverse order Back to Contents Page ...

Страница 41: ...e the wireless wide area network WWAN card 8 Remove the keyboard 9 Remove the palm rest 10 Remove the display assembly 11 Remove the display bezel 12 Remove the screws that secure the display panel to the display assembly 13 Carefully lift the display panel from the display assembly WARNING Before working inside your computer read the safety information that shipped with your computer For addition...

Страница 42: ...secure the brackets and hinges to the display panel 15 Remove the hinges and brackets from the display panel Replacing the Display Panel To replace the display panel perform the above steps in reverse order Back to Contents Page ...

Страница 43: ...ve the base cover 4 Push apart the memory retention clips to release the memory module 5 Remove the memory module from its connector on the system board WARNING Before working inside your computer read the safety information that shipped with your computer For additional safety best practices information see the Regulatory Compliance Homepage at www dell com regulatory_compliance ...

Страница 44: ...Replacing the Memory Module s To replace the memory module s perform the above steps in reverse order Back to Contents Page ...

Страница 45: ... Computer 2 Press in on the memory card to release it from the computer 3 Slide the memory card out of the computer WARNING Before working inside your computer read the safety information that shipped with your computer For additional safety best practices information see the Regulatory Compliance Homepage at www dell com regulatory_compliance ...

Страница 46: ...Replacing the Memory Card To replace the memory card perform the above steps in reverse order Back to Contents Page ...

Страница 47: ...he base cover 4 Remove the screw that secures the optical drive to the computer 5 Using a screwdriver carefully gently pry the optical drive out of the computer WARNING Before working inside your computer read the safety information that shipped with your computer For additional safety best practices information see the Regulatory Compliance Homepage at www dell com regulatory_compliance ...

Страница 48: ...Replacing the Optical Drive To replace the optical drive perform the above steps in reverse order Back to Contents Page ...

Страница 49: ...e the hard drive 5 Remove the optical drive 6 Remove the rubber feet at the bottom of the computer 7 Remove the screws that secure the palm rest to the bottom of the computer WARNING Before working inside your computer read the safety information that shipped with your computer For additional safety best practices information see the Regulatory Compliance Homepage at www dell com regulatory_compli...

Страница 50: ...omputer over with the right side facing up 9 Remove the keyboard 10 Open the clip that secures the media button cable to the system board 11 Disconnect the media button cable from its connector on the system board ...

Страница 51: ...12 Open the clip that secures the touchpad data cable to the system board 13 Disconnect the touchpad data cable from its connector on the system board ...

Страница 52: ...14 Open the clip that secures the audio board data cable to the system board 15 Disconnect the audio board cable from its connector on the system board ...

Страница 53: ...16 Open the clip that secures the fingerprint reader cable to the system board 17 Disconnect the fingerprint reader cable from its connector on the system board ...

Страница 54: ...18 Remove the screws that secure the palm rest to the front of the computer 19 Gently pry along the edges of the palm rest to release the palm rest ...

Страница 55: ...20 Lift the palm rest up and away from the computer Replacing the Palm Rest To replace the palm rest perform the above steps in reverse order Back to Contents Page ...

Страница 56: ... Coin Cell Battery Wireless Local Area Network WLAN Card Palm Rest Bluetooth Card Speaker Display Bezel Camera Heat Sink System Board Memory Card Subscriber Identity Module SIM Card Memory Optical Drive Wireless Wide Area Network WWAN Card Keyboard Audio Board Power Button Board Display Assembly Display Panel ExpressCard Cage Processor I O Board ...

Страница 57: ...9 Remove the palm rest 10 Remove the display assembly 11 Remove the ExpressCard cage 12 Remove the system board 13 Remove the heat sink and fan assembly 14 Using a flat blade screwdriver rotate the cam screw counterclockwise to release the processor from its socket on the system board 15 Lift the processor up and away from the system board WARNING Before working inside your computer read the safet...

Страница 58: ...ck to Contents Page CAUTION While replacing the processor ensure that the cam lock is in the fully open position before seating the processor module A processor module that is not properly seated can result in an intermittent connection or permanent damage to the microprocessor and ZIF socket ...

Страница 59: ...e the optical drive 6 Remove the keyboard 7 Remove the palm rest 8 Remove the tape that secures the power button cable to the power button board 9 Remove the screw that secures the power button board to the palm rest WARNING Before working inside your computer read the safety information that shipped with your computer For additional safety best practices information see the Regulatory Compliance ...

Страница 60: ...10 Open the clip that secures the power button cable to the power button board 11 Disconnect the power button cable from the power button board ...

Страница 61: ...12 Lift the power button board up and away from the computer Replacing the Power Button Board To replace the power button board perform the above steps in reverse order Back to Contents Page ...

Страница 62: ...our Computer 2 Remove the battery 3 Press in on the SIM card to release it from the computer 4 Slide the SIM card out of the computer WARNING Before working inside your computer read the safety information that shipped with your computer For additional safety best practices information see the Regulatory Compliance Homepage at www dell com regulatory_compliance ...

Страница 63: ...Replacing the SIM Card To replace the SIM card perform the above steps in reverse order Back to Contents Page ...

Страница 64: ... Remove the keyboard 7 Remove the palm rest 8 Remove the tape that secures the speaker cable to the front of the palm rest 9 Remove the touchpad and finger print reader data cables from the routing on the palm rest WARNING Before working inside your computer read the safety information that shipped with your computer For additional safety best practices information see the Regulatory Compliance Ho...

Страница 65: ...10 Remove the silver tape that secures the speaker cable to the palm rest 11 Release the speaker cables from their routings on the palm rest ...

Страница 66: ...12 Remove the screws that secure the speakers to the palm rest 13 Lift the speakers up and away from the palm rest ...

Страница 67: ...Replacing the Speaker To replace the speaker perform the above steps in reverse order Back to Contents Page ...

Страница 68: ...red Memory Type DDR3 SDRAM Speed 1066 MHz or 1333 MHz NOTE Intel Core i3 i5 i7 dual core processors shipped with your computer support both 1066 MHz and 1333 MHz memory modules However the dual core processors will operate at 1066 MHz memory module only Connectors two SODIMM slots Module capacities 1 GB 2 GB or 4 GB Minimum memory 1 GB Maximum memory 8 GB NOTE Only 64 bit operating systems can det...

Страница 69: ... SATA 2 Mobile HDD Optical drive DVD RW Blu ray Display Type 15 60 inch anti glare AG true life TL high definition low cost LC white light emitting diode WLED Active area X Y 344 232 mm X 193 536 mm Dimensions Height 209 50 mm 08 25 inches Width 359 30 mm 14 15 inches Diagonal 396 24 mm 15 60 inches Maximum resolution 1366 x 768 at 262 K colors Maximum brightness 200 nits Operating angle 0 closed ...

Страница 70: ...Output power 65 W or 90 W Output current 65 W 4 34 A maximum at 4 second pulse 3 34 A continuous 90 W 5 62 A maximum at 4 second pulse 4 62 A continuous Depth 65 W 57 80 mm 2 27 inches 90 W 70 00 mm 2 75 inches Height 65 W 28 30 mm 1 11 inches 90 W 22 60 mm 0 88 inches Width 65 W 137 20 mm 5 40 inches 90 W 147 00 mm 5 78 inches Temperature range Operating 0 C to 35 C 32 F to 95 F Storage 40 C to 6...

Страница 71: ...ng 1 30 Grms 2 Hz 600 Hz NOTE Vibration is measured using a random vibration spectrum that simulates user environment Maximum shock Operating 110 G 2 ms Non operating 160 G 2 ms NOTE Shock is measured with hard drive in head parked position and a 2 ms half sine pulse ...

Страница 72: ...7 Remove the wireless wide area network WWAN card 8 Remove the memory 9 Remove the keyboard 10 Remove the palm rest 11 Remove the display assembly 12 Remove the ExpressCard cage 13 Remove the coin cell battery 14 Remove the screws that secure the system board to the computer WARNING Before working inside your computer read the safety information that shipped with your computer For additional safet...

Страница 73: ...15 Gently lift the system board up and away from the computer Replacing the System Board To replace the system board perform the above steps in reverse order Back to Contents Page ...

Страница 74: ...ve the battery 3 Remove the base cover 4 Disconnect the antenna cables from the WLAN card 5 Remove the screw that secures the WLAN card to the system board WARNING Before working inside your computer read the safety information that shipped with your computer For additional safety best practices information see the Regulatory Compliance Homepage at www dell com regulatory_compliance ...

Страница 75: ...ull the WLAN card away from its connector on the system board and remove it from the computer Replacing the WLAN Card To replace the WLAN Card perform the above steps in reverse order Back to Contents Page ...

Страница 76: ...gulatory Compliance Homepage at www dell com regulatory_compliance CAUTION Many repairs may only be done by a certified service technician You should only perform troubleshooting and simple repairs as authorized in your product documentation or as directed by the online or telephone service and support team Damage due to servicing that is not authorized by Dell is not covered by your warranty Read...

Страница 77: ...puter After you complete any replacement procedure ensure you connect any external devices cards and cables before turning on your computer 1 Connect any external devices such as a port replicator battery slice or media base and replace any cards such as an ExpressCard 2 Connect any telephone or network cables to your computer 3 Replace the battery 4 Connect your computer and all attached devices ...

Страница 78: ...ve the battery 3 Remove the base cover 4 Disconnect the antenna cables from the WWAN card 5 Remove the screw that secures the WWAN card to the system board WARNING Before working inside your computer read the safety information that shipped with your computer For additional safety best practices information see the Regulatory Compliance Homepage at www dell com regulatory_compliance ...

Страница 79: ...ull the WWAN card away from its connector on the system board and remove it from the computer Replacing the WWAN Card To replace the WWAN Card perform the above steps in reverse order Back to Contents Page ...

Отзывы: