Steps
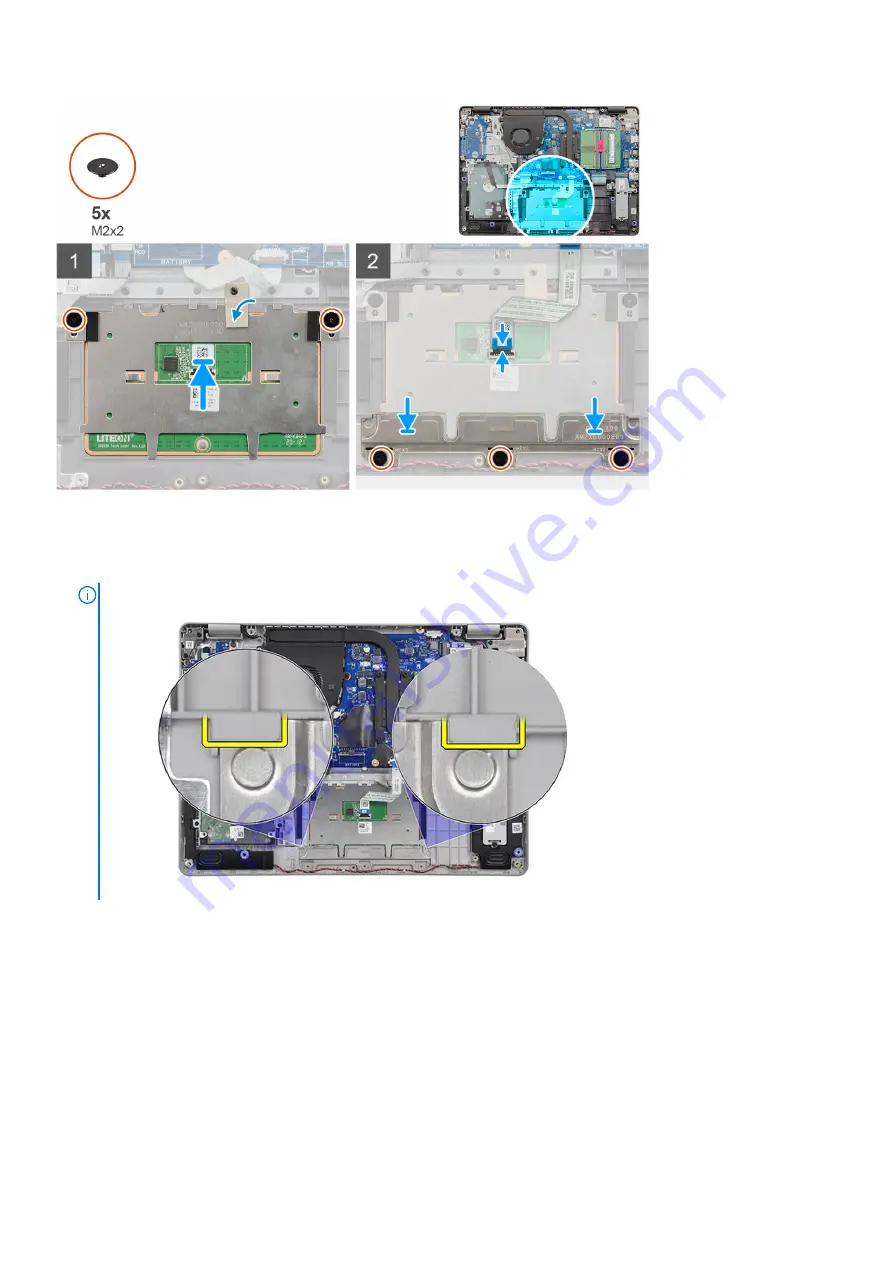
1. Reconnect the touchpad FFC to the touchpad module.
2. Align and place the touchpad module onto the system.
NOTE:
When installing the touchpad bracket on the Vostro 3401, insert its top corners under the two tabs on the palm
rest.
3. Install the two (M2x2) screws to secure the touchpad module to the palmrest.
4. Install the touchpad bracket on the touchpad and secure it using the three (M2x2) screws.
5. Peel back the conductive tape over the touchpad module.
6. Reconnect the touchpad FFC to the system board.
Next steps
1. Install the
.
2. Install the
.
3. Install the
.
after working inside your computer
.
50
Disassembly and reassembly
Содержание Vostro 3401
Страница 1: ...Vostro 3401 Service Manual Regulatory Model P132G Regulatory Type P132G001 September 2020 Rev A00 ...
Страница 5: ...WiFi power cycle 86 Chapter 6 Getting help 87 Contacting Dell 87 Contents 5 ...
Страница 15: ...3 Exploded View 15 ...
Страница 16: ...Exploded View 16 Exploded View ...
Страница 21: ...About this task Disassembly and reassembly 21 ...
Страница 23: ...About this task Disassembly and reassembly 23 ...
Страница 52: ...Steps 1 Disconnect the display cable from the connector on the system board 52 Disassembly and reassembly ...
Страница 62: ...About this task 62 Disassembly and reassembly ...
Страница 64: ...About this task 64 Disassembly and reassembly ...
Страница 69: ...About this task Disassembly and reassembly 69 ...
Страница 71: ...About this task Disassembly and reassembly 71 ...
Страница 77: ...About this task Disassembly and reassembly 77 ...
Страница 79: ...About this task Disassembly and reassembly 79 ...


