Dell ST2220 Скачать руководство пользователя страница 17


Menu Transparency 

Menu Timer 

Menu Lock 

DDC/CI


LCD Conditioning


Factory Reset 

Back


Allows you to adjust the OSD background from opaque to transparent. 

OSD Hold Time: Sets the amount of time the OSD will remain active after the last time you pressed a button.

Use the 

and 

 buttons to adjust the slider in 5 second increments, from 5 to 60 seconds.  

Controls user access to adjustments. When selected, no user adjustments are allowed. All buttons are locked except the


NOTE: 

Lock function 

 Either soft lock (through OSD menu) or hard lock (Press and hold the button above power button for 10 sec)

Unlock function


Only 

hard unlock (Press and hold the button above power button for 10 sec) 

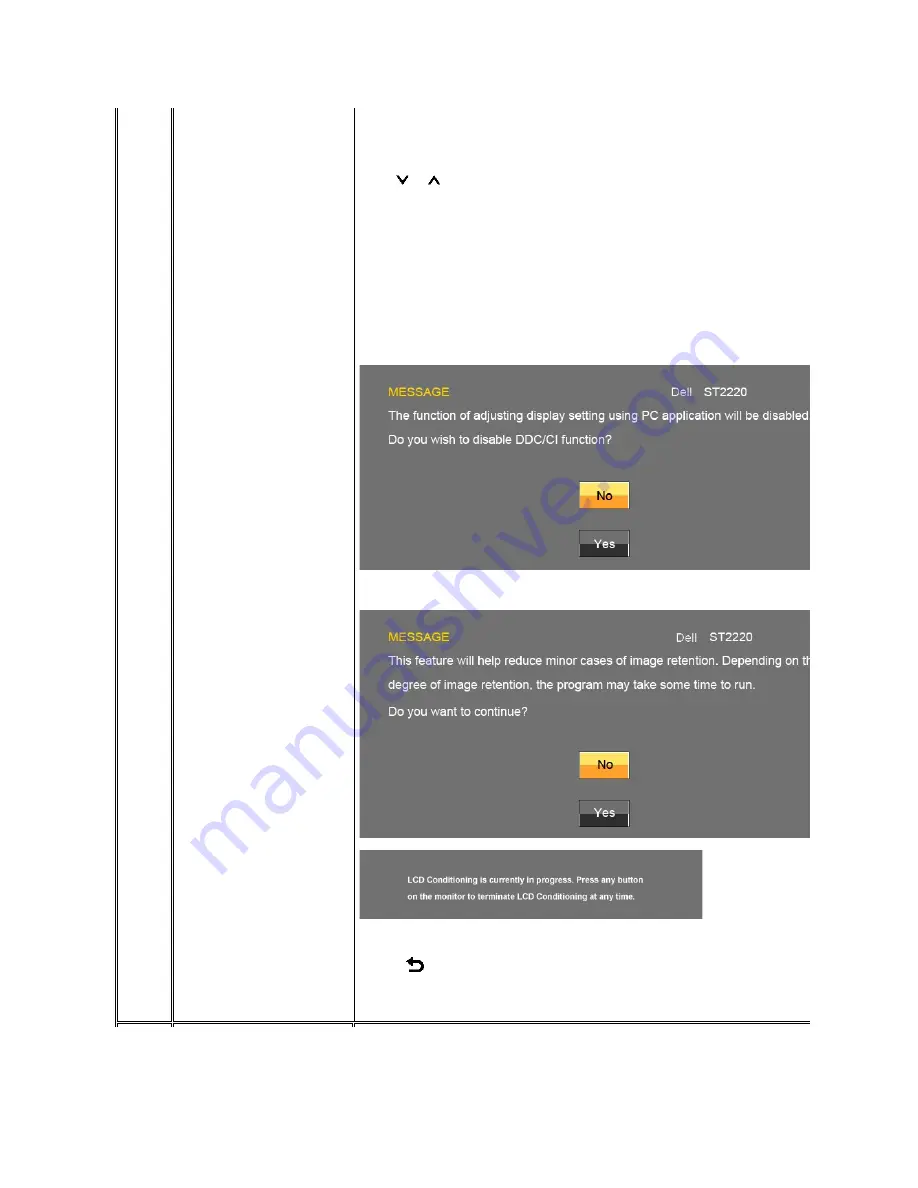
DDC/CI (Display Data Channel/Command Interface) allows your monitor parameters (brightness, color balance,  etc.) to be adjustable using software on your computer. You can disable this feature by selecting "Disable".

Enable this feature for best user experience and optimum performance of your monitor. 

If an image appears to be retained on the monitor, select

 LCD Conditioning

 to help eliminate any image retention. Using the LCD Conditioning feature may take several hours. Severe cases of image retention are known as burn

does not remove burn-in. 


Reset all OSD settings to the factory default settings.

Press the 

 button to go back to or exit the main menu.

Содержание ST2220

Страница 1: ...Agency As an ENERGY STAR partner Dell Inc has determined that this product meets the ENERGY STAR guidelines for energy efficiency Other trademarks and trade names may be used in this document to refer to either the entities claiming the marks and names or their products Dell Inc disclaims any proprietary interest in trademarks and trade names other than its own ST2220c June 2010 Rev A00 About Your...

Страница 2: ...n below Ensure that you have received all the components and contact Dell if something is missing Product Features The ST2220 flat panel display has an active matrix Thin Film Transistor TFT and Liquid Crystal Display LCD The monitor features include NOTE Some items may be optional and may not ship with your Monitor Some features or media may not be available in certain countries l Monitor with St...

Страница 3: ...CD which includes an information file INF Image Color Matching File ICM and product documentation Energy Saver feature for Energy Star compliance Security lock slot Identifying Parts and Features Front View Back View Front View Front Panel Controls Label Description 1 2 Shortcut keys The default settings are Preset Modes and Brightness Contrast 1 Shortcut key Preset Modes Default 2 Shortcut key Br...

Страница 4: ...To contact Dell for technical support 2 Security lock slot To help secure your monitor 3 Dell Soundbar mounting brackets To attach the optional Dell Soundbar 4 Regulatory rating label Lists the regulatory approvals 5 Stand release button To release stand assembly from monitor Left Side ...

Страница 5: ...ic power saving feature Pin Assignments VGA Connector Bottom view Label Description 1 AC power cord connector 2 VGA connector VESA Modes Horizontal Sync Vertical Sync Video Power Indicator Power Consumption Normal operation Active Active Active White 28 W maximum 20 W typical Active off mode Inactive Inactive Blanked Amber Less than 1 W Switch off Off Less than 0 5 W NOTE This monitor is ENERGY ST...

Страница 6: ...64 mm 18 76 inches 268 11 mm 10 56 inches Pixel pitch 0 248 mm Viewing angle 160 vertical typical 170 horizontal typical Luminance output 250 CD m typical Contrast ratio 1000 1 typical Dynamic Contrast Ratio 8 000 000 to 1 Faceplate coating Antiglare with hard coating 3H Backlight LED light bar system Response Time 5 ms typical Color Depth 16 7 mil colors Color Gamut 78 Model ST2220 Horizontal sca...

Страница 7: ...s 5 positive polarity at 75 ohm input impedance Synchronization input signals Separate horizontal and vertical synchronizations polarity free TTL level SOG Composite SYNC on green AC input voltage frequency current 100 to 240 VAC 50 or 60 Hz 3 Hz 2 0A Max Inrush iso surge current 120 V 30 A Max 240 V 60 A Max Model ST2220 Connector type l D sub Blue connector Signal cable type l D sub Detachable A...

Страница 8: ...monitor l To clean your antistatic screen lightly dampen a soft clean cloth with water If possible use a special screen cleaning tissue or solution suitable for the antistatic coating Do not use benzene thinner ammonia abrasive cleaners or compressed air l Use a lightly dampened warm cloth to clean the monitor Avoid using detergent of any kind as some detergents leave a milky film on the monitor l...

Страница 9: ...ilability varies by country and product and some services may not be available in your area To contact Dell for sales technical support or customer service issues 1 Visit support dell com 2 Verify your country or region in the Choose A Country Region drop down menu at the bottom of the page 3 Click Contact Us on the left side of the page 4 Select the appropriate service or support link based on yo...

Страница 10: ...rt dell com enter your service tag and download the latest driver for your graphics card 2 After installing the drivers for your Graphics Adapter attempt to set the resolution to 1920x1080 again Back to Contents Page NOTE If you are unable to set the resolution to 1920x1080 please contact Dell to inquire about a Graphics Adapter that supports these resolutions ...

Страница 11: ...set the resolution to 1920x1080 again In Windows Vista or Windows 7 1 Right click on the desktop and click Personalization 2 Click Change Display Settings 3 Click Advanced Settings 4 Identify your graphics controller supplier from the description at the top of the window e g NVIDIA ATI Intel etc 5 Please refer to the graphics card provider website for updated driver for example http www ATI com OR...

Страница 12: ...ct access to the control menu that you define in the personalize menu The default settings are Preset Modes Select and Brightness Contrast Select 1 Preset Modes Select Use this button for different display preset modes on your monitor 2 Brightness Contrast Use this button to access the Brightness Contrast control menu 3 OSD Menu Use this button to open the On Screen Display OSD See Using the OSD M...

Страница 13: ...OSD menu Icon Menu and Submenus Description Brightness Contrast Brightness Contrast Back Allows you to adjust the brightness and contrast Brightness adjusts the luminance of the backlight Press the button to increase the brightness and Press the button to decrease the brightness min 0 max 100 Adjust the Brightness first and then adjust the Contrast only if further adjustment is necessary Press the...

Страница 14: ...ed to your monitor choose Graphics If a DVD Mode suitable for desktop applications Mode for multimedia applications e g video playback Mode suitable for gaming applications Select warm mode to obtain a red tint This color setting is typically used for color intensive applications photograph image editing Select cool mode to obtain a bluish tint This color setting is typically used for text based a...

Страница 15: ...input Allows you to adjust the color saturation of the video image Use or buttons to adjust the saturation from 0 to 100 makes video image looks monochrome makes video image looks colorful NOTE Saturation adjustment is only available for video input Vertically splits the screen into two segments The left half of the screen in the normal mode and the right half of the screen is dis NOTE Demo Mode i...

Страница 16: ...sharpness from 0 to 100 The Phase and Pixel Clock adjustments allow you to adjust your monitor to your preference These settings are accessed through Use the and buttons to adjust for best image quality If satisfactory results are not obtained using the Phase adjustment use the Pixel Clock coarse adjustment and then use Phase Allows you to increase the level of contrast to provide sharper and more...

Страница 17: ...ock function Either soft lock through OSD menu or hard lock Press and hold the button above power button for 10 se Unlock function Only hard unlock Press and hold the button above power button for 10 sec DDC CI Display Data Channel Command Interface allows your monitor parameters brightness color balance etc to be adjus Enable this feature for best user experience and optimum performance of your m...

Страница 18: ...ns that the monitor cannot synchronize with the signal that it is receiving from the computer See Monitor Specifications for the Horizontal and Vertical frequency ranges addressable by this monitor The recommended mode is 1920x1080 When monitor enters Power Save mode the following message appears Activate the computer and wake up the monitor to gain access to the OSD If you press any button other ...

Страница 19: ...puter complete one of the following procedures If you have a Dell desktop or portable computer Go to support dell com enter your service tag and download the latest driver for your graphics card If you are using a non Dell computer portable or desktop Go to the support site for your computer and download the latest graphic drivers Go to your graphics card website and download the latest graphic dr...

Страница 20: ... tilt the monitor for the most comfortable viewing angle Back to Contents Page 1 Attach mechanism 2 Headphone connectors 3 Power indicator 4 Power Volume control NOTE The stand riser and stand base are detached when the monitor is shipped from the factory ...

Страница 21: ... adjust the screen resolution to 1920x1080 4 Click OK In Windows Vista or Windows 7 1 Right click on the desktop and click Personalization 2 Click Change Display Settings 3 Move the slider bar to the right by pressing and holding the left mouse button and adjust the screen resolution to 1920x1080 4 Click OK If you do not see 1920x1080 as an option you may need to update your graphics driver Please...

Страница 22: ...Corporation in the United States and or other countries ENERGY STAR is a registered trademark of the U S Environmental Protection Agency As an ENERGY STAR partner Dell Inc has determined that this product meets the ENERGY STAR guidelines for energy efficiency Other trademarks and trade names may be used in this document to refer to either the entities claiming the marks and names or their products...

Страница 23: ...d riser to stand base a Place the stand riser on top of the stand base Slide the stand riser horizontally until the tabs are fully inserted into the stand base grooves b Tighten the thumbscrew below the stand base 2 Attach the stand assembly to the monitor a Place the monitor on a soft cloth or cushion near the edge of desk NOTE The stand riser and stand base are detached when the monitor is shipp...

Страница 24: ...hen they are connected to different computers with appropriate video systems Connecting the blue VGA cable After you have completed connecting the VGA cable follow the procedure below to complete your monitor setup 1 Plug the power cables for your computer and monitor into a nearby outlet 2 Turn on the monitor and the computer If your monitor displays an image installation is complete If it does n...

Страница 25: ... the monitor Back to Contents Page 1 Working from the rear of the monitor attach the Soundbar by aligning the two slots with the two tabs along the bottom rear of the monitor 2 Slide the Soundbar to the left until it snaps into place 3 Connect the Soundbar with the DC power connector 4 Insert the mini stereo plug from the rear of the Soundbar into the computer s audio output jack or the monitor s ...

Страница 26: ...itor screen remains blank after you have performed Step 5 check your video controller and computer system Built in Diagnostics Your monitor has a built in diagnostic tool that helps you determine if the screen abnormality you are experiencing is an inherent problem with your monitor or with your computer and video card To run the built in diagnostics 1 Ensure that the screen is clean no dust parti...

Страница 27: ...a OSD l Adjust the Phase and Pixel Clock controls via OSD l Reset the monitor to Factory Settings l Check environmental factors l Relocate the monitor and test in another room Missing Pixels LCD screen has spots l Cycle power on off l Pixel that is permanently off is a natural defect that can occur in LCD technology l Run the built in diagnostics Stuck on Pixels LCD screen has bright spots l Cycle...

Страница 28: ...l Check whether the signal cable is plugged in and seated properly Re plug the signal cable if necessary l Re boot the computer or video player The monitor will not fill the entire screen The picture does not fill the height or width of the screen l Due to the non standard formats of DVDs the monitor may not show the full screen pictures COMMON SYMPTOMS WHAT YOU EXPERIENCE POSSIBLE SOLUTIONS No So...

Страница 29: ...any obstructions between the Soundbar and the user l Turn the volume up to its maximum level l Set all Windows volume controls to their maximum l Increase the volume of the audio application l Test the Soundbar using another audio source i e portable CD player ...

Отзывы: