Dell S2240L Скачать руководство пользователя страница 32

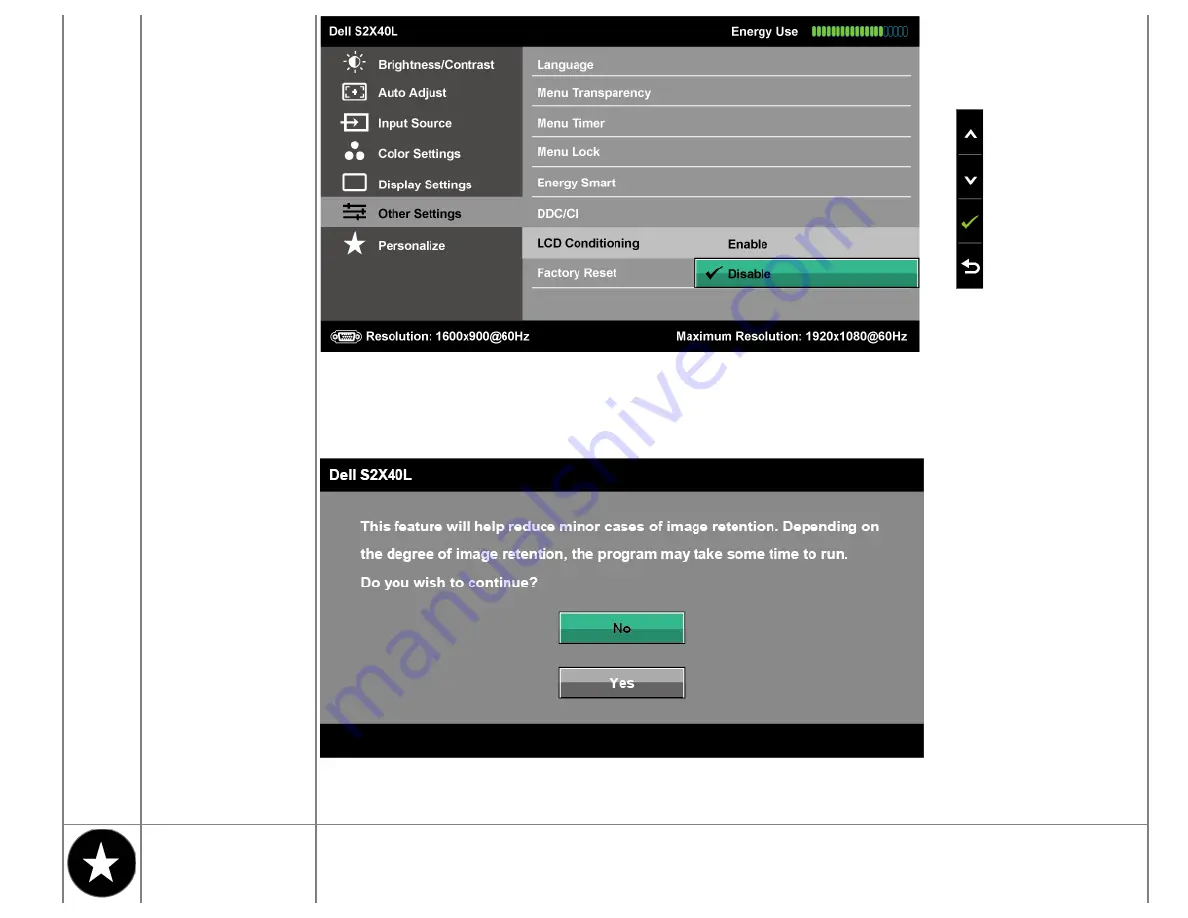
If an image appears to be stuck on the monitor, select 

LCD Conditioning

 to help eliminate any image retention. Using the LCD

Conditioning feature may take some time. LCD Conditioning feature cannot remove  severe cases of image retention or burn-in.

NOTE:

 Use LCD Conditioning only when you experience a problem with image retention.

The below warning message appears once user selects “Enable" LCD Conditioning.


Factory Reset

Resets all OSD settings to the factory preset values.

Personalize

Select this option allows you to set two shortcut keys.

Содержание S2240L

Страница 1: ...ner whatsoever without the written permission of Dell Inc is strictly forbidden Trademarks used in this text Dell and the DELL logo are trademarks of Dell Inc Microsoft and Windows are either trademarks or registered trademarks of Microsoft Corporation in the United States and or other countries ENERGY STAR is a registered trademark of the U S Environmental Protection Agency As an ENERGY STAR part...

Страница 2: ... Capability LCD Monitor Quality Pixel Policy Maintenance Guidelines Package Contents Your monitor ships with all the components shown below Ensure that you have received all the components and Contacting Dell if anything is missing NOTE Some items may be optional and may not ship with your monitor Some features or media may not be available in certain countries Monitor Stand Riser ...

Страница 3: ...Stand Base Velcro Strap Power Cable Adapter Cable VGA Cable Drivers and Documentation media Quick Setup Guide Product Information Guide ...

Страница 4: ...viewing angle to allow viewing from a sitting or standing position or while moving from side to side Removable pedestal Plug and play capability if supported by your system On Screen Display OSD adjustments for ease of set up and screen optimization Software and documentation media which includes an information file INF Image Color Matching File ICM and product documentation Dell Display Manager i...

Страница 5: ...1 Function buttons For more information see Operating the Monitor 2 Power On Off button 3 Power LED indicator Back View ...

Страница 6: ...able 5 Adapter connector To connect the monitor power cable using a 12V DC adapter for transition 6 Security lock slot Use a security lock with the slot to help secure your monitor 7 Barcode serial number label Refer to this label if you need to contact Dell for technical support 8 Cable clip For cable management 9 Stand release button To release stand from monitor Headphone usage is not supported...

Страница 7: ...unctioning The following table shows the power consumption and signaling of this automatic power saving feature VESA Modes Horizontal Sync Vertical Sync Video Power Indicator Power Consumption Normal operation Active Active Active White 23 W Maximum for S2240L 18 W Typical for S2240L 24 W Maximum for S2340L 19 W Typical for S2340L Active off mode Inactive Inactive Blank Amber Less than 0 5 W Switc...

Страница 8: ...onitor Maximum power consumption with max luminance and contrast Pin Assignments 15 pin D Sub connector Pin Number Monitor Side of the 15 pin Side Signal Cable 1 Video Red 2 Video Green 3 Video Blue 4 GND 5 Self test 6 GND R 7 GND G 8 GND B 9 DDC 5V 10 GND sync 11 GND 12 DDC data 13 H sync 14 V sync ...

Страница 9: ... D S Data 2 Shield 3 T M D S Data 2 4 T M D S Data 1 5 T M D S Data 1 Shield 6 T M D S Data 1 7 T M D S Data 0 8 T M D S Data 0 Shield 9 T M D S Data 0 10 T M D S Clock 11 T M D S Clock Shield 12 T M D S Clock 13 CEC 14 Reserved N C on device 15 SCL 16 SDA 17 DDC CEC Ground 18 5V Power 19 Hot Plug Detect ...

Страница 10: ...21 5 inches 21 5 inch viewable image size 58 42 cm 23 inches 23 inch wide viewable image size Preset display area Horizontal Vertical 476 06 mm 18 76 inches 267 78 mm 11 85 inches 509 18 mm 20 05 inches 286 41 mm 11 28 inches Pixel pitch 0 248 mm 0 265 mm Viewing angle Horizontal Vertical 178 typical 178 typical 178 typical 178 typical Luminance output 250 cd m typical 250 cd m typical Contrast ra...

Страница 11: ...izontal and vertical synchronizations polarity free TTL level SOG Composite SYNC on green Separate horizontal and vertical synchronizations polarity free TTL level SOG Composite SYNC on green AC DC Adapter input voltage frequency current Delta adapter ADP 40DD B 100 VAC to 240 VAC 50 Hz to 60 Hz 3 Hz 1 5 A Max Lite On adapter PA 1041 71 100 VAC to 240 VAC 50 Hz or 60 Hz 3 Hz 1 2 A Max Delta adapte...

Страница 12: ...the preset modes for which Dell guarantees image size and centering S2240L Display Mode Horizontal Frequency kHz Vertical Frequency Hz Pixel Clock MHz Sync Polarity Horizontal Vertical VESA 720 x 400 31 5 70 0 28 3 VESA 640 x 480 31 5 60 0 25 2 VESA 640 x 480 37 5 75 0 31 5 VESA 800 x 600 37 9 60 0 40 0 VESA 800 x 600 46 9 75 0 49 5 VESA 1 024 x 768 48 4 60 0 65 0 VESA 1 024 x 768 60 0 75 0 78 8 V...

Страница 13: ...Dell S2340L monitor Connector type D subminiature blue connector HDMI D subminiature blue connector HDMI Signal cable type Analog attachable D Sub 15 pins shipped detached from the monitor Analog attachable D Sub 15 pins shipped detached from the monitor Dimensions with stand Height Width Depth 380 28 mm 14 97 inches 499 10 mm 19 65 inches 175 80 mm 6 92 inches 398 90 mm 15 70 inches 532 20 mm 20 ...

Страница 14: ...to 90 non condensing 10 to 80 non condensing Storage 5 to 90 non condensing Shipping 5 to 90 non condensing Altitude Operating Non operating 5 000 m 16 405 ft max 12 192 m 40 000 ft max 5 000 m 16 405 ft max 12 192 m 40 000 ft max Thermal dissipation 78 43 BTU hour maximum 61 38 BTU hour typical 81 84 BTU hour maximum 64 79 BTU hour typical LCD Monitor Quality Pixel Policy During the LCD Monitor m...

Страница 15: ...or the antistatic coating Do not use benzene thinner ammonia abrasive cleaners or compressed air Use a slightly dampened warm cloth to clean the plastics Avoid using detergent of any kind as some detergents leave a milky film on the plastics If you notice a white powder when you unpack your monitor wipe it off with a cloth This white powder occurs during the shipping of the monitor Handle your mon...

Страница 16: ...izing Your Cables Removing the Monitor Stand Attaching the Stand NOTE The stand base and stand riser are detached when the monitor is shipped from the factory 1 Assemble the stand riser to stand base a Attach the stand riser to the stand base b Tighten the screw clockwise located on the base 2 Attach the stand assembly to the monitor ...

Страница 17: ...edures in this section follow the Safety Instructions To connect your monitor to the computer 1 Turn off your computer and disconnect the power cable 2 Connect the blue analog VGA or HDMI display connector cable to the corresponding video port on the back of your computer Do not use both cables on the same computer Use both the cables only when they are connected to two different computers with ap...

Страница 18: ...Connecting the monitor with HDMI ...

Страница 19: ...ttaching all necessary cables to your monitor and computer organize all cables as shown below 1 Insert cables into cable clip 2 Tie the cables together using the velcro strap that shipped with your monitor Removing the Monitor Stand ...

Страница 20: ...nitor panel on a soft cloth or cushion complete the following steps to remove the base 1 Push the release button above the stand 2 While pushing the release button pull the stand away from the monitor Back to Contents Page ...

Страница 21: ...ing the Right Side Panel Controls Using the On Screen Display OSD Menu Setting the Maximum Resolution Using the Tilt Power On the Monitor Press the button to turn on the monitor Using the Right Side Panel Controls Use the keys on the Right side of the monitor to adjust the image settings ...

Страница 22: ...st Use the Brightness Contrast key to direct access to the Brightness and Contrast control menu C Menu Use the Menu key to open the on screen display OSD D Exit Use the Exit key to exit on screen display OSD from menu and sub menus Right side panel Key Use the keys on the Right side of the monitor to adjust the image settings Right side panel Key Description ...

Страница 23: ...y to go back to the previous menu Using the On Screen Display OSD Menu Accessing the Menu System NOTE If you change the settings and then either proceed to another menu or exit the OSD menu the monitor automatically saves those changes The changes are also saved if you change the settings and then wait for the OSD menu to disappear 1 Press the button to open the OSD menu and display the main menu ...

Страница 24: ...and then use the or buttons according to the indicators on the menu to make your changes 6 Select the to return to previous menu without accepting current settings or to accept and return to previous menu The table below provides a list of all the OSD menu options and their functions Icon Menu and Submenus Description Energy Use This meter shows the energy level being consumed by the monitor in re...

Страница 25: ...or the degree of difference between darkness and lightness on the monitor screen Adjust brightness first and adjust contrast only if you need further adjustment Press the key to increase contrast and press the key to decrease contrast min 0 max 100 AUTO ADJUST Use this key to activate automatic setup and adjust menu The following dialog appears on a black screen as the monitor self adjusts to the ...

Страница 26: ...input signals or attached cables INPUT SOURCE Use the Input Source menu to select between different video signals that may be connected to your monitor Auto Select Select Auto Select to scan for available input signals VGA Select VGA input when you are using the analog VGA connector Push to select the VGA input source HDMI Select HDMI input when you are using the Digital HDMI connector Push to sel...

Страница 27: ...e or the HDMI to DVI adapter YPbPr Select this option if your DVD player supports only YPbPr output Preset Modes Allows you to choose from a list of preset color modes Standard Loads the monitor s default color settings This is the default preset mode Multimedia Loads color settings ideal for multimedia applications Movie Loads color settings ideal for movies ...

Страница 28: ...create your own preset color mode In the Movie preset mode Hue Allows you to adjust the skin tone of the image Use or to adjust the hue from 0 to 100 Saturation Allows you to adjust the color saturation of the image Use or to adjust the saturation from 0 to 100 Demo Mode You can launch the Demo Mode to identify the monitor display difference between Normal and Enhanced Image Enhance The function w...

Страница 29: ... Clock adjustments allow you to adjust your monitor to your preference Use or buttons to adjust for best image quality Phase If satisfactory results are not obtained using the Phase adjustment use the Pixel Clock coarse adjustment and then use Phase fine again Dynamic Contrast Allows you to increase the level of contrast to provide sharper and more detailed image quality NOTE Dynamic Contrast is n...

Страница 30: ...n Lock is selected no user adjustments are allowed All buttons are locked NOTE Lock function Either soft lock through the OSD menu or hard lock press and hold the button above the power button for 10 seconds Unlock function Only hard unlock press and hold the button above the power button for 10 seconds Energy Smart Dynamic dimming activated The Dynamic dimming feature automatically reduces the sc...

Страница 31: ...performance of your monitor and provides a better customer experience Disable Disables the DDC CI option and the following message appears on the screen LCD Conditioning This feature will help reduce minor cases of image retention ...

Страница 32: ...Conditioning feature cannot remove severe cases of image retention or burn in NOTE Use LCD Conditioning only when you experience a problem with image retention The below warning message appears once user selects Enable LCD Conditioning Factory Reset Resets all OSD settings to the factory preset values Personalize Select this option allows you to set two shortcut keys ...

Страница 33: ... from Preset Modes Brightness Contrast Auto Adjust Input Source Aspect Ratio and set as shortcut key Shortcut Key 2 User can select from Preset Modes Brightness Contrast Auto Adjust Input Source Aspect Ratio and set as shortcut key ...

Страница 34: ...message This means that the monitor cannot synchronize with the signal that it is receiving from the computer See Monitor Specifications for the horizontal and vertical frequency ranges addressable by this monitor Recommended mode is 1 920 x 1 080 When the Energy Smart or Dynamic Contrast feature is enabled in these preset modes Game or Movie the manual brightness adjustment is disabled ...

Страница 35: ...abled When the monitor enters the Power Save mode the following message appears Activate the computer and wake up the monitor to gain access to the OSD If you press any button other than the power button the following messages will appear depending on the selected input ...

Страница 36: ...op tile to switch to classic desktop 2 Right click on the desktop and click Screen Resolution 3 Click the Dropdown list of the Screen resolution and select 1920 x 1080 4 Click OK If you do not see 1920 x 1080 as an option you may need to update your graphics driver Depending on your computer complete one of the following procedures If you have a Dell desktop or portable computer Go to support dell...

Страница 37: ...ing the Tilt Tilt With the stand assembly you can tilt the monitor for the most comfortable viewing angle NOTE The stand base is detached when the monitor is shipped from the factory Back to Contents Page ...

Страница 38: ... remains dark run the monitor self test by performing the following steps 1 Turn off both your computer and the monitor 2 Unplug the video cable from the back of the computer To ensure proper Self Test operation remove both Digital black connector and the Analog blue connector cables from the back of computer 3 Turn on the monitor The floating dialog box should appear on screen against a black bac...

Страница 39: ...us procedure check your video controller and computer because your monitor is functioning properly Built in Diagnostics Your monitor has a built in diagnostic tool that helps you determine if the screen abnormality you are experiencing is an inherent problem with your monitor or with your computer and video card NOTE You can run the built in diagnostics only when the video cable is unplugged and t...

Страница 40: ...nformation about common monitor problems you might encounter and the possible solutions Common Symptoms What You Experience Possible Solutions No Video Power LED off No picture Ensure that the video cable connecting the monitor and the computer is properly connected and secured Verify that the power outlet is functioning properly using any other electrical equipment Ensure that the power button is...

Страница 41: ...en using HDMI the Pixel Clock and Phase adjustments are not available Synchronization Problems Screen is scrambled or appears torn Reset the monitor to Factory Settings Perform Auto Adjust via OSD Adjust Phase and Pixel Clock controls via OSD Perform monitor self test feature check to determine if the scrambled screen appears in self test mode Check for bent or broken pins in the video cable conne...

Страница 42: ... power cord plug back and then turn on the monitor Check if the OSD menu is locked If yes press and hold key for 10 seconds to unlock See Menu Lock No Input Signal when user controls are pressed No picture the LED light is white When you press up down or Menu key the message No input signal will appear Check the signal source Ensure the computer is not in the power saving mode by moving the mouse ...

Страница 43: ...ith Part 15 of the FCC Rules Operation is subject to the following two conditions 1 this device may not cause harmful interference 2 this device must accept any interference received including interference that may cause undesired operation Contacting Dell For customers in the United States call 800 WWW DELL 800 999 3355 NOTE If you do not have an active Internet connection you can find contact in...

Страница 44: ... Click Contact Us on the left side of the page 4 Select the appropriate service or support link based on your need 5 Choose the method of contacting Dell that is convenient for you Back to Contents Page ...

Отзывы: