background image

18

Rack Installation Guide

Содержание PowerVault MD1000

Страница 1: ...Dell Systems Rack Installation Guide Guide d installation du rack Rack Installationsanleitung ラック取り付けガイド Guía de instalación del rack ...

Страница 2: ......

Страница 3: ...Rack Installation Guide ...

Страница 4: ... in this document is subject to change without notice 2005 Dell Inc All rights reserved Reproduction in any manner whatsoever without the written permission of Dell Inc is strictly forbidden Trademarks used in this text Dell the DELL logo RapidRails and VersaRails are trademarks of Dell Inc Other trademarks and trade names may be used in this document to refer to either the entities claiming the m...

Страница 5: ... VersaRails 6 Four Post Rack Installation 7 Rack Stabilizer Feet 7 Recommended Tools and Supplies 7 RapidRails Rack Kit Contents 8 VersaRails Rack Kit Contents 8 Installation Tasks 9 Removing the Rack Doors 10 Marking the Rack 10 Installing the Mounting Rails in the Rack 12 Installing the System in the Rack 15 Removing the System from the Rack 16 Replacing the Rack Doors 17 ...

Страница 6: ...4 Contents ...

Страница 7: ...s not been approved by any safety agencies It is your responsibility to ensure that the final combination of system and rack complies with all applicable safety standards and local electric code requirements Dell disclaims all liability and warranties in connection with such combinations System rack kits are intended to be installed in an approved rack by trained service technicians If you install...

Страница 8: ...ss of cabinet control may occur Extend the leveling feet for support and to prevent the cabinet from rolling NOTE For instructions on installing the system itself see Installing the System in the Rack Important Safety Information Observe the safety precautions in the following subsections when installing your system in the rack CAUTION You must strictly follow the procedures in this document to pr...

Страница 9: ... a rack could cause the rack to tip over potentially resulting in bodily injury under certain circumstances Therefore always install the stabilizer s before installing components in the rack The stabilizer feet help prevent the rack from tipping over See the documentation provided with the rack cabinet for instructions on installing and anchoring the stabilizer feet Recommended Tools and Supplies ...

Страница 10: ...ack Kit Contents The VersaRails rack kit contains the following One pair of VersaRails mounting rails 10 32 x 0 5 inch flange head Phillips screws 8 NOTE The nonmetric screws described in illustrations and in procedural steps are identified by size and number of threads per inch For example a 10 Phillips head screw with 32 threads per inch is identified as a 10 32 screw 1 Mounting rails 2 1 ...

Страница 11: ...asks described in detail in subsequent sections in their numbered order 1 Removing the rack doors 2 Marking the rack 3 Installing the mounting rails in the rack RapidRails installation VersaRails installation 4 Installing the system in the rack 5 Replacing the rack doors 1 Mounting rails 2 2 10 32 x 0 5 inch flange head Phillips screws 8 2 1 ...

Страница 12: ...holes per rack unit with center to center hole spacing beginning at the top hole of a 1 U space of 15 9 mm 15 9 mm and 12 7 mm 0 625 inch 0 625 inch and 0 5 inch for the front and back vertical rails see Figure 1 3 Rack cabinets may have round or square holes NOTE The vertical rails may be marked by horizontal lines and numbers in 1 U increments If you want you can make a note of the number markin...

Страница 13: ...ed The bottom of each 1 U space is at the middle of the narrowest metal area between holes marked with a horizontal line on some rack cabinets see Figure 1 3 2 Place a second mark 132 mm 5 25 inches above the first mark you made or count up nine holes in a rack that meets EIA 310 standards This mark should indicates the system s upper edge on the vertical rails see Figure 1 4 Figure 1 4 Marking th...

Страница 14: ...tical rails 2 Push the mounting rail forward until the two mounting hooks enter their square holes Then push down on the mounting bracket flange until the mounting hooks seat and the blue tab on the top mounting hook pops out and clicks see Figure 1 5 3 At the back of the cabinet pull back on the mounting bracket flange until the mounting hooks enter their square holes Then push down on the flange...

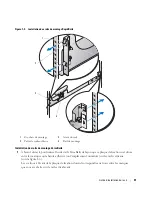
Страница 15: ...een the marks or numbered location on the vertical rails see Figure 1 6 The six holes on the front of the mounting bracket flange should align with the holes between the marks you made on the front vertical rail 2 Install two 10 32 x 0 5 inch flange head Phillips screws in the mounting bracket flange s top and bottom holes to secure the mounting rail to the front vertical rail 1 Mounting hooks 3 F...

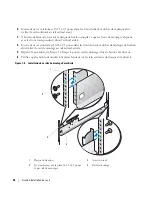
Страница 16: ...ket flange s top and bottom holes to secure the mounting rail to the back vertical rail 5 Repeat step 1 through step 4 for the mounting rail on the other side of the rack 6 Ensure that the mounting rails are mounted at the same position on the vertical rails on each side of the rack Figure 1 6 Installing the VersaRails Mounting Rails 1 Mounting bracket flange 3 Front of rack 2 10 32 x 0 5 inch fla...

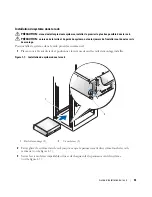
Страница 17: ...g rails by yourself To install the system on the rack perform the following procedure 1 From the front of the rack position the system in front of the mounting rails you installed in the rack cabinet Figure 1 7 Installing the System in the Rack 2 Slide the system fully into the rack until the system front panel is touching the vertical rails see Figure 1 7 3 Tighten the captive thumbscrews on each...

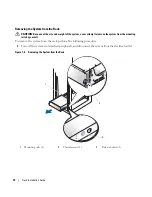
Страница 18: ... to remove the system from the mounting rails by yourself To remove the system from the rack perform the following procedure 1 Turn off the system and attached peripherals and disconnect the system from the electrical outlet Figure 1 8 Removing the System from the Rack 1 Mounting rails 2 2 Thumbscrews 2 3 Release button 2 1 2 3 ...

Страница 19: ...er person on the other side of the rack depress the round release buttons blue on each side of the system and slide the system completely out of the rack 5 Place the system on a strong stable surface Replacing the Rack Doors See the procedures for replacing doors in the documentation provided with your rack CAUTION Because of the size and weight of the rack cabinet doors never attempt to remove or...

Страница 20: ...18 Rack Installation Guide ...

Страница 21: ...Guide d installation du rack ...

Страница 22: ... dans ce document peuvent être modifiées sans préavis 2005 Dell Inc Tous droits réservés La reproduction de ce document de quelque manière que ce soit sans l autorisation écrite de Dell Inc est strictement interdite Marques utilisées dans ce document Dell le logo DELL RapidRails et VersaRails sont des marques de Dell Inc Tous les autres noms de marques et marques commerciales utilisés dans ce docu...

Страница 23: ... VersaRails 24 Installation dans un rack à quatre montants 25 Pieds stabilisateurs du rack 25 Outils et fournitures recommandés 25 Contenu du kit RapidRails 26 Contenu du kit VersaRails 26 Tâches d installation 27 Retrait des portes du rack 28 Marquage du rack 28 Installation des rails de montage dans le rack 30 Installation du système dans le rack 33 Retrait du système de l armoire rack 34 Remise...

Страница 24: ...22 Sommaire ...

Страница 25: ...autre armoire n a reçu aucune homologation des organismes de certification de la sécurité Il vous incombe de veiller à ce que la combinaison finale système et rack soit conforme à toutes les normes de sécurité en vigueur ainsi qu aux normes électriques locales Dell décline toute responsabilité et toutes garanties liées à ce type de combinaisons Les kits de racks sont destinés à être installés par ...

Страница 26: ...ngs ou trop abrupts sur lesquels l armoire pourrait vous échapper Ressortez les pieds réglables lorsqu il est nécessaire de soutenir l armoire ou pour lui éviter de glisser sur ses roulettes REMARQUE pour plus d informations sur l installation du système proprement dit voir la section Installation du système dans le rack Informations importantes sur la sécurité Respectez les précautions décrites d...

Страница 27: ...un rack non équipé de pieds stabilisateurs peut provoquer son basculement et entraîner des blessures Installez toujours les pieds stabilisateurs du rack avant d ajouter des composants dans celui ci Les pieds stabilisateurs évitent au rack de basculer Consultez la documentation fournie avec l armoire rack pour savoir comment installer et fixer les pieds stabilisateurs Outils et fournitures recomman...

Страница 28: ...ersaRails contient les éléments suivants Une paire de rails de montage VersaRails Vis cruciformes à tête plate 10 32 x 0 5 pouce 8 REMARQUE les vis au pas non métrique décrites dans les illustrations et dans les étapes des procédures sont identifiées par la taille et le nombre de filets par pouce Par exemple une vis à tête cruciforme n 10 avec 32 filets par pouce est désignée par l appellation vis...

Страница 29: ...tâches suivantes décrites plus loin dans ce guide 1 Retrait des portes du rack 2 Marquage du rack 3 Installation des rails de montage dans le rack Installation du kit RapidRails Installation du kit VersaRails 4 Installation du système dans le rack 5 Remise en place des portes du rack 1 Rails de montage 2 2 Vis cruciformes à tête plate 10 32 x 0 5 pouce 8 2 1 ...

Страница 30: ...s EIA 310 comportent des séries alternées de trois trous par unité L espacement entre les trous mesuré de centre à centre en commençant par le trou supérieur est respectivement de 15 9 mm 15 9 mm et 12 7 mm 0 625 pouce 0 625 pouce et 0 5 pouce pour les rails verticaux avant et arrière voir la figure 1 3 Les armoires rack peuvent comporter des trous ronds ou carrés REMARQUE les rails verticaux peuv...

Страница 31: ...droit correspondant au bas du système à installer Le bas de chaque espace 1 U se trouve au milieu de la zone métallique la plus étroite entre les trous repérée par une ligne horizontale sur certaines armoires rack voir la figure 1 3 2 Placez une seconde marque à 13 2 cm 5 25 pouces au dessus de la première ou comptez 9 trous pour un rack aux normes EIA 310 Cette marque indique l emplacement du hau...

Страница 32: ...à ce que les crochets de montage soient positionnés dans les trous carrés Ensuite appuyez sur la plaque de fixation jusqu à ce que les crochets de montage s emboîtent et que la patte bleue sur le crochet du haut ressorte avec un déclic voir la figure 1 5 3 À l arrière de l armoire tirez la plaque de fixation jusqu à ce que les crochets de montage soient positionnés dans les trous carrés Appuyez en...

Страница 33: ...s de façon que sa plaque de fixation soit située entre les marques ou la bande adhésive ou l emplacement numéroté sur les rails verticaux voir la figure 1 6 Les six trous à l avant de la plaque de fixation doivent correspondre aux trous entre les marques que vous avez faites sur le rail vertical avant 1 Crochets de montage 3 Avant du rack 2 Patte de couleur bleue 4 Rail de montage 3 4 1 2 ...

Страница 34: ...rez deux vis cruciformes 10 32 x 0 5 pouce dans les trous du haut et du bas de la plaque de fixation afin de fixer le rail de montage au rail vertical arrière 5 Répétez la procédure de l étape 1 à l étape 4 pour le rail de montage situé de l autre côté du rack 6 Vérifiez que les rails sont montés à la même hauteur sur les rails verticaux de chaque côté du rack Figure 1 6 Installation des rails de ...

Страница 35: ...ntage Pour installer le système dans le rack procédez comme suit 1 Placez vous à l avant du rack et positionnez le système devant les rails de montage installés Figure 1 7 Installation du système dans le rack 2 Faites glisser le système dans le rack jusqu à ce que le panneau avant du système touche les rails verticaux voir la figure 1 7 3 Serrez les vis moletées imperdables situées de chaque côté ...

Страница 36: ...tentez jamais de le retirer des rails de montage sans vous faire aider Pour retirer le système du rack procédez comme suit 1 Éteignez le système et les périphériques connectés puis débranchez le de la prise de courant Figure 1 8 Retrait du système de l armoire rack 1 Rails de montage 2 2 Vis moletées 2 3 Bouton d éjection 2 1 2 3 ...

Страница 37: ...e placée de l autre côté du rack appuyez sur les boutons d éjection ronds de couleur bleue situés de chaque côté du système puis retirez le système du rack 5 Posez le système sur une surface stable et solide Remise en place des portes du rack Reportez vous aux procédures de remise en place des portes dans la documentation fournie avec votre rack PRÉCAUTION compte tenu de leur poids et de leur tail...

Страница 38: ...36 Guide d installation du rack ...

Страница 39: ...Rack Installationsanleitung ...

Страница 40: ...n Tod von Menschen zur Folge haben können ____________________ Irrtümer und technische Änderungen vorbehalten 2005 Dell Inc Alle Rechte vorbehalten Jegliche Reproduktion dieses Dokuments ohne schriftliche Genehmigung von Dell Inc ist streng untersagt Marken in diesem Text Dell das DELL Logo RapidRails und VersaRails sind Marken von Dell Inc Alle anderen in dieser Dokumentation genannten Marken und...

Страница 41: ...3 Montage in einem Rack mit vier Stützen 43 Rack Stabilisatoren 43 Empfohlene Werkzeuge und Zubehör 43 Inhalt des RapidRails Rack Kits 44 Inhalt des VersaRails Rack Kits 44 Ablauf der Installation 45 Abnehmen der Rack Türen 46 Markieren des Racks 46 Installation der Montageschienen im Rack 48 Installation des Systems im Rack 51 Entfernen des Systems aus dem Rack 52 Wiederanbringen der Rack Türen 5...

Страница 42: ...40 Inhalt ...

Страница 43: ...s kundenseitigen Rack Kits sicherheitszertifiziert Die Installation des Systems und des Rack Kits in anderen Gestellschränken ist von keiner Prüfbehörde abgenommen Sie sind selbst dafür verantwortlich dass die endgültige Kombination von System und Rack alle geltenden Sicherheitsstandards und die lokalen elektrischen Richtlinien erfüllt Dell übernimmt keinerlei Haftung und Gewährleistung für derart...

Страница 44: ...teme in einem Rack installieren schließen Sie alle Maßnahmen für ein System ab bevor Sie das nächste System installieren VORSICHT Racks können sehr schwer sein und leicht wegrollen Sie sind nicht mit Bremsen ausgestattet Bewegen Sie ein Rack nur mit größter Vorsicht Fahren Sie die höhenverstellbaren Füße ein bevor Sie ein Rack bewegen Vermeiden Sie lange bzw steile Neigungen oder Rampen auf denen ...

Страница 45: ...en installieren Sie bei frei stehenden Racks die vorderen und seitlichen Stabilisatoren und bei Racks die mit anderen Racks verbunden sind die vorderen Stabilisatoren Wenn vor dem Einsetzen von Systemen in einem Rack keine Stabilisatoren angebracht werden kann das Rack unter Umständen umkippen und Verletzungen verursachen Befestigen Sie daher immer zuerst die Stabilisatoren bevor Sie Komponenten i...

Страница 46: ...ack Kits Das VersaRails Rack Kit enthält folgende Teile Ein Paar VersaRails Montageschienen 10 32 x 0 5 Zoll Kreuzschlitzbundschrauben 8 ANMERKUNG Die in den Abbildungen und Anweisungen genannten nichtmetrischen Schrauben werden nach ihrer Größe und der Anzahl der Windungen pro Zoll bezeichnet So wird z B eine Kreuzschlitzschraube Nr 10 mit 32 Windungen pro Zoll als 10 32 Schraube bezeichnet 1 Mon...

Страница 47: ...tte ausführlich in den nächsten Abschnitten beschrieben nacheinander auszuführen 1 Abnehmen der Rack Türen 2 Markieren des Racks 3 Installation der Montageschienen im Rack Installation von RapidRails Installation von VersaRails 4 Installation des Systems im Rack 5 Wiederanbringen der Rack Türen 1 Montageschienen 2 2 10 32 x 0 5 Zoll Kreuzschlitzbundschrauben 8 2 1 ...

Страница 48: ...ht 132 mm Gestellschränke nach EIA 310 Norm besitzen ein sich wiederholendes Muster aus drei Löchern pro Rack Einheit deren Mittenabstand zueinander beginnend mit dem oberen Loch einer 1 U Einheit 15 9 mm 15 9 mm und 12 7 mm an den vorderen und hinteren vertikalen Schienen beträgt siehe Abbildung 1 3 Die Racks haben meist runde oder rechteckige Löcher ANMERKUNG Die vertikalen Schienen sind eventue...

Страница 49: ...nterseite des zu installierenden Systems befinden soll Die Unterkante jeder 1 U Einheit befindet sich in der Mitte des schmalsten Metallstücks zwischen den Löchern bei einigen Racks mit einer horizontalen Linie gekennzeichnet siehe Abbildung 1 3 2 Bringen Sie 132 mm oberhalb der ersten Markierung eine zweite Markierung an oder zählen Sie neun Löcher nach oben falls es sich um ein Rack nach EIA 310...

Страница 50: ...agehaken in die entsprechenden Rechtecklöcher eingreifen Drücken Sie dann den Flansch der Montagehalterung nach unten bis die Montagehaken in den Rechtecklöchern sitzen und die blaue Verriegelungslasche am oberen Montagehaken hervorspringt und einrastet siehe Abbildung 1 5 3 Ziehen Sie auf der Rückseite des Gestellschranks den Flansch der Montagehalterung nach hinten bis die Montagehaken in die en...

Страница 51: ...mmerierten Stellen auf den vertikalen Schienen zu liegen kommt siehe Abbildung 1 6 Die sechs Löcher an der Vorderseite des Montagehalterungsflansches sollten mit den Löchern zwischen Ihren Markierungen an der vorderen vertikalen Schiene übereinstimmen 2 Befestigen Sie die Montageschiene durch je eine 10 32 x 0 5 Zoll Kreuzschlitzbundschraube im oberen und unteren Loch des Montageflanschs an der vo...

Страница 52: ...oberen und unteren Loch des Montageflanschs an der hinteren vertikalen Schiene 5 Wiederholen Sie Schritt 1 bis Schritt 4 für die Montageschiene auf der anderen Seite des Racks 6 Achten Sie darauf dass die Montageschienen auf beiden Seiten des Racks jeweils an der gleichen vertikalen Position befestigt werden Abbildung 1 6 Installation der VersaRails Montageschienen 1 Flansch der Montagehalterung 3...

Страница 53: ...geschienen zu installieren Um das System im Rack zu installieren gehen Sie wie folgt vor 1 Positionieren Sie das System von der Rack Vorderseite aus vor den im Rack installierten Montageschienen Abbildung 1 7 System im Rack installieren 2 Schieben Sie das System vollständig in das Rack bis die System Frontplatte die vertikalen Schienen berührt siehe Abbildung 1 7 3 Ziehen Sie die Rändelschrauben a...

Страница 54: ...ystem ohne fremde Hilfe aus den Montageschienen zu entfernen Gehen Sie wie folgt vor um das System aus dem Rack zu entfernen 1 Schalten Sie das System sowie die angeschlossenen Peripheriegeräte aus und unterbrechen Sie die Stromzufuhr Abbildung 1 8 System aus dem Rack entfernen 1 Montageschienen 2 2 Rändelschrauben 2 3 Freigabetaste 2 1 2 3 ...

Страница 55: ...iner anderen Person auf beiden Seiten des Racks jeweils die runde Freigabetaste blau und ziehen Sie das System vollständig aus dem Rack 5 Legen Sie das System auf eine stabile Arbeitsfläche Wiederanbringen der Rack Türen Siehe Vorgehensweise zum Austauschen der Türen in der Dokumentation des Racks VORSICHT Da die Rack Türen sehr groß und schwer sind versuchen Sie niemals die Türen ohne fremde Hilf...

Страница 56: ...54 Rack Installationsanleitung ...

Страница 57: ...ラック取り付けガイド ...

Страница 58: ...なる可能性があることを示します ____________________ 本書の内容は予告なく変更されることがあります 2005 すべての著作権は Dell Inc にあります Dell Inc の書面による許可のない複製は いかなる形態においても厳重に禁じられています 本書で使用されている商標について Dell DELL ロゴ RapidRails および VersaRails は Dell Inc の商標です 本書では 必要に応じて上記以外の商標や会社名が使用されている場合がありますが これらの商標や会社名は 一切 Dell Inc に所属するものではありません 2005 年 8 月 P N RC782 Rev A00 ...

Страница 59: ...付け手順 60 作業を開始する前に 60 安全に関する重要な注意 60 VersaRails のラック要件 60 4 柱型ラックの取り付け 61 ラックスタビライザ 61 推奨する工具および備品 61 RapidRails ラックキットの内容 62 VersaRails ラックキットの内容 62 取り付け手順 63 ラック扉の取り外し 64 ラックへの印付け 64 ラックへのマウントレールの取り付け 66 ラックへのシステムの取り付け 70 ラックからのシステムの取り外し 71 ラック扉の取り付け 72 ...

Страница 60: ...58 目次 ...

Страница 61: ...以外のラッ クキャビネットにシステムおよびラックキットを取り付ける場合は 安全性が保証されません 最終 的に組み合わせたシステムおよびラックについては ユーザーの責任において 適用される安全基準 および地域の電気規約の要件に適合することを確認してください デルでは このような組み合わせ に関連するいかなる保証責任も負いません システムラックキットは トレーニングを受けたサービス技術者が 規格に適合するラックに 取り付けます キットを別のラックに取り付ける場合は そのラックがデルのラック仕様に適 合していることを確認してください 警告 大型ラックを 1 人で移動しないでください ラックの高さと重さを考慮して 少なくとも 2 人 以上でラックを移動することをお勧めします ラックで作業をする前に スタビライザがラックに固定されて床面に伸び ラックの全重量が 床面にかかっていることを確認してくださ...

Страница 62: ...はブレーキがないため ラックキャビネットを移動すると きは十分な注意が必要です ラックキャビネットを別の場所に移動するときは 水平調節用の脚を収 納してください 長い傾斜面 急勾配のある場所 スロープなど バランスが取りにくい場所には キャビネットを設置しないでください 水平調節用の脚を伸ばしてキャビネットを支え キャビネッ トが動かないようにしてください メモ システム自体の設置方法については ラックへのシステムの取り付け を参照してください 安全に関する重要な注意 システムをラックに取り付けるときは 次の各項の安全に関する注意を遵守してください 警告 作業者は 自分自身と周囲の人々を保護するために 本書の手順に必ず従ってください 本シ ステムは非常に重量があり大きいため ご自身や周囲の人々のけがを防ぐために準備と計画を適切に 行うことが重要です これは 特にシステムをラックの高い位置に...

Страница 63: ...り付けて からラックにシステムを取り付けてください スタビライザを正しく取り付けずにシステムをラック に取り付けると ラックが転倒し けがをするおそれがあります 必ずスタビライザを取り付けてか ら ラックにコンポーネントを取り付けてください スタビライザはラックの転倒を防ぎます スタビライザを取り付けて床に固定する手順については ラックキャビネットに付属のマニュアルを参照してください 推奨する工具および備品 システムを 4 柱型ラックキャビネットに取り付ける際 以下の工具および備品が必要な場合があり ます 2 プラスドライバ マスキングテープまたはフェルトペン 取り付け作業中に取り付け穴に印を付けるために使用 ...

Страница 64: ...apidRails マウントレール 1 組 図 1 1 RapidRails ラックキットの内容 VersaRails ラックキットの内容 VersaRails ラックキットの内容は次のとおりです VersaRails マウントレール 1 組 10 32 x 0 5 インチフランジヘッドプラスネジ 8 メモ 図と手順の説明に示すメートル法規格以外のネジは サイズとインチ当たりのネジ山数で表記 されています たとえば 1 インチに 32 本のネジ山がある 10 プラスネジは 10 32 ネジと表記します 1 マウントレール 2 1 ...

Страница 65: ...ersaRails ラックキットの内容 取り付け手順 ラックキットを取り付けるには 次の手順 以降の各項で詳細を説明 を番号順に実行します 1 ラック扉の取り外し 2 ラックへの印付け 3 ラックへのマウントレールの取り付け RapidRails の取り付け VersaRails の取り付け 4 ラックへのシステムの取り付け 5 ラック扉の取り付け 1 マウントレール 2 2 10 32 x 0 5 インチフランジヘッドプラスネジ 8 2 1 ...

Страница 66: ...は ラックに取り付ける各システムの上下に 3 U 132 mm の空間を空ける必要があります EIA 310 規格を満たすラックキャビネットには 1 ラックユニット 1 U ごとに 3 つの穴が交互に 並んでいます 穴の中心から中心までの距離は 前面および背面垂直レールの 1 U スペースの一番 上の穴から計測して 15 9 mm 15 9 mm 12 7 mm となっています 図 1 3 を参照 ラックキャ ビネットの穴には丸型または角型があります メモ 垂直レールには 1 U 間隔の水平の線と数字で印が付いていることがあります ラックの垂直 レールについている印の番号を控える方法もあるので ラックに印を付けたりテープを貼る作業は必 須ではありません 図 1 3 1 ラックユニット 1 U 1 U 44 mm 12 7 mm 15 9 mm 15 9 mm 12 7 mm ...

Страница 67: ...の手順を実行します 1 ラック前面の垂直レール上で ラックキャビネットに取り付けるシステムの底部の位置を決 め フェルトペンまたはマスキングテープを使って印を付けます 底部にあたる各 1 U スペースの位置は 穴と穴の間が狭い方の金属部分の中央です 横線で印 が付いているラックキャビネットもあります 図 1 3 を参照 2 最初に印を付けた位置から 132 mm 上 EIA 310 規格に適合したラックであれば 9 個上の 穴 に 2 つ目の印を付けます このマークは 垂直レール上でシステムの上端が来る位置 を示します 図 1 4 を参照 図 1 4 垂直レールの印付け 1 垂直レールに貼ったテープ 1 ...

Страница 68: ...の前面取り付けブラケットフランジの上部取り付けフックを 垂直レールに付 けた印の間にある一番上の穴に差し込みます 2 マウントレールを正面に向かって押して 2 つの取り付けフックを角型の穴に差し込みま す 次に 2 つの取り付けフックが両方とも固定され 上部取り付けフックの青いタブがカ チッという音がして飛び出すまで 取り付けブラケットのフランジを下に押します 図 1 5 を参照 3 キャビネットの背面から 取り付けブラケットのフランジを後ろに引いて 取り付けフック を対応する角型の穴に差し込みます 次に 取り付けフックが固定され 青いタブがカチッ という音がして飛び出すまで フランジを下に押します 4 ラックの反対側のマウントレールで 手順 1 手順 3 を繰り返します 5 左右の垂直レールで マウントレールが同じ高さに取り付けられていることを確認します ...

Страница 69: ...ラック取り付けガイド 67 図 1 5 RapidRails マウントレールの取り付け 1 取り付けフック 3 ラック正面 2 青いタブ 4 マウントレール 3 4 1 2 ...

Страница 70: ...ラケットフランジの前面の 6 個穴を 前部垂直レールに付けた印の間の穴に合わせ ます 2 2 本の 10 32 x 0 5 インチフランジヘッドプラスネジを取り付けブラケットフランジの上と 下の穴に差し込んで マウントレールを前面垂直レールに固定します 3 キャビネットの背面から 取り付けブラケットフランジを後ろに引いて 取り付け穴を背面 垂直レールのそれぞれ対応する穴に合わせます 4 2 本の 10 32 x 0 5 インチフランジヘッドプラスネジを背面取り付けブラケットフランジの 上と下の穴に差し込んで マウントレールを背面垂直レールに固定します 5 ラックの反対側のマウントレールで 手順 1 手順 4 を繰り返します 6 左右の垂直レールで マウントレールが同じ高さに取り付けられていることを確認します ...

Страница 71: ...ラック取り付けガイド 69 図 1 6 VersaRails マウントレールの取り付け 1 取り付けブラケットフランジ 3 ラック正面 2 10 32 x 0 5 インチフランジヘッドプラスネジ マウントレール 1 本につき 4 本 4 マウントレール 3 4 2 1 ...

Страница 72: ...い 警告 システムの大きさと重さを考慮して マウントレールへのシステムの取り付けは 1 人では行わ ないでください システムをラックに取り付けるには 次の手順を実行します 1 ラックの正面から ラックキャビネットに取り付けたマウントレールの前にシステムを置き ます 図 1 7 ラックへのシステムの取り付け 2 システムをラックの中に十分にスライドさせ システムの正面パネルと垂直レールが接触す るところまで押し込みます 図 1 7 を参照 3 システムの正面パネルの左右にある拘束蝶ネジを締めます 図 1 7 を参照 1 マウントレール 2 2 蝶ネジ 2 1 2 ...

Страница 73: ... 71 ラックからのシステムの取り外し 警告 システムの大きさと重さを考慮して マウントレールからのシステムの取り外しは 1 人では行 わないでください システムをラックから取り外すには 次の手順を実行します 1 システムおよび接続されている周辺機器の電源を切り システムを電源コンセントから外し ます 図 1 8 ラックからのシステムの取り外し 1 マウントレール 2 2 蝶ネジ 2 3 リリースボタン 2 1 2 3 ...

Страница 74: ...の 側面のラッチが垂直レールの四角いストップホールにかかるまで引き出します 図 1 7 を参照 4 ラックの反対側をもう 1 人に持ってもらい システム両側の丸いリリースボタン 青 を押し システムをスライドさせてラックから完全に引き出します 5 システムをしっかりした安定した平面に置きます ラック扉の取り付け ラックに付属のマニュアルに記載されている扉の取り付け手順を参照してください 警告 ラックキャビネットの扉の大きさと重さを考慮して 取り付けおよび取り外しは 1 人では行わ ないでください これで 4 柱型ラックキャビネットへのシステムの取り付けは完了です ...

Страница 75: ...Guía de instalación del rack ...

Страница 76: ...carse sin previo aviso 2005 Dell Inc Reservados todos los derechos Queda estrictamente prohibida la reproducción de este documento en cualquier forma sin la autorización por escrito de Dell Inc Marcas comerciales utilizadas en este texto Dell el logotipo de DELL RapidRails y VersaRails son marcas comerciales de Dell Inc Otras marcas y otros nombres comerciales pueden utilizarse en este documento p...

Страница 77: ...ación del rack de cuatro postes 79 Pies estabilizadores del rack 79 Herramientas y material recomendados 79 Contenido del kit de rack RapidRails 80 Contenido del kit de rack VersaRails 80 Tareas de instalación 81 Extracción de las puertas del rack 82 Marcado del rack 82 Instalación de los rieles de montaje en el rack 84 Instalación del sistema en el rack 88 Extracción del sistema del rack 89 Coloc...

Страница 78: ...76 Contenido ...

Страница 79: ...se vuelque y ello puede producir lesiones graves NOTA este sistema tiene el certificado de seguridad de una unidad independiente y como un componente para uso en un armario rack Dell con el kit de rack para clientes La instalación del sistema y del kit de rack en otros armarios rack no ha sido aprobada por ninguna agencia de seguridad Es su responsabilidad asegurarse de que la combinación final de...

Страница 80: ...rramientas y el kit de rack VersaRails se puede montar en la mayoría de los armarios rack estándar del sector Los procedimientos para instalar los kits de rack RapidRails y VersaRails son similares Por cada sistema que se vaya a instalar en el armario rack se precisa un kit de rack Antes de comenzar Antes de empezar a montar el sistema en el rack lea atentamente las Instrucciones de seguridad en u...

Страница 81: ...n un rack que cumpla las especificaciones siguientes ANSI EIA 310 D 92 IEC 297 y DIN 41494 Se precisa un kit de rack para cada sistema que se instale en el rack Instalación del rack de cuatro postes Antes de llevar a cabo la instalación lea detenidamente el procedimiento completo Pies estabilizadores del rack PRECAUCIÓN antes de instalar sistemas en un rack instale los estabilizadores frontales y ...

Страница 82: ...saRails El kit de rack VersaRails contiene lo siguiente Un par de rieles de montaje VersaRails 8 tornillos Phillips con arandela 10 32 x 0 5 pulgadas NOTA los tornillos no métricos que se describen en las ilustraciones y en los procedimientos se identifican por el tamaño y el número de roscas por pulgada Por ejemplo un tornillo Phillips del nº 10 con 32 roscas por pulgada se identifica como un tor...

Страница 83: ...en en detalle en las siguientes subsecciones en el orden indicado 1 Extracción de las puertas del rack 2 Marcado del rack 3 Instalación de los rieles de montaje en el rack Instalación de RapidRails Instalación de VersaRails 4 Instalación del sistema en el rack 5 Colocación de las puertas del rack 1 Rieles de montaje 2 2 Tornillos Phillips con arandela 10 32 x 0 5 pulgadas 8 2 1 ...

Страница 84: ...alterno de tres orificios por unidad de rack con un espacio entre orificios de centro a centro comenzando en el orificio superior de un espacio 1 U de 15 9 mm 15 9 mm y 12 7 mm para los rieles verticales frontal y posterior vea la figura 1 3 Los armarios rack pueden tener orificios circulares o cuadrados NOTA los rieles verticales pueden estar marcados con líneas horizontales y números en incremen...

Страница 85: ...e cada espacio 1 U se encuentra en el centro de la zona metálica más estrecha entre orificios marcados con una línea horizontal en algunos armarios rack vea la figura 1 3 2 Coloque una segunda marca 132 mm por encima de la primera marca señalada o cuente nueve orificios en un rack que cumpla los estándares EIA 310 Esta marca indica dónde se va a situar el borde superior del sistema en los rieles v...

Страница 86: ...los dos ganchos de montaje entren en los orificios cuadrados correspondientes A continuación presione hacia abajo la superficie de montaje del soporte hasta que los ganchos de montaje encajen y la lengüeta azul del gancho de montaje superior se expulse y se oiga un clic vea la figura 1 5 3 En la parte posterior del armario tire hacia atrás de la superficie de montaje del soprote hasta que los ganc...

Страница 87: ...Guía de instalación del rack 85 Figura 1 5 Instalación de los rieles de montaje RapidRails 1 Ganchos de montaje 3 Parte frontal del rack 2 Lengüeta azul 4 Riel de montaje 3 4 1 2 ...

Страница 88: ...x 0 5 pulgadas en los orificios superior e inferior de la superficie de montaje del soporte para fijar el riel de montaje al riel vertical frontal 3 En la parte posterior del armario tire hacia atrás de la superficie de montaje del soporte hasta que los orificios de montaje queden alineados con los orificios correspondientes del riel vertical posterior 4 Coloque dos tornillos Phillips con arandela...

Страница 89: ...ck 87 Figura 1 6 Instalación de los rieles de montaje VersaRails 1 Superficie de montaje del soporte 3 Parte frontal del rack 2 Tornillos Phillips con arandela 10 32 x 0 5 pulgadas 4 por riel de montaje 4 Riel de montaje 3 4 2 1 ...

Страница 90: ...UCIÓN debido al tamaño y al peso del sistema no intente nunca montar el sistema en los rieles de montaje sin ayuda Para instalar el sistema en el rack realice el procedimiento siguiente 1 En la parte frontal del rack coloque el sistema delante de los rieles de montaje instalados en el armario rack Figura 1 7 Instalación del sistema en el rack 1 Rieles de montaje 2 2 Tornillos mariposa 2 1 2 ...

Страница 91: ... figura 1 7 Extracción del sistema del rack PRECAUCIÓN debido al tamaño y al peso del sistema no intente nunca extraer el sistema de los rieles de montaje sin ayuda Para extraer el sistema del rack realice el procedimiento siguiente 1 Apague el sistema y los periféricos conectados y desconecte el sistema de la toma eléctrica Figura 1 8 Extracción del sistema del rack 1 Rieles de montaje 2 2 Tornil...

Страница 92: ... el otro lado del rack presione los botones de liberación redondos azules de ambos lados del sistema y deslícelo hasta extraerlo completamente del rack 5 Coloque el sistema en una superficie resistente y estable Colocación de las puertas del rack Para volver a colocar las puertas consulte los procedimientos en la documentación suministrada con el rack PRECAUCIÓN debido al tamaño y al peso de las p...

Отзывы: