background image

38

アップデート情報

www

.dell.com | support.dell.com

1-2

プロセッサの交換

プロセッサの取り付け


1

新しいプロセッサをパッケージから取り出します。

2

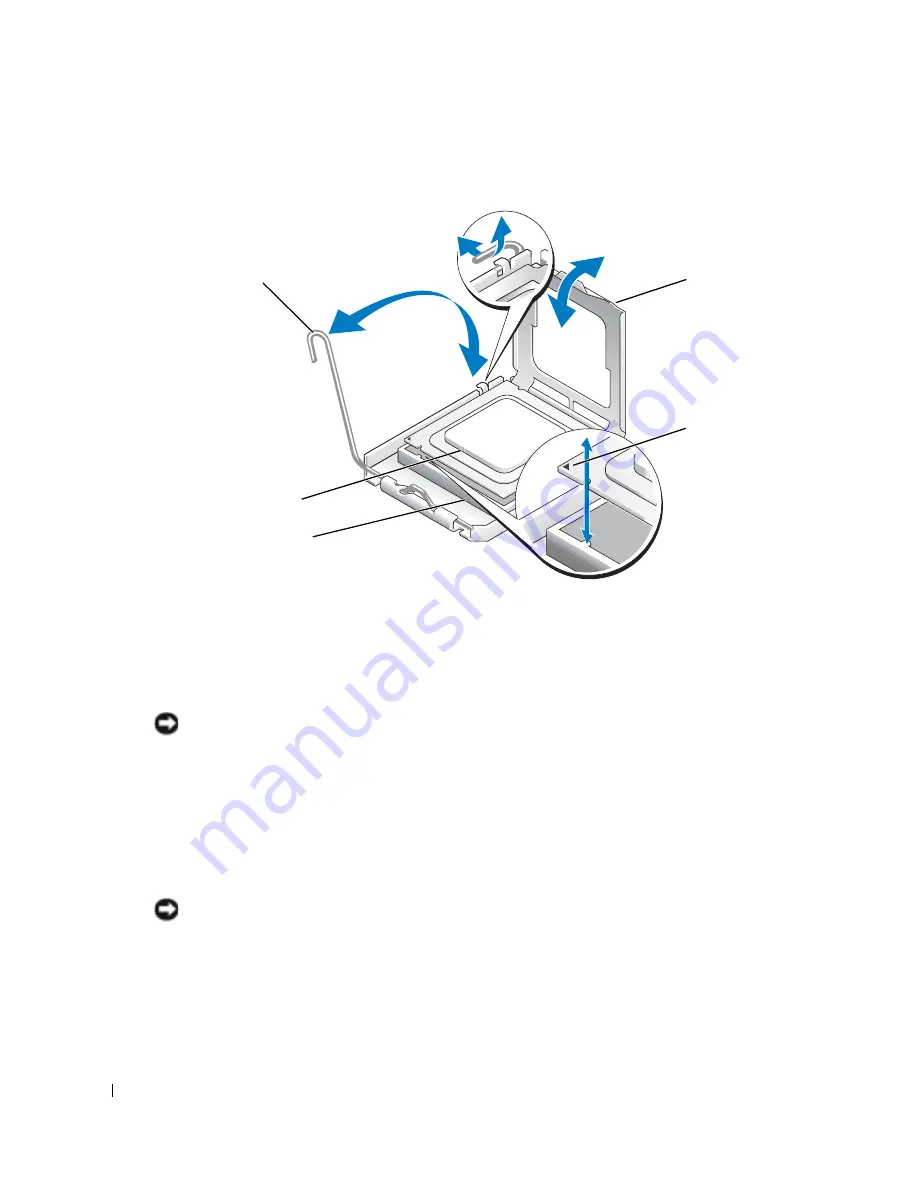
プロセッサソケットのリリースレバーが、完全に開いた状態であることを確認します。

3

プロセッサとソケットの

 1 

番ピンの角を合わせます。


1-2 

を参照してください。


注意:


システムの電源投入時にプロセッサとシステム基板に損傷を与えないように、プロ

セッサをソケットに正しく装着してください。


ソケットのピンに触れたり、ピンを曲げたり

しないように注意してください。

4

プロセッサをソケットにわずかに差し込み、プロセッサがソケット内で水平になって

いることを確認します。


プロセッサが所定の位置に正しくセットされていれば、軽く

押すとソケットに収まります。

5

プロセッサカバーを閉じます。

6

所定の位置にカチッと収まるまでリリースレバーを倒して、プロセッサを固定します。


注意:


ヒートシンクが取り付けられていない状態でシステムを動作させないでください。


ヒートシンクは適切な温度条件を保つために必要な部品です。


7

糸くずのでない清潔な布を使って、先に取り外したヒートシンクからサーマルグリー

スを拭き取ります。

8

サーマルグリースをプロセッサ上面に均等に塗布します。

9

ヒートシンクをプロセッサの上に置きます。


1-1 

を参照してください。

ピン

 1 

ロケーター(

2

プロセッサカバー

プロセッサソケット

プロセッサソケットのリリースレバー

プロセッサ

Содержание PowerEdge 800

Страница 1: ...w w w d e l l c o m s u p p o r t d e l l c o m Dell PowerEdge 800 Systems Information Update 信息更新 Mise à jour des informations Aktuelle Informationen アップデート情報 정보 업데이트 Actualización de información ...

Страница 2: ......

Страница 3: ...w w w d e l l c o m s u p p o r t d e l l c o m Dell PowerEdge 800 Systems Information Update ...

Страница 4: ... Information in this document is subject to change without notice 2004 Dell Inc All rights reserved Reproduction in any manner whatsoever without the written permission of Dell Inc is strictly forbidden Trademarks used in this text Dell the DELL logo and PowerEdge are trademarks of Dell Inc Intel is a registered trademark of Intel Corporation Red Hat is a registered trademark of Red Hat Inc Other ...

Страница 5: ... Hat Enterprise Linux 3 If your system has a DRAC 4 P card installed the integrated IDE controllers and their devices will not be available on systems running RHEL 3 As a temporary solution append the following kernel parameter to the kernel line for each stanza in the grub conf file ide2 0x1f0 As an alternative go to rhn redhat com and upgrade your kernel to version 2 4 21 15 EL or higher 64 Bit ...

Страница 6: ...in your Installation and Troubleshooting Guide 3 Lay the system on its right side 4 Remove the cover See Removing the Cover in Troubleshooting Your System in your Installation and Troubleshooting Guide 5 Remove the cooling shroud See Removing the Cooling Shroud in installing System Components in your Installation and Troubleshooting Guide NOTICE After removing the heat sink place it upside down on...

Страница 7: ... the release lever upward to the fully open position See Figure 1 2 8 Open the processor cover See Figure 1 2 9 Lift the processor vertically out of the socket Leave the processor cover and release lever in the open position so that the socket is ready for the new processor See Figure 1 2 securing clips 2 heat sink ...

Страница 8: ...n the socket and ensure that the processor is level in the socket When the processor is positioned correctly press it gently to seat it in the socket 5 Close the processor cover 6 Rotate the release lever back down until it snaps into place securing the processor cover NOTICE Do not operate the system without the heat sink installed The heat sink is required to maintain proper thermal conditions 7...

Страница 9: ...ed peripherals 17 Enter the System Setup program and ensure that the processor options match the new system configuration See Using the System Setup Program in your User s Guide As the system boots it detects the presence of the new processor and automatically changes the system configuration information in the System Setup program A message similar to the following appears One 2 3 GHz Processor P...

Страница 10: ...8 Information Update w w w d e l l c o m s u p p o r t d e l l c o m ...

Страница 11: ...w w w d e l l c o m s u p p o r t d e l l c o m Dell PowerEdge 800 系统 信息更新 ...

Страница 12: ...阅 用户指南 中的 词汇表 ____________________ 本文中的信息如有更改 恕不另行通知 2004 Dell Inc 版权所有 翻印必究 未经 Dell Inc 书面许可 不得以任何方式进行复制 本文件中使用的商标 Dell DELL 徽标和 PowerEdge 是 Dell Inc 的商标 Intel 是 Intel Corporation 的注册商标 Red Hat 是 Red Hat Inc 的注册商标 本文件中述及的其它商标和产品名称是指拥有相应商标和名称的公司或其制造的产品 Dell Inc 对本公司的商标和产品名称之外的其它商标和产品名称不拥有任何专有权 2004 年 10 月 P N H6440 Rev A01 ...

Страница 13: ...序并启用 IPMI PT 则 VLAN 功能将无法正常工作 操作系统 公用程序将允许您配置 VLANS 但通过 VLAN 接口将不会收到任何流量 在 Red Hat Enterprise Linux 3 中使用 DRAC 4 P 如果系统中安装了 DRAC 4 P 卡 则在运行 RHEL 3 的系统中将无法使用集成 IDE 控制器及其 设备 作为一种临时解决方案 请在 grub conf 文件中将下列内核参数添加到每节的内核行 ide2 0x1f0 作为一种备用方法 也可以访问 rhn redhat com 并将您的内核升级至版本 2 4 21 15 EL 或更高版本 64 位能力 如果系统中安装的处理器具有 64 位能力 则系统设置程序的 CPU Information CPU 信息 屏幕上的 64 bit Technology 64 位技术 选项将显示 Yes Intel EM64T ...

Страница 14: ...享受保修 请阅读并遵循产品附带的安全说明 1 关闭系统 包括连接的任何外围设备 的电源 然后断开系统与电源插座的连接 2 卸下挡板 请参阅 安装与故障排除指南 中 排除系统故障 的 卸下挡板 部分 3 将系统侧放 使其右侧朝下 4 卸下主机盖 请参阅 安装与故障排除指南 中 排除系统故障 的 卸下主机盖 部分 5 卸下冷却护罩 请参阅 安装与故障排除指南 中 安装系统组件 的 卸下冷却护 罩 部分 注意 卸下散热器后 请将其倒置放在平坦的表面上 以防止损坏或污染散热材料 6 卸下散热器 请参阅图 1 1 a 向下按一个固定夹的末端并使其离开固定支架 直至与固定模块上的固定卡舌分开 这样打开固定夹 然后将固定夹向上提起 b 对其余固定夹重复步骤 a c 轻轻旋转散热器 然后将散热器从处理器上提起 请勿将散热器从处理器上撬下 ...

Страница 15: ...信息更新 13 图 1 1 卸下散热器 7 向下按压处理器插槽释放拉杆 然后将释放拉杆向上拉至完全打开位置 请参阅图 1 2 8 打开处理器护盖 请参阅图 1 2 9 将处理器从插槽中垂直取出 使处理器护盖和释放拉杆保持在打开位置 以便可以在插 槽中安装新处理器 请参阅图 1 2 固定夹 2 个 散热器 ...

Страница 16: ... 1 边角与插槽的插针 1 边角对齐 请参阅图 1 2 注意 您必须将处理器正确地放置在插槽中 以免开机时损坏处理器和主板 请注意不要触摸 或弯曲插槽上的插针 4 将处理器轻轻放置在插槽中 并确保处理器在插槽中处于水平位置 处理器正确定位后 轻轻按压处理器 使其固定在插槽中 5 合上处理器护盖 6 向下转回释放拉杆直至其卡入到位 从而固定处理器护盖 注意 如果还未安装散热器 请勿操作系统 要保持正确散热 散热器必不可少 7 使用不起毛的干净软布擦掉本过程前面卸下的散热器上的散热膏 8 在处理器顶部均匀涂上散热膏 9 将散热器放到处理器上 请参阅图 1 1 插针 1 定位器 2 个 处理器护盖 处理器插槽 处理器插槽释放拉杆 处理器 ...

Страница 17: ...南 中 排除系统故障 的 安装挡板 部分 16 将系统 包括连接的任何外围设备 重新连接至电源插座 然后开机 17 进入系统设置程序 并确保处理器选项与新的系统配置相符 请参阅 用户指南 中的 使用系统设置程序 系统在引导时将检测是否存在新的处理器 并且自动更改系统设置程序中的系统配置信 息 屏幕上将显示与下面类似的信息 One 2 3 GHz Processor Processor Bus 533 MHz L2 cache 256 KB 18 在系统设置程序中 确认系统数据区域的顶行正确识别了已安装的处理器 请参阅 用户指南 中的 使用系统设置程序 19 退出系统设置程序 20 确保系统运行的是最新 BIOS 版本 您可以从 Dell 支持 Web 站点 support ap dell com china 下载最新的 BIOS 版本 21 运行系统诊断程序 验证新处理器是否正常工作 有关...

Страница 18: ...16 信息更新 w w w d e l l c o m s u p p o r t d e l l c o m ...

Страница 19: ...w w w d e l l c o m s u p p o r t d e l l c o m Systèmes Dell PowerEdge 800 Mise à jour des informations ...

Страница 20: ...__ Les informations contenues dans ce document peuvent être modifiées sans préavis 2004 Dell Inc Tous droits réservés La reproduction de ce document de quelque manière que ce soit sans l autorisation écrite de Dell Inc est strictement interdite Marques utilisées dans ce document Dell le logo DELL et PowerEdge sont des marques de Dell Inc Red Hat est une marque déposée de Red Hat Inc Intel est une ...

Страница 21: ... contrôleurs IDE intégrés et les périphériques associés ne seront pas disponibles sur les systèmes exécutant Red Hat Enterprise Linux 3 La solution temporaire consiste à ajouter le paramètre supplémentaire suivant à la ligne concernant le noyau dans chaque paragraphe du fichier grub conf ide2 0x1f0 Vous pouvez aussi vous rendre sur le site rhn redhat com et mettre le noyau à niveau en installant l...

Страница 22: ...on et de dépannage 3 Couchez le système sur son côté droit 4 Retirez le capot Consultez la section Retrait du capot dans le chapitre Dépannage du système du Guide d installation et de dépannage 5 Retirez le carénage de ventilation Consultez la section Retrait du carénage de ventilation du chapitre Installation des composants du système dans le Guide d installation et de dépannage AVIS après avoir ...

Страница 23: ...ez complètement ce levier Voir la figure 1 2 8 Ouvre le cache du processeur Voir la figure 1 2 9 Retirez le processeur de son support verticalement Laissez le levier d éjection et le cache du processeur en position ouverte afin que le support soit prêt à accueillir le nouveau processeur Voir la figure 1 2 Clips de fixation 2 Dissipateur de chaleur ...

Страница 24: ...nt positionné Lorsqu il est en place appuyez légèrement dessus pour le fixer dans le support 5 Fermez le cache du processeur 6 Abaissez le levier d éjection pour le remettre en place et fixer le cache du processeur AVIS n utilisez pas le système si le dissipateur de chaleur n est pas installé Le dissipateur de chaleur est nécessaire pour maintenir les conditions de température adéquates 7 À l aide...

Страница 25: ...17 Accédez au programme de configuration du système et vérifiez que les options du processeur correspondent bien à la nouvelle configuration Consultez la section Utilisation du programme de configuration du système dans le Guide d utilisation Lorsque le système démarre il détecte la présence du nouveau processeur et modifie automatiquement les informations du programme de configuration du système ...

Страница 26: ...24 Mise à jour des informations w w w d e l l c o m s u p p o r t d e l l c o m ...

Страница 27: ...w w w d e l l c o m s u p p o r t d e l l c o m Dell PowerEdge 800 Systeme Aktuelle Informationen ...

Страница 28: ...onyme finden Sie im Benutzerhandbuch unter Glossar ____________________ Irrtümer und technische Änderungen vorbehalten 2004 Dell Inc Alle Rechte vorbehalten Die Reproduktion dieses Dokuments in jeglicher Form ohne schriftliche Genehmigung von Dell Inc ist streng untersagt Marken in diesem Text Dell das DELL Logo und PowerEdge sind Marken von Dell Inc Intel ist eine eingetragene Marke von Intel Cor...

Страница 29: ... Karte installiert ist sind die integrierten IDE Controller und deren Geräte bei Systemen unter RHEL 3 nicht verfügbar Um dem Problem vorübergehend abzuhelfen ergänzen Sie in jedem Abschnitt der Datei grub conf die Kernel Zeile um den folgenden Kernel Parameter ide2 0x1f0 Alternativ können Sie rhn redhat com aufrufen und einen Kernel Upgrade auf die Version 2 4 21 15 EL oder höher durchführen 64 B...

Страница 30: ...ng beim System in der Anleitung zur Installation und Fehlersuche 3 Legen Sie das System auf die rechte Seite 4 Entfernen Sie die Abdeckung Siehe dazu Abdeckung entfernen im Abschnitt Fehlerbehebung beim System in der Anleitung zur Installation und Fehlersuche 5 Entfernen Sie die Kühlkörperabdeckung Siehe dazu Kühlkörperabdeckung entfernen im Abschnitt Installieren von Systemkomponenten in der Anle...

Страница 31: ...die vollständig geöffnete Position Siehe Abbildung 1 2 8 Öffnen Sie die Prozessorabdeckung Siehe Abbildung 1 2 9 Heben Sie den Prozessor gerade nach oben aus dem Sockel heraus Belassen Sie die Prozessorabdeckung und den Freigabehebel in der geöffneten Position so dass der Sockel zur Aufnahme des neuen Prozessors bereitsteht Siehe Abbildung 1 2 Sicherungsklammern 2 Kühlkörper ...

Страница 32: ...ystems zu vermeiden Achten Sie sorgfältig darauf die Pins am Sockel nicht zu berühren oder zu verbiegen 4 Setzen Sie den Prozessor leicht auf den Sockel auf und stellen Sie sicher dass der Prozessor gerade im Sockel aufliegt Wenn der Prozessor korrekt positioniert ist drücken Sie ihn sanft in seinen Sitz im Sockel 5 Schließen Sie die Prozessorabdeckung 6 Schwenken Sie den Freigabehebel zurück nach...

Страница 33: ...auf der Systemplatine angeschlossen ist Siehe Abbildung A 3 in der Anleitung zur Installation und Fehlersuche 12 Installieren Sie die Kühlkörperabdeckung Siehe dazu Kühlkörperabdeckung installieren im Abschnitt Installieren von Systemkomponenten in der Anleitung zur Installation und Fehlersuche 13 Installieren Sie die Abdeckung Siehe dazu Abdeckung anbringen im Abschnitt Fehlerbehebung beim System...

Страница 34: ...cache 256 KB 18 Bestätigen Sie dass der installierte Prozessor in der obersten Zeile des Systemdatenbereichs im System Setup Programm korrekt angegeben ist Weitere Informationen finden Sie im Benutzerhandbuch unter System Setup Programm verwenden 19 Beenden Sie das System Setup Programm 20 Stellen Sie sicher dass Sie die aktuelle BIOS Version verwenden Sie können die aktuelle BIOS Version von der ...

Страница 35: ...w w w d e l l c o m s u p p o r t d e l l c o m Dell PowerEdge 800 システム アップデート情報 ...

Страница 36: ...照してください ____________________ 本書の内容は予告なく変更されることがあります 2004 すべての著作権は Dell Inc にあります Dell Inc の書面による許可のない複製は いかなる形態においても厳重に禁じられています このマニュアルに使用されている商標 Dell DELL ロゴ および PowerEdge は Dell Inc の商標です Intel は Intel Corporation の登録商標です Red Hat は Red Hat Inc の登録商標です 本書では 必要に応じて上記記載以外の商標や会社名が使用されている場合がありますが これらの商標や会社名は 一切 Dell Inc に所属するものではありません 2004 年 10 月 P N H6440 Rev A01 ...

Страница 37: ...設定はできますが VLAN のインタフェー スでトラフィックの受信ができません Red Hat Enterprise Linux 3 での DRAC 4 P の使い方 システムに DRAC 4 P カードが取り付けられている場合 RHEL 3 を実行しているシステム では 内蔵 IDE コントローラおよびそのデバイスは使用できません 一時的な解決策とし て grub conf ファイル内の各スタンザにつき カーネル行にカーネルパラメータ ide2 0x1f0 を追加します または rhn redhat com を開いて カーネルをバージョン 2 4 21 15 EL 以降にアップグレードします 64 ビット機能 システムに取り付けられているプロセッサが 64 ビット機能を持つ場合は セットアップ ユーティリティ内の CPU Information 画面の 64 bit Technology...

Страница 38: ...電源を切って 電源コンセントか ら外します 2 ベゼルを取り外します インストール トラブルシューティング にある システ ムのトラブルシューティング の ベゼルの取り外し を参照してください 3 右側を下にしてシステムを置きます 4 カバーを取り外します インストール トラブルシューティング にある システ ムのトラブルシューティング の カバーの取り外し を参照してください 5 冷却用エアフローカバーを取り外します インストール トラブルシューティング にある システム部品の取り付け の 冷却用エアフローカバーの取り外し を参照 してください 注意 取り外したヒートシンクは 平面の上に裏返して置き サーマルインタフェース材の 損傷や汚れを防止します 6 ヒートシンクを取り外します 図 1 1 を参照してください a 一方の固定クリップの端を押し下げて保持モジュールの固定タブから外し 次...

Страница 39: ...取り外し 7 プロセッサソケットのリリースレバーを押し下げた後に 完全に開いた位置まで起こ します 図 1 2 を参照してください 8 プロセッサカバーを開きます 図 1 2 を参照してください 9 プロセッサをまっすぐに持ち上げてソケットから取り出します ソケットに新しいプ ロセッサをすぐに取り付けることができるように プロセッサカバーとリリースレ バーは開いたままの状態にしておきます 図 1 2 を参照してください 固定クリップ 2 ヒートシンク ...

Страница 40: ...ソケットに正しく装着してください ソケットのピンに触れたり ピンを曲げたり しないように注意してください 4 プロセッサをソケットにわずかに差し込み プロセッサがソケット内で水平になって いることを確認します プロセッサが所定の位置に正しくセットされていれば 軽く 押すとソケットに収まります 5 プロセッサカバーを閉じます 6 所定の位置にカチッと収まるまでリリースレバーを倒して プロセッサを固定します 注意 ヒートシンクが取り付けられていない状態でシステムを動作させないでください ヒートシンクは適切な温度条件を保つために必要な部品です 7 糸くずのでない清潔な布を使って 先に取り外したヒートシンクからサーマルグリー スを拭き取ります 8 サーマルグリースをプロセッサ上面に均等に塗布します 9 ヒートシンクをプロセッサの上に置きます 図 1 1 を参照してください ピン 1 ロケーター 2...

Страница 41: ... を参照してください 16 システムおよびシステムに接続されている周辺機器を電源コンセントに接続し 電源を入れます 17 セットアップユーティリティを起動し プロセッサのオプションが新しいシステム設 定と一致していることを確認します ユーザーズガイド の セットアップユー ティリティの使い方 を参照してください システムが起動すると 新しいプロセッサの存在を検知し セットアップユーティリ ティのシステム設定情報を自動的に変更します 次のようなメッセージが表示されます One 2 3 GHz Processor Processor Bus 533 MHz L2 cache 256 KB 18 セットアップユーティリティのシステムデータ領域の一番上の行で 取り付けたプロ セッサが正しく認識されていることを確認します ユーザーズガイド の セット アップユーティリティの使い方 を参照してください...

Страница 42: ...40 アップデート情報 w w w d e l l c o m s u p p o r t d e l l c o m ...

Страница 43: ...w w w d e l l c o m s u p p o r t d e l l c o m Dell PowerEdge 800 시스템 정보 업데이트 ...

Страница 44: ...__________________ 본 설명서에 수록된 정보는 사전 통보 없이 변경될 수 있습니다 2004 Dell Inc All rights reserved 어떠한 경우에도 Dell Inc 의 사전 승인 없이 무단 복제하는 행위는 엄격하게 금지되어 있습니다 본 설명서에 사용된 상표인 Dell DELL 로고 및 PowerEdge는 Dell Inc 의 상표입니다 Intel은 Intel Corporation의 등록 상표이며 Red Hat은 Red Hat Inc 의 등록 상표입니다 본 설명서에서 특정 회사의 표시나 제품 이름을 지칭하기 위해 기타 상표나 상호를 사용할 수도 있습니다 Dell Inc 는 자사가 소유하고 있는 것 이외에 기타 모든 등록 상표 및 상표 이름에 대한 어떠한 소유권도 보유하지 않습니다 200...

Страница 45: ... VLANS를 구성할 수 있지만 VLAN 인터페이스 상에서 트래픽을 전혀 수신할 수 없습니다 Red Hat Enterprise Linux 3 에서 DRAC 4 P 사용 시스템에 DRAC 4 P 카드가 설치된 경우 RHEL 3을 실행하는 시스템에서 통합 IDE 컨트롤러 및 장치를 사용할 수 없습니다 임시 해결 방법으로서 grub conf 파일의 각 절마다 커널 매개 변 수 ide2 0x1f0을 커널 라인에 추가하십시오 또는 rhn redhat com을 방문하여 커널을 2 4 21 15 EL 이상 버전으로 업그레이드하십시오 64 비트 기능 시스템에 설치된 프로세서가 64비트 기능을 지원하는 경우 System Setup 프로그램의 CPU Information 화면에서 64 bit Technology 옵션이 Yes...

Страница 46: ... 전원 콘센트에서 시스템을 분리 하십시오 2 베젤을 분리하십시오 설치 및 문제 해결 설명서에 있는 시스템 문제 해결 의 베젤 분리 를 참조하십시오 3 시스템을 오른쪽으로 눕히십시오 4 덮개를 분리하십시오 설치 및 문제 해결 설명서에 있는 시스템 문제 해결 의 덮개 분리 를 참조하십시오 5 냉각기 덮개를 분리하십시오 설치 및 문제 해결 설명서에 있는 시스템 구성 요소 설치 의 냉각기 덮개 제거 를 참조하십시오 주의사항 방열판을 분리한 후에는 방열재 TIM Thermal Interface Material 가 손상되거나 오염되 지 않도록 평평한 곳에 뒤집어 놓아야 합니다 6 방열판을 분리하십시오 그림 1 1을 참조하십시오 a 고정 모듈의 고정 탭이 빠질 때까지 클립 끝부분을 아래로 누르면서 고정 클립을 완전 히 ...

Страница 47: ...방열판 분리 7 프로세서 소켓 분리 레버를 아래로 누른 다음 분리 레버를 위로 당겨 완전히 젖혀지도록 하십시오 그림 1 2를 참조하십시오 8 프로세서 덮개를 여십시오 그림 1 2를 참조하십시오 9 소켓에서 프로세서를 수직으로 똑바로 들어 올리십시오 소켓에 새 프로세서를 설치할 수 있도록 프로세서 덮개와 분리 레버를 열림 위치에 그대로 두십시오 그림 1 2를 참조하십 시오 고정 클립 2 방열판 ...

Страница 48: ...켓에 정확하게 꽂아야 합니다 소켓 핀에 닿거나 핀이 구부러지지 않도록 주의하십시오 4 소켓에서 프로세서가 수평이 되도록 프로세서를 소켓에 살짝 내려 놓으십시오 프로세서 가 제대로 놓여졌으면 프로세서를 천천히 눌러서 소켓에 끼우십시오 5 컴퓨터 덮개를 닫으십시오 6 제자리에 딸깍 소리를 내면서 설치될 때까지 분리 레버를 아래쪽으로 다시 돌려서 프로세 서 덮개를 고정시키십시오 주의사항 방열판이 설치되지 않은 상태에서 시스템을 작동시키지 마십시오 방열판은 온도를 알맞게 유지하는 데 필요합니다 7 깨끗하고 보풀이 없는 천으로 앞에서 분리한 방열판에서 열 그리즈를 닦아 내십시오 8 프로세서 맨 위에 열 그리즈를 고르게 바르십시오 9 프로세서 위에 방열판을 놓으십시오 그림 1 1을 참조하십시오 1번 핀 위치 지정자 2...

Страница 49: ...스템에 연결된 주변장치의 전원을 모 두 켜십시오 17 System Setup 프로그램으로 들어가서 프로세서 옵션이 새 시스템 구성과 일치하는지 확 인하십시오 사용 설명서의 시스템 설치 프로그램 사용 을 참조하십시오 시스템을 부팅하면 시스템에서 새로운 프로세서를 감지하고 System Setup 프로그램의 시스템 구성 정보를 자동으로 변경합니다 다음과 비슷한 메시지가 표시됩니다 One 2 3 GHz Processor Processor Bus 533 MHz L2 cache 256 KB 18 System Setup 프로그램에서 시스템 데이터 영역의 맨 위 줄에서 설치된 프로세서를 올바 르게 인식하는지를 확인하십시오 사용 설명서의 시스템 설치 프로그램 사용 을 참조하 십시오 19 System Setup 프로그램을 종...

Страница 50: ...48 정보 업데이트 w w w d e l l c o m s u p p o r t d e l l c o m ...

Страница 51: ...w w w d e l l c o m s u p p o r t d e l l c o m Sistemas Dell PowerEdge 800 Actualización de información ...

Страница 52: ...cumento puede modificarse sin previo aviso 2004 Dell Inc Reservados todos los derechos Queda estrictamente prohibida la reproducción de este documento en cualquier forma sin la autorización por escrito de Dell Inc Marcas comerciales utilizadas en este texto Dell el logotipo de DELL y PowerEdge son marcas comerciales de Dell Inc Intel es una marca comercial registrada de Intel Corporation Red Hat e...

Страница 53: ...rjeta DRAC 4 P las controladoras IDE integradas y los dispositivos correspondientes no estarán disponibles en los sistemas que se ejecuten en RHEL 3 Como solución temporal añada el parámetro de kernel siguiente a la línea del kernel para cada entrada del archivo grub conf ide2 0x1f0 Como alternativa vaya a rhn redhat com y actualice el kernel a la versión 2 4 21 15 EL o a una superior Capacidad de...

Страница 54: ...ón de problemas 3 Apoye el sistema sobre su lado derecho 4 Extraiga la cubierta Consulte Extracción de la cubierta en la sección Solución de problemas del sistema de la Guía de instalación y solución de problemas 5 Extraiga la cubierta de refrigeración Consulte Extracción de la cubierta de refrigeración en la sección Instalación de los componentes del sistema de la Guía de instalación y solución d...

Страница 55: ... posición totalmente abierta Consulte la figura 1 2 8 Abra la cubierta del procesador Consulte la figura 1 2 9 Levante el procesador verticalmente para extraerlo del zócalo Deje la cubierta del procesador y la palanca de liberación en la posición abierta de modo que el zócalo esté listo para alojar el nuevo procesador Consulte la figura 1 2 Ganchos de fijación 2 Disipador de calor ...

Страница 56: ...ndo el procesador esté en la posición correcta presione con cuidado hasta asentarlo en el zócalo 5 Cierre la cubierta del procesador 6 Baje de nuevo la palanca de liberación hasta que encaje en su sitio de este modo la cubierta del procesador queda fijada AVISO no haga funcionar el sistema sin el disipador de calor instalado El disipador de calor es necesario para mantener las condiciones térmicas...

Страница 57: ...de configuración del sistema y compruebe que las opciones del procesador coinciden con la nueva configuración del sistema Consulte Uso del programa de configuración del sistema en la Guía del usuario Cuando el sistema se inicia detecta la presencia del nuevo procesador y cambia automática mente la información de configuración del sistema en el programa de configuración del sistema Aparece un mensa...

Страница 58: ...56 Actualización de información w w w d e l l c o m s u p p o r t d e l l c o m ...

Отзывы: