background image


Throughout this guide, blocks of text may be accompanied by an icon and printed in 
bold type or in italic type. These blocks are notes, notices, cautions, and warnings, 
and they are used as follows:

NOTE: A NOTE indicates important information that helps you make better use of 
your computer system.


     !"

"#

$ %& $ %&!"

"#

Information in this document is subject to change without notice.
© 2001 Dell Computer Corporation. All rights reserved.

Reproduction in any manner whatsoever without the written permission of Dell Computer Corpo-
ration is strictly forbidden. 

Trademarks used in this text: 

Dell

 , the 

DELL

 logo, and 

VersaRails

 are trademarks of Dell Computer 

Corporation. 

Other trademarks and trade names may be used in this document to refer to either the entities 
claiming the marks and names or their products. Dell Computer Corporation disclaims any propri-
etary interest in trademarks and trade names other than its own.

September 2001     P/N 0H113 Rev. A02


Содержание PowerEdge 6400

Страница 1: ...w w w d e l l c o m s u p p o r t d e l l c o m Dell Systems Installing VersaRails Installation de VersaRails Installation von VersaRails Instalación de VersaRails VersaRails ...

Страница 2: ... ...

Страница 3: ... ...

Страница 4: ...01 Dell Computer Corporation All rights reserved Reproduction in any manner whatsoever without the written permission of Dell Computer Corpo ration is strictly forbidden Trademarks used in this text Dell the DELL logo and VersaRails are trademarks of Dell Computer Corporation Other trademarks and trade names may be used in this document to refer to either the entities claiming the marks and names ...

Страница 5: ...es on installing your system in the rack see your Rack Installation Guide The kit includes the following items One pair of VersaRails slide assemblies One cable management arm assembly Ten 10 32 x 0 500 Phillips head screws One cable tray and five 6 32 x 0 25 inch hex head screws for 4U and 7U systems only One pair of rack adapters and four 10 32 shoulder screws for 7U systems only One strain reli...

Страница 6: ...ability and warranties in connection with such combinations For instructions on installing the system itself see your Rack Installation Guide See your Rack Installation Guide for important safety information To install the VersaRail kit components you need the following tools 2 Phillips screwdriver Measuring tape Level Installing the VersaRail kit and the system into a rack cabinet involves the fo...

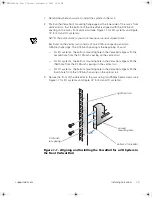
Страница 7: ...cing and two 0 250 inch spacings The 0 125 inch spacing is the beginning of a unit For 2U systems the bottom mounting hole in the VersaRail aligns with the second hole from the 0 125 inch spacing on the vertical rail For 4U systems the bottom mounting hole in the VersaRail aligns with the third hole from the 0 125 inch spacing on the vertical rail For 7U systems the bottom mounting hole in the Ver...

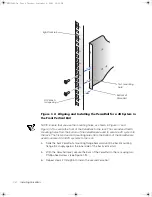
Страница 8: ...nting holes from the bottom of the VersaRail are used to secure 4U and 7U systems to the rack 4 Slide the back VersaRail s mounting flange backward until the back mounting flange fits snugly against the inner side of the back vertical rail 5 With the VersaRail level secure the back of the VersaRail to the rack using two Phillips head screws see Figure 1 3 6 Repeat steps 2 through 5 to install the ...

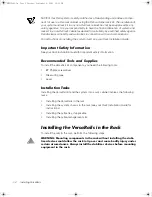
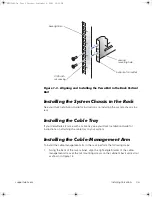
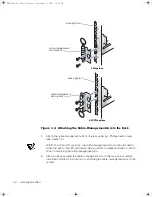
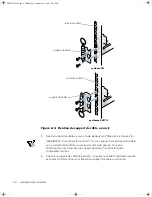
Страница 9: ...n Guide for instructions on attaching the cable tray to your system To install the cable management arm in the rack perform the following steps 1 Facing the back of the rack cabinet align the right angle bracket of the cable management arm over the rail mounting screws on the cabinet s back vertical rail as shown in Figure 1 4 0 125 inch rail spacing bottom of VersaRail second mounting hole back r...

Страница 10: ...to either the right or the left vertical rail See your Rack Installation Guide for instruc tions on reversing the cable management arm 3 After you have secured the cable management arm to the rack see your Rack Installation Guide for instructions on attaching the cable management arm to the system back right rail cable management arm bracket back right rail cable management arm bracket ...

Страница 11: ... 0H113ft2 fm Page 1 Thursday September 6 2001 11 39 AM ...

Страница 12: ...er Corporation Tous droits réservés La reproduction de ce document de quelque manière que ce soit sans l autorisation écrite de Dell Computer Corporation est strictement interdite Marques déposées utilisées dans ce guide Dell le logo DELL et VersaRails sont des marques commerciales de Dell Computer Corporation Toutes les autres marques déposées et noms de marques utilisés dans ce document se rappo...

Страница 13: ...stème dans le rack consultez le Guide d installation du rack Le kit contient les éléments suivants Deux axes coulissants VersaRail Un support de maintien des câbles Dix vis à tête Phillips 10 32 x 0 5 pouce Un support de câble et Cinq vis à tête hexagonale 6 32 x 0 25 pouce pour systèmes 4U et 7U uniquement Deux adaptateurs de rack et Quatre vis à épaulement 10 32 pour systèmes 7U uniquement Un dé...

Страница 14: ...sponsabilité et toutes garanties liées à ce type de combinaisons Pour plus d informations sur l installation du système lui même consultez le Guide d installation du rack Pour plus d informations sur la sécurité consultez le Guide d installation du rack Pour installer les composants du kit VersaRail vous avez besoin des outils suivants Tournevis Phillips n 2 Mètre Niveau Pour installer le kit Vers...

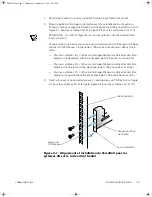
Страница 15: ...correspond au début d une unité Pour les systèmes 2U l orifice de montage inférieur du VersaRail doit être aligné sur le deuxième orifice de l espace de 0 125 pouce du rail vertical Pour les systèmes 4U l orifice de montage inférieur du VersaRail doit être aligné sur le troisième orifice de l espace de 0 125 pouce du rail vertical Pour les systèmes 7U l orifice de montage inférieur du VersaRail do...

Страница 16: ...s du VersaRail permettent d installer un système 4U ou un système 7U dans le rack 4 Faites glisser la patte de fixation du VersaRail vers l arrière jusqu à ce qu elle se loge contre la face interne du rail vertical arrière 5 A l aide du niveau VersaRail fixez la face arrière du VersaRail au rack à l aide de deux vis Phillips voir la Figure 2 3 6 Répétez les étapes 2 à 5 pour installer le deuxième ...

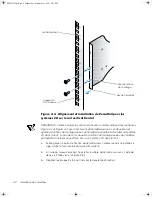
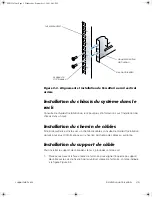
Страница 17: ...us d informations sur la fixation du chemin de câbles au système Pour installer le support de câble dans le rack procédez comme suit 1 Placez vous devant la face arrière de l armoire pour aligner l équerre du support de câble sur les vis de fixation du rail vertical arrière de l armoire comme indiqué à la figure Figure 2 4 espace de 0 125 pouce bas du VersaRail deuxième orifice de fixation rail ar...

Страница 18: ... ou sur le rail vertical de gauche Pour plus d informations sur l inversion du support de câble consultez le Guide d installation du rack 3 Une fois le support de câble fixé au rack consultez le Guide d installation du rack pour plus d informations sur la fixation du support de câble au système rail arrière droit support de câble rail arrière droit support de câble 0H113fb2 fm Page 6 Wednesday Sep...

Страница 19: ... 0H113gt2 fm Page 1 Thursday September 6 2001 11 41 AM ...

Страница 20: ...e Rechte vorbehalten Eine Reproduktion dieses Dokuments in jeglicher Form ist nur mit vorheriger schriftlicher Genehmigung der Dell Computer Corporation erlaubt Die in diesem Text verwendeten Warenzeichen Dell das DELL Firmenzeichen und VersaRails sind Warenzeichen der Dell Computer Corporation Andere in diesem Dokument möglicherweise verwendete Warenzeichen und Handels bezeichnungen sind unter Um...

Страница 21: ... die Installation Ihres Systems im Rack finden Sie in Ihrer Rack Installationsanleitung Das Kit enthält Folgendes Ein Paar VersaRails Schiebeeinheiten Ein Kabelarm Zehn 10 32 x 0 500 Kreuzschlitzschrauben Eine Kabelführung und fünf 6 32 x 0 25 Zoll Sechskantschrauben nur für die Systeme 4U und 7U Ein Paar Rack Adapter und vier 10 32 Ansatzschrauben nur für 7U Systeme Eine Zugentlastungsklammer nur...

Страница 22: ...d Gewährleistung für solche Kombinationen ab Anweisungen zur Installation des Systems selbst finden Sie in Ihrer Rack Installationsanleitung Wichtige Sicherheitsinformationen finden Sie in Ihrer Rack Installationsanleitung Um die VersaRail Kit Komponenten zu installieren benötigen Sie die folgenden Werkzeuge Kreuzschlitz Schraubendreher Nr 2 Maßband Wasserwaage Die Installatin des VersaRail Kits u...

Страница 23: ...bständen Der 0 125 Zoll breite Abstand befindet sich am Anfang einer Einheit Bei 2U Systemen stimmt das untere Montageloch im VersaRail mit dem zweiten Loch des 0 125 Zoll breiten Abstands auf der vertikalen Schiene überein Bei 4U Systemen stimmt das untere Montageloch im VersaRail mit dem dritten Loch des 0 125 Zoll breiten Abstands auf der vertikalen Schiene überein Bei 7U Systemen stimmt das un...

Страница 24: ...aRails werden zur Befestigung eines 4U Systems im Rack verwendet 4 Schieben Sie den hinteren Montageflansch des VersaRails zurück bis der hintere Montageflansch eng an der Innenseite der hinteren vertikalen Schiene anliegt 5 Wenn das VersaRail in der Waage ist befestigen Sie die Rückseite des VersaRails mit zwei Kreuzschlitzschrauben am Rack siehe Abbildung 3 3 6 Wiederholen Sie die Schritte 2 bis...

Страница 25: ...rem System in Ihrer Rack Installationsanleitung Um den Kabelarm im Rack zu installieren führen Sie folgende Schritte aus 1 Stellen Sie sich hinter den Gestellschrank richten Sie die rechtwinklige Klemme des Kabelarms über den Befestigungsschrauben an der hinteren vertikalen Schiene des Gestellschranks wie in Abbildung 3 4 gezeigt aus 0 125 Zoll Schienenabstand Unterseite des VersaRails zweites Mon...

Страница 26: ...kalen Schiene befestigt werden In Ihrer Rack Installationsanleitung finden Sie Anweisungen für die Montage des Kabelarms auf der anderen Seite 3 Nachdem Sie den Kabelarm am Rack befestigt haben finden Sie in Ihrer Rack Installationsanleitung Anweisungen zur Befestigung des Kabelarms am System rechte hintere Schiene Kabelarmklemme rechte hintere Schiene Kabelarmklemme 0H113gb2 fm Page 6 Thursday Se...

Страница 27: ... 0H113st2 fm Page 1 Wednesday September 5 2001 4 11 PM ...

Страница 28: ...ervados todos los derechos Queda prohibida su reproducción en cualquier medio sin la autorización por escrito de Dell Computer Corporation Marcas comerciales que aparecen en el texto Dell el logotipo de DELL y VersaRails son marcas comerciales de Dell Computer Corporation En este documento pueden utilizarse otras marcas y nombres comerciales para referirse a las entidades propietarias de dichas ma...

Страница 29: ...ulte la Guía de montaje en rack El kit consta de los elementos siguientes Un par de conjuntos deslizantes VersaRail Un conjunto de extensión para tendido de cables Diez tornillos Phillips de 10 32 x 0 500 pulgadas Una bandeja para cables y cinco tornillos de cabeza hexagonal de 6 32 x 0 25 pulgadas sólo para sistemas 4U y 7U Un par de adaptadores de rack y cuatro tornillos con pivote de 10 32 sólo...

Страница 30: ...as relacionadas con tales combinaciones Para obtener información sobre el procedimiento de instalación del sistema consulte la Guía de montaje en rack Consulte la Guía de montaje en rack para obtener información de seguridad importante Para montar los componentes del kit VersaRail necesita las siguientes herramientas Destornillador Phillips del n º 2 Cinta métrica Nivel Montar el kit VersaRail y e...

Страница 31: ...lgadas corresponde al principio de una unidad En los sistemas 2U el agujero inferior de montaje de VersaRail está alineado con el segundo agujero del espacio de 0 125 pulgadas de la guía vertical En los sistemas 4U el agujero inferior de montaje de VersaRail queda alineado con el tercer agujero del espacio de 0 125 pulgadas de la guía vertical Si se trata de sistemas 7U el agujero inferior de mont...

Страница 32: ...e inferior de VersaRail se utilizan para ajustar los sistemas 4U y 7U al rack 4 Deslice el soporte de montaje trasero de VersaRail hacia atrás hasta que se ajuste perfectamente en el lado interior de la guía vertical trasera 5 Con VersaRail nivelado ajuste la parte trasera de VersaRail al rack usando dos tornillos Phillips consulte la Figura 4 3 6 Repita los pasos del 2 al 5 para instalar un segun...

Страница 33: ...a bandeja para cables en el sistema Para montar la extensión para tendido de cables en el rack siga estos pasos 1 Mirando hacia la parte trasera del armario rack alinee el soporte en ángulo recto de la extensión para tendido de cables por encima de los tornillos de montaje de las guías situados en la guía trasera vertical del armario como se indica en la Figura 4 4 espacio de 0 125 pulgadas parte ...

Страница 34: ... la Guía de montaje en rack para obtener instrucciones sobre cómo invertir la extensión para tendido de cables 3 Una vez fijada al rack la extensión para tendido de cables consulte la Guía de montaje en rack para recibir instrucciones sobre cómo instalar en el sistema la extensión para tendido de cables guía trasera derecha soporte de la extensión para tendido de cables guía trasera derecha soport...

Страница 35: ... Dell VersaRails ...

Страница 36: ...89 3 0 1 234 56 0 1 234781 9 4 2001 Dell Computer Corporation Dell Computer Corporation Dell DELL VersaRails Dell Computer Corporation 0 12345 67589 5 234 Dell Computer Corporation 89 A 2001 B 9 C P N 0H113 Rev A02 ...

Страница 37: ...rsaRails 1 3 456 78 9 ABCDEF GF H IJKL MN CDEF VersaRails OP Q 2 VersaRails JKR3 ST 1 U V SWXYR R3 ST 1 Z 10 32 x 0 500 10 Z V SW J 1 Z 6 32 x 0 25 J _ 5 4U ab 7U B Rc d 1 U 10 32 e f 4 7U B J TT gS V 1 Z 2U B hijk GF l mn d o p nRWH jkL qrEs F tu vFF DC w 1 x ABCDEF ...

Страница 38: ...l Dell 2 u Es F Dell Dell UB v 4 u CDEF Dell q UB ab GF H IJKL MN CDEF 6 u jk GF H IJKL MN CDEF VersaRails l Q a ª 456 2 K J W VersaRails 2 2 VersaRails GF H IJ KL MN CDEF V SW J V SWXYR VersaRails VersaRails CDEF 0123415 678 9 8 AB C D8 01234 15 678 E FG H ...

Страница 39: ... 5 1 4U ab 7U À 5 2 MN CDEF W Á ÂFÁ 2Ã_FÁ 4Ä W Å 0 125 J 1 G2 0 250 J 2 G4Ä 0 125 J Æ Ç Ä 2U VersaRail È ÉBÁ W 0 125 J ÊË 2 ZÌ Á2 4U VersaRail È ÉBÁ W 0 125 J ÊË 3 ZÌ Á2 7U VersaRail È ÉBÁ W 0 125 J ÊË 4 ÍÌ Á2 3 2 v VersaRail 9 Î 2U À 5 1 4U ab 7U À 5 2 MN CDEF 5 1 VersaRail 2U 0 125 VersaRail 2 ...

Страница 40: ...a Á È ÉB Versa Rail 9 4 Î Es F 2 Ð CDEF VersaRail 2 ÍÌ2 4 ÍÌ Á 4È É s 2U 4 Î Es F VersaRail 1 ÍÌ2 2 ÍÌ È ÉBÁ 4È É s 4U ab 7U 4 Î Es F 4 VersaRail g Ñ Ñ W O Ò JK 5 VersaRail W v 2 Z VersaRail Ñ Î À 5 3 MN CDEF 6 2 ZÌ VersaRail 2 5 Ó Ô 0 125 VersaRail 1 ...

Страница 41: ...support dell com VersaRails 5 5 5 3 VersaRail GF H IJ KL MN CDEF V SW J VersaRails 4 o F V SW J GF H IJKL MN CDEF V SWXYR CDEF 1 À 5 4 ÏEs F a ÕÖ 9 _ V SWXYR S V Ñ W 0 125 VersaRail 2 ...

Страница 42: ...5 6 VersaRails 5 4 2 2 Z v V SWXYR À 5 4 MN CDEF 4U ab 7U V SWXYR Ø Ù W 2 f V SWXYR f Ú Ë GF H IJKL MN CDEF 3 V SWXYR Î Ñ V SWXYR GF H IJKL MN CDEF 2U 4U 7U ...

Отзывы: