background image

Installing a Fif th SC SI Hard-Disk Drive

1-1

About This Guide

This document describes installing and configuring an optional fifth SCSI hard-disk drive 
in your Dell™ system’s peripheral bay.

Before You Begin

Before installing a fifth SCSI hard-disk drive, you should install and configure the other four 
SCSI drives. If you want to set up the five drives in a split 1 x 2 and 1 x 3 configuration, you 
must install a second, optional SCSI backplane daughter card in your system. (For more 
information about the daughter card, see “Installing Hard-Disk Drives” in your system’s 

Installation and Troubleshooting Guide

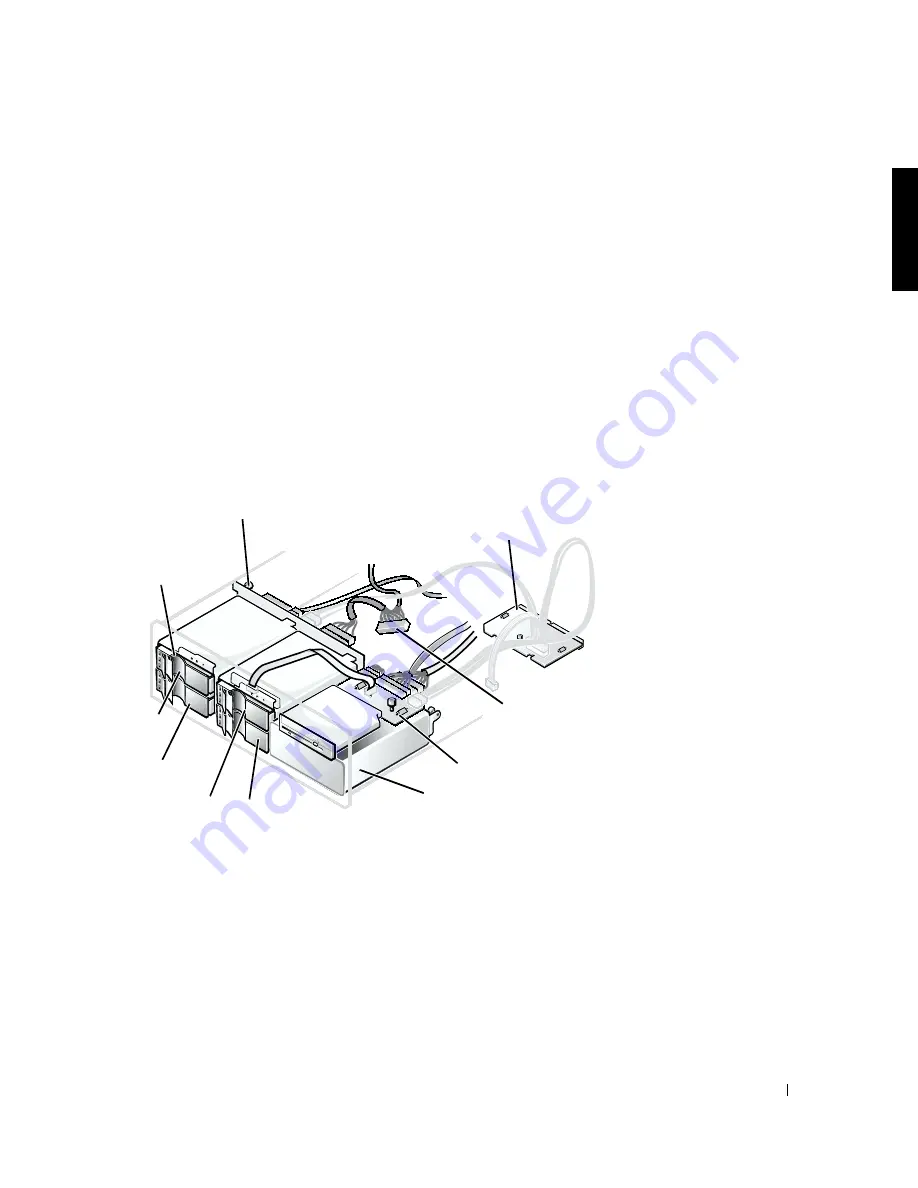
.) Figure 1-1 illustrates the system components 

associated with the SCSI hard-disk drives.

F i g u r e   1 - 1 .   B a s i c   S C S I   H a r d - D i s k   D r i v e   S y s t e m   C o m p o n e n t s

.

SCSI hard-disk 
drives (4)

SCSI backplane board

SCSI ID 0

SCSI ID 2

SCSI ID 3

SCSI ID 1

interposer board

peripheral bay

SCSI interface cable 
connection for fifth 
hard-disk drive

power supply 
distribution board

Содержание PowerEdge 2550

Страница 1: ...www dell com support dell com Dell Systems INSTALLING A FIFTH SCSI HARD DISK DRIVE ...

Страница 2: ...sult in severe injury ____________________ Information in this document is subject to change without notice 2001 Dell Computer Corporation All rights reserved Reproduction in any manner whatsoever without the written permission of Dell Computer Corporation is strictly forbidden Trademarks used in this text Dell and the DELL logo are trademarks of Dell Computer Corporation Other trademarks and trad...

Страница 3: ...onfiguration you must install a second optional SCSI backplane daughter card in your system For more information about the daughter card see Installing Hard Disk Drives in your system s Installation and Troubleshooting Guide Figure 1 1 illustrates the system components associated with the SCSI hard disk drives Figure 1 1 Basi c SCSI Ha rd D is k Drive System Componen t s SCSI hard disk drives 4 SC...

Страница 4: ...d disk drive bays For a drive carrier to fit in the peripheral bay you must remove the peripheral bay and install a special hard disk drive cage in the bay You then reinstall this bay and cage assembly and insert the drive carrier into the hard disk drive cage WARNING Before you perform the procedures in this section you must turn off the system and disconnect it from its AC power source WARNING S...

Страница 5: ...ral bay see Figure 1 3 Fig u re 1 3 I n s ta l l i n g th e Ha rd Di s k D ri ve C a g e i n th e Pe rip h e ra l B a y system board interface cable connector interposer board power cable connector cooling fan wiring harness connector control panel cable connector diskette drive CD ROM drive interface connector thumbscrew peripheral bay hard disk drive cage rails 2 ...

Страница 6: ...front of each drive rail and slide the drive out of the bay 11 Slide the hard disk drive cage into the peripheral bay until the rails snap into place see Figure 1 3 12 Lower the peripheral bay back into the chassis and then slide the bay forward into position Be careful to avoid trapping power or interface cables underneath the peripheral bay when you reinstall it 13 Secure the peripheral bay by t...

Страница 7: ...g from the power supply distribution board see Figure 1 1 to the power connector on the fifth drive backplane board see Figure 1 4 18 Reconnect the control panel cable power cable cooling fan wiring harness and interposer board interface cable to the interposer board see Figure 1 2 19 Install the fifth hard disk drive by aligning the edge of the hard disk drive carrier with the opening in the fron...

Страница 8: ...re Arrange cables so that they do not catch on the system covers or block the airflow of the fans or cooling vents 22 Close the system covers 23 Reconnect the system and peripherals to their AC power sources and turn them on 24 If you removed the system s optional bezel in step 3 reinstall it 25 If the hard disk drive is a new drive run the Dell Diagnostics to test the drive For more information s...

Страница 9: ...www dell com support dell com Systèmes Dell INSTALLATION D UNE CINQUIÈME UNITÉ DE DISQUE DUR SCSI ...

Страница 10: ...ures graves ____________________ Les informations contenues dans ce document sont sujettes à modification sans préavis 2001 Dell Computer Corporation Tous droits réservés Toute reproduction sous quelque forme que ce soit sans l autorisation écrite de Dell Computer Corporation est strictement interdite Marques utilisées dans ce texte Dell et le logo DELL sont des marques de Dell Computer Corporatio...

Страница 11: ...s à Installation des unités de disque dur dans le Guide d installation et de dépannage de votre système La figure 2 1 illustre les composants du système associés aux unités de disque dur SCSI Fig u re 2 1 C o m p o s an t s d e ba s e d u s y s tè m e d u n i t é d e d i s q u e d u r S C S I Configuration d une unité de disque dur SCSI Les quatre unités de disque dur connectées à la carte de fond...

Страница 12: ...spécial dans la baie Vous devez ensuite réinstaller l assemblage baie bâti et insérer le support d unité dans le bâti d unité de disque dur AVERTISSEMENT Avant d effectuer cette procédure éteignez le système et débranchez le de sa source d alimentation en CA AVERTISSEMENT Consultez les consignes de sécurité importantes dans le document intitulé Informations sur le système avant d opérer à l intéri...

Страница 13: ...I n s ta l l a tio n d u b ât i d u n i té d e di s q ue d u r da n s l a b a i e de p ér ip h ér iq u es connecteur du câble d interface de la carte système connecteur du câble d alimentation de la carte intercalaire connecteur du faisceau de câbles des ventilateurs de refroidissement connecteur du câble du panneau de commande connecteur d interface du lecteur de disquette lecteur de CD ROM vis à...

Страница 14: ...ant sur l avant de chaque rail d unité et faites glisser l unité hors de la baie 11 Faites glisser le bâti d unité de disque dur dans la baie de périphériques jusqu à ce que les rails s enclenchent reportez vous à la figure 2 3 12 Abaissez la baie de périphériques dans le châssis et faites la glisser vers l avant pour la mettre en place Prenez garde à ne pas coincer les câbles d alimentation ou d ...

Страница 15: ...e panier SCSI reportez vous à la figure 2 5 Fig u re 2 5 C o n n e ct e ur s d e l a ca rt e d e f on d d e p an i e r S C S I p ri n c i p a l e 17 Raccordez le câble d alimentation de rechange allant de la carte de distribution du bloc d alimentation reportez vous à la figure 2 1 au connecteur d alimentation sur la carte de fond de panier de la cinquième unité reportez vous à la figure 2 4 conne...

Страница 16: ...ue dur pour verrouiller le support d unité reportez vous à la figure 2 6 21 Vérifiez toutes les connexions de câbles pouvant s être desserrées pendant la procédure d installation Arrangez les câbles de façon à ce qu ils ne s accrochent pas aux capots du système et qu ils ne bloquent pas la circulation d air des ventilateurs ou des grilles d aération 22 Fermez les capots du système 23 Rebranchez le...

Страница 17: ...www dell com support dell com Dell Systeme EIN FÜNFTES SCSI FESTPLATTENLAUFWERK EINBAUEN ...

Страница 18: ...tuation an die bei Nichtbeachtung zu schweren Verletzungen führen könnte ____________________ Irrtümer und technische Änderungen vorbehalten 2001 Dell Computer Corporation Alle Rechte vorbehalten Nachdrucke jeglicher Art ohne die vorherige schriftliche Genehmigung der Dell Computer Corporation sind strengstens untersagt Warenzeichen in diesem Text Dell unds das DELL Logo sind Warenzeichen der Dell...

Страница 19: ...zur Tochterkarte finden Sie unter Festplattenlaufwerke installieren im Installations und Fehlerbehebungshandbuch des Systems Abbildung 3 1 zeigt die den SCSI Festplattenlaufwerken zugeordneten Systemkomponenten A bbi l du n g 3 1 Gru n d leg en d e Ko mp onen t en de s S CS I Fe st p l at te n l au f we rk sy ste m s Festplattenlaufwerkkonfiguration Die vier Festplattenlaufwerke die an der Haupt S...

Страница 20: ...tplattenlaufwerkkäfig im Schacht installiert werden Danach muß diese Schacht Käfig Anordnung wieder eingebaut und der Laufwerkträger in den Festplattenlaufwerkkäfig geschoben werden WARNUNG Bevor Sie die in diesem Abschnitt enthaltenen Verfahren durchführen muß das System ausgeschaltet und von der Netzstromquelle getrennt werden WARNUNG Lesen Sie die Sicherheitshinweise in der Systeminformationsdo...

Страница 21: ... A b b i l d u n g 3 3 Fe s tp l a tt en l a u fw er k k äf ig i m ex te r ne n S c h a ch t e i n ba u e n Schnittstellenkabelanschluß der Systemplatine Netzkabelanschluß der Zwischenplatine Kabelbaumanschluß des Kühlungslüfters Kabelanschluß des Bedienungsfelds Schnittstellenkabelanschluß des Diskettenlaufwerks CD ROM Laufwerks Flügelschraube externer Schacht Festplatten laufwerkabschirmung Schi...

Страница 22: ...nd das Laufwerk aus dem Schacht schieben 11 Schieben Sie den Festplattenlaufwerkkäfig in den externen Schacht bis die Schienen einschnappen siehe Abbildung 3 3 12 Fügen Sie den externen Schacht wieder zurück in das Gehäuse ein und schieben Sie den Schacht dann nach vorne in die entsprechende Position Stellen Sie sicher daß sich beim Wiedereinbau keine Netz oder Schnittstellenkabel unter dem extern...

Страница 23: ...ilverteilerplatine siehe Abbildung 3 1 mit dem Netzanschluß auf der Rückwandplatine des fünften Laufwerks siehe Abbildung 3 4 18 Schließen Sie Bedienungsfeldkabel Netzkabel Kabelbaum des Kühlungslüfters und Schnittstellenkabel der Zwischenplatine wieder an die Zwischenplatine an siehe Abbildung 3 2 19 Installieren Sie das fünfte Festplattenlaufwerk indem Sie die Kante des Festplattenlaufwerkträger...

Страница 24: ...temabdeckung eingeklemmt werden können oder den Luftstrom der Lüfter oder Kühlschlitze blockieren 22 Schließen Sie die Systemabdeckungen 23 Schließen Sie Computer und Peripheriegeräte wieder an das Netz an und schalten Sie sie ein 24 Wenn Sie die optionale Blende des Systems in Schritt 3 entfernt haben befestigen Sie sie wieder 25 Handelt es sich beim Festplattenlaufwerk um ein neues Laufwerk führ...

Страница 25: ...www dell com support dell com Sistemas Dell INSTALACIÓN DE UNA QUINTA UNIDAD DE DISCO DURO SCSI ...

Страница 26: ..._____ La información contenida en este documento puede modificarse sin aviso previo 2001 Dell Computer Corporation Quedan reservados todos los derechos Queda estrictamente prohibida la reproducción de este documento en cualquier forma sin la autorización por escrito de Dell Computer Corporation Marcas comerciales utilizadas en este texto Dell y el logotipo DELL son marcas comerciales de Dell Compu...

Страница 27: ...o en la Guía de instalación y solución de problemas del sistema Figura 4 1 ilustra los componentes del sistema asociados con las unidades de disco duro SCSI Fig u ra 4 1 C o m p o ne n te s b á s i c o s d el s i s te m a d e u n i d a d de d i s c o duro SCSI Configuración de la unidad de disco duro Las cuatro unidades de disco duro conectadas a la tarjeta de plano posterior SCSI principal están ...

Страница 28: ...e disco duro especial en el compartimiento Luego se vuelve a instalar este ensamblaje de compartimiento y canastilla y se inserta el portaunidades en la canastilla para unidades de disco duro ADVERTENCIA Antes de realizar los procedimientos en esta sección debe apagar el sistema y desconectarlo de su fuente de energía de CA ADVERTENCIA Para obtener información importante de seguridad consulte su d...

Страница 29: ... aci ón d e la ca nastilla para unidade s de disco dur o en el co m p ar tim ie nt o p er ifé ric o conector del cable de interfaz de la placa base conector del cable de alimentación de la tarjeta mediadora conector del arnés de las conexiones de cable del ventilador conector del cable del panel de control conector de interfaz de la unidad de disco CD ROM tornillo mariposa compartimiento para peri...

Страница 30: ...rtimiento 11 Deslice la canastilla para unidades de disco duro en el compartimiento periférico hasta que los rieles se asienten en su lugar consulte la Figura 4 3 12 Baje el compartimiento para periféricos nuevamente dentro del chasis y luego deslícelo hacia adelante a su posición Tenga cuidado para evitar atascar cables de alimentación o de interfaz debajo del compartimiento periférico cuando lo ...

Страница 31: ... energía consulte la Figura 4 1 al conector de alimentación ubicado en la tarjeta de plano posterior de la quinta unidad consuslte la Figura 4 4 18 Vuelve a conectar el cable del panel de control el cable de alimentación el arnés de cables del ventilador el cable de interfaz de la tarjeta mediadora a la tarjeta mediadora vea la Figura 4 2 19 Instale la quinta unidad de disco duro alineando el bord...

Страница 32: ...es de tal modo que no se atasquen en las cubiertas del sistema ni bloqueen el flujo de aire de los ventiladores o respiraderos de ventilación 22 Cierre las cubiertas del sistema 23 Vuelva a conectar el sistema y los periféricos a sus fuentes de energía de CA y enciéndalos 24 Si desmontó el bisel opcional del sistema en el paso 3 reinstálelo 25 Si la unidad de disco duro es una unidad nueva ejecute...

Отзывы: