


Rack Installation Guide
1-11
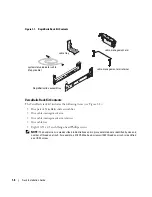
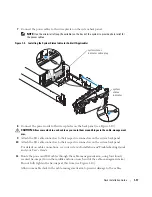
Figure 1-4.
Marking the Vertical Rails
Installing the RapidRails Slide Assemblies
1
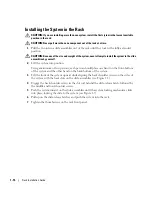
At the front of the rack cabinet, position one of the RapidRails slide assemblies so that
its mounting-bracket flange fits in the appropriate location on the rack (see Figure 1-5).
The top mounting hook on the rail assembly’s front-mounting bracket flange should enter
the top hole between the marks on the vertical rails.
2
Push the slide assembly forward until the top mounting hook enters the square hole just
below the upper marks or tape you placed on the vertical rail. Next, push down on the
mounting-bracket flange until the mounting hooks seat in the square holes and the push
button pops out and clicks (see Figure 1-5).
3
At the back of the cabinet, pull back on the mounting-bracket flange until the mounting
hooks are in the appropriate hole, and then push down on the flange until the mounting
hooks seat in the square holes and the push button pops out and clicks.
tape on vertical rail
Содержание PowerEdge 1800
Страница 2: ......
Страница 3: ...Rack Installation Guide ...
Страница 22: ...1 20 Rack Installation Guide ...
Страница 24: ...22 Index 1 22 Index ...
Страница 25: ...Guide d installation en rack ...
Страница 44: ...2 20 Guide d installation en rack ...
Страница 46: ...22 Index 2 22 Index ...
Страница 47: ...Rack Installationsanleitung ...
Страница 68: ...22 Index 3 22 Index ...
Страница 69: ...ラック取り付けガイド ...
Страница 87: ...ラック取り付けガイド 4 19 ラック扉の取り付け 扉の取り付け手順は ご使用の 24U および 42U ラックキャビネットに同梱されているマ ニュアルを参照してください これでラックへのシステムの取り付けは完了です ...
Страница 88: ...4 20 ラック取り付けガイド ...
Страница 90: ...22 索引 4 22 索引 ...
Страница 91: ...Guía de instalación del rack ...
Страница 112: ...22 Índice 5 22 Índice ...


