background image

28

What should I do if the Dell Portable SSD 
cannot be accessed after hot-plugging 
the Dell Portable SSD on Mac Platform? 
(continued)

Problems 

Possible Solutions

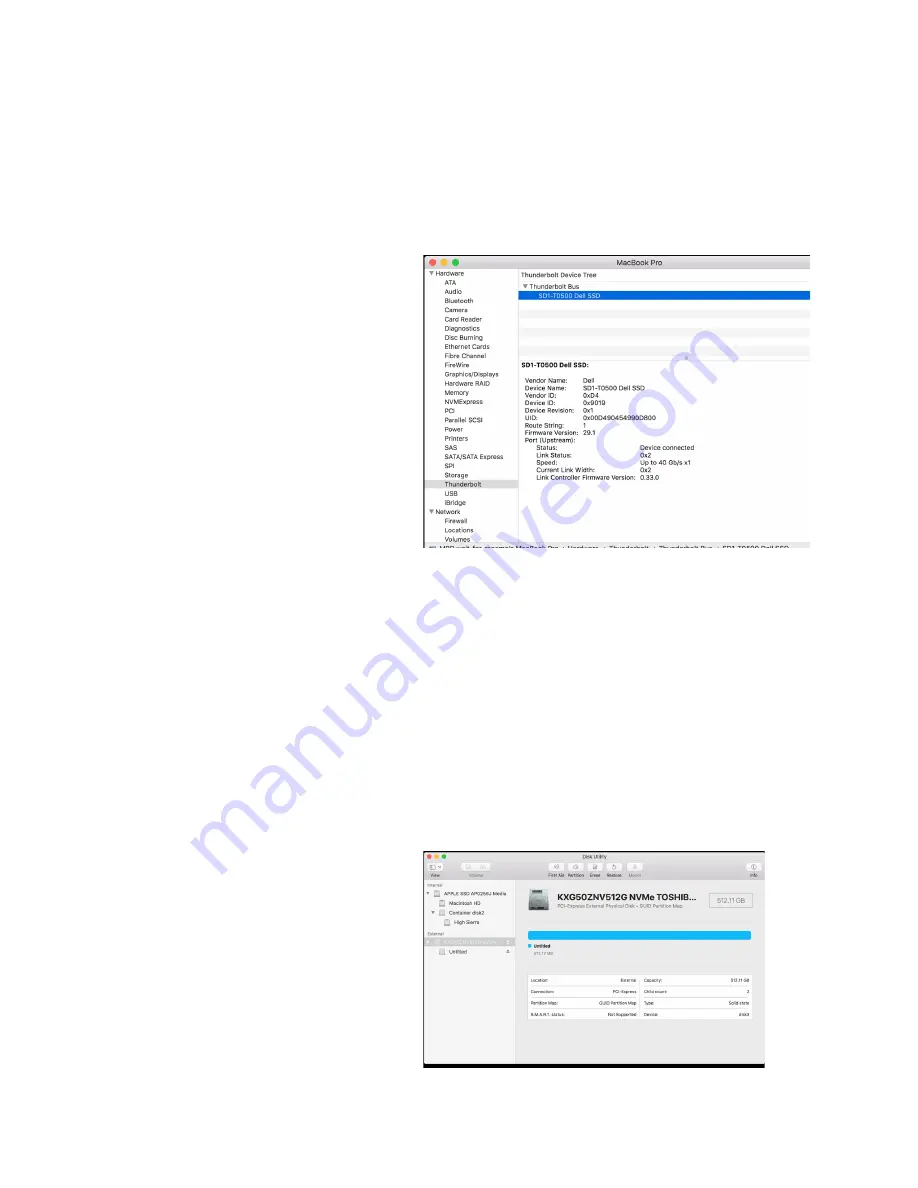
Under System Information, Thunderbolt™ bus would have the 
value SD1-T1000 Dell SSD / SD1-T0500 Dell SSD. 

To repair Dell Portable SSD and resolve the access problem:

Connect the Dell Portable SSD to a powered off Mac 
Computer.

Power on the platform.

Back up data to another drive.

Open Disk Utility.

Click View -> Show All Devices.

Unmount the volume of Dell Portable SSD.

Erase “KXG50ZNV512G NVMe TOSHIBA 512GB Media” or 
”KXG50ZNV1T02 NVMe TOSHIBA 1024GB Media” to macOS 
supported File System.

For example: 

System Information->Hardware->Thunderbolt™ Bus->SD1-T1000 
Dell SSD

Содержание Portable Thunderbolt 3 SSD

Страница 1: ...Dell Portable Thunderbolt 3 Solid State Drive 500 GB 1 TB User s Guide ...

Страница 2: ...ted States and or other jurisdictions All other marks and names mentioned herein may be trademarks of their respective companies 2018 02 Rev A01 NOTE A NOTE indicates important information that helps you make better use of your computer CAUTION A CAUTION indicates potential damage to hardware or loss of data if instructions are not followed WARNING A WARNING indicates a potential for property dama...

Страница 3: ...the Utility 11 Thunderbolt 3 SSD Utility 12 Installing the Thunderbolt 3 SSD Utility 12 Using the Thunderbolt 3 SSD Utility 13 Drive Status 13 Tools 14 Security 14 Locking the solid state drive 15 Unlocking the drive 16 Unlocking the drive with PSID 17 Safely removing the solid state drive using the Thunderbolt 3 SSD Utility 18 Performance 19 Help 20 Managing the solid state drive in Windows 21 Tr...

Страница 4: ...s quo omni doluptamusa necuptus et quam que iduntio testibus Ciaspic totate cones ab illecae rnatet quis voles imus es ulliquae porruptus et od eum quid millign imodia doluptas dolorro bea sinveni millor autem Sernat Ebis aut illis et occupta erepudis nit volorer ataqui tem etur voluptatum ne sunt faccupta delecae stemque sitatis cus ent utas as ut in nonsecto consequ isciducita aut aliquo minctat...

Страница 5: ...ort 1 2 3 The Dell Portable Thunderbolt 3 SSD features a single LED indicator located on the left of the Thunderbolt 3 port Use this to help determine the status of the device power and status of the internal cooling fan 3 Thunderbolt 3 connector ...

Страница 6: ...e following table describes the status LED behavior on the SSD LED behavior Power Fan Activity Blinking White ON ON Yes White ON ON No Blinking Amber ON Malfunction Yes Amber ON Malfunction No Off OFF NA NA ...

Страница 7: ...unplugging the cable See Ejecting the solid state drive in Windows or Safely removing the solid state drive using the Thunderbolt 3 SSD Utility for instructions CAUTION Unplugging the portable solid state drive from your computer when the light indicator is blinking white may cause data loss or damage to your device ...

Страница 8: ...l SSD s are high performance ultra portable and reliable storage solutions They are ideal for transferring large amounts of data quickly to help maintain productivity whether at home in the workplace or on the road Use the Thunderbolt 3 SSD Utility to manage the drive ...

Страница 9: ...shipped with the device into the Thunderbolt 3 port on your computer Connect the other end into the Thunderbolt 3 port on the Dell Portable Thunderbolt 3 SSD A window will pop up after a few seconds 2 In the pop up window you are asked if you want to allow the drive to connect to your system Choose the Always Connect option from the drop down menu and click OK ...

Страница 10: ...hen the drive is connected To remove the Dell Portable Thunderbolt 3 SSD you have two options See Ejecting the solid state drive in Windows or Safely removing the solid state drive using the Thunderbolt 3 SSD Utility DO NOT disconnect the drive when the status LED is blinking ...

Страница 11: ...sing Windows eject drive follow these steps 1 Move the cursor to the Windows System Tray and choose the Eject option for the Dell Portable SSD 2 When the Safe To Remove Hardware message appears disconnect the cable Ejecting the solid state drive using the Utility See Thunderbolt 3 SSD Utility ...

Страница 12: ... to install the software utility to monitor performance You also need the utility to lock the SSD for security This PC Installing the Thunderbolt 3 SSD Utility 1 Use Windows Explorer to open or view the drive Double click on This PC on the desktop the drive is displayed along with other storage devices 2 Double click on the Thunderbolt 3 SSD Utility installation file located on the drive Follow th...

Страница 13: ...atus The Status tab displays when the utility is launched This is useful for checking how much storage capacity is available and provides information useful for troubleshooting Using the Thunderbolt 3 SSD Utility ...

Страница 14: ...Each time you lock the drive you need to complete the procedure to create a password You can use the same password used in previous sessions NOTE When you lock the drive you must create a password Set a password that you can remember easily to unlock the drive CAUTION Also keep in mind that you must remember this password to unlock the drive There is no way to unlock the drive if you forget the pa...

Страница 15: ...menu appears 2 Enter the password used to unlock the drive Use a password that is difficult to guess but one that you can remember You cannot unlock the drive without the password Retype the password in the space provided 3 Click on the Submit button to create the password and put the drive into locked status ...

Страница 16: ...16 Unlocking the drive 1 To unlock the drive go to the Tools menu and click on the Unlock button A new menu appears 2 Enter the password used to unlock the drive and click on the Submit button ...

Страница 17: ...UTION All data and password on the SSD will be erased if unlock by PSID Unlocking the drive with PSID NOTE The PSID is printed on the bottom of the Dell Portable Thunderbolt 3 SSD and on a sticker located inside the box shipped with the device The sticker can be pealed off and placed as per your preference ...

Страница 18: ...emoving the solid state drive using the Thunderbolt 3 SSD Utility To safely remove the SSD using the Thunderbolt 3 SSD Utility open the utility and click on the Eject Drive button at the top of the menu interface ...

Страница 19: ...19 Performance Use the Performance tab to test drive speed ...

Страница 20: ...20 Help Use the Help tab to view documentation and help information for the SSD ...

Страница 21: ...dows Administrative Tools to partition or change the file system on the Dell Portable Thunderbolt 3 SSD Go to Control Panel View by Small Large icons Administrative Tools Computer Management Storage Disk Management to access the Windows Disk Management interface ...

Страница 22: ...ftware is running the Thunderbolt 3 software icon appears in the Windows System Tray b To check if the Dell Portable SSD is detected and approved on the Thunderbolt software Click on the right button of your mouse on software icon Check devices on View Attached Devices Approve Attached Devices Always Connect Manage Approved Devices 3 Disk Management Problems Possible Solutions a Is the Dell Portab...

Страница 23: ...vices Contact the manufacturer of the notebook or motherboard Right click your mouse on NVM Express Controller Choose Properties item Go to General page Check the description on Device Status 7 Power Shortage a Remove other Thunderbolt accessories and insert the SSD as the First Primary plug in device to a Thunderbolt 3 port on the computer b Install SD1 TSeries Portable SSD Utility first to diagn...

Страница 24: ...he Unlock button 5 Input the PSID to the page Erase Recovery with PSID then Submit Remaining Life refers to the endurance of the NAND flash This is calculated by how much data has been written to the flash It is a value estimated by the flash manufacturer If a warning message displays for the Remaining Life to avoid data loss it is recommended to back up any important data in the drive If the Dell...

Страница 25: ...be affected as well 1 Open Disk Utility on Mac platform 2 Erase Dell Portable SSD to macOS supported File System 1 Open Command Prompt and execute diskpart to clean Dell Portable SSD 2 Open Disk Management 3 Initialize disk 4 New volume for Dell Portable SSD NOTE Converting the file system will erase the entire contents of the drive All data currently on the drive will be lost NOTE Converting the ...

Страница 26: ...ject procedure then hot plugging the Dell Portable SSD can cause the operating system BSoD However the SSD should still work well after a COLD BOOT together with your Windows platform To repair Dell Portable SSD and resolve the BSoD problem 1 Connect the Dell Portable SSD to powered off Windows platform 2 Power on the platform 3 Back up data to another drives 4 Format Dell Portable SSD Problems Po...

Страница 27: ...uld still work after a cold boot on a Mac platform Symptoms of failed detection Problems Possible Solutions 1 No Volume of Dell Portable SSD can be accessed 2 Under System Information Driver Installed status is No NOTE There is a very low probability of this occurring However if it happens it will keep happening until the problem is corrected For example System Information Hardware PCI pci1179 116...

Страница 28: ...To repair Dell Portable SSD and resolve the access problem 1 Connect the Dell Portable SSD to a powered off Mac Computer 2 Power on the platform 3 Back up data to another drive 4 Open Disk Utility 5 Click View Show All Devices 6 Unmount the volume of Dell Portable SSD 7 Erase KXG50ZNV512G NVMe TOSHIBA 512GB Media or KXG50ZNV1T02 NVMe TOSHIBA 1024GB Media to macOS supported File System For example ...

Страница 29: ... Environmental Operating temperature 0 C 32 F to 35 C 95 F Operating humidity 95 relative humidity non condensing Certificates CE VCCI FCC ACMA IC NRTL CB Warranty Three year limited warranty NOTE For more information about Dell Warranty and Support Policy go to Dell com System Requirements Desktop or notebook computer with a Thunderbolt 3 port and one of the following operating systems Windows 10...

Страница 30: ...r contract terms Dell may also provide an additional hard ware warranty full details of the Del lend user contract and warranty terms can be found by going to Dell com selecting your country from the list at the bottom of the home Page and then clicking the terms and conditions link for the end user terms or the support link for the warranty terms For non U S customers Dell branded products that a...

Отзывы: