background image

Back to Contents Page


Memory compatibility error

2.

If two modules are installed, remove one and test. Try the 
other module in the same slot and test. Test the other slot 
with both modules.  

3.

Replace the memory.  

4.

Replace the system board.  

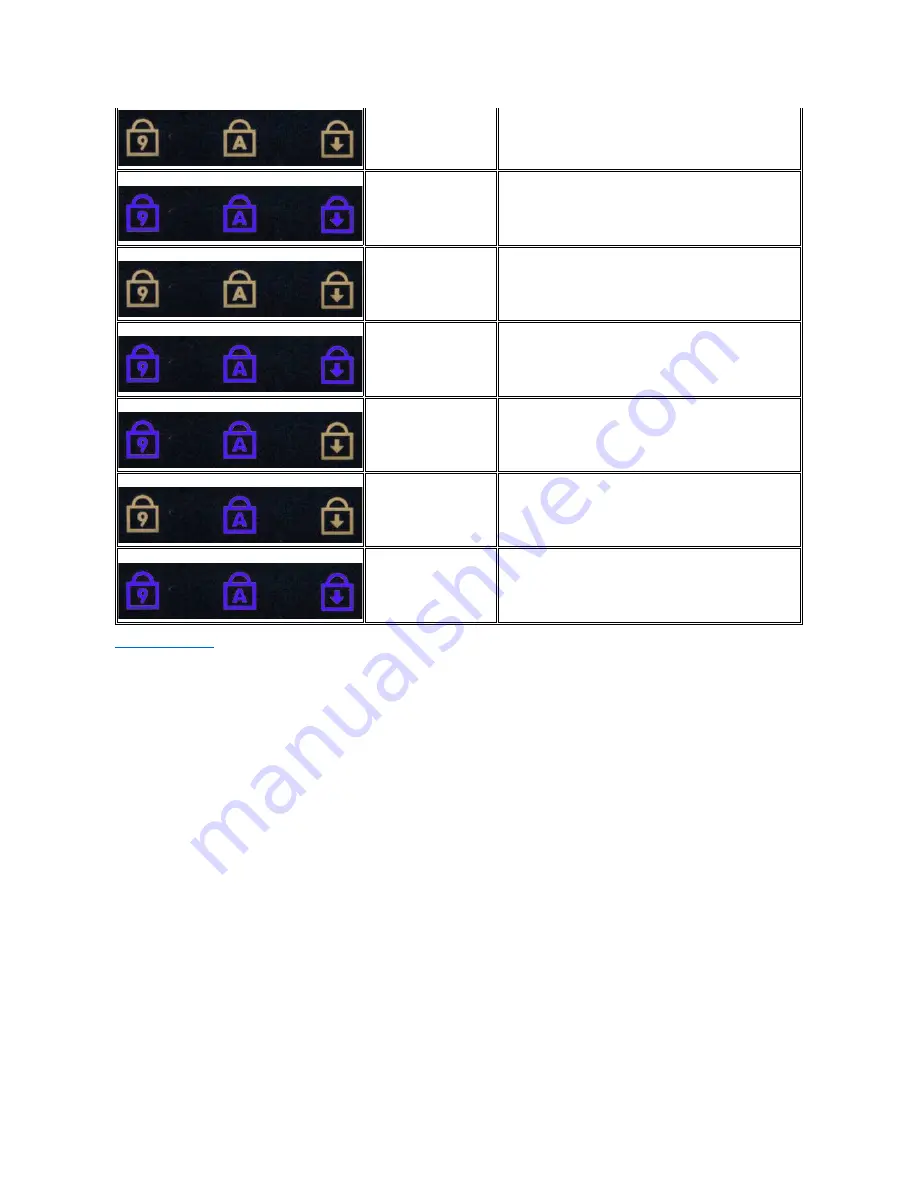
ON-FLASH-ON


Memory is detected but has 

errors

1.

Reseat the memory.  

2.

If two modules are installed remove one and test. Try the 
other module in the same slot and test. Test the other slot 
with both modules.  

3.

Replace the memory  

4.

Replace the system board.  

OFF-FLASH-FLASH


Modem Error

1.

Reseat the modem.  

2.

Replace the modem.  

3.

Replace the system board.  

FLASH-FLASH-FLASH


System board error

1.

Replace the system board.  

FLASH-FLASH-OFF


Option ROM Error

1.

Reseat the device.  

2.

Replace the device.  

3.

Replace the system board.  

OFF-ON-OFF


Storage device error

1.

Reseat the hard drive and optical drive.  

2.

Test the computer with just the hard drive and just the optical 
drive.  

3.

Replace the device that is causing the failure.  

4.

Replace the system board.  

FLASH-FLASH-ON


Video card error

1.

Replace the system board.  

Содержание Latitude Z

Страница 1: ...Blu ray Disc is a trademark of the Blu ray Disc Association Microsoft Windows Windows Server MS DOS Aero Windows Vista and the Windows Vista start button are either trademarks or registered trademarks of Microsoft Corporation in the United States and or other countries Adobe the Adobe logo and Adobe Flash Player are trademarks of Adobe Systems Incorporated Other trademarks and trade names may be u...

Страница 2: ...u does not make any changes to the boot order stored in the BIOS Navigation Keystrokes Use the following keystrokes to navigate the System Setup screens System Setup Menu Options The following tables describe the menu options for the System Setup program Navigation Keystrokes Action Keystroke Expand and collapse field Enter left or right arrow key or Expand or collapse all fields Exit BIOS Esc Rem...

Страница 3: ...a small amount of battery power to ensure availability of Latitude ON Without Instant on mode Latitude ON will take up to a minute longer to boot but will not use any battery power when off Keyboard Illumination This field lets you choose the operating mode of the keyboard illumination feature The settings are Disabled Auto ALS and Input and Auto Input Only Default setting Auto ALS and Input USB P...

Страница 4: ...able options will permanently activate or disable the feature and no further changes will be allowed CPU XD Support This field enables or disables the Execute Disable mode of the processor Use the check box to enable disable this feature Default setting Enabled Non Admin Setup Changes This option lets you determine whether changes to the setup option are permitted when an administrator password is...

Страница 5: ... Virtual Machine Monitor VMM can utilize the additional hardware capabilities provided by Intel Virtualization Technology Use the check box to enable disable this feature The factory default setting is Disabled VT for Direct I O This option specifies whether a Virtual Machine Monitor VMM can utilize the additional hardware capabilities provided by Intel Virtualization Technology for Direct I O Use...

Страница 6: ...Back to Contents Page ...

Страница 7: ...harge remaining If no lights appear the battery has no charge To check the battery health using the charge gauge press and hold the status button on the battery charge gauge for at least 3 seconds If no lights appear the battery is in good condition and more than 80 percent of its original charge capacity remains Each light represents incremental degradation If five lights appear less than 60 perc...

Страница 8: ...r slot with both modules 3 Replace the memory 4 Replace the system board OFF FLASH FLASH Modem Error 1 Reseat the modem 2 Replace the modem 3 Replace the system board FLASH FLASH FLASH System board error 1 Replace the system board FLASH FLASH OFF Option ROM Error 1 Reseat the device 2 Replace the device 3 Replace the system board OFF ON OFF Storage device error 1 Reseat the hard drive and optical ...

Страница 9: ...s Panel Internal Card With Bluetooth Wireless Technology Speakers WWAN Card Power Connector Display Assembly Heat Sink Assembly Charging Coil Hinge Covers Hard Drive Coin Cell Battery WLAN Card Network Connector System Board Ultra Wide Band UWB Card Wide Area Network WLAN Card Connector Keyboard and Palm Rest Assembly ...

Страница 10: ...dule connector Memory soldered to the system board Memory module capacities 2 GB and 4 GB fixed configurations Memory type DDR3 SODIMM Minimum memory 2 GB Maximum memory 4 GB Ports and Connectors Audio Stereo headphones and speakers connector Mini Card One dedicated half mini card slot for WLAN One dedicated full mini card slot for WWAN GPS mobile broadband Network Adapter RJ 45 connector USB Two ...

Страница 11: ...ns 1600 x 900 at 262 K colors Operating angle 0 closed to 140 Refresh rate 60 Hz Viewing angle horizontal 55 Pixel pitch 0 2588 Power consumption panel with backlight 7 0 W max Keyboard Number of keys 83 United States and China 84 Europe Layout QWERTY AZERTY Touch Pad X Y position resolution graphics table mode 240 CPI Size Width 91 0 mm 3 6 inch sensor active area Height 46 7 mm 1 8 inch rectangl...

Страница 12: ...nology Physical Height 4 cell 20 10 8 cell 21 00 mm Width Height 14 55 20 1 mm 0 57 79 inches Width 396 34 mm 15 6 inches Depth 272 25 mm 10 72 inches Weight 2 kg 4 5 lb Environmental Temperature range Operating 0 to 35 C 32 to 95 F Storage 40 to 65 C 40 to 149 F Relative humidity maximum Operating 10 to 90 non condensing Storage 5 to 95 non condensing Maximum vibration using a random vibration sp...

Страница 13: ...ter Replacing the Battery To replace the battery perform the above steps in reverse order Back to Contents Page WARNING Before working inside your computer read the safety information that shipped with your computer For additional safety best practices information see the Regulatory Compliance Homepage at www dell com regulatory_compliance NOTE You may need to install Adobe Flash Player from Adobe...

Страница 14: ...puter 4 Repeat the procedure to remove the left hinge cover Replacing the Hinge Covers To replace the hinge covers perform the above steps in reverse order Back to Contents Page WARNING Before working inside your computer read the safety information that shipped with your computer For additional safety best practices information see the Regulatory Compliance Homepage at www dell com regulatory_com...

Страница 15: ... and palm rest assembly kit affix the new foam rings in the same pattern on the new assembly Replacing the Keyboard and Palm Rest Assembly To replace the keyboard and palm rest assembly perform the above steps in reverse order Back to Contents Page WARNING Before working inside your computer read the safety information that shipped with your computer For additional safety best practices informatio...

Страница 16: ...rd if applicable 8 Remove the screws that secure the access panel to the computer in the battery well 9 Remove the screw on the inside of the right hinge assembly 10 Remove the screws that secure the access panel to the computer 11 Remove the access panel from the computer Back to Contents Page WARNING Before working inside your computer read the safety information that shipped with your computer ...

Страница 17: ...primary hard drive from the computer Replacing the Primary Hard Drive To replace the primary hard drive perform the above steps in reverse order Removing the Secondary Hard Drive WARNING Before working inside your computer read the safety information that shipped with your computer For additional safety best practices information see the Regulatory Compliance Homepage at www dell com regulatory_co...

Страница 18: ...nector by drawing the two gray tabs outward and away from the white connector 8 Disconnect the bio metric reader cable from its connector on the system board by pulling it slowly from the connector 9 Disconnect the secondary hard drive cable from the secondary hard drive 10 Remove the screws that secure the hard drive to the computer 11 Sliding the secondary hard drive from under the ribbon cables...

Страница 19: ...board 6 Remove the screw that secures the Bluetooth module to the computer 7 Remove the Bluetooth module from the computer Replacing the Bluetooth Module To replace the Bluetooth module perform the above steps in reverse order Back to Contents Page WARNING Before working inside your computer read the safety information that shipped with your computer For additional safety best practices informatio...

Страница 20: ...m its connector on the system board 7 Remove the coin cell battery from under the flat copper cable assembly then lift the battery from the computer Replacing the Coin Cell Battery To replace the coin cell battery perform the above steps in reverse order Back to Contents Page WARNING Before working inside your computer read the safety information that shipped with your computer For additional safe...

Страница 21: ...ext to the computer 8 Remove the screws that secure the left speaker 9 Lift the speaker from the computer and lay it next to the computer 10 Remove the speaker assembly from the computer Replacing the Speakers To replace the speakers perform the above steps in reverse order Back to Contents Page WARNING Before working inside your computer read the safety information that shipped with your computer...

Страница 22: ...the screws that secure the WLAN card to the computer 7 Remove the WLAN card from the computer at a 45 degree angle Replacing the Wireless LAN Card To replace the WLAN card perform the above steps in reverse order Back to Contents Page WARNING Before working inside your computer read the safety information that shipped with your computer For additional safety best practices information see the Regu...

Страница 23: ...ove the screws that secure the WWAN card to the computer 7 Remove the WWAN card from the computer at a 45 degree angle Replacing the WWAN Card To replace the WWAN card perform the above steps in reverse order Back to Contents Page WARNING Before working inside your computer read the safety information that shipped with your computer For additional safety best practices information see the Regulato...

Страница 24: ... cover from the hinge 7 Disconnect the network connector cable from the system board 8 Remove the network connector from the computer Replacing the Network Connector To replace the network connector perform the above steps in reverse order Back to Contents Page WARNING Before working inside your computer read the safety information that shipped with your computer For additional safety best practic...

Страница 25: ...r from the computer hinge 7 Disconnect the power connector cable from the system board 8 Remove the power connector from the computer Replacing the Display Assembly To replace the display assembly perform the above steps in reverse order Back to Contents Page WARNING Before working inside your computer read the safety information that shipped with your computer For additional safety best practices...

Страница 26: ... Remove the tape that secures the remaining antenna cables to the computer then remove the antenna cables from the computer 13 Disconnect the power connector cable from its connector on the system board 14 Remove the screws that secure the system board to the computer chassis 15 Carefully flip over the system board and rest it on top of the computer chassis 16 Disconnect the display panel cable fr...

Страница 27: ...rd 8 Remove the antenna cables from their routing paths in the computer 9 Disconnect the antenna from its connectors on the Secure Digital I O SDIO board 10 Remove the screws that secure the system board to the computer chassis 11 Remove the remaining cables from the computer 15 Carefully flip over the system board and rest it on top of the computer chassis 11 Disconnect the network interface cabl...

Страница 28: ...Back to Contents Page ...

Страница 29: ...emove the screws that secure the UWB card to the system board 9 Remove the UWB card from the computer Replacing the UWB Card To replace the UWB perform the above steps in reverse order Back to Contents Page WARNING Before working inside your computer read the safety information that shipped with your computer For additional safety best practices information see the Regulatory Compliance Homepage a...

Страница 30: ...t sink fan cables and their connectors on the system board 7 Disconnect the heat sink fan cables from their connectors on the system board 8 Flip the system board upside down 9 Remove the screws that secure the heat sink assembly to the system board 10 Remove the heat sink assembly from the system board Replacing the Heat Sink To replace the heat sink perform the above steps in reverse order Back ...

Страница 31: ...mputer 5 Remove the screws that secure the WLAN connector assembly to the computer 6 Remove the connector assembly from the computer Replacing the WLAN Card Connector To replace the WLAN card connector perform the above steps in reverse order Back to Contents Page WARNING Before working inside your computer read the safety information that shipped with your computer For additional safety best prac...

Страница 32: ...e the screws that secure the charging coil to the system board 7 Remove the wireless charging coil from the computer Replacing the Wireless Charging Coil To replace the wireless charging coil perform the steps above in the reverse order Back to Contents Page WARNING Before working inside your computer read the safety information that shipped with your computer For additional safety best practices ...

Страница 33: ...isplay Panel Assembly 1 Follow the procedures in Before Working Inside Your Computer 2 Remove the battery from the computer 3 Remove the display bezel from the computer 4 Remove the screws that secure the display panel assembly to the computer 5 Carefully flip over the display panel assembly and rest it on top of the palmrest 6 From the back of the display panel remove the tape covering the displa...

Страница 34: ...he Display Panel Assembly To replace the display panel assembly perform the above steps in reverse order Back to top Removing the Display Assembly 1 Follow the procedures in Before Working Inside Your Computer 2 Remove the battery from the computer 3 Remove the hinge covers from the computer 4 Remove the access panel from the computer 5 Remove the system board from the computer 6 Remove the screw ...

Страница 35: ...ay assembly from the computer and set the display assembly on a clean flat workspace 8 Remove the screws that secure the right display hinge to the display assembly 9 Lift the display hinge from the display assembly 10 Unthread any wires and remove the first display hinge 11 Repeat the above steps to remove the second display hinge 12 Lift the second display hinge from the display assembly Replaci...

Страница 36: ...egulatory Compliance Homepage at www dell com regulatory_compliance CAUTION Many repairs may only be done by a certified service technician You should only perform troubleshooting and simple repairs as authorized in your product documentation or as directed by the online or telephone service and support team Damage due to servicing that is not authorized by Dell is not covered by your warranty Rea...

Страница 37: ...puter After you complete any replacement procedure ensure you connect any external devices cards and cables before turning on your computer 1 Connect any external devices such as a port replicator battery slice or media base and replace any cards such as an ExpressCard 2 Connect any telephone or network cables to your computer 3 Replace the battery 4 Connect your computer and all attached devices ...

Отзывы: