background image

NOTE: 

To remove both cards if equipped and no need to remove the blank filler.

c

base cover

d

battery

NOTE: 

Disconnect and remove the battery from the system board.

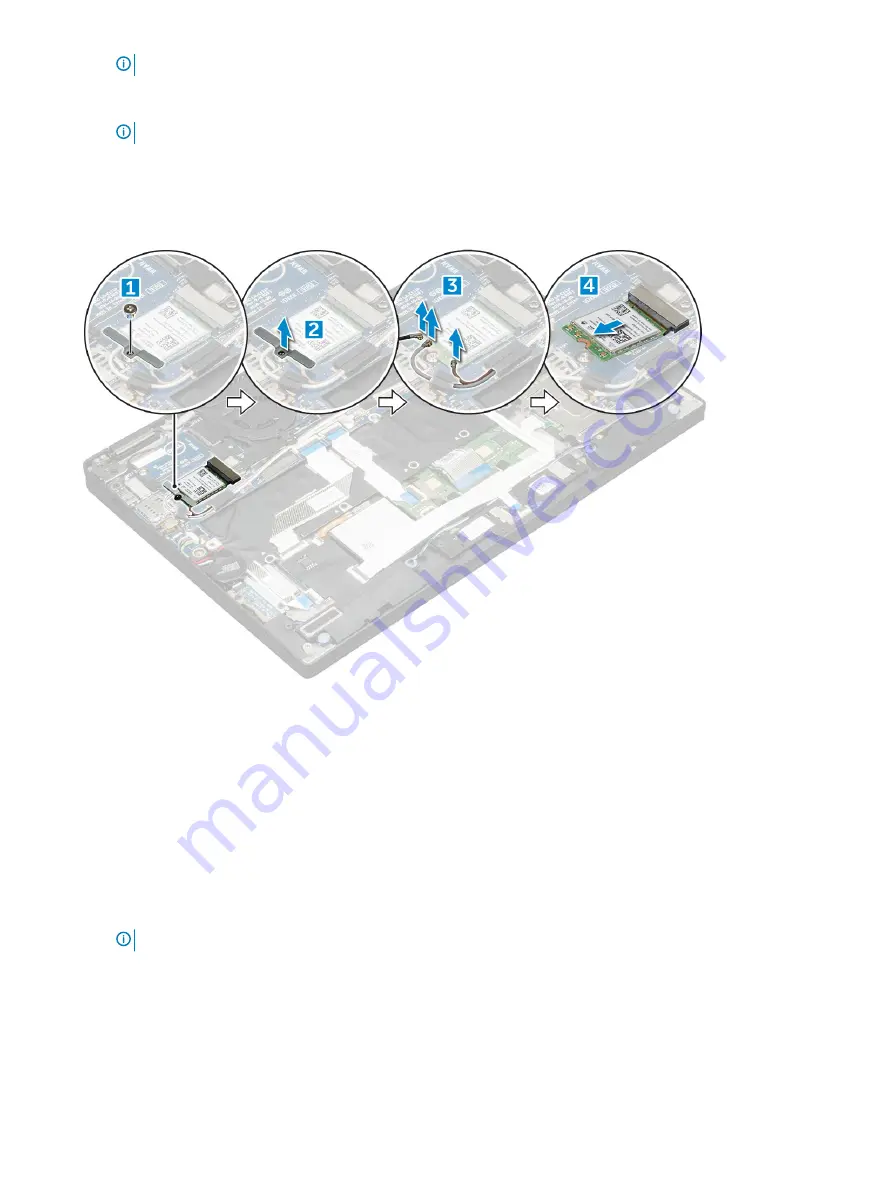
To remove the WLAN card:

a Remove the M2.0 x 3.0 screw that secures the metal bracket to the WLAN card [1].
b Lift the metal bracket [2].
c Disconnect the WLAN cables from the connectors on the WLAN card [3].
d Remove the WLAN card [4].

Installing the WLAN card

Insert the WLAN card into the connector on the system board.

Connect the WLAN cables to the connectors on the WLAN card.

Place the metal bracket and replace the M2.0 x 3.0 screw to secure WLAN card to the computer.

Install the:

a

battery

b

base cover

c

SIM card

d

MicroSD card

NOTE: 

To install both cards if equipped.

Follow the procedure in 

After working inside your computer

.

Extracción e instalación de componentes

15

Содержание Latitude 7389 2-in-1

Страница 1: ...Dell Latitude 7389 2 in 1 Owner s Manual Regulatory Model P29S Regulatory Type P29S001 ...

Страница 2: ...dida de datos y le explica cómo evitar el problema AVISO Un mensaje de AVISO indica el riesgo de daños materiales lesiones corporales o incluso la muerte 2017 Dell Inc or its subsidiaries All rights reserved Dell EMC y otras marcas comerciales son marcas comerciales de Dell Inc o de sus filiales Puede que otras marcas comerciales sean marcas comerciales de sus respectivos propietarios 2017 08 Rev ...

Страница 3: ...e 11 Extracción de la cubierta de la base 11 Instalación de la cubierta de la base 12 Batería 12 Lithium ion battery precautions 12 Removing the battery 12 Installing battery 13 PCIe Solid State Drive SSD 13 Removing the NVMe SSD card 13 Installing the NVMe SSD 14 Tarjeta WLAN 14 Removing the WLAN card 14 Installing the WLAN card 15 la tarjeta WWAN 16 Removing the WWAN card 16 Installing the WWAN ...

Страница 4: ... palm rest 36 3 Technology and components 38 USB features 38 USB 3 0 USB 3 1 Gen 1 SuperSpeed USB 38 Speed 39 Applications 39 Compatibility 40 HDMI 1 4 40 HDMI 1 4 Features 40 Advantages of HDMI 41 4 Especificaciones del sistema 42 System specifications 42 Especificaciones del procesador 42 Display specifications 43 Memory 43 Video specifications 43 Audio specifications 43 Opciones de almacenamien...

Страница 5: ...n 58 Opciones de la pantalla Virtualization support Compatibilidad con virtualización 58 Opciones de la pantalla Wireless Inalámbrico 59 Maintenance screen 59 System logs 60 Updating the BIOS in Windows 60 System and setup password 60 Assigning a system setup password 61 Deleting or changing an existing system setup password 61 6 Software 62 Sistemas operativos compatibles 62 Downloading drivers 6...

Страница 6: ...Running the ePSA Diagnostics 68 Diagnostic LED 69 Real Time Clock reset 69 8 Cómo ponerse en contacto con Dell 71 6 Contents ...

Страница 7: ...self by using a wrist grounding strap or by periodically touching an unpainted metal surface that is grounded to ground yourself before you touch the computer to perform any disassembly tasks CAUTION Handle components and cards with care Do not touch the components or contacts on a card Hold a card by its edges or by its metal mounting bracket Hold a component such as a processor by its edges not ...

Страница 8: ...connector on the back of the computer 8 Remove any installed ExpressCards or Smart Cards from the appropriate slots Después de manipular el interior del equipo Una vez finalizado el procedimiento de instalación asegúrese de conectar los dispositivos externos las tarjetas y los cables antes de encender el equipo PRECAUCIÓN Para evitar daños en la computadora utilice únicamente la batería diseñada e...

Страница 9: ... la tarjeta WWAN Placa de alimentación Altavoz Placa de LED Compartimento para tarjetas inteligentes Ensamblaje de la pantalla Disipador de calor Placa base Coin cell battery Teclado Reposamanos Screw size list Table 1 Latitude 7389 Screw size list Component M 2 5 x 2 5L M 2 5 x 4 0L M 2 0 x 3 0L M 2 x 2L M 2 0 x 2L M 2 x 1 7L M 2 x 4L M 2 5 x 5 Hinge bracket 4 Power Board 2 LED Board 2 Smart Card...

Страница 10: ...uter 2 Press in on the Micro SD card to release it from the computer 3 Slide the Micro SD card out of the computer Installing the Micro Secure Digital SD Card 1 Slide the Micro SD into the slot until it clicks into place 2 Follow the procedures in After working inside your computer Subscriber Identity Module SIM Card Removing the micro SIM card or the micro SIM card tray CAUTION Removing the micro...

Страница 11: ...ta de la base 1 Siga los procedimientos que se describen en Antes de manipular el interior del equipo 2 Afloje los tornillos cautivos M2 5 x 5 0 que sujetan la cubierta de la base a la computadora 3 Utilice una punta trazadora de plástico para hacer palanca en la cubierta de la base comenzando desde las bisagras situadas en el borde superior de la cubierta de la base y levántela para extraerla del...

Страница 12: ...the battery Do not bend the battery Do not use tools of any kind to pry on or against the battery If a battery gets stuck in a device as a result of swelling do not try to free it as puncturing bending or crushing a Lithium ion battery can be dangerous In such an instance the entire system should be replaced Contact https www dell com support for assistance and further instructions Always purchase...

Страница 13: ... install both cards if equipped 5 Follow the procedure in After working inside your computer PCIe Solid State Drive SSD Removing the NVMe SSD card 1 Follow the procedure in Before working inside your computer 2 Remove a MicroSD card b SIM card NOTE To remove both cards if equipped and no need to remove the blank filler c base cover d battery NOTE Disconnect the battery cable from the system board ...

Страница 14: ...ector 2 Install the thermal bracket over the SSD card 3 Tighten the M2 0 x 3 0 screws to secure the SSD thermal bracket 4 Install the a battery b base cover c MicroSD card d SIM card NOTE To install both cards if equipped 5 Follow the procedure in After working inside your computer Tarjeta WLAN Removing the WLAN card 1 Follow the procedure in Before working inside your computer 2 Remove a MicroSD ...

Страница 15: ...ables from the connectors on the WLAN card 3 d Remove the WLAN card 4 Installing the WLAN card 1 Insert the WLAN card into the connector on the system board 2 Connect the WLAN cables to the connectors on the WLAN card 3 Place the metal bracket and replace the M2 0 x 3 0 screw to secure WLAN card to the computer 4 Install the a battery b base cover c SIM card d MicroSD card NOTE To install both car...

Страница 16: ...a Remove the M2 0 x 3 0 screw that secures the metal bracket to the WWAN card b Lift the metal bracket that secures the WWAN card c Disconnect the WWAN cables from the connectors on the WWAN card d Lift the WWAN card from the computer Installing the WWAN card 1 Insert the WWAN card into the connector on the system board 2 Connect the WWAN cables to the connectors on the WWAN card 3 Place the metal...

Страница 17: ...ow the procedure in Before working inside your computer 2 Remove a MicroSD card b SIM card tray NOTE To remove both cards if equipped and no need to remove the blank filler c base cover d battery 3 To remove the power board a Lift the coin cell battery affixed to the computer 1 b Disconnect the power cable from the power board 2 c Remove the M2 0x3 0 screws to release the power board 3 d Lift the ...

Страница 18: ...ds if equipped 6 Follow the procedure in After working inside your computer Altavoz Removing the speaker module 1 Follow the procedure in Before working inside your computer 2 Remove a MicroSD card b SIM card NOTE To remove both cards if equipped and no need to remove the blank filler c base cover d battery e power board 3 To disconnect the cables a Disconnect the LED board cable and smart card re...

Страница 19: ...rd 1 b Un route the speaker cable from the retention clips and remove the tapes that secure the speaker cable 2 5 To remove the speaker module a Un route the speaker cable by removing the tapes near the palm rest 1 b Lift the speaker module from the computer Extracción e instalación de componentes 19 ...

Страница 20: ...the connector on the system board 4 Connect the smart card reader cable and then the LED board cable to the connector on the palm rest 5 Install the a power board b battery c base cover d SIM card e Micro SD NOTE To install both cards if equipped 6 Follow the procedure in After working inside your computer Placa de LED Removing the LED board 1 Follow the procedure in Before working inside your com...

Страница 21: ...board 3 d Lift the LED board from the computer 4 Installing the LED board 1 Install the LED board into the slot 2 Replace the M2 x 3 screws to secure the LED board 3 Affix the tape to secure the LED board 4 Connect the LED board cable to the LED board 5 Install the a battery b base cover c SIM card d MicroSD card NOTE To install both cards if equipped 6 Follow the procedure in After working inside...

Страница 22: ...connect the cables a Disconnect the LED board cable and smart card reader cable 1 b Peel back the previously disconnected LED board smart card reader cable 2 c Peel the SSD thermal pad from the SSD slot 3 NOTE You may need to apply force to peel off the SSD thermal pad 4 To remove the smart card cage a Remove the M2 0 x 1 7 screws that secure the smart card cage to the computer 1 b Slightly slide ...

Страница 23: ... to the USH board on the computer 5 Affix the LED board cable and connect it to the LED board on the computer 6 Install the a SSD card b battery c base cover d SIM card e MicroSD card NOTE To install both cards if equipped 7 Follow the procedure in After working inside your computer Ensamblaje de la pantalla Removing the display assembly 1 Follow the procedure in Before working inside your compute...

Страница 24: ...a and touchscreen cable 1 b Remove the M 2 x 1 7L screws that secure the eDP bracket and lift it away from the computer 2 c Disconnect the eDP cable from the system board 3 d Disconnect th G sensor and eDP cables 4 4 Peel the tapes that secure the antenna cables and un route the cables from the routing clips 24 Extracción e instalación de componentes ...

Страница 25: ...away from the display assembly 6 To remove the display assembly NOTE Open the Laptop as shown in the illustration above a Remove the M2 5 x 4 0 screws that secure the display hinge brackets 1 Extracción e instalación de componentes 25 ...

Страница 26: ...splay assembly 4 Close the display assembly and flip the computer 5 Connect the cables a G sensor and eDP cable b Place the eDP bracket on the eDP cable and replace the M 2 x 1 7L screw on the bracket c IR camera and touch screen cables 6 Route the antenna cables through the routing clips 7 Affix the tapes to secure the antenna cables to the system board 8 Install the a WWAN card b WLAN card c bat...

Страница 27: ...e refer LCD assembly a Disconnect the fan cable from the system board 1 b Disconnect cables from the LCD assembly to gain access to screws 2 c Remove the 1 M2 0 x 3 0 screws that secure the fan to the system board 3 d Remove the 1 M2 0 x 2 0 screws that secure the heat sink to the system board 4 NOTE Loosen the screws on the system board in the order of the callout numbers 1 2 3 4 as indicated on ...

Страница 28: ...connector on the system board 6 Install the a battery b base cover c SIM card d MicroSD card NOTE To install both cards if equipped 7 Follow the procedure in After working inside your computer Placa base Removing system board 1 Follow the procedure in Before working inside your computer 2 Remove the a Micro SD b SIM card tray c base cover d battery e SSD card f WLAN card g WWAN card h heatsink ass...

Страница 29: ...nd lift it away from the computer Disconnect the eDP cable from the system board 5 To release the cables a Flip the coin cell battery to reveal the speaker cable 1 b Disconnect the speaker cable from the system board 2 c Disconnect the power board cable from the system board 3 Extracción e instalación de componentes 29 ...

Страница 30: ...e the system board a Remove the M2 0 x 4L screws from the USB Type C bracket 1 b Lift the USB Type C bracket from the Type C module 2 c Remove the M2 0 x 3 0 screws that secure the system board to the computer 3 d Lift the system board away from the computer 4 30 Extracción e instalación de componentes ...

Страница 31: ... Connect the power board and the speaker cable to the system board 7 Affix the coin cell battery on the speaker cable 8 Connect the USH board Touchpad board and LED board cables to the system board 1 NOTE If your computer has a WWAN card then SIM card tray installation is a requirement 9 Install the a heatsink module Connect the following cables from the system board 1 LED board cable 2 USH cable ...

Страница 32: ... card NOTE To remove both cards if equipped and no need to remove the blank filler c base cover d battery e SSD card f WLAN card g WWAN card h heat sink assembly i system board 3 Disconnect the RTC cable to release it from the system board Installing real time clock RTC 1 Connect the coin cell battery cable to the system board 2 Install a system board b heat sink module c WWAN card d WLAN card 32 ...

Страница 33: ...ly 1 Follow the procedure in Before working inside your computer 2 Remove the a Micro SD b SIM card tray NOTE To remove both cards if equipped and no need to remove the blank filler c base cover d battery e SSD card f WLAN card g WWAN card h Heatsink assembly i system board 3 To Disconnect the cables and thermal pad a LED board cable 1 b SSD thermal pad 2 c Touchpad and USH board cable 3 d keyboar...

Страница 34: ...4 To remove the keyboard a Remove the M2 0 x 3 0 screws that secure the keyboard to the chassis 1 b Lift the keyboard from the chassis 2 34 Extracción e instalación de componentes ...

Страница 35: ...ghten the M2 0 x 2 0 screws to secure the keyboard to the keyboard tray 3 Install the keyboard assembly Installing keyboard assembly NOTE The keyboard and the keyboard tray together are called the keyboard assembly 1 Align the keyboard assembly with the screw holders on the chassis 2 Replace the M2 0 x 3 0 screws that secure the keyboard to the chassis 3 Affix and connect the keyboard and the back...

Страница 36: ...samanos Replacing palm rest 1 Follow the procedure in Before working inside your computer 2 Remove the a base cover b battery c SSD module d WLAN card e WWAN card f heat sink assembly g speaker h display assembly i system board j keyboard The component you are left with is the palmrest 3 Replace the palmrest 4 Install the 36 Extracción e instalación de componentes ...

Страница 37: ...ystem board c display assembly d speaker e heat sink assembly f WLAN card g WWAN card h SSD module i battery j base cover 5 Follow the procedure in After working inside your computer Extracción e instalación de componentes 37 ...

Страница 38: ...or years the USB 2 0 has been firmly entrenched as the de facto interface standard in the PC world with about 6 billion devices sold and yet the need for more speed grows by ever faster computing hardware and ever greater bandwidth demands The USB 3 0 USB 3 1 Gen 1 finally has the answer to the consumers demands with a theoretically 10 times faster than its predecessor In a nutshell USB 3 1 Gen 1 ...

Страница 39: ...meras etc USB 2 0 may not be fast enough Furthermore no USB 2 0 connection could ever come close to the 480Mbps theoretical maximum throughput making data transfer at around 320Mbps 40MB s the actual real world maximum Similarly USB 3 0 USB 3 1 Gen 1 connections will never achieve 4 8Gbps We will likely see a real world maximum rate of 400MB s with overheads At this speed USB 3 0 USB 3 1 Gen 1 is ...

Страница 40: ...ll digital audio video interface HDMI provides an interface between any compatible digital audio video source such as a DVD player or A V receiver and a compatible digital audio and or video monitor such as a digital TV DTV The intended applications for HDMI TVs and DVD players The primary advantage is cable reduction and content protection provisions HDMI supports standard enhanced or high defini...

Страница 41: ...formats in a simple cost effective manner Audio HDMI supports multiple audio formats from standard stereo to multichannel surround sound HDMI combines video and multichannel audio into a single cable eliminating the cost complexity and confusion of multiple cables currently used in A V systems HDMI supports communication between the video source such as a DVD player and the DTV enabling new functi...

Страница 42: ...n Near field communication NFC specifications Fingerprint reader specifications Ports and connector specifications Especificaciones de la superficie táctil Camera specifications IR camera specifications AC adapter specifications Battery specifications Docking Option Device drivers Especificaciones físicas Environmental specifications System specifications Feature Specification Chipset Intel Kaby L...

Страница 43: ...Pixel pitch FHD 0 144 mm Memory Your computer supports a maximum of 16 GB of memory Table 3 Memory specifications Type LPDDR3 SDRAM Soldered down memory Minimum Memory Configuration 4 GB Maximum Memory Configuration 16 GB Video specifications Table 4 Video specifications Feature Specifications Type Integrated on system board UMA controller Intel HD Graphics 620 External display support On system e...

Страница 44: ...a Red de área local inalámbrica interna WLAN red de área extensa inalámbrica WWAN y WiGig Bluetooth 4 1 LE Bluetooth 4 2 Intel preparado para HW el SW depende del SO Windows 10 admite hasta 4 1 Near field communication NFC specifications Feature Specification Type Broadcom BCM58102 NFC controller NFC Standard ISO IEC 18092 ISO IEC 21481 ISO IEC 14443 Type A and B Japanese Industrial Standard JIS X...

Страница 45: ...Type C docking Express Card None Especificaciones de la superficie táctil Función Especificación Área activa Eje X 90 5 mm 3 56 pulg Eje Y 50 mm 1 97 pulg Multitáctil Puede configurar gestos de un solo dedo y múltiples dedos Camera specifications Feature Specification Type HD fixed focus Sensor type CMOS sensor technology Imaging rate Up to 30 frames per second Video Resolution 1280 x 720 pixels I...

Страница 46: ...Rated output voltage 65 W and 90 W 20 V DC 15 V DC 9 V DC 5 V DC Weight 45 W 0 17 kg 0 37 lb 65 W 0 216 kg 0 476 lb 90 W 0 291 kg 0 641 lb Dimensions 45 W Height 22 mm 0 87 inch Width 55 mm 2 17 inches Depth 87 mm 3 42 inches Dimensions 65 W Height 99 mm 3 90 inches Width 66 mm 2 60 inches Depth 22 mm 0 87 inch Dimensions 90W Height 130 mm 5 12 inches Width 66 mm 2 60 inches Depth 22 mm 0 87 inch ...

Страница 47: ...ttery Width 238 mm 9 37 inches Height 4 7 mm 0 22 inch Weight 270 g 0 6 lb Voltage 7 6 VDC Life span 300 discharge per charge cycles Temperature range Operating Charge 0 C to 50 C 32 F to 122 F Discharge 0 C to 70 C 32 F to 158 F Temperature range Non Operating 20 C to 65 C 4 F to 149 F Coin cell battery 3 V CR2032 lithium coin cell Docking Option Table 6 Docking options Feature Specifications Typ...

Страница 48: ... Table 7 Environmental specifications Environmental specification Temperature range Operating 0 C to 35 C 32 F to 104 F Storage 40 C to 65 C 40 F to 149 F Relative humidity Operating 10 to 90 non condensing Storage 0 to 95 non condensing Altitude maximum Operating 0 m to 3048 m 0 to 10 000 ft Non Operating 0 m to 10668 m 0 to 35 000 ft Storage 0 m to 10668 m 0 to 35 000 ft Airborne contaminant lev...

Страница 49: ...ntalla Comportamiento durante la POST Capacidad de administración Opciones de la pantalla Virtualization support Compatibilidad con virtualización Opciones de la pantalla Wireless Inalámbrico Maintenance screen System logs Updating the BIOS in Windows System and setup password Menú de inicio Presione F12 cuando aparezca el logotipo de Dell para iniciar un menú de inicio de única vez con una lista ...

Страница 50: ...a de activo etiqueta de propiedad fecha de propiedad fecha de fabricación el código de servicio rápido y la actualización de firmware con firma opción activada de manera predeterminada Memory Information Información de la memoria muestra la memoria instalada la memoria disponible la velocidad de la memoria el modo de canales de memoria la tecnología de memoria el tamaño del DIMM A y el tamaño del ...

Страница 51: ...de la unidad de disco duro SATA interna Las opciones son Disabled Desactivado AHCI RAID On RAID activada esta opción está activada de forma predeterminada Drives Permite configurar las unidades SATA integradas Todas las unidades están activadas de manera predeterminada Las opciones son SATA 2 activado de forma predeterminada M 2 PCIE SSD 0 opción activada de manera predeterminada M 2 PCIE SSD 1 op...

Страница 52: ...derbolt está desactivado Enable Thunderbolt Adapter Boot Support Activar compatibilidad de inicio del adaptador Thunderbolt está desactivado Enable Thunderbolt Adapter Pre boot Modules Habilitar módulos de inicio previo del adaptador Thunderbolt está desactivado Enable Thunderbolt and PCIE behind TBT Preboot Activar preinicio Thunderbolt y PCIE tras TBT opción activada de manera predeterminada Sec...

Страница 53: ...0 sec 30 segundos 1 min 1 minuto 5 min 5 minutos 15 min 15 minutos Never Nunca Keyboard Backlight Timeout on AC Con la opción de CA la expiración de tiempo de la retroiluminación del teclado disminuye la iluminación La función de iluminación del teclado principal no se ve afectada La Iluminación del teclado seguirá siendo compatible con los distintos niveles de iluminación Este campo tiene efecto ...

Страница 54: ...ivado Enabled Activado Configuración predeterminada Enabled Activado Expert Key Management Esta opción activa o desactiva la característica de Expert Key Management Administración de Expert Key PK activada de manera predeterminada KEK db dbx Configuración predeterminada Enabled Activado Opciones de la pantalla Intel Software Guard Extensions Extensiones de protección del software Intel Opción Desc...

Страница 55: ...ción predeterminada la opción está activada C States Control Permite activar o desactivar los estados de reposo adicionales del procesador C states Estados C Configuración predeterminada la opción está activada Intel TurboBoost Permite habilitar o deshabilitar el modo Intel TurboBoost del procesador Enable Intel TurboBoost Habilitar Intel TurboBoost Configuración predeterminada la opción está acti...

Страница 56: ...mite minimizar el consumo de energía de CA durante los momentos de alimentación pico del día Después de activar esta opción el sistema solo se ejecuta con batería incluso si el adaptador de CA está conectado Enable peak shift Activar turno de horas pico deshabilitado Set battery threshold Establecer umbral de la batería del 15 al 100 el valor predeterminado activado es 15 Configuración de carga de...

Страница 57: ... opción no tiene efecto alguno La configuración funciona en el modo Fn Key Only Mouse Touchpad Le permite definir la forma en que el sistema maneja la entrada del ratón y la superficie táctil Las opciones son Serial Mouse Ratón de serie PS2 Mouse Ratón PS2 Touchpad PS 2 Mouse Superficie táctil ratón PS 2 esta opción está activada de forma predeterminada Activar Bloq Num Permite habilitar o deshabi...

Страница 58: ...ebe activar durante el inicio del sistema Disabled Desactivado Enabled Activado Configuración predeterminada Disabled Desactivado Opciones de la pantalla Virtualization support Compatibilidad con virtualización Opción Descripción Virtualization Este campo especifica si un monitor de máquina virtual VMM puede utilizar las capacidades de hardware adicionales proporcionadas por la tecnología de virtu...

Страница 59: ... número IMEI para WWAN se puede encontrar en la caja exterior o en la tarjeta WWAN Maintenance screen Option Description Service Tag Displays the Service Tag of your computer Asset Tag Allows you to create a system asset tag if an asset tag is not already set This option is not set by default BIOS Downgrade This controls flashing of the system firmware to previous revisions Option Allow BIOS downg...

Страница 60: ... to reach the product page 5 Select your computer model and the Product Support page of your computer appears 6 Click Get drivers and click Drivers and Downloads The Drivers and Downloads section opens 7 Click Find it myself 8 Click BIOS to view the BIOS versions 9 Identify the latest BIOS file and click Download 10 Select your preferred download method in the Please select your download method be...

Страница 61: ...es The computer reboots Deleting or changing an existing system setup password Ensure that the Password Status is Unlocked in the System Setup before attempting to delete or change the existing System and or Setup password You cannot delete or change an existing System or Setup password if the Password Status is Locked To enter the System Setup press F2 immediately after a power on or reboot 1 In ...

Страница 62: ...os compatibles Descripción Windows 10 Microsoft Windows 10 Pro 64 bits Microsoft Windows 10 Home 64 bits Downloading drivers 1 Turn on the notebook 2 Go to Dell com support 3 Click Product Support enter the Service Tag of your notebook and then click Submit NOTE If you do not have the Service Tag use the auto detect feature or manually browse for your notebook model 4 Click Drivers and Downloads 5...

Страница 63: ... by default Intel HID Event Filter Driver Intel Dynamic Platform and Thermal Framework Driver Intel Thunderbolt TM Controller driver Optional Management Engine Realtek PCI E memory card Intel serial IO driver Intel HID Event Filter Verify if the Intel HID event filter is already installed in the computer Table 10 Intel HID Event Filter Before Installation After Installation Intel Dynamic Platform ...

Страница 64: ...ltek PCI E Memory Card Verify if the Realtek PCI E Memory Card is already installed in the computer Table 13 Realtek PCI E memory card Before Installation After Installation Serial IO driver Verify if the drivers for Touchpad are installed Figure 1 Serial IO driver Chipset device software Verify if the chipset device software is already installed in the computer 64 Software ...

Страница 65: ...Software 65 ...

Страница 66: ...ver Before Installation After Installation Network drivers Install the WLAN and Bluetooth drivers from the Dell support site Table 15 Network drivers Before installation After installation Realtek Audio Verify if audio drivers are already installed in the computer Table 16 Realtek audio Before Installation After Installation 66 Software ...

Страница 67: ...erify if the default serial ATA drivers are installed in the computer Security drivers This section lists the security devices in the Device Manager Security device drivers Verify if the security device drivers are installed in the computer Fingerprint sensor drivers Verify if the Fingerprint sensor drivers are installed in the computer Software 67 ...

Страница 68: ...nteraction Always ensure that you are present at the computer terminal when the diagnostic tests are performed Running the ePSA Diagnostics Invoke diagnostics boot by either of the methods that are suggested below 1 Power on the computer 2 As the computer boots press the F12 key when the Dell logo is displayed 3 In the boot menu screen use Up Down arrow key to select the Diagnostics option and the...

Страница 69: ...or processor failure 2 2 system board BIOS ROM system board covers BIOS corruption or ROM error 2 3 memory no memory no RAM detected 2 4 memory memory failure RAM failure 2 5 memory invalid memory installed 2 6 system board chipset system board chipset error 2 7 display display failure 3 1 RTC power failure coin cell battery failure 3 2 PCI Video PCI Video card chip failure 3 3 BIOS recovery 1 rec...

Страница 70: ...tive Key Databases System Logs The following items may or may not reset based on your custom BIOS setting selections The Boot List Enable Legacy OROMs Secure Boot Enable Allow BIOS Downgrade 70 Solución de problemas ...

Страница 71: ... país y del producto es posible que no pueda disponer de algunos servicios en su área Si desea ponerse en contacto con Dell para tratar cuestiones relacionadas con las ventas la asistencia técnica o el servicio de atención al cliente 1 Vaya a Dell com support 2 Seleccione la categoría de soporte 3 Seleccione su país o región en la lista desplegable Elija un país o región que aparece al final de la...

Отзывы: