28
| Removing
the
Palm-Rest
Assembly
6
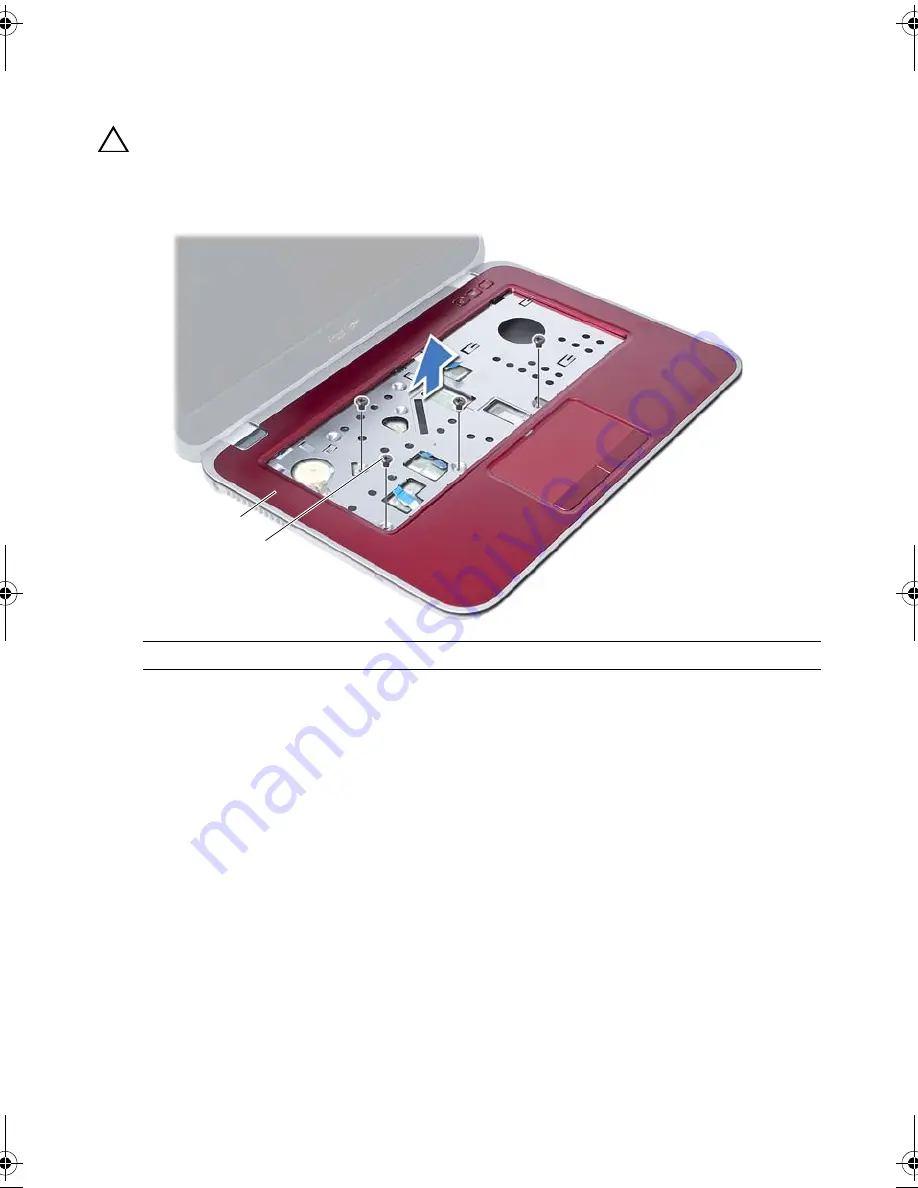
Remove the screws that secure the palm-rest assembly to the system board.
7
Gently lift and release the tabs on palm-rest assembly from the slots on
the computer base.
CAUTION: Carefully separate the palm-rest assembly from the display assembly
to avoid damage to the display assembly.
8
Lift the palm-rest assembly off the computer base.
1
palm-rest assembly
2
screws (4)
1
2
OM_Book.book Page 28 Tuesday, October 16, 2012 11:59 AM
Содержание Inspiron 14Z 5423
Страница 10: ...10 After Working Inside Your Computer ...
Страница 14: ...14 Replacing the Memory Module s ...
Страница 18: ...18 Replacing the Optical Drive Assembly ...
Страница 20: ...20 Removing the Keyboard 2 Remove the screw that secures the keyboard to the system board 1 screw 1 ...
Страница 24: ...24 Replacing the Keyboard ...
Страница 30: ...30 Replacing the Palm Rest Assembly ...
Страница 34: ...34 Replacing the Battery ...
Страница 38: ...38 Replacing the Hard Drive ...
Страница 46: ...46 Replacing the mSATA Card ...
Страница 50: ...50 Removing the Daughter Board ...
Страница 52: ...52 Replacing the Daughter Board ...
Страница 56: ...56 Replacing the Speakers ...
Страница 66: ...66 Replacing the Coin Cell Battery ...
Страница 70: ...70 Replacing the Thermal Cooling Assembly ...
Страница 74: ...74 Replacing the Display Assembly ...
Страница 78: ...78 Replacing the Display Bezel ...
Страница 82: ...82 Replacing the Display Hinges ...
Страница 86: ...86 Removing the Display Panel ...
Страница 88: ...88 Replacing the Display Panel ...
Страница 92: ...92 Replacing the Camera Module ...
Страница 94: ...94 Flashing the BIOS ...


