background image


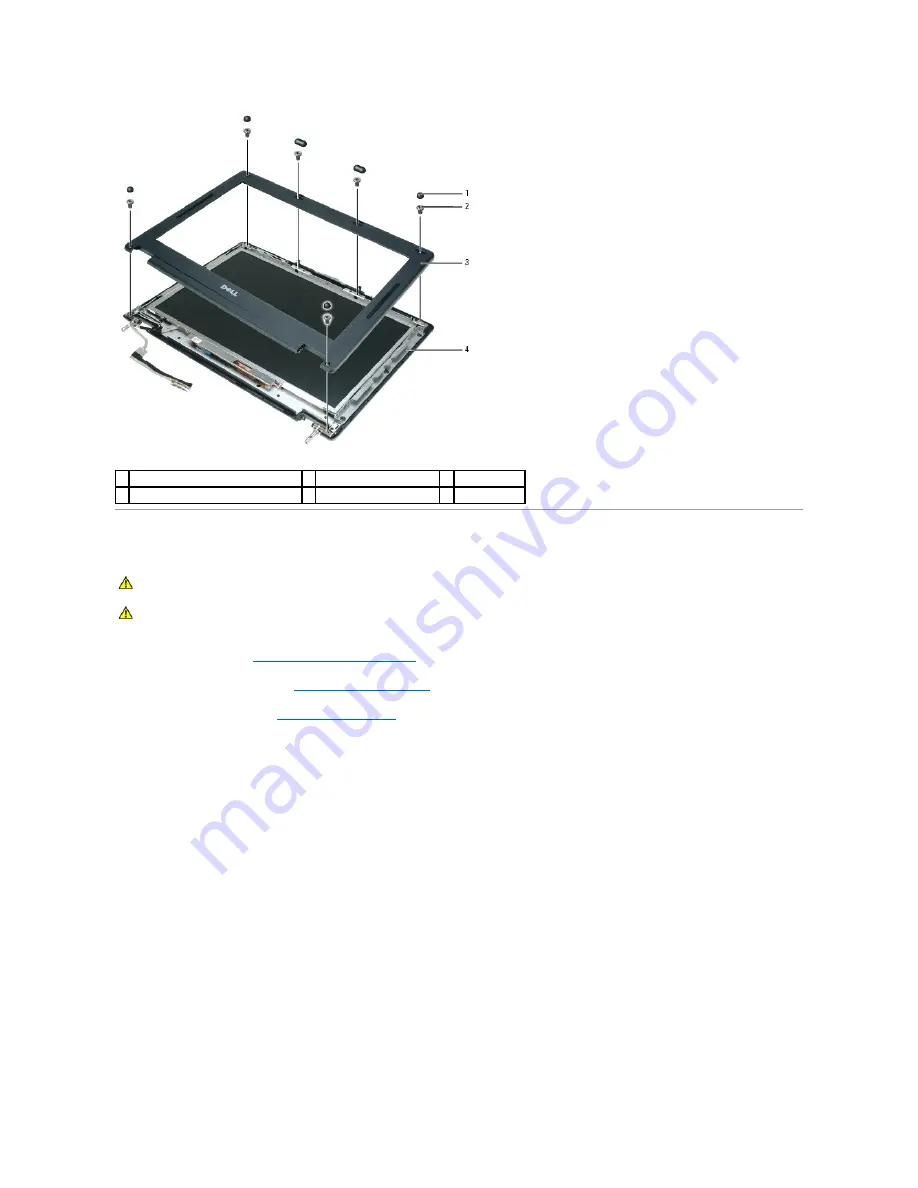
Removing the Display Panel  


1.

Follow the instructions in 

Before Working Inside Your Computer

.  


2.

Remove the display assembly. See 

Removing the Display Assembly

.  


3.

Remove the display bezel. See 

Removing the Display Bezel

.  


4.

Remove the four M2 x 3-mm screws from each side of the display panel.  


5.

Lift the display panel out of the top cover.  
 

1  screw covers/display bumpers (6) 

2  M2.5 x 5-mm screws (6) 

3  display bezel 

4  top cover 


CAUTION: 

Before performing the following procedures, follow the safety instructions in the 

Product Information Guide


CAUTION: 

To prevent static damage to components inside your computer, discharge static electricity from your body before you touch any of 

your computer's electronic components. You can do so by touching an unpainted metal surface.

Содержание Inspiron 120L

Страница 1: ...c disclaims any proprietary interest in trademarks and trade names other than its own January 2006 Rev A00 Before You Begin Processor Thermal Cooling Assembly System Components Processor Module Memory Optical Drive and Mini PCI Card Speakers Hard Drive System Board Hinge Cover Antenna Keyboard Fan Display Assembly Flashing the BIOS Palm Rest Base Plastics Modem Pinout Assignments for I O Connector...

Страница 2: ...eyboard See Removing the Keyboard 10 Remove the display assembly See Removing the Display Assembly 11 Remove the palm rest See Palm Rest 12 Remove the modem See Removing the Modem 13 Remove the speakers connector See Removing the Speakers 14 Remove the system board See Removing the System Board 15 Remove the antenna cable from the routing guides 16 Replace the antenna cable securing it under the g...

Страница 3: ...Back to Contents Page ...

Страница 4: ...ove the hinge cover See Removing the Hinge Cover 9 Remove the keyboard See Removing the Keyboard 10 Remove the display assembly See Removing the Display Assembly 11 Remove the palm rest See Palm Rest 12 Remove the modem See Removing the Modem 13 Remove the speakers connector See Removing the Speakers 14 Remove the system board See Removing the System Board Back to Contents Page CAUTION Before perf...

Страница 5: ...ds Before Working Inside Your Computer Use the following safety guidelines to help protect your computer from potential damage and to help ensure your own personal safety 1 Ensure that the work surface is flat and clean to prevent the computer cover from being scratched 2 Turn off your computer See Turning Off Your Computer NOTICE To avoid losing data save and close any open files and exit any ope...

Страница 6: ...e system board 8 Remove any installed ExpressCards from the ExpressCard slot Computer Orientation Screw Identification When you are removing and replacing components print this section as a tool to lay out and keep track of the screws The printout provides the number of screws and their sizes NOTICE To disconnect a network cable first unplug the cable from your computer and then unplug it from the...

Страница 7: ...el 6 each Display Panel 8 each Top of Palm Rest to Computer Base 5 each of M2 5 x 5 mm 2 each of M2 x 3 mm Base Plastic to Palm Rest From Bottom 10 each Hard Drive Carrier to Hard Drive 2 each Speakers to Base Plastics 1 for left speaker 2 for right speaker 3 total System Board to Base Plastics 5 each system board Keyboard to Palm Rest 2 each ...

Страница 8: ...nector 5 Remove the cable from the routing guides and lift the coin cell battery from the computer Replacing the Coin Cell Battery 1 Connect the cable to the system board connector 2 Route the cable through the channel and press the coin cell battery into place CAUTION Before performing the following procedures follow the safety instructions in the Product Information Guide CAUTION To prevent stat...

Страница 9: ...Back to Contents Page ...

Страница 10: ... your warranty NOTICE Unless otherwise noted each procedure in this document assumes that a part can be replaced by performing the removal procedure in reverse order 1 display latch 7 battery 13 modem 2 display 8 hard drive 14 processor thermal cooling assembly 3 hinge cover 9 coin cell battery 15 processor 4 keyboard 10 speakers 2 16 palm rest 5 optical drive 11 base plastics 17 display feed flex...

Страница 11: ... damage to components inside your computer discharge static electricity from your body before you touch any of your computer s electronic components You can do so by touching an unpainted metal surface NOTICE Press and hold the processor down by applying slight pressure to the center of the processor while turning the cam screw to prevent intermittent contact between the cam screw and processor NO...

Страница 12: ...y 2 Tighten the ZIF socket by turning the cam screw clockwise to secure the processor module to the system board 3 Wipe the thermal grease off of the processor thermal cooling assembly with a clean paper towel 4 Replace the processor thermal cooling assembly See Replacing the Processor Thermal Cooling Assembly 5 Update the BIOS using a flash BIOS update program CD See Flashing the BIOS From a CD B...

Страница 13: ...the cover 4 Loosen in consecutive order the four captive screws labeled 1 through 4 in the thermal cooling assembly 5 Lift the thermal cooling assembly out of the computer by pulling straight up on the pull strap CAUTION Before performing the following procedures follow the safety instructions in the Product Information Guide CAUTION To prevent static damage to components inside your computer disc...

Страница 14: ... fan assembly and the arrow on the pull strap pointing toward the outside edge of the system board 2 Tighten the four captive screws labeled 1 through 4 in consecutive order 3 Replace the thermal cooling processor cover and tighten the screw Back to Contents Page NOTICE Before you install the replacement processor thermal cooling assembly remove the mylar that covers the thermal grease on the asse...

Страница 15: ...cable 6 Close the display 7 Turn the computer upside down with the back of the computer facing you 8 From the bottom of the computer remove the two M2 5 x 8 mm screws labeled D 9 From the back of the computer remove the two M2 5 x 8 mm screws labeled D 10 Turn the computer right side up and open the display 11 Carefully remove the antenna cable and the display cables from their routing guides CAUT...

Страница 16: ...the bezel from the top cover and lift the inside edge of the bezel away from the top cover 1 antenna cable 2 display cable 1 antenna cable 2 display cable pull tab NOTICE Be careful not to damage the display switch when removing the display CAUTION Before performing the following procedures follow the safety instructions in the Product Information Guide CAUTION To prevent static damage to componen...

Страница 17: ...y panel 5 Lift the display panel out of the top cover 1 screw covers display bumpers 6 2 M2 5 x 5 mm screws 6 3 display bezel 4 top cover CAUTION Before performing the following procedures follow the safety instructions in the Product Information Guide CAUTION To prevent static damage to components inside your computer discharge static electricity from your body before you touch any of your comput...

Страница 18: ...r 2 Connect the bottom flex cable connector to the inverter connector 3 Lay the display panel into the top cover 4 Replace the eight M2 x 3 mm screws that secure the display panel to the top cover 5 Route the display feed flex cable so that it rests in the notch located in the bottom edge of the top cover 6 Replace the display bezel Back to Contents Page 1 display panel 2 top cover 3 M2 x 3 mm scr...

Страница 19: ......

Страница 20: ...e Hinge Cover 9 Remove the keyboard See Removing the Keyboard 10 Remove the display assembly See Removing the Display Assembly 11 Remove the palm rest See Palm Rest 12 Remove the modem See Removing the Modem 13 Remove the speakers connector See Removing the Speakers 14 Remove the system board See Removing the System Board 15 Disconnect the fan power cable from the system board 16 Turn the system b...

Страница 21: ...assembly aligning the screw holes in the system board with those in the fan assembly 2 Place the metal plate over the holes in the system board and replace the four M2 5 x 5 mm screws 3 Turn the system board over and connect the fan connector to the system board Back to Contents Page 1 fan assembly 2 metal plate 3 M2 5 x 5 mm screws 4 ...

Страница 22: ... the drive and restart the computer Flashing the BIOS From the Hard Drive 1 Ensure that the AC adapter is plugged in the main battery is properly installed and a network cable is attached 2 Turn on the computer 3 Locate the latest BIOS update file for your computer at support dell com 4 Click Download Now to download the file 5 If the Export Compliance Disclaimer window appears click Yes I Accept ...

Страница 23: ...f the hard drive CAUTION Before you begin any of the procedures in this section follow the safety instructions in the Product Information Guide NOTICE To prevent data loss turn off your computer before removing the hard drive Do not remove the hard drive while the computer is on in standby mode or in hibernate mode NOTICE Hard drives are extremely fragile even a slight bump can damage the drive NO...

Страница 24: ...nstructions see Reinstalling Software in the User s Guide for your computer 5 Reinstall the drivers and utilities for your computer if you installed a replacement hard drive For instructions see Reinstalling Drivers and Utilities in the User s Guide for your computer Returning a Hard Drive to Dell Return your old hard drive to Dell in its original or comparable foam packaging Otherwise the hard dr...

Страница 25: ...t to right until the cover snaps into place 3 Close the display and turn the computer upside down 4 Replace the battery See Before Working Inside Your Computer Back to Contents Page CAUTION Before performing the following procedures follow the safety instructions in the Product Information Guide CAUTION To prevent static damage to components inside your computer discharge static electricity from y...

Страница 26: ...nd lay the keyboard down on the palm rest 3 Replace the two screws at the top of the keyboard 4 Replace the hinge cover See Replacing the Hinge Cover CAUTION Before working inside your Dell computer follow the safety instructions in your Product Information Guide CAUTION To prevent static damage to components inside your computer discharge static electricity from your body before you touch any of ...

Страница 27: ...Back to Contents Page ...

Страница 28: ...m board 9 Pull up on the pull tab to disconnect the modem from the connector on the system board 10 Disconnect the modem cable from the modem Replacing the Modem CAUTION Before you begin the following procedure see the safety instructions in the Product Information Guide NOTICE To prevent damage to the system board remove the main battery before working inside the computer See Before Working Insid...

Страница 29: ...Align the connector on the bottom of the modem with the modem connector on the system board and press down on the connector side of the modem 3 Replace the two M2 x 3 mm screws Back to Contents Page NOTICE Ensure that the modem cable is routed correctly when you replace the modem ...

Страница 30: ...m the bottom of the computer 8 Turn the computer top side up and remove the five M2 5 x 5 mm screws from the top of the palm rest and the remaining two M2 5 x 3 mm screws from near the power button and the activity LEDs 9 Disconnect the touch pad connector from the system board by pulling the release tabs away from the connector and removing the cable CAUTION Before performing the following proced...

Страница 31: ... your fingers to separate the palm rest from the base plastics by lifting the inside edge of the palm rest Back to Contents Page 1 suspend switch connector 2 touch pad ribbon cable release tabs 2 3 touch pad ribbon cable NOTICE Carefully separate the palm rest from the base plastics to prevent damage to the palm rest ...

Страница 32: ...ervice Manual USB Connector Video Connector USB Connector Video Connector Back to Contents Page Pin Signal 1 USB5V 2 USBP 3 USBP 4 GND Pin Signal Pin Signal 1 CRT_R 9 5V 2 CRT_G 10 GND 3 CRT_B 11 MONITOR_DETECT 4 NC 12 DDC_DATA 5 GND 13 CRT_HS 6 GND 14 CRT_VS 7 GND 15 DDC_CLK 8 GND ...

Страница 33: ...t the speaker connector from the system board 8 Remove the speaker cables from under or between their routing clips 9 Remove the three M2 x 3 mm screws from the speaker mounts 10 Remove the speakers by pulling them straight up and out of the base plastics Replacing the Speakers 1 Slide the speakers down into the base plastics CAUTION Before performing the following procedures follow the safety ins...

Страница 34: ...x 3 mm screws 4 Connect the speaker connector to the system board Back to Contents Page NOTICE Ensure that the speaker cables are under or between their routing clips NOTE The speakers face out in the base plastics holders NOTE The right speaker cable is longer than the left speaker cable ...

Страница 35: ... Remove the processor thermal cooling assembly See Removing the Processor Thermal Cooling Assembly 7 Remove the processor See Removing the Processor Module 8 Remove the hinge cover See Removing the Hinge Cover 9 Remove the keyboard See Removing the Keyboard 10 Remove the display assembly See Removing the Display Assembly 11 Remove the palm rest See Palm Rest 12 Remove the modem See Removing the Mo...

Страница 36: ...rom the old system board See Replacing the Memory Module 12 Replace the optical drive See Replacing the Optical Drive 13 Replace the hard drive See Replacing the Hard Drive 14 Insert the battery into the battery bay See Before Working Inside Your Computer 15 Connect the AC adapter to the computer and to an electrical outlet 16 Turn on the computer 17 Insert the CD that accompanied the replacement ...

Страница 37: ...marks and trade names may be used in this document to refer to either the entities claiming the marks and names or their products Dell Inc disclaims any proprietary interest in trademarks and trade names other than its own January 2006 Rev A00 Back to Contents Page NOTE A NOTE indicates important information that helps you make better use of your computer NOTICE A NOTICE indicates either potential...

Страница 38: ...uring clips on each end of the memory module connector until the module pops up b Remove the module from the connector CAUTION Before working inside your Dell computer follow the safety instructions in the Product Information Guide CAUTION To prevent static damage to components inside your computer discharge static electricity from your body before you touch any of your computer s electronic compo...

Страница 39: ...mory installed in the computer click Start Help and Support Use Tools to view your computer information and diagnose problems My Computer Information Optical Drive Removing the Optical Drive 1 memory module 2 securing clips 2 per connector 1 memory slot notch 2 memory slot tab NOTICE If the cover is difficult to close remove the module and reinstall it Forcing the cover to close may damage your co...

Страница 40: ... display 4 The operating system automatically recognizes the device If necessary enter your password to unlock your computer Mini PCI Card Removing the Mini PCI Card If you ordered a Mini PCI card with your computer the card is already installed 1 Follow the instructions in Before Working Inside Your Computer 2 Turn the computer upside down loosen the captive screws on the memory module Mini PCI c...

Страница 41: ...he Mini PCI card b Release the Mini PCI card by spreading the metal securing tabs until the card pops up slightly c Lift the Mini PCI card out of its connector 1 captive screws 3 1 antenna cable NOTICE The connectors are keyed to ensure correct insertion If you feel resistance check the connectors and realign the card 1 Mini PCI card 2 metal securing tabs 2 ...

Страница 42: ...lace the memory module Mini PCI cover and tighten the screws 3 Insert the battery into the battery bay or connect the AC adapter to your computer and an electrical outlet 4 Turn on the computer Back to Contents Page NOTICE To prevent damage to the Mini PCI card ensure that the antenna cable is not under the card when you press the card into place 1 Mini PCI card 2 metal securing tabs 2 1 antenna c...

Отзывы: