Dell IN1930 Скачать руководство пользователя страница 18


Auto Adjust 


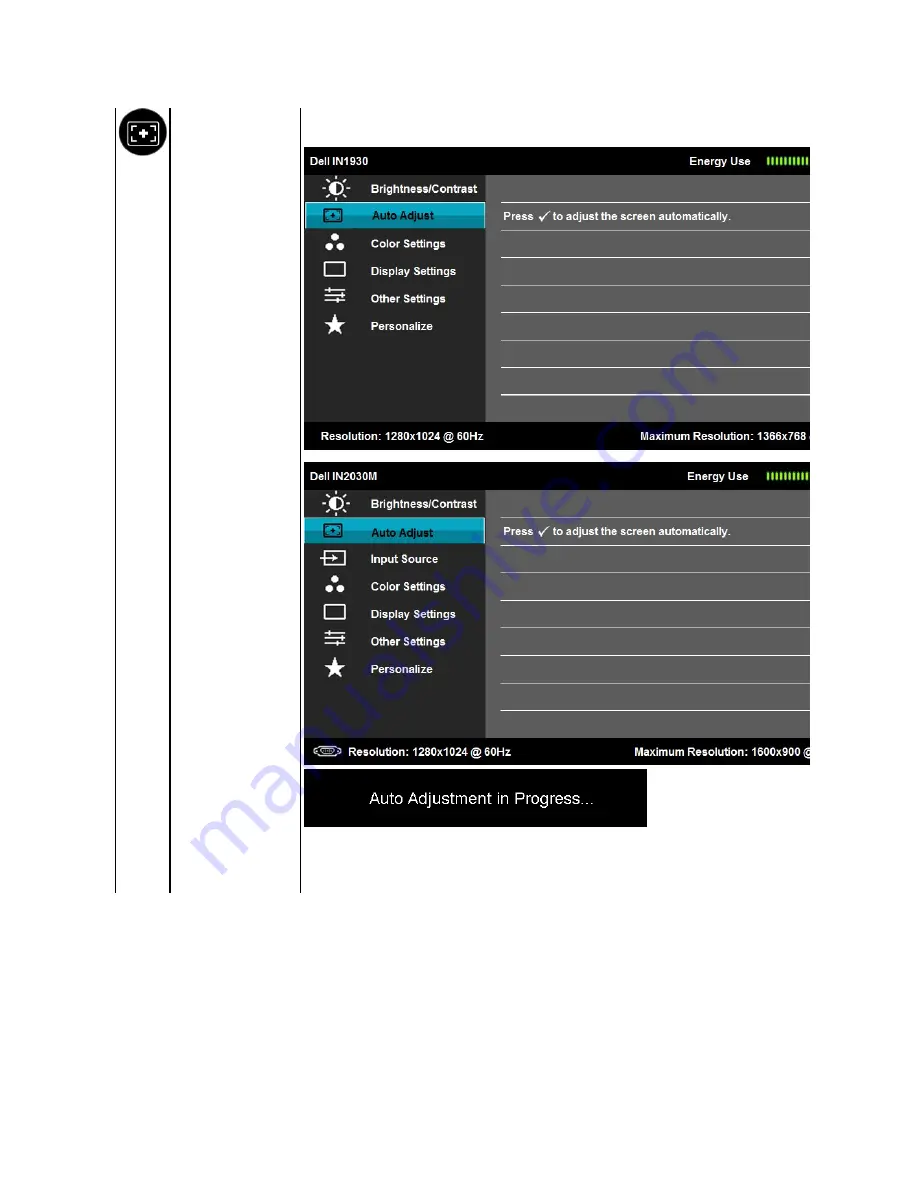
Use this key to activate automatic setup and adjust menu. The following dialog appears on a black screen as the monitor self

current input:  


Auto Adjustment allows the monitor to self-adjust to the incoming video signal. After using Auto Adjustment, you can further tune your monitor 

by using the Pixel Clock (Coarse) and Phase (Fine) controls under Image Settings. 


NOTE: 

Auto Adjust does not occur if you press the button while there are no active video input signals or attached cables

.


Содержание IN1930

Страница 1: ... an ENERGY STAR partner Dell Inc has determined that this product meets the ENERGY STAR guidelines for energy efficiency Other trademarks and trade names may be used in this document to refer to either the entities claiming the marks and names or their products Dell Inc disclaims any proprietary interest in trademarks and trade names other than its own Model IN1930f IN2030Mf IN1930c IN2030Mc Febru...

Страница 2: ... Pixel Policy Maintenance Guidelines Package Contents Your monitor ships with all the components shown below Ensure that you have received all the components and Contact Dell if anything is missing NOTE Some items may be optional and may not ship with your monitor Some features or media may not be available in certain countries l Monitor l Stand Riser l Stand Base l Power Cable l VGA Cable attache...

Страница 3: ...s Standards Association VESA 100 mm mounting holes for flexible mounting solutions Plug and play capability if supported by your system On Screen Display OSD adjustments for ease of set up and screen optimization Software and documentation media which includes an information file INF Image Color Matching File ICM and product documentation ENERGY STAR compliant Security lock slot EPEAT Silver compl...

Страница 4: ...ct Dell for technical support 2 Regulatory rating label Lists the regulatory approvals 3 VESA mounting holes 100 mm To mount the monitor 4 Security lock slot Use a security lock with the slot to help secure your monitor 5 Dell soundbar mounting brackets To attach the optional Dell Soundbar Right Side IN1930 IN2030M ...

Страница 5: ...n in OFF mode can only be achieved by disconnecting the main cable from the monitor Maximum power consumption with max luminance and contrast Pin Assignments Label Description Use 1 AC power connector To connect the monitor power cable 2 VGA connector To connect your computer to the monitor using a VGA cable Label Description Use 1 AC power connector To connect the monitor pow 2 DVI connector To c...

Страница 6: ...5 V 10 GND sync 11 GND 12 DDC data 13 H sync 14 V sync 15 DDC clock Pin Number 24 pin Side of the Connected Signal Cable 1 TMDS RX2 2 TMDS RX2 3 TMDS Ground 4 Floating 5 Floating 6 DDC Clock 7 DDC Data 8 Floating 9 TMDS RX1 10 TMDS RX1 11 TMDS Ground 12 Floating 13 Floating 14 5 V power 15 Self test 16 Hot Plug Detect 17 TMDS RX0 18 TMDS RX0 19 TMDS Ground 20 Floating 21 Floating ...

Страница 7: ...81 inches Pixel pitch 0 300 mm 0 277 mm Viewing angle l Horizontal l Vertical 170 typical 160 typical 170 typical 160 typical Luminance output 250 cd m typical 250 cd m typical Contrast ratio 1000 to 1 typical 1000 to 1 typical Dynamic Contrast Ratio 8 000 000 to 1 typical 8 000 000 to 1 typical Faceplate coating Antiglare with hard coating 3H Antiglare with hard coating 3H Backlight LED light bar...

Страница 8: ...75 0 49 5 VESA 1024 x 768 48 4 60 0 65 0 VESA 1024 x 768 60 0 75 0 78 8 VESA 1152 x 864 67 5 75 0 108 0 VESA 1280 x 1024 64 0 60 0 108 0 VESA 1280 x 1024 80 0 75 0 135 0 VESA 1600 x 900 55 5 60 0 97 8 Physical Characteristics The following table lists the monitor s physical characteristics Model Number Dell IN1930 monitor Dell IN2030M monitor Connector type D subminiature blue connector D subminia...

Страница 9: ...e best image quality on your monitor use a dynamically changing screen saver and power off your monitor when not in use l Height l Width l Depth 141 50 mm 5 57 inches 236 33 mm 9 30 inches 163 78 mm 6 45 inches 141 50 mm 5 57 inches 236 33 mm 9 30 inches 163 78 mm 6 45 inches Weight Weight with packaging 3 94 kg 8 69 lb 4 25 kg 9 37 lb Weight with stand assembly and cables 3 26 kg 7 19 lb 3 53 kg ...

Страница 10: ...Back to Contents Page ...

Страница 11: ...United States call 800 WWW DELL 800 999 3355 Dell provides several online and telephone based support and service options Availability varies by country and product and some services may not be available in your area To contact Dell for sales technical support or customer service issues Back to Contents Page WARNING Use of controls adjustments or procedures other than those specified in this docum...

Страница 12: ... and download the latest driver for your graphics card 2 After installing the drivers for your graphics adapter attempt to set the resolution to 1366 x 768 for IN1930 or 1600 x 900 for IN2030M again Back to Contents Page NOTE If you are unable to set the resolution to 1366 x 768 for IN1930 or 1600 x 900 for IN2030M please contact Dell to inquire about a graphics adapter that supports these resolut...

Страница 13: ...ain In Windows Vista or Windows 7 1 Right click on the desktop and click Personalization 2 Click Change Display Settings 3 Click Advanced Settings 4 Identify your graphics controller supplier from the description at the top of the window e g NVIDIA ATI Intel etc 5 Please refer to the graphics card provider website for updated driver for example http www ATI com OR http www NVIDIA com 6 After insta...

Страница 14: ...tor Using the Front Panel Controls Use the keys on the front of the monitor to adjust the image settings Front panel Key Description A Preset modes Use the Preset modes key to choose from a list of preset color modes See Using the OSD Menu B Brightness Contrast Use the Brightness Contrast key to direct access to the Brightness and Contrast control menu C Menu Use the Menu key to open the on screen...

Страница 15: ...key to adjust decrease ranges items in the OSD menu C OK Use the OK key to confirm your selection D Back Use the Back key to go back to the previous menu NOTE If you change the settings and then either proceed to another menu or exit the OSD menu the monitor automatically saves those changes The changes are also saved if you change the settings and then wait for the OSD menu to disappear 1 Press t...

Страница 16: ...ttons to select the desired parameter 5 Press the button to enter the slide bar and then use the or buttons according to the indicators on the menu to make your changes 6 Select the to return to previous menu without accepting current settings or to accept and return to previous menu Icon Menu and Submenus Description Energy Use This meter shows the energy level being consumed by the monitor in re...

Страница 17: ...ey to decrease brightness min 0 max 100 Contrast Allows you to adjust the contrast or the degree of difference between darkness and lightness on the monitor screen Adjust brightness first and adjust contrast only if you need further adjustment Press the key to increase contrast and press the key to decrease contrast min 0 max 100 ...

Страница 18: ... input Auto Adjustment allows the monitor to self adjust to the incoming video signal After using Auto Adjustment you can further tune your monitor by using the Pixel Clock Coarse and Phase Fine controls under Image Settings NOTE Auto Adjust does not occur if you press the button while there are no active video input signals or attached cables ...

Страница 19: ...ect Select Auto Select to scan for available input signals VGA Select VGA input when you are using the analog VGA connector Push to select the VGA input source DVI D Select DVI D input when you are using the Digital DVI connector Push to select the DVI input source COLOR SETTINGS Use the Color Setting menu to adjust the monitor s color settings ...

Страница 20: ...B Select this option if your monitor is connected to a computer or DVD player using the HDMI cable or the HDMI to DVI adapter l YPbPr Select this option if your DVD player supports only YPbPr output Preset Modes Allows you to choose from a list of preset color modes ...

Страница 21: ... most gaming applications l Text Loads color settings ideal for office environment l Warm Increases the color temperature The screen appears warmer with a red yellow tint l Cool Decreases the color temperature The screen appears cooler with a blue tint l Custom Color Allows you to manually adjust the color settings Press the and keys to adjust the Red Green and Blue values and create your own pres...

Страница 22: ...on of the image Use or to adjust the saturation from 0 to 100 Demo Mode You can launch the Demo Mode to identify the monitor display difference between Normal and Enhanced Reset Color Settings Resets your monitor s color settings to the factory defaults DISPLAY SETTINGS Use the Displays Settings menu to adjust the monitor s display settings ...

Страница 23: ...e Phase and Pixel Clock adjustments allow you to adjust your monitor to your preference Use or buttons to adjust for best image quality Phase If satisfactory results are not obtained using the Phase adjustment use the Pixel Clock coarse adjustment and then use Phase fine again Dynamic Contrast Allows you to increase the level of contrast to provide sharper and more detailed image quality NOTE Dyna...

Страница 24: ...TE When the OSD is locked pressing the menu key takes you directly to the OSD settings menu with OSD Lock pre press and hold key for 15 seconds to unlock and allow user access to all applicable settings Energy Smart Dynamic dimming activated The Dynamic dimming feature automatically reduces the screen brightness level when the displayed image contains a high proportion of bright areas DDC CI DDC C...

Страница 25: ...ditioning to help eliminate any image retention Using the LCD Conditioning feature may take some time LCD Conditioning feature cannot remove severe cases of image retention or burn in The below warning message appears once user selects Enable LCD Conditioning NOTE Use LCD Conditioning only when you experience a problem with image retention ...

Страница 26: ... the factory preset values Personalize Select this option allows you to set two shortcut keys Shortcut Key 1 User can select from Preset Modes Brightness Contrast Auto Adjust Input Source for IN2030M only Aspect Ratio and set as shortcut key ...

Страница 27: ...Shortcut Key 2 User can select from Preset Modes Brightness Contrast Auto Adjust Input Source for IN2030M only Aspect Ratio and set as shortcut key ...

Страница 28: ...D Messages Reset Personalization Allows you to restore shortcut key to the default setting When the monitor does not support a particular resolution mode you will see the following message IN1930 IN2030M ...

Страница 29: ...l and vertical frequency ranges addressable by this monitor Recommended mode is 1366 x 768 for IN1930 or 1600 x 900 for IN2030M You will see the following message before the DDC CI function is disabled When the monitor enters the Power Save mode the following message appears Activate the computer and wake up the monitor to gain access to the OSD ...

Страница 30: ...1 Right click on the desktop and select Properties If you press any button other than the power button the following messages will appear depending on the selected input If VGA or DVI cable is not connected a floating dialog box as shown below appears The monitor will enter Power Save Mode after 5 minutes if left at this state or ...

Страница 31: ...you have a Dell desktop or portable computer Go to support dell com enter your service tag and download the latest driver for your graphics card If you are using a non Dell computer portable or desktop Go to the support site for your computer and download the latest graphic drivers Go to your graphics card website and download the latest graphic drivers Using the Dell Soundbar The Dell Soundbar is...

Страница 32: ...Back to Contents Page NOTE The stand base is detached when the monitor is shipped from the factory ...

Страница 33: ...olution to 1366 x 768 for IN1930 or 1600 x 900 for IN2030M 4 Click OK In Windows Vista or Windows 7 1 Right click on the desktop and click Personalization 2 Click Change Display Settings 3 Move the slider bar to the right by pressing and holding the left mouse button and adjust the screen resolution to 1366 x 768 for IN1930 or 1600 x 900 for IN2030M 4 Click OK If you do not see 1366 x 768 for IN19...

Страница 34: ...ed States and or other countries ENERGY STAR is a registered trademark of the U S Environmental Protection Agency As an ENERGY STAR partner Dell Inc has determined that this product meets the ENERGY STAR guidelines for energy efficiency Other trademarks and trade names may be used in this document to refer to either the entities claiming the marks and names or their products Dell Inc disclaims any...

Страница 35: ...sembly to the monitor Connecting Your Monitor NOTE The stand base is detached when the monitor is shipped from the factory a Place the monitor stand base on a stable table top b Slide the monitor stand body in the correct direction down onto the stand base until it clicks into place a Place the monitor on a soft cloth or cushion near the edge of desk b Align the stand assembly bracket to the monit...

Страница 36: ...s Connecting the Blue VGA Cable Connecting the white DVI cable for IN2030M only Removing the Monitor Stand Attaching the Dell Soundbar WARNING Before you begin any of the procedures in this section follow the Safety Instructions CAUTION The graphics are used for the purpose of illustration only Appearance on the computer may vary After placing the monitor panel on a soft cloth or cushion complete ...

Страница 37: ... monitor attach Soundbar by aligning the two slots with the two tabs along the bottom of the monitor 2 Slide the Soundbar to the left until it snaps into place 3 Connect the Soundbar with the DC power connector from the Soundbar Power Adapter 4 Insert the mini stereo plug from the back of the Soundbar into the computer s audio output jack ...

Страница 38: ... Turn on the monitor or 4 This box also appears during normal system operation if the video cable becomes disconnected or damaged The monitor will enter Power Save Mode after 5 minutes if left at this state 5 Turn off your monitor and reconnect the video cable then turn on both your computer and the monitor If your monitor screen remains blank after you use the previous procedure check your video ...

Страница 39: ...puter is properly connected and secure l Verify that the power outlet is functioning properly using any other electrical equipment l Ensure that the power button is depressed fully No Video Power LED on No picture or no brightness l Increase brightness contrast controls via OSD l Perform monitor self test feature check l Check for bent or broken pins in the video cable connector l Ensure that the ...

Страница 40: ...tic image displayed appears on the screen l Use the Power Management feature to turn off the monitor at all times when not in use for more information see Power Management Modes l Alternatively use a dynamically changing screensaver Specific Symptoms What You Experience Possible Solutions Screen image is too small Image is centered on screen but does not fill entire viewing area l Reset the monito...

Страница 41: ...e of the audio source l Turn the Power Volume knob on the Soundbar counter clockwise to a lower volume setting l Clean and reseat the audio line in plug Unbalanced Sound Output Sound from only one side of Soundbar l Clear any obstructions between the Soundbar and the user l Confirm that the audio line in plug is completely inserted into the jack of the sound card or audio source l Set all Windows ...

Отзывы: