background image

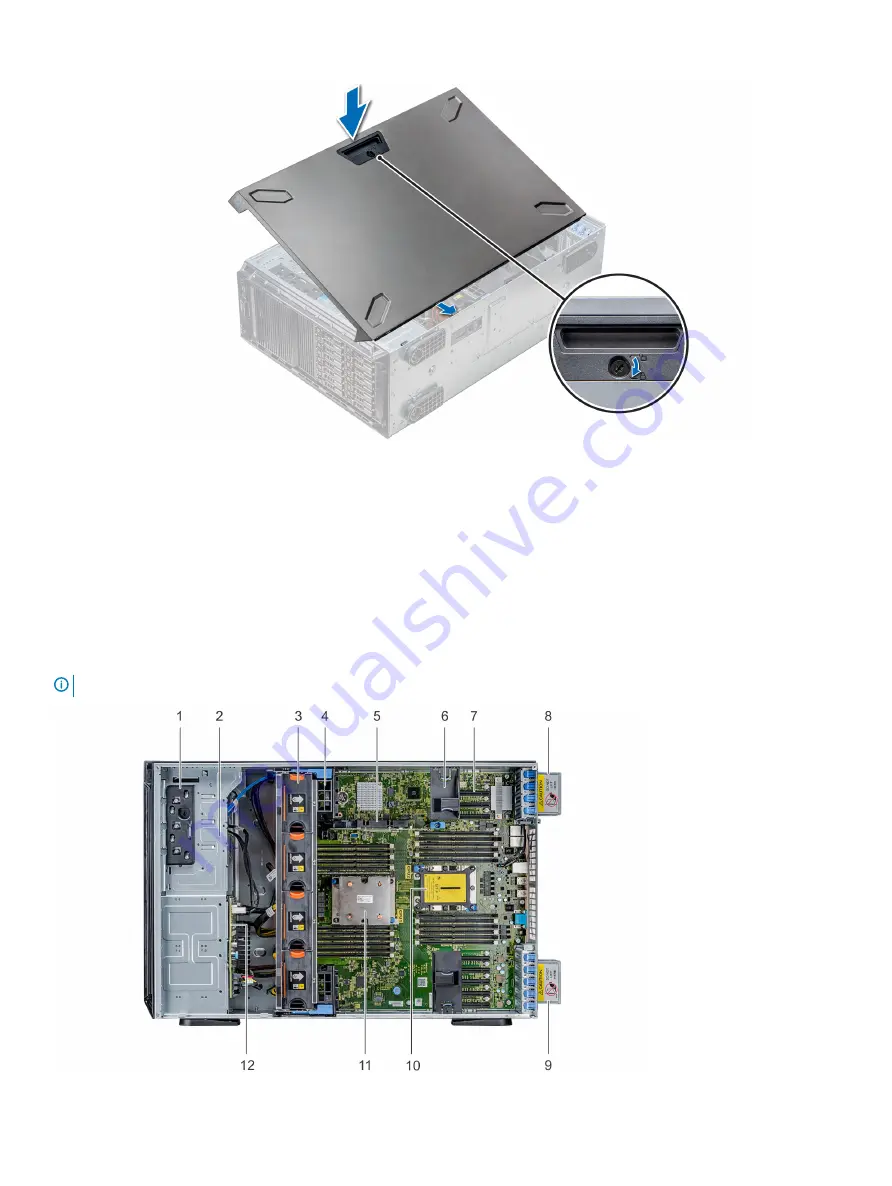
Figure 42. Installing the system cover

Next steps

1

Place the system upright on its feet on a flat and stable surface.

2

If removed, 

install the front bezel

.

3

Reconnect the peripherals and connect the system to the electrical outlet.

4

Turn on the system, including all attached peripherals.

Inside the system

NOTE: 

Components that are hot swappable are marked orange and touch points on the components are marked blue.

88

Installing and removing system components

Содержание EMC PowerEdge T640 D24XR

Страница 1: ...and Service Manual Regulatory Model E47S Series Regulatory Type E47S001 Questo manuale d istruzione è fornito da trovaprezzi it Scopri tutte le offerte per Dell PowerEdge T640 D24XR o cerca il tuo prodotto tra le migliori offerte di Server ...

Страница 2: ...age to hardware or loss of data and tells you how to avoid the problem WARNING A WARNING indicates a potential for property damage personal injury or death 2017 2018 Dell Inc or its subsidiaries All rights reserved Dell EMC and other trademarks are trademarks of Dell Inc or its subsidiaries Other trademarks may be trademarks of their respective owners 2018 08 Rev A02 ...

Страница 3: ...ssis dimensions 28 Chassis weight 28 Processor specifications 28 Supported operating systems 29 Cooling fan specifications 29 PSU specifications 29 System battery specifications 30 Expansion bus specifications 30 Memory specifications 31 Storage controller specifications 31 Drive specifications 31 Hard drives 31 Optical drive 32 Ports and connectors specifications 32 USB ports 32 NIC ports 32 VGA ...

Страница 4: ...r 62 Boot Manager main menu 63 One shot BIOS boot menu 63 System Utilities 63 PXE boot 63 5 Installing and removing system components 64 Safety instructions 64 Before working inside your system 64 After working inside your system 64 Optional front bezel 64 Removing the front bezel 65 Installing the front bezel 65 System feet 66 Removing the system feet 66 Installing the system feet 67 Caster wheel...

Страница 5: ... Removing the air shroud 91 Installing the air shroud 92 Cooling fans 93 Cooling fan specifications 93 Cooling fan matrix 94 Removing a middle or rear cooling fan 94 Installing a middle or rear cooling fan 95 Removing the right external fan 96 Installing the right external fan 97 Cooling fan middle fan assembly 98 Removing the middle cooling fan assembly 98 Installing the middle cooling fan assemb...

Страница 6: ...allation guidelines 124 Removing the optional GPU card holder 124 Installing the optional GPU card holder 125 Expansion cards 126 Expansion card installation guidelines 126 Expansion card slot priority 127 Removing a expansion card 129 Installing an expansion card 130 M 2 SSD module 131 Removing the M 2 SSD module 131 Installing the M 2 SSD module 132 Optional IDSDM or vFlash module 133 Removing t...

Страница 7: ... 158 Installing the GPU power interposer board 159 Removing the main power interposer board 159 Installing the main power interposer board 160 Converting the system from tower mode to rack mode 161 Converting the system from tower mode to rack mode 161 6 Using system diagnostics 163 Dell Embedded System Diagnostics 163 Running the Embedded System Diagnostics from Boot Manager 163 Running the Embed...

Страница 8: ... dedicated PERC slot Four GPUs Two hot swappable power supply units Drive configurations 8 x 3 5 inch or 8 x 2 5 inch in 3 5 inch carrier SAS SATA SSD drives 18 x 3 5 inch SAS SATA SSD drives 16 x 2 5 inch SAS SATA SSD drives 16 x 2 5 inch SAS SATA SSD drives with 8 x NVME drives 32 x 2 5 inch SAS SATA SSD drives Topics Supported configurations Front view of the system Back view of the system Loca...

Страница 9: ...Supported configurations Figure 1 Supported configurations of the PowerEdge T640 Dell EMC PowerEdge T640 overview 9 ...

Страница 10: ...inch drive tower system 1 Power button 2 Information tag 3 iDRAC Quick Sync 2 wireless indicator optional 4 Status LED indicators 5 System health and system ID indicator 6 USB port USB 2 0 compliant 7 USB port USB 3 0 compliant 8 iDRAC Direct Micro AB USB port 9 Optical drive optional 10 Drive slots 10 Dell EMC PowerEdge T640 overview ...

Страница 11: ...ion tag 3 iDRAC Quick Sync 2 wireless indicator optional 4 Status LED indicators 5 System health and system ID indicator 6 USB port USB 2 0 compliant 7 USB port USB 3 0 compliant 8 iDRAC Direct Micro AB USB port 9 Optical drive optional 10 Drive slots Dell EMC PowerEdge T640 overview 11 ...

Страница 12: ...e slots 12 Rack ear latch 2 13 Drive blank For more information on the ports see the Technical specifications section Status LED indicators NOTE The indicators display solid amber if any error occurs Figure 5 Status LED indicators Table 1 Status LED indicators and descriptions Icon Description Condition Corrective action PCIe indicator The indicator turns solid amber if a PCIe Restart the system U...

Страница 13: ...perature is out of range or there is a fan failure Ensure that none of the following conditions exist A cooling fan has been removed or has failed System cover air shroud memory module blank or back filler bracket is removed Ambient temperature is too high External airflow is obstructed If the problem persists see Getting help Drive indicator The indicator turns solid amber if there is a drive err...

Страница 14: ... Quick Sync 2 is ready to communicate Press the iDRAC Quick Sync 2 button to turn off If the LED fails to turn off restart the system If the problem persists see the Getting help section Blinks white rapidly Indicates data transfer activity If the indicator continues to blink indefinitely see the Getting help section Blinks white slowly Indicates that firmware update is in progress If the indicato...

Страница 15: ...th and system ID button to switch to system ID mode Blinking blue Indicates that the system ID mode is active Press the system health and system ID button to switch to system health mode Solid amber Indicates that the system is in fail safe mode If the problem persists see the Getting help section Blinking amber Indicates that the system is experiencing a fault Check the System Event Log for speci...

Страница 16: ...CI mode the status LED indicator does not turn on Table 5 Drive indicator codes Drive status indicator code Condition Flashes green twice per second Identifying drive or preparing for removal Off Drive ready for removal NOTE The drive status indicator remains off until all drives are initialized after the system is turned on Drives are not ready for removal during this time Flashes green amber and...

Страница 17: ...m Figure 9 Back view of the tower configuration 1 PCIe expansion card slots 2 System ID button indicator 3 VGA port 4 Serial port 5 iDRAC9 dedicated network port 6 USB 2 0 port 2 7 PCIe expansion card slots 8 NIC port 2 9 USB 3 0 port 4 10 Power supply unit 2 Dell EMC PowerEdge T640 overview 17 ...

Страница 18: ...USB 3 0 port 4 11 Power supply unit 2 12 Left external fan available only with GPGPU configuration NIC indicator codes Each NIC on the back of the system has indicators that provide information about the activity and link status The activity LED indicator indicates if data is flowing through the NIC and the link LED indicator indicates the speed of the connected network Figure 11 NIC indicator cod...

Страница 19: ...reen and activity is off NIC identify is enabled through the NIC configuration utility NOTE The LOM Broadcom 57416 is compatible with 10GBASE T IEEE 802 3an and 1000 BASE T IEEE 802 3ab Power supply unit indicator codes AC power supply units PSUs have an illuminated translucent handle that serves as an indicator The DC PSUs have an LED that serves as an indicator The indicator shows whether power ...

Страница 20: ...tion to a low output configuration or vice versa you must turn off the system CAUTION AC PSUs support both 240 V and 120 V input voltages with the exception of Titanium PSUs which support only 240 V When two identical PSUs receive different input voltages they can output different wattages and trigger a mismatch CAUTION If two PSUs are used they must be of the same type and have the same maximum o...

Страница 21: ... CAUTION If two PSUs are used they must be of the same type and have the same maximum output power CAUTION Combining AC and DC PSUs is not supported and triggers a mismatch Locating the Service Tag of your system You can identify your system using the unique Express Service Code and Service Tag Pull out the information tag in front of the system to view the Express Service Code and Service Tag Alt...

Страница 22: ...System information label PowerEdge T640 system information label Figure 15 LED behavior 22 Dell EMC PowerEdge T640 overview ...

Страница 23: ...Figure 16 Configuration and layout Dell EMC PowerEdge T640 overview 23 ...

Страница 24: ...Figure 17 Electrical overview 24 Dell EMC PowerEdge T640 overview ...

Страница 25: ...Figure 18 Memory information Dell EMC PowerEdge T640 overview 25 ...

Страница 26: ...26 Dell EMC PowerEdge T640 overview ...

Страница 27: ...ght Processor specifications Supported operating systems Cooling fan specifications PSU specifications System battery specifications Expansion bus specifications Memory specifications Storage controller specifications Drive specifications Ports and connectors specifications Video specifications Environmental specifications 2 Technical specifications 27 ...

Страница 28: ...inches 443 5 mm 17 46 inches 471 5 mm 18 56 inches 15 9 mm 0 62 inches 659 9 mm 25 98 inches 692 8 mm 27 27 inches Chassis weight Table 10 Chassis weight System Maximum weight with all hard drives SSDs 32 x 2 5 inch 42 36 Kg 93 38 lb 18 x 3 5 inch 49 65 Kg 109 45 lb Processor specifications The Dell EMC PowerEdge T640 system supports up to two Intel Xeon Scalable processors up to 28 cores per proc...

Страница 29: ...d on the outside of the chassis for GPU configurations There are two additional fans integrated in the power supplies to cool the power supplies and provide additional cooling for the whole system The below listed configurations features and the PCIe expansion cards are supported only with the four hot swappable middle fans installed Fan redundancy Fresh air condition NVMe PCIe SSD 3 5 inch x 18 h...

Страница 30: ... to 1400 W NOTE If a system with 2000 W AC PSU operates at low line 100 120 V AC then the power rating per PSU is derated to 1000 W NOTE If a system with 1600 W AC PSU operates at low line 100 120 V AC then the power rating per PSU is derated to 800 W NOTE If a system with 1100 W AC PSU operates at low line 100 120 V AC then the power rating per PSU is derated to 1050 W System battery specificatio...

Страница 31: ...2 GB 384 GB Dual rank 32 GB 32 GB 384 GB 64 GB 768 GB LRDIMM Quad rank 64 GB 64 GB 768 GB 128 GB 1536 GB Octal rank 128 GB 128 GB 1536 GB 256 GB 3072 GB NVDIMM N Single rank 16 GB Not supported with single processor Not supported with single processor RDIMM 192 GB RDIMM 384 GB NVDIMM N 16 GB NVDIMM N 192 GB NOTE 8 GB RDIMMs and NVDIMM N must not be mixed NOTE A minimum of two processors are requir...

Страница 32: ...em supports the following USBs Table 14 USB specifications System Front panel Back panel Internal PowerEdge T640 One USB 2 0 compliant port and one USB 3 0 compliant port One iDRAC USB MGMT port USB 2 0 Six USB ports Four USB 3 0 compliant ports Two USB 2 0 compliant ports One USB 3 0 compliant port NIC ports The Dell EMC PowerEdge T640 system supports two onboard Network Interface Controller NIC ...

Страница 33: ...h the microSD card capacity is 16 GB NOTE The write protect switch is on the IDSDM or vFlash module NOTE The IDSDM supports only Micro SD cards Video specifications The Dell EMC PowerEdge T640 system supports integrated Matrox G200eW3 graphics controller with 16 MB of video frame buffer Table 15 Supported video resolution options Resolution Refresh rate Hz Color depth bits 1024 x 768 60 8 16 32 12...

Страница 34: ...erating 0 26 Grms at 5 Hz to 350 Hz all operation orientations Storage 1 88 Grms at 10 Hz to 500 Hz for 15 min all six sides tested Table 19 Maximum shock specifications Maximum vibration Specifications Operating Six consecutively executed shock pulses in the positive and negative x y and z axes Storage Six consecutively executed shock pulses in the positive and negative x y and z axes one pulse o...

Страница 35: ...temperature by 1 C per 175 m above 950 m 1 F per 319 ft 1 of annual operating hours 5 C to 45 C at 5 to 90 RH with 29 C dew point NOTE Outside the standard operating temperature 10 C to 35 C the system can operate down to 5 C or up to 45 C for a maximum of 1 of its annual operating hours For temperatures between 40 C and 45 C de rate maximum allowable temperature by 1 C per 125 m above 950 m 1 F p...

Страница 36: ...SO 14644 1 with a 95 upper confidence limit NOTE The ISO Class 8 condition applies to data center environments only This air filtration requirement does not apply to IT equipment designed to be used outside a data center in environments such as an office or factory floor NOTE Air entering the data center must have MERV11 or MERV13 filtration Conductive dust Air must be free of conductive dust zinc...

Страница 37: ...iDRAC alerts administrators about system issues helps them perform remote system management and reduces the need for physical access to the system Options to set up iDRAC IP address You must configure the initial network settings based on your network infrastructure to enable the communication to and from iDRAC NOTE For static IP configuration you must request for it at the time of purchase This o...

Страница 38: ...r more information about drivers documentation and white papers on the Intel QAT see https 01 org intel quickassist technology For more information about logging in to the iDRAC and iDRAC licenses see the latest Integrated Dell Remote Access Controller User s Guide at Dell com poweredgemanuals You can also access iDRAC by using RACADM For more information see the RACADM Command Line Interface Refe...

Страница 39: ...racmanuals Downloading drivers and firmware Dell recommends that you download and install the latest BIOS drivers and systems management firmware on your system Prerequisite Ensure that you clear the web browser cache before downloading the drivers and firmware Steps 1 Go to Dell com support home 2 In the Drivers Downloads section type the Service Tag of your system in the Enter a Service Tag or p...

Страница 40: ... configure the BIOS settings iDRAC settings and device settings of your system NOTE Help text for the selected field is displayed in the graphical browser by default To view the help text in the text browser press F1 You can access system setup by using two methods Standard graphical browser The browser is enabled by default Text browser The browser is enabled by using Console Redirection Viewing ...

Страница 41: ... operating system begins to load before you press F2 wait for the system to finish booting and then restart your system and try again 3 On the System Setup Main Menu screen click System BIOS System BIOS Settings details The System BIOS Settings screen details are explained as follows Option Description System Information Specifies information about the system such as the system model name BIOS ver...

Страница 42: ...ange the system date and time System Information You can use the System Information screen to view system properties such as Service Tag system model name and the BIOS version Viewing System Information To view the System Information screen perform the following steps 1 Turn on or restart your system 2 Press F2 immediately after you see the following message F2 System Setup NOTE If your operating ...

Страница 43: ...ait for the system to finish booting and then restart your system and try again 3 On the System Setup Main Menu screen click System BIOS 4 On the System BIOS screen click Memory Settings Memory Settings details The Memory Settings screen details are explained as follows Option Description System Memory Size Specifies the memory size in the system System Memory Type Specifies the type of memory ins...

Страница 44: ...logy hardware prefetcher logical processor idling and opportunistic self refresh Viewing Processor Settings To view the Processor Settings screen perform the following steps 1 Turn on or restart your system 2 Press F2 immediately after you see the following message F2 System Setup NOTE If your operating system begins to load before you press F2 wait for the system to finish booting and then restar...

Страница 45: ...hermal Design Power TDP levels during POST based on the power and thermal delivery capabilities of the system TDP verifies the maximum heat the cooling system is needed to dissipate This option is set to Nominal by default NOTE This option is only available on certain stock keeping units SKUs of the processors x2APIC Mode Enables or disables the x2APIC mode This option is set to Disabled by defaul...

Страница 46: ...ice For the Embedded SATA settings in ATA mode set this field to Auto to enable BIOS support Set it to OFF to turn off BIOS support For AHCI or RAID mode BIOS support is always enabled Option Description Model Specifies the drive model of the selected device Drive Type Specifies the type of drive attached to the SATA port Capacity Specifies the total capacity of the hard drive This field is undefi...

Страница 47: ...el of the selected device Drive Type Specifies the type of drive attached to the SATA port Capacity Specifies the total capacity of the hard drive This field is undefined for removable media devices such as optical drives Port F Sets the drive type of the selected device For the Embedded SATA settings in ATA mode set this field to Auto to enable BIOS support Set it to OFF to turn off BIOS support ...

Страница 48: ... immediately after you see the following message F2 System Setup NOTE If your operating system begins to load before you press F2 wait for the system to finish booting and then restart your system and try again 3 On the System Setup Main Menu screen click System BIOS 4 On the System BIOS screen click NVMe Settings NVMe Settings details The NVMe Settings screen details are explained as follows Opti...

Страница 49: ...This option is set to UEFI by default NOTE Setting this field to UEFI disables the BIOS Boot Settings menu Boot Sequence Retry Enables or disables the Boot Sequence Retry feature If this option is set to Enabled and the system fails to boot the system re attempts the boot sequence after 30 seconds This option is set to Enabled by default Hard Disk Failover Specifies the drive that is booted in the...

Страница 50: ...to change the boot order if you want to boot from a USB key or an optical drive The following instructions may vary if you have selected BIOS for Boot Mode Steps 1 On the System Setup Main Menu screen click System BIOS Boot Settings UEFI BIOS Boot Settings UEFI BIOS Boot Sequence 2 Click Boot Option Settings BIOS UEFI Boot Settings Boot Sequence 3 Use the arrow keys to select a boot device and use...

Страница 51: ...ion ROM of the network controller handles the network settings Viewing UEFI iSCSI Settings To view the UEFI iSCSI Settings screen perform the following steps 1 Turn on or restart your system 2 Press F2 immediately after you see the following message F2 System Setup NOTE If your operating system begins to load before you press F2 wait for the system to finish booting and then restart your system an...

Страница 52: ...orts On and All Ports Off disables the USB management port and also restricts access to the iDRAC features Internal USB Port Enables or disables the internal USB port This option is set to Enabled by default Integrated RAID Controller Enables or disables the integrated RAID controller This option is set to Enabled by default Embedded NIC1 and NIC2 Enables or disables the OS interface of the embedd...

Страница 53: ...hdog Timer If your system stops responding this watchdog timer aids in the recovery of your operating system When this option is set to Enabled the operating system initializes the timer When this option is set to Disabled the default the timer does not have any effect on the system Memory Mapped I O above 4 GB Enables or disables the support for the PCIe devices that need large amounts of memory ...

Страница 54: ...erial port address to either COM1 or COM2 COM1 0x3F8 COM2 0x2F8 This option is set to Serial Device1 COM2 or Serial Device 2 COM1 by default NOTE You can use only Serial Device 2 for the Serial Over LAN SOL feature To use console redirection by SOL configure the same port address for console redirection and the serial device NOTE Every time the system boots the BIOS syncs the serial MUX setting sa...

Страница 55: ...ed as follows Option Description System Profile Sets the system profile If you set the System Profile option to a mode other than Custom the BIOS automatically sets the rest of the options You can only change the rest of the options if the mode is set to Custom This option is set to Performance Per Watt Optimized DAPC by default DAPC is Dell Active Power Controller NOTE All the parameters on the s...

Страница 56: ...instructions in the processor This option is set to Enabled for all system profiles except Custom by default NOTE This option can be disabled only if the C States option in the Custom mode is set to disabled NOTE When C States is set to Enabled in the Custom mode changing the Monitor Mwait setting does not impact the system power or performance CPU Interconnect Bus Link Power Management Enables or...

Страница 57: ...ect Intel R TXT Enables or disables the Intel Trusted Execution Technology TXT option To enable the Intel TXT option virtualization technology and TPM Security must be enabled with Pre boot measurements This option is set to Off by default Power Button Enables or disables the power button on the front of the system This option is set to Enabled by default AC Power Recovery Sets how the system beha...

Страница 58: ...he Secure Boot Custom Policy To enable this option set the Secure Boot Policy to Custom option Creating a system and setup password Prerequisite Ensure that the password jumper is enabled The password jumper enables or disables the system password and setup password features For more information see the System board jumper settings section NOTE If the password jumper setting is disabled the existi...

Страница 59: ...not delete or change an existing system or setup password if the Password Status is set to Locked Steps 1 To enter System Setup press F2 immediately after turning on or restarting your system 2 On the System Setup Main Menu screen click System BIOS System Security 3 On the System Security screen ensure that Password Status is set to Unlocked 4 In the System Password field alter or delete the exist...

Страница 60: ... Redundant OS Control To view the Redundant OS Control screen perform the following steps 1 Turn on or restart your system 2 Press F2 immediately after you see the following message F2 System Setup NOTE If your operating system begins to load before you press F2 wait for the system to finish booting and then restart your system and try again 3 On the System Setup Main Menu screen click System BIOS...

Страница 61: ...llaneous Settings screen details are explained as follows Option Description System Time Enables you to set the time on the system System Date Enables you to set the date on the system Asset Tag Specifies the asset tag and enables you to modify it for security and tracking purposes Keyboard NumLock Enables you to set whether the system boots with the NumLock enabled or disabled This option is set ...

Страница 62: ...agnosis LC is delivered as part of the iDRAC out of band solution and Dell system embedded Unified Extensible Firmware Interface UEFI applications Embedded system management The Dell Lifecycle Controller provides advanced embedded system management throughout the system s lifecycle The Dell Lifecycle Controller can be started during the boot sequence and can function independently of the operating...

Страница 63: ...aunch Lifecycle Controller Exits the Boot Manager and invokes the Dell Lifecycle Controller program System Utilities Enables you to launch System Utilities menu such as System Diagnostics and UEFI shell One shot BIOS boot menu One shot BIOS boot menu enables you to select a boot device to boot from System Utilities System Utilities contains the following utilities that can be launched Launch Diagn...

Страница 64: ...d by Dell is not covered by your warranty Read and follow the safety instructions that are shipped with your product NOTE It is recommended that you always use an antistatic mat and antistatic strap while working on components inside the system CAUTION To ensure proper operation and cooling all bays in the system and system fans must be always populated with a component or a blank Before working i...

Страница 65: ...stem and lift the bezel away Figure 21 Removing the front bezel Next step 1 Installing the front bezel Installing the front bezel Prerequisite Follow the safety guidelines listed in Safety instructions Steps 1 Locate and remove the bezel key NOTE There are two bezel keys attached to the back of the bezel 2 Insert the bezel tabs into the slots in the chassis 3 Press the release latch and push the b...

Страница 66: ...mode or when you are replacing the system feet with the wheel assembly 1 Follow the safety guidelines listed in Safety instructions 2 Place the system on its side on a flat stable surface 3 Rotate the system feet inward Step Using the Phillips 2 screwdriver remove the screw that secures the foot to the base of the system a Repeat the above step for the 3 remaining feet 66 Installing and removing s...

Страница 67: ...d cause injury to the user or damage to the system 1 Follow the safety guidelines listed in Safety instructions 2 Place the system on its side on a flat stable surface Steps 1 Align the three tabs on the system foot with the three slots on the base of the system 2 Using the Phillips 2 screwdriver secure the screw that secures the foot to the base of the system a Repeat the above steps to install t...

Страница 68: ... the system on a flat stable surface Steps 1 Using the Phillips 2 screwdriver loosen the captive screw that secures the front wheel unit to the base of the system 2 Push the front wheel unit toward the rear of the system to release the retention hooks and pull out the front wheel unit 3 Loosen the screw that secures the back wheel unit to the base of the chassis 4 Push the rear wheel unit toward t...

Страница 69: ...heel unit with the two slots on the base of the system and insert the hooks into the slots 2 Push the rear wheel unit toward the back of the system and using a Phillips 2 screwdriver secure the unit in place using a single screw 3 Align the two retention hooks on the front wheel unit with the two slots on the base of the system and insert the hooks into the slots 4 Push the front wheel unit toward...

Страница 70: ...requisites 1 Follow the safety guidelines listed in Safety instructions 2 If installed remove the front bezel CAUTION To maintain proper system cooling drive blanks must be installed in all empty drive slots CAUTION Mixing drive blanks from previous generations of PowerEdge servers is not supported Step Press the release button and slide the drive blank out of the drive slot 70 Installing and remo...

Страница 71: ...identical Prerequisites 1 Follow the safety guidelines listed in Safety instructions 2 If installed remove the front bezel CAUTION Mixing drive blanks from previous generations of PowerEdge servers is not supported Step Insert the drive blank into the drive slot and push the blank until the release button clicks into place Installing and removing system components 71 ...

Страница 72: ...ation for the storage controller CAUTION Before attempting to remove or install a drive while the system is running see the documentation for the storage controller card to ensure that the host adapter is configured correctly to support drive removal and insertion CAUTION Mixing drives from previous generations of PowerEdge servers is not supported CAUTION To prevent data loss ensure that your ope...

Страница 73: ...e next to a partially installed carrier can damage the partially installed carrier s shield spring and make it unusable CAUTION To prevent data loss ensure that your operating system supports hot swap drive installation See the documentation supplied with your operating system CAUTION When a replacement hot swappable drive is installed and the system is powered on the drive automatically begins to...

Страница 74: ...site Follow the safety guidelines listed in Safety instructions CAUTION Mixing drives from previous generations of PowerEdge servers is not supported Steps 1 Using a Phillips 1 screwdriver remove the screws from the slide rails on the drive carrier 2 Lift the drive out of the drive carrier 74 Installing and removing system components ...

Страница 75: ...d NOTE When installing a drive into the drive carrier ensure that the screws are torqued to 4 in lbs Steps 1 Insert the drive into the drive carrier with the connector end of the drive towards the back of the carrier 2 Align the screw holes on the drive with the screws holes on the drive carrier When aligned correctly the back of the drive is flush with the back of the drive carrier 3 Using a Phil...

Страница 76: ...1 Follow the safety guidelines listed in Safety instructions 2 If installed remove the front bezel 3 Remove the drive carrier Steps 1 Using a Phillips 1 screwdriver remove the screws from the rails on the drive carrier 2 Lift the 3 5 inch drive adapter out of the 3 5 inch drive carrier 76 Installing and removing system components ...

Страница 77: ...in Safety instructions 2 Install the 2 5 inch drive into the 3 5 inch drive adapter Steps 1 Insert the 3 5 inch drive adapter into the 3 5 inch drive carrier with the connector end of the drive toward the back of the 3 5 inch drive carrier 2 Align the screw holes on the 3 5 inch drive adapter with the holes on the 3 5 inch drive carrier 3 Using a Phillips 1 screwdriver secure the 3 5 inch drive ad...

Страница 78: ...safety guidelines listed in Safety instructions 2 Remove the 3 5 inch drive adapter from the 3 5 inch drive carrier NOTE A 2 5 inch drive is installed in a 3 5 inch drive adapter which is then installed in the 3 5 inch drive carrier Steps 1 Using a Phillips 2 screwdriver remove the screws from the side of the 3 5 inch drive adapter 2 Remove the 2 5 inch drive from the 3 5 inch drive adapter 78 Ins...

Страница 79: ...rerequisites 1 Follow the safety guidelines listed in Safety instructions 2 Remove the 3 5 inch drive adapter from the 3 5 inch hot swappable drive carrier Steps 1 Align the screw holes on the 2 5 inch drive with the screw holes on the 3 5 inch drive adapter 2 Using a Phillips 2 screwdriver secure the 2 5 inch drive to the 3 5 inch drive adapter Installing and removing system components 79 ...

Страница 80: ... Extended Power Performance EPP label Mixing PSUs from previous generations of PowerEdge servers is not supported even if the PSUs have the same power rating Mixing PSUs will result in mismatch condition or failure to turn the system on NOTE Titanium PSU is nominally rated for 200 V AC to 240 V AC input only NOTE When two identical PSUs are installed power supply redundancy 1 1 with redundancy or ...

Страница 81: ... wattage then the redundant PSU is switched to the active state If the load on the active PSU falls below 20 percent of PSU rated power wattage then the redundant PSU is switched to the sleep state You can configure the hot spare feature by using the iDRAC settings For more information see the iDRAC User s Guide available at Dell com idracmanuals Removing a power supply unit blank Prerequisite Fol...

Страница 82: ... inside your system Removing a AC power supply unit Prerequisites CAUTION The system needs one power supply unit PSU for normal operation On power redundant systems remove and replace only one PSU at a time in a system that is powered on 1 Follow the safety guidelines listed in Safety instructions 2 Disconnect the power cable from the power source and from the PSU you intend to remove and then rem...

Страница 83: ...ety instructions 2 For systems that support redundant PSU ensure that both the PSUs are of the same type and have the same maximum output power NOTE The maximum output power shown in watts is listed on the PSU label Step Slide the PSU into the system until the PSU is fully seated and the release latch snaps into place Installing and removing system components 83 ...

Страница 84: ...ed electrician must perform all connections to DC power and to safety grounds Do not attempt connecting to DC power or installing grounds yourself All electrical wiring must comply with applicable local or national codes and practices Damage due to servicing that is not authorized by Dell is not covered by your warranty Read and follow all safety instructions that came with the product CAUTION The...

Страница 85: ...e PSU and determine its status The PSU status indicator turns green to signify that the PSU is functioning properly Wiring instructions for a DC power supply unit Your system supports up to two 48 60 V DC power supply units PSUs WARNING For equipment using 48 60 V DC power supply units PSUs a qualified electrician must perform all connections to DC power and to safety grounds Do not attempt connec...

Страница 86: ...m stranded red wire V DC return One UL 10 AWG 2 m maximum green with a yellow stripe stranded wire safety ground System cover Removing the system cover Prerequisites 1 Follow the safety guidelines listed in Safety instructions 2 Turn off the system and all attached peripherals 3 Disconnect the system from the electrical outlet and peripherals 4 If installed remove the front bezel 5 Place the syste...

Страница 87: ... no tools or extra parts are left inside the system Follow the safety guidelines listed in Safety instructions Steps 1 Align the tabs on the system cover with the slots on the chassis 2 Press the cover release latch and push the cover toward the chassis until the latch locks into place 3 Rotate the latch release lock clockwise to the locked position Installing and removing system components 87 ...

Страница 88: ...ed install the front bezel 3 Reconnect the peripherals and connect the system to the electrical outlet 4 Turn on the system including all attached peripherals Inside the system NOTE Components that are hot swappable are marked orange and touch points on the components are marked blue 88 Installing and removing system components ...

Страница 89: ...al GPU air shrouds Prerequisites CAUTION Never operate your system with the air shroud removed The system may get overheated quickly resulting in shutdown of the system and loss of data 1 Follow the safety guidelines listed in Safety instructions 2 Follow the procedure listed in Before working inside your system Step Holding the touch points press the release latch and lift the shroud out Installi...

Страница 90: ...ling the optional GPU air shrouds Prerequisite Follow the safety guidelines listed in Safety instructions Steps 1 Align the tabs on the GPU air shroud with the securing slots on the chassis 2 Lower the GPU air shroud into the chassis until it is firmly seated 90 Installing and removing system components ...

Страница 91: ... the system and loss of data 1 Follow the safety guidelines listed in Safety instructions 2 Follow the procedure listed in Before working inside your system 3 If required remove the two fans from the air shroud NOTE The procedure to remove the cooling fan from the air shroud is similar to removing a cooling fan Step Push the air shroud release tab and holding the touch points at the center of the ...

Страница 92: ...ecuring slots on the chassis a Guide on the air shroud with the guide pin on the system board b Align the intrusion switch with the intrusion switch connector on the system board 2 Lower the air shroud into the chassis until it is firmly seated When firmly seated the memory socket numbers marked on the air shroud align with the respective memory sockets 3 NOTE The procedure to install the cooling ...

Страница 93: ...e other four hot swappable middle fans are mounted in the fan assembly that is located in the chassis between the hard drive bay and the processors The two external fans are mounted on the outside of the chassis for GPU configurations There are two additional fans integrated in the power supplies to cool the power supplies and provide additional cooling for the whole system The below listed config...

Страница 94: ...h configuration 2 5 inch x 16 Yes Base configuration 2 5 inch x 32 Yes Base configuration 2 5 inch x 16 NVMe Yes Yes STD Rich configuration Fan redundancy FA and high cooling tier PCIe card Yes Yes STD Rich configuration GPGPU card Yes Yes HPR Yes GPU configuration Removing a middle or rear cooling fan The procedure for removing a standard and a high performance fans is identical Prerequisites WAR...

Страница 95: ...u to a risk of electric shock Exercise utmost care while removing or installing cooling fans CAUTION The cooling fans are hot swappable To maintain proper cooling while the system is on replace only one fan at a time 1 Follow the safety guidelines listed in Safety instructions 2 Follow the procedure listed in Before working inside your system Step Holding the release tab align the connector at the...

Страница 96: ...oving or installing cooling fans NOTE The procedure to remove the left external fan is similar to removing the right rear fan 1 Follow the safety guidelines listed in Safety instructions 2 Remove the GPU air shrouds 3 Remove the air shroud Steps 1 Disconnect the fan cable from the system board 2 Using the Phillips 2 screwdriver loosen the captive screws that secure the fan to the system 3 Lift the...

Страница 97: ...e right rear fan Follow the safety guidelines listed in Safety instructions Steps 1 Guiding the fan cable through the cable vent install the external fan over the PCIe slots 2 Using the Phillips 2 screwdriver secure the fan in place 3 Connect the fan cable to the connected on the system board Figure 50 Install the right external fan Next steps 1 Install the air shroud Installing and removing syste...

Страница 98: ...sted in Before working inside your system Steps 1 Lift the release levers to unlock the cooling fan assembly from the system 2 Hold the release levers and lift the cooling fan assembly away from the system Figure 51 Removing the middle cooling fan assembly Next step 1 Installing the middle cooling fan assembly Installing the middle cooling fan assembly Prerequisite Follow the safety guidelines lis...

Страница 99: ...he release levers to lock the cooling fan assembly into the system Figure 52 Installing the middle cooling fan assembly Next step 1 Follow the procedure listed in After working inside your system Flex bays Removing a NVMe drive bay or flex bay Prerequisites NOTE The procedure to remove the flex bay is identical to removing the NVMe drive bay 1 Follow the safety guidelines listed in Safety instruct...

Страница 100: ...y Installing a NVMe drive bay or flex bay Prerequisite NOTE The procedure to install the flex bay is identical to installing the NVMe drive bay Follow the safety guidelines listed in Safety instructions Steps 1 Align the tabs on the NVMe drive bay with the slots on the front of the system 2 Insert the NVMe drive bay into the system until the tabs click into place 3 Using the Phillips 2 screwdriver...

Страница 101: ...ications Your system supports one of the following configurations Table 30 System configurations System Configurations Eight 3 5 inch drives or sixteen 2 5 inch drives Up to two SATA slim optical drives and one SAS tape drive Sixteen 2 5 inch drives and eight NVMe drives One SATA slim optical drive Systems with up to eighteen 3 5 inch drives One SATA slim optical drive or one SAS tape drive System...

Страница 102: ...st be installed on empty optical drive or tape drive slots to maintain FCC certification of the system The brackets also keep dust and dirt out of the system and aid in proper cooling and airflow inside the system Perform the same steps to install blanks Figure 55 Removing the optical drive or tape drive Next step 1 Install theoptical drive blank an optical drive or a tape drive Installing the opt...

Страница 103: ... front bezel Steps 1 Disconnect the power and data cable from the back of the drive NOTE Observe the routing of the power and data cable inside the chassis as you remove them from the system board and the drive You must route these cables properly when you replace them to prevent them from being pinched or crimped 2 To remove the drive push the release latch to release the drive 3 Slide the drive ...

Страница 104: ...tions see the documentation that shipped with the drive If you are installing a SAS tape drive you must have an internal tape adapter installed For more information on installing a SAS tape drive see the Installing an expansion card section 2 If applicable remove the existing drive or the drive blank 3 Align the guide on the drive with the slot on drive bay 4 Slide the drive into the slot until th...

Страница 105: ...lim optical drive Prerequisites 1 Follow the safety guidelines listed in Safety instructions 2 Follow the procedure listed in Before working inside your system 3 Remove the optical drive cage NOTE The procedure to remove the optical drive cage is identical to removing the optical or tape drive blank Steps 1 Locate the touch point for the slim optical drive lock on the cage 2 Press the lock and pus...

Страница 106: ...all the optical drive blank is similar to installing the slim optical drive Prerequisite Follow the safety guidelines listed in Safety instructions Steps 1 Align the slim optical drive with the slim optical drive bay on the optical drive cage 2 Slide the optical drive into the optical drive bay until the lock clicks into place 106 Installing and removing system components ...

Страница 107: ...To prevent data loss ensure that your system is turned off and that the indicator LEDs on the battery are Off before removing the NVDIMM N battery CAUTION To avoid damage to the battery connector you must firmly support the connector while installing or removing a battery 3 Remove the NVDIMM N battery cage Steps 1 Disconnect the cables from the NVDIMM N battery 2 Using the Phillips 2 screwdriver l...

Страница 108: ...tor you must firmly support the connector while installing or removing a battery Follow the safety guidelines listed in Safety instructions Steps 1 Install the NVDIMM N battery into the battery cage 2 Using the Phillips 2 screwdriver tighten the screw to secure the NVDIMM N battery 3 Connect the cables to the NVDIMM N battery 108 Installing and removing system components ...

Страница 109: ...d by the processor NOTE MT s indicates DIMM speed in MegaTransfers per second Memory bus operating frequency can be 2666 MT s 2400 MT s or 2133 MT s depending on the following factors DIMM type RDIMM or LRDIMM NVDIMM Number of DIMMs populated per channel System profile selected for example Performance Per Watt DAPC Performance Per Watt OS Performance Workstation Performance and Custom Maximum supp...

Страница 110: ...ots B2 B6 and B10 Slots B3 B7 and B11 Slots B4 B8 and B12 The following table shows the memory populations and operating frequencies for the supported configurations Table 32 Memory population DIMM Type DIMMs Populated Channel Voltage Operating Frequency in MT s Maximum DIMM Rank Channel RDIMM 1 1 2 V 2666 2400 2133 Dual rank or single rank 2 2666 2400 2133 Dual rank or single rank 110 Installing ...

Страница 111: ...y module sockets only if a processor is installed For single processor systems sockets A1 to A12 are available For dual processor systems sockets A1 to A12 and sockets B1 to B12 are available Populate all the sockets with white release tabs first followed by the black release tabs When mixing memory modules with different capacities populate the sockets with memory modules with the highest capacit...

Страница 112: ...the operating system is running to prevent errors from causing an uncorrectable failure Requires population of three ranks or more per channel With single rank memory sparing enabled the system memory available to the operating system is reduced by one rank per channel For example in a dual processor configuration with twenty four 16 GB dual rank memory modules the available system memory is 3 4 r...

Страница 113: ...dd amount per CPU allowed Requires two ranks or more per channel Multi rank spare population order C1 1 C2 1 C1 2 C2 2 C1 3 C2 3 C1 4 C2 4 C1 5 C2 5 Populate in this order odd amount per CPU allowed Requires three ranks or more per channel Fault resilient population order C1 1 2 3 4 5 6 C2 1 2 3 4 5 6 C1 7 8 9 10 11 12 C2 7 8 9 10 11 12 Supported with 6 or 12 DIMM slots per CPU Removing a memory m...

Страница 114: ...talling the NVDIMM N battery CAUTION To ensure proper system cooling memory module blanks must be installed in any memory socket that is not occupied Remove memory module blanks only if you intend to install memory modules in those sockets Steps 1 Locate the appropriate memory module socket CAUTION Handle each memory module only by the card edges ensuring not to touch the middle of the memory modu...

Страница 115: ...ot be installed properly Ensure that the memory module is firmly seated in the memory module socket 5 Run the system memory test in system diagnostics Processors and heat sinks Removing a processor and heat sink module Prerequisites WARNING The heat sink may be hot to touch for some time after the system is powered down Allow the heat sink to cool before removing it NOTE For a processor greater th...

Страница 116: ...facing up Figure 66 Removing the processor and heat sink module Next step 1 Install the PHM Removing the processor from the processor and heat sink module Prerequisites NOTE Only remove the processor from the processor and heat sink module if you are replacing the processor or heat sink This procedure is not required when replacing a system board 116 Installing and removing system components ...

Страница 117: ... do not pry the screwdriver to break the thermal paste seal 3 Push the retaining clips on the processor bracket to unlock the bracket from the heat sink Figure 67 Loosening the processor bracket 4 Lift the bracket and the processor away from the heat sink and place the processor connector side down on the processor tray 5 Flex the outer edges of the bracket to release the bracket from the processo...

Страница 118: ...the pin 1 indicator on the processor tray is aligned with the pin 1 indicator on the processor 2 Flex the outer edges of the bracket around the processor ensuring that the processor is locked into the clips on the bracket NOTE Ensure that the pin 1 indicator on the bracket is aligned with the pin 1 indicator on the processor before placing the bracket on the processor NOTE Ensure that the processo...

Страница 119: ...essor kit to apply the grease in a quadrilateral design on the top of the processor CAUTION Applying too much thermal grease can result in excess grease coming in contact with and contaminating the processor socket NOTE The thermal grease syringe is intended for single use only Dispose the syringe after you use it Figure 70 Applying thermal grease on top of the processor Installing and removing sy...

Страница 120: ...ss on the heat sink fins Ensure that the pin 1 indicator on the heat sink is aligned with the pin 1 indicator on the bracket before placing the heat sink onto the processor and bracket Figure 71 Installing the heat sink onto the processor Next steps 1 Install the processor and heat sink module 2 Install the air shroud 3 Follow the procedure listed in After working inside your system 120 Installing...

Страница 121: ... components 2 Push the blue retention clips inward to allow the heat sink to drop into place 3 Using the Torx T30 screwdriver tighten the screws on the heat sink in the order below a Partially tighten the first screw approximately 3 turns b Tighten the second screw completely c Return to the first screw and tighten it completely If the PHM slips off the blue retention clips when the screws are par...

Страница 122: ... listed in After working inside your system Expansion card holder Removing the expansion card holder Prerequisites 1 Follow the safety guidelines listed in Safety instructions 2 Follow the procedure listed in Before working inside your system 122 Installing and removing system components ...

Страница 123: ...rd holder Installing the expansion card holder Prerequisite Follow the safety guidelines listed in Safety instructions Step Align the expansion card holder with the guide pins on the system and push it down until it locks in place Figure 74 Installing the expansion card holder Next step 1 Follow the procedure listed in After working inside your system Installing and removing system components 123 ...

Страница 124: ...llowing guidelines while installing a GPU card GPU are supported only in the Rack mode configuration GPU can be installed only on systems that have 1100 W or higher power supply units Each GPU card supports up to 32 GB of dedicated GDDR5 memory Two double width GPU cards on a single processor configuration and four double width GPU cards on a dual processor configuration do not support any other a...

Страница 125: ...stalling the optional GPU card holder Prerequisite Follow the safety guidelines listed in Safety instructions Step Align the GPU card holder with the slots and the guide pin on the system and push the GPU card holder down until it locks in place Installing and removing system components 125 ...

Страница 126: ...on cards Table 35 Supported PCI express generation 3 expansion cards PCIe Slot Processor Connection Height Length Link Width Slot Width 0 Gen3 dedicated for PERC or HBA Processor 1 Half Length x8 x8 1 Gen3 Processor 1 Standard Height Full Length x16 x16 2 Gen3 Processor 1 Standard Height Full Length x4 x8 3 Gen3 Processor 1 Standard Height Full Length x16 x16 4 Gen3 Processor 2 Standard Height Hal...

Страница 127: ... To use PCIe cards with external I O in slots 1 2 3 right external fan must not be installed and to use PCIe cards with external I O in slots 5 6 7 8 left external fan must not be installed Table 36 Expansion card installation order System Configuration Card Priority Card Type Slot Priority Maximum Allowed 1 or 2 CPU no GPU no external fan 1 Dell PowerEdge Express Flash PCIe SSD Bridge 1 3 2 2 RAI...

Страница 128: ... NICs 8 6 4 3 40 Gb NICs 25 Gb NICs 7 8 6 4 4 4 FC32 HBAs FC16 HBAs 7 8 6 4 4 5 10 Gb NICs 7 8 6 4 4 6 FC8 HBAs 7 8 6 4 4 7 1 Gb NICs 7 8 6 4 4 8 12Gb SAS HBA 7 8 6 4 4 9 HBA330 0 1 3 2 10 PCIe SSD 1 3 7 8 6 4 6 2 CPU 2 External fans 1 Dell PowerEdge Express Flash PCIe SSD Bridge 1 3 2 2 GPUs 3 6 8 1 4 RAID H330 RAID H730 0 1 RAID H740 0 1 3 2 RAID H840 4 1 BOSS 1 3 7 8 6 4 6 3 NICs 4 1 4 12Gb SAS...

Страница 129: ...n card by its edge and pull the card up to remove it from the expansion card connector and the system 4 Install the filler brackets by performing the following steps a Align the slot on the filler bracket with the tab on the expansion card slot b Press the expansion card latch till the filler bracket locks into place NOTE Filler brackets must be installed in empty expansion card slots to maintain ...

Страница 130: ...et from the expansion card holder NOTE Store this bracket for future use Filler brackets must be installed in empty expansion card slots to maintain FCC certification of the system The brackets also keep dust and dirt out of the system and aid in proper cooling and airflow inside the system 4 Holding the card by its edges position the card so that the card aligns with the expansion card connector ...

Страница 131: ...the procedure listed in After working inside your system M 2 SSD module Removing the M 2 SSD module Prerequisites 1 Follow the safety guidelines listed in Safety instructions 2 Follow the procedure listed in Before working inside your system 3 Remove the air shroud 4 Remove the BOSS card Installing and removing system components 131 ...

Страница 132: ... Removing the M 2 SSD module Next step 1 Install the M 2 SSD module Installing the M 2 SSD module Prerequisite 1 Follow the safety guidelines listed in Safety instructions Steps 1 Align the M 2 SSD module connectors with the connectors on the BOSS card 2 Push the M 2 SSD module until the module is seated firmly on the BOSS card 3 Secure the M 2 SSD module on the BOSS card with the retention straps...

Страница 133: ...ty guidelines listed in Safety instructions 2 Follow the procedure listed in Before working inside your system Steps 1 Locate the MicroSD card slot on the vFlash IDSDM module and press the card to partially release it from the slot To locate IDSDM vFlash module see the System board jumpers and connectors section 2 Hold the MicroSD card and remove it from the slot NOTE Temporarily label each MicroS...

Страница 134: ...The slot is keyed to ensure correct insertion of the card 2 Press the card into the card slot to lock it into place Next step 1 Follow the procedure listed in After working inside your system Removing the optional IDSDM or vFlash module Prerequisites 1 Follow the safety guidelines listed in Safety instructions 2 Follow the procedure listed in Before working inside your system 3 If you are replacin...

Страница 135: ...h module Prerequisite Follow the safety guidelines listed in Safety instructions Steps 1 Locate the IDSDM vFlash connector on the system board To locate IDSDM vFlash connector see the System board jumpers and connectors section 2 Align the IDSDM vFlash card with the connector on the system board 3 Push the IDSDM vFlash module until it is firmly seated on the system board Installing and removing sy...

Страница 136: ...ur system Backplane Backplane connectors Depending on the configuration your system supports one of the following 8 x 3 5 inch SAS SATA backplane 18 x 3 5 inch SAS SATA backplane 8 x 2 5 inch Dell PowerEdge Express Flash NVMe backplane 16 x 2 5 inch SAS SATA backplane with the optional additional backplanes below 8 x 2 5 inch NVMe backplane 16 x 2 5 inch SAS SATA backplane FlexBay 32 x 2 5 inch SA...

Страница 137: ... signal connector J_BP_SIG 5 SAS A0 connector J_SAS_A0 6 SAS B0 connector J_SAS_B0 7 I2C connector Figure 86 8 x 2 5 NVMe backplane 1 backplane power connector J_BP_PWR1 2 PCIe B0 connector J_PCIE_B0 3 PCIe A0 connector J_PCIE_A0 4 backplane signal connector J_BP_SIG1 5 PCIe A1 connector J_PCIE_A1 6 PCIe B1 connector J_PCIE_B1 Installing and removing system components 137 ...

Страница 138: ...connector J_SAS_A0_B0 Figure 88 8 x 3 5 SAS SATA backplane 1 optical drive power connector J_ODD1 2 backplane power connector J_BP_PWR_A 3 SAS A0 connector J_BP_SIG 4 backplane signal connector J_SAS_A0 5 SAS B0 connector J_SAS_B0 Removing a backplane Prerequisites CAUTION To prevent damage to the drives and backplane you must remove the hard drives from the system before removing the backplane 13...

Страница 139: ...the release pin and holding the pin lift the backplane out of the system Figure 89 Removing a backplane Next step 1 Install a backplane Installing a backplane Prerequisites 1 Follow the safety guidelines listed in Safety instructions 2 Follow the procedure listed in Before working inside your system Steps 1 Use the hooks at the base of the system as guides to align the hard drive backplane 2 Lower...

Страница 140: ...plane Next steps 1 If removed install the middle cooling fan assembly 2 Install the drives into their original slots 3 Follow the procedure listed in After working inside your system 140 Installing and removing system components ...

Страница 141: ...6 backplane flex bay 2 SAS cable BP J_EXP_A1 to PERC adapter 3 SAS cable BP J_EXP_B1 to PERC adapter 4 internal PERC card 5 PERC adapter 6 SAS cable BP J_SAS_A0 to internal PERC card 7 SAS cable BP J_SAS_B0 to internal PERC card 8 2 5 inch x 16 backplane Installing and removing system components 141 ...

Страница 142: ...e BP J_PCIE_A0 to PCIe bridge J5 4 NVMe cable BP J_PCIE_B1 to PCIe bridge J6 5 NVMe cable BP J_PCIE_A1 to PCIe bridge J5 6 internal PERC card 7 PCIe bridge on Slot 1 8 PCIe bridge on Slot 3 9 SAS cable BP SAS_B0 to internal PERC card SAS_B 10 SAS cable BP SAS_A0 to internal PERC card SAS_A 11 2 5 inch x16 SAS SATA backplane 142 Installing and removing system components ...

Страница 143: ...8 SAS SATA to internal PERC 1 SAS cable BP SAS_A0 to internal PERC card SAS_A 2 SAS cable BP SAS_B0 to internal PERC card SAS_B 3 internal PERC 4 3 5 inch x8 SAS SATA backplane Installing and removing system components 143 ...

Страница 144: ...Figure 94 3 5 inch x8 onboard SAS controller 1 SAS cable BP SAS_A0 to MB SAS_A 2 SAS cable BP SAS_B0 to MB SAS_B 3 3 5 inch x8 SAS SATA backplane 144 Installing and removing system components ...

Страница 145: ...e integrated storage controller card Prerequisites 1 Follow the safety guidelines listed in Safety instructions 2 Follow the procedure listed in Before working inside your system 3 Remove the air shroud 4 Remove the GPU card holder Steps 1 Holding the integrated storage controller card firmly lift the card out of the server 2 Disconnect the data cables from the integrated storage controller Instal...

Страница 146: ...tions Steps 1 Connect the data cables from the integrated storage controller 2 Holding the storage controller card firmly insert the card into the dedicated slot on the system board Figure 97 Installing the integrated storage controller card Next steps 1 Install the GPU card holder 2 Install the air shroud 3 Follow the procedure listed in After working inside your system System battery 146 Install...

Страница 147: ...To avoid damage to the battery connector you must firmly support the connector while installing or removing a battery 2 Use a plastic scribe to pry out the system battery Figure 98 Removing the system battery 3 To install a new system battery hold the battery with the positive side facing up and slide it under the securing tabs 4 Press the battery into the connector until it snaps into place Figur...

Страница 148: ...e procedure listed in Before working inside your system 2 While booting press F2 to enter System Setup and verify that the system detects the USB memory key Control panel assembly Removing the control panel assembly Prerequisites 1 Follow the safety guidelines listed in Safety instructions 2 Follow the procedure listed in Before working inside your system 3 Remove the cooling fan assembly Steps 1 ...

Страница 149: ... press the tabs on the information tag b Push the information tag out of the slot to remove it from the control panel NOTE Retain the information tag to replace it in the new control panel Figure 101 Removing the information tag Next step 1 Install the control panel assembly Installing and removing system components 149 ...

Страница 150: ...formation tag 2 To install the information tag push the information tag into the control panel slot 3 Connect the control panel cable and the control panel USB cable to the control panel assembly 4 Align and insert the control panel into the control panel slot in the chassis 5 Secure the control panel to the chassis by using the screw 6 Connect the control panel cable and the control panel USB cab...

Страница 151: ... configured to enable UEFI boot mode About this task CAUTION If you are using the Trusted Platform Module TPM with an encryption key you may be prompted to create a recovery key during program or System Setup Work with the customer to create and safely store this recovery key When replacing this system board you must supply the recovery key when you restart your system or program before you can ac...

Страница 152: ...t the plastic rivet aligns with the slot on the system board 3 Press the plastic rivet until the rivet snaps into place Figure 104 Installing the TPM Next steps 1 Install the system board 2 Follow the procedure listed in After working inside your system Initializing TPM for BitLocker users Initialize the TPM For more information see http technet microsoft com en us library cc753140 aspx The TPM St...

Страница 153: ...isted in Safety instructions 2 Follow the procedure listed in Before working inside your system 3 Remove the following a Air shroud b GPU card holder if installed c Expansion card holder d Cooling fan assembly if installed e Expansion cards if installed f Integrated storage controller card g vFlash IDSDM module h Internal USB key if installed i Processors and heat sink modules CAUTION To prevent d...

Страница 154: ...Figure 105 Disengaging the system board Figure 106 Removing the system board 154 Installing and removing system components ...

Страница 155: ... the system board into the chassis 2 Holding the post incline the system board and lower the system board into the chassis 3 Holding the system board holder push the system board toward the back of the system until the release pin clicks into place Figure 107 Installing the system board 4 Using the Phillips 2 screwdriver secure the system board to the chassis with screws Next steps 1 Replace the f...

Страница 156: ... UEFI configuration and the system configuration data after replacing the system board All data is backed up in a backup flash device automatically If BIOS detects a new system board and the service tag in the backup flash device BIOS prompts the user to restore the backup information Below is a list of options available Restore the service tag license and diagnostics information press Y Navigate ...

Страница 157: ... Main power interposer board 1 backplane 1 power connector J_BP1 2 backplane 0 power connector J5 3 P2 power connector J3 4 P1 power connector J_BP0 5 backplane 2 power connector J_BP2 6 PSU 1 connector 7 PSU 2 connector 8 signal cable connector J4 Installing and removing system components 157 ...

Страница 158: ... Prerequisites 1 Follow the safety guidelines listed in Safety instructions 2 Follow the procedure listed in Before working inside your system 3 Remove the power supply units PSUs 4 Remove the system board Steps 1 Lift the release pin and slide the power interposer board PIB to release the board from the guide pin 2 Disengage the GPU PIB from the guide pins and lift the PIB out of the system Figur...

Страница 159: ...ted in After working inside your system Removing the main power interposer board Prerequisites CAUTION To prevent damage to the main power interposer board PIB you must remove the power supply units PSUs from the system before removing the PIBs 1 Follow the safety guidelines listed in Safety instructions 2 Follow the procedure listed in Before working inside your system 3 Remove the PSUs 4 Remove ...

Страница 160: ...oard PIB with the holes on the system chassis 2 Using the Phillips 2 screwdriver secure the main PIB to the system using the screws 3 Connect all the disconnected power cables to the main PIB Figure 113 Installing the main power interposer board Next steps 1 If removed install the GPU PIB 2 Install the system board 3 Install the power supply units 4 Follow the procedure listed in After working ins...

Страница 161: ...stem 3 Lay the system on a flat stable surface 4 Remove the system cover 5 If installed remove the system feet or caster wheels Steps 1 Remove the system top cover 2 Remove the control panel assembly 3 Install the rack slide cover by performing the following steps a Slide the rack slide cover between the system s side cover and the chassis b Slide the rack slide cover toward the back of the system...

Страница 162: ...om of system b Using a Phillips 2 screwdriver secure the rack ears to the system Figure 116 Installing the system ears Next steps 1 Install the system cover 2 Install the system in the rack For more information see the Rack Installation Guide that is shipped with your system 3 Follow the procedure listed in After working inside your system 162 Installing and removing system components ...

Страница 163: ...he failed device s View status messages that inform you if tests are completed successfully View error messages that inform you of problems encountered during testing Running the Embedded System Diagnostics from Boot Manager Run the Embedded System Diagnostics ePSA if your system does not boot 1 When the system is booting press F11 2 Use the up arrow and down arrow keys to select System Utilities ...

Страница 164: ...etected devices Results Displays the results of all tests that are run System health Provides the current overview of the system performance Event log Displays a time stamped log of the results of all tests run on the system This is displayed if at least one event description is recorded 164 Using system diagnostics ...

Страница 165: ...tact Dell EMC for sales technical assistance or customer service issues 1 Go to Dell com support home 2 Select your country from the drop down menu on the lower right corner of the page 3 For customized support a Enter your system Service Tag in the Enter your Service Tag field b Click Submit The support page that lists the various support categories is displayed 4 For general support a Select you...

Страница 166: ...Reference materials including the Owner s Manual and mechanical overview Your system service tag to quickly access your specific hardware configuration and warranty information A direct link to Dell to contact technical assistance and sales teams Steps 1 Go to Dell com qrl and navigate to your specific product or 2 Use your smartphone or tablet to scan the model specific Quick Resource QR code on ...

Отзывы: