background image

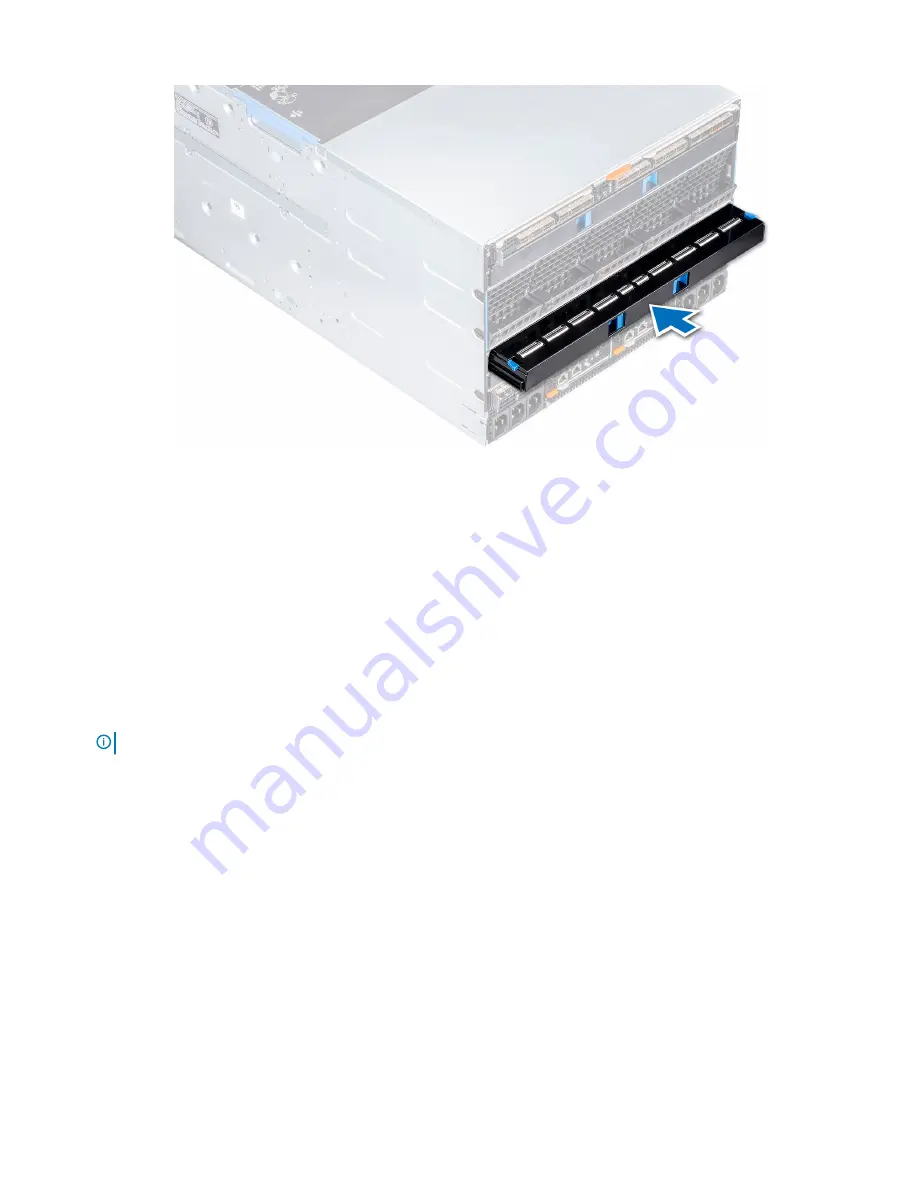
Figure 29. Installing a blank in Fabric A or B slot

Removing a module from Fabric A or B slot

Prerequisites

1

Follow the safety guidelines listed in 

Safety instructions

.

2

Disconnect the cables that are connected to the modules.

Steps

Press the orange release button on the module to open the release levers.

Hold the release levers, and pull the module out of the enclosure.

NOTE: 

Ensure that you install an IOM blank if you are removing a module permanently.

42

Installing and removing system components

Содержание EMC PowerEdge MX7000

Страница 1: ...Dell EMC PowerEdge MX7000 Enclosure Installation and Service Manual Regulatory Model E44S Series Regulatory Type E44S001 ...

Страница 2: ...amage to hardware or loss of data and tells you how to avoid the problem WARNING A WARNING indicates a potential for property damage personal injury or death 2018 Dell Inc or its subsidiaries All rights reserved Dell EMC and other trademarks are trademarks of Dell Inc or its subsidiaries Other trademarks may be trademarks of their respective owners 2018 09 Rev A00 ...

Страница 3: ... drivers 22 Downloading drivers and firmware 23 LCD touch panel 23 Assigning an IP address out of the box 23 Configuring the Static IP address using the LCD 24 Configuring the DHCP IP address using the LCD 24 5 Installing and removing system components 25 Safety instructions 25 Before working inside your enclosure 25 After working inside your enclosure 25 Hot plug and Non hot plug devices 26 Stora...

Страница 4: ...ent module 50 Installing a management module 52 6 Technical specifications 54 Component guidelines 54 Population rules 54 PSU redundancy and population rules 55 Chassis dimensions 56 Chassis weight 57 Fan specifications 57 PSU specifications 57 Ports and connectors specifications 58 USB ports 58 Mini DisplayPort 58 PowerEdge MX modules ports and connectors 58 PowerEdge MX740c 58 PowerEdge MX840c 5...

Страница 5: ... 65 Documentation feedback 65 Accessing system information by using QRL 65 Quick Resource Locator for PowerEdge MX7000 enclosure 66 Receiving automated support with SupportAssist 66 8 Documentation resources 67 Contents 5 ...

Страница 6: ...t This document provides an overview about the PowerEdge MX7000 information about installing and replacing components technical specifications and guidelines to follow while installing components 1 6 About this document ...

Страница 7: ...Next Generation Modular overview Figure 1 Next Generation Modular Front view Compute sleds MX740c and MX840c Storage sled MX5016s 2 Next Generation Modular overview 7 ...

Страница 8: ...nnel Switch Dell EMC PowerEdge MX5000s SAS Switch Ethernet Pass Through Module Dell EMC PowerEdge MX 10GBASE T Ethernet Pass Through Module Dell EMC PowerEdge MX 25 Gb Ethernet Pass Through Module MX740c The PowerEdge MX740c is a single width compute sled that supports Up to two Intel Xeon Scalable Processors Up to 24 DIMM slots Up to six 2 5 inch SAS SATA SSD or NVMe drives MX840c The PowerEdge M...

Страница 9: ...s a basic L2 L3 switch that is designed to provide high performance low latency networking for the PowerEdge MX7000 installations It provides FCoE transit but no native Fibre Channel functionality and offers Eight 25 GE server facing ports Two 100 GE QSFP28 uplink ports One 40 GE QSFP28 uplink port Four 10GBASE T uplink ports Dell EMC Power Networking MXG610s Fibre Channel Switch The PowerEdge MXG...

Страница 10: ...to realize your IT and digital business transformations With the kinetic architecture and Agile management the MX portfolio dynamically configures compute storage and fabric increases team effectiveness and accelerates operations The responsive design delivers the innovation and longevity customers of all sizes need for their IT and digital business transformations The PowerEdge MX infrastructure ...

Страница 11: ...e populated in the enclosure NOTE One compute node must be present and it must be mapped to a storage node Up to six hot swappable power supply units Up to two hot swappable management modules Up to six I O modules Four Fabric A B type IOMs Two Fabric C type IOMs Four front accessible hot swappable cooling fans Five rear accessible hot swappable cooling fans For more information about dual managem...

Страница 12: ...ont view of the enclosure 1 Left control panel 2 Single width compute sled 3 Sled blank 4 Front fan 4 5 Double width compute sled 6 Single width storage sled 7 Right control panel 8 Information tag 9 Power supply unit 6 12 Enclosure overview ...

Страница 13: ... status PSU thermal status and fan status 3 I O module health Blinks amber for 2 seconds and is OFF for 1 second when an I O module is faulty By default the LED is unlit 4 Fan health Blinks amber for 2 seconds and is OFF for 1 second when a front or rear mounted fan fails or has a warning By default the LED is unlit 5 Stack or group Indicates that the enclosure is a member of a group 6 LED status ...

Страница 14: ...for LCD with QuickSync 2 0 Enables access to QuickSync related controls and connection information NOTE QuickSync feature allows you to manage your system using mobile devices This feature is only available on certain configurations NOTE If not ordered at the time of purchase the QuickSync module will not be available on the enclosure 6 System alerts indicator System ID Indicator status Descriptio...

Страница 15: ... LCD when there are any critical warning alerts on the enclosure 9 Optional Quick Sync wireless status indicator Displays the connection status of the enclosure with any QuickSync enabled device NOTE For more information about the feature see LCD touch panel Right control panel Figure 6 Right control panel 1 Power button 2 USB 2 0 port 2 3 Mini DisplayPort NOTE For more information on the ports se...

Страница 16: ...te PSU functioning normally Green PSU faulty Blinking amber PSU mismatch ON for 1 second and then 5 blinks and OFF non repeating cycle Table 4 AC indicator codes AC indicator Indicator state AC source available ON AC source unavailable or power cable unplugged OFF Table 5 DC indicator codes DC indicator Indicator state DC output available ON DC output unavailable OFF 16 Enclosure overview ...

Страница 17: ... module indicator codes Fan indicators Indicator state Fan functioning normally Front Rear Solid green Fan failure Blinks amber 2 seconds and 1 second OFF NOTE When the chassis is powered off with the AC connection that is powered on only the rear fans are powered off Enclosure overview 17 ...

Страница 18: ...r fans 5 4 Slot for Fabric B1 5 Slot for Fabric B2 6 Slot for Fabric C2 7 Power cable connection status LED 8 C22 Power inlet connectors 6 9 Management Module 2 10 Management Module 1 11 Slot for Fabric C1 NOTE For more information about the ports and connectors see Technical specifications 18 Enclosure overview ...

Страница 19: ... indicator blue blinking Failed chassis Management module Mode 1 Power indicator OFF status indicator OFF NOTE Hardware failure prevents the management module from powering Failed chassis Management module Mode 2 Power indicator OFF status indicator Amber solid NOTE The management module starts boot but is unable to boot to one or more operating system partitions The management module boots but de...

Страница 20: ...ave opted for default access to the management module the default password is available on the Information tag This label is blank if you have not opted for secure default access then the default username and password are root and calvin 3 Express Service Tag 4 Quick resource locator 5 Information tag Bottom view 20 Enclosure overview ...

Страница 21: ...tory storage event logs and manage drive or enclosure assignments For more information about managing the SAS fabric using OpenManage Enterprise Modular see OpenManage Enterprise Modular User s Guide available at Dell com openmanagemanuals Chassis Management Controllers Options to set up the management module IP address Configure the initial network settings on your network infrastructure to enabl...

Страница 22: ...le credentials to log in to management module NOTE Ensure that you change the default username and password after setting up the management module IP address For more information about logging in to the management module see the Dell EMC OpenManage Enterprise Modular User s Guide at Dell com manuals Methods of setting up and configuring the IP address for the management module You can configure ma...

Страница 23: ...efore you replace the module power off the enclosure and disconnect the AC power from the chassis The LCD touch panel enables you to scroll or swipe on the screen The options available on the LCD touch panel are Welcome Screen Enables you to select your native language and the default LCD home page Main Menu Enables you to access the LCD functionality such as Identify Settings QuickSync Alerts Hel...

Страница 24: ...ed home screen tap Settings 2 Tap Network Settings 3 Select IPv4 and tap Edit The Change IP settings from DHCP to Static screen is displayed 4 Tap Yes 5 Update the IPv4 octet and tap Next 6 Edit the Mask octet and tap Next 7 Edit the Gateway octet and tap Save The Success screen is displayed NOTE If the IP address is incorrect an Error screen is displayed Configuring the DHCP IP address using the ...

Страница 25: ...ds module bays power supply units and system fans must be populated with a component or a blank Before working inside your enclosure Prerequisite Follow the safety guidelines listed in Safety instructions Steps 1 Power off the compute sleds the storage sleds and then the attached peripherals 2 Disconnect the sleds and the peripherals from the enclosure 3 Power off the enclosure 4 Disconnect the en...

Страница 26: ...l panels Sleds NOTE Ensure that the sled is powered off before removing it from the enclosure Storage and compute sleds Removing a sled blank Prerequisite 1 Follow the safety guidelines listed in Safety instructions Steps 1 Press the release button to release the sled blank 2 Pull the sled blank out of the enclosure CAUTION Ensure to install a sled blank in all the empty bays Operating the enclosu...

Страница 27: ...rerequisite 1 Follow the safety guidelines listed in Safety instructions Steps 1 Align the sled blank with the bay in the enclosure 2 Insert and push the sled blank until it locks into place NOTE Install two sled blanks when a double width sled is removed Installing and removing system components 27 ...

Страница 28: ...t indicates that all the compute sleds mapped to the storage sled are powered off NOTE If there are two Fabric C SAS IOMs in powered on state the management module in the enclosure powers on the storage sleds automatically Steps 1 To remove a storage or compute sled NOTE The procedure to remove a single width and double width compute sled is the same For a storage sled a Open the sled removal hatc...

Страница 29: ...e that you install a sled blank if you are removing the sled permanently CAUTION Operating the enclosure without a blank for an extended time can result in overheating CAUTION Ensure that the sled is supported with both hands while you are removing the sled Figure 15 Removing a storage sled from an enclosure Installing and removing system components 29 ...

Страница 30: ... 1 Install a sled or a sled blank Installing a compute or storage sled into the enclosure Prerequisites 1 Follow the safety guidelines listed in Safety instructions 2 Ensure that the sled release lever is in the open position Steps 1 Remove the I O connector cover from the sled 30 Installing and removing system components ...

Страница 31: ... 3 Push the sled into the bay in the enclosure NOTE The procedure to install a single width and double width sled is the same 4 Close the release lever to lock the sled in place Figure 18 Installing a single width compute sled into the enclosure Installing and removing system components 31 ...

Страница 32: ...odules NOTE The system must be populated with the full set of fans to support the airflow requirements of the chassis Removing a front fan module Steps 1 Press the release button to release the fan module 2 Hold and pull the fan module out of the fan bay 32 Installing and removing system components ...

Страница 33: ...ng a front fan module 1 Insert the fan module into the fan bay 2 Push the fan module into the fan bay until it locks into place NOTE Ensure that the green LED on the fan module is illuminated indicating that the module is functioning properly Installing and removing system components 33 ...

Страница 34: ...Installing the front fan module Removing a rear fan module Steps 1 Press the release button to release the fan module 2 Hold and pull the fan module out of the fan bay 34 Installing and removing system components ...

Страница 35: ...ng a rear fan module 1 Insert the fan module into the fan bay 2 Push the fan module into the fan bay until it locks into place NOTE Ensure that the green LED on the fan module is illuminated indicating that the module is functioning properly Installing and removing system components 35 ...

Страница 36: ...llow the safety guidelines listed in Safety instructions 2 Disconnect the power cable from the power connector associated to the PSU you intend to remove Steps 1 Press the orange release button to open the PSU release lever 2 Hold the release lever pull the PSU out of the enclosure CAUTION Ensure that you install a PSU blank if you are removing a PSU permanently 36 Installing and removing system c...

Страница 37: ...ank Installing a power supply unit Prerequisite 1 Follow the safety guidelines listed in Safety instructions Steps 1 Push the PSU into the enclosure until it is seated firmly 2 Close the PSU release lever to secure the PSU in the bay Installing and removing system components 37 ...

Страница 38: ...not occur until discovery is complete Wait until the new PSU is discovered and enabled before you remove any PSU The PSU status indicator turns green to indicate that the PSU is functioning properly Acoustic baffle NOTE Ensure to install the air baffle to reduce the noise level of the enclosure Removing the air baffle 1 Press the release latch to detach the air baffle from the enclosure 2 Pull the...

Страница 39: ...Figure 26 Removing the air baffle Installing the air baffle 1 Align the air baffle with the enclosure 2 Push the air baffle until it locks into place Installing and removing system components 39 ...

Страница 40: ...ween the two modules to facilitate redundancy failover or other module to module communication The usage of these interconnects depends on the IOM design and its particular requirements There are three fabrics connections available in MX7000 enclosure General purpose 2 Fabric A and B Storage 1 Fabric C Fabric module A or B Fabric module C Management module Removing a blank from Fabric A or B slot ...

Страница 41: ... a blank Installing a blank in Fabric A or B slot Prerequisites 1 Follow the safety guidelines listed in Safety instructions 2 Remove the module from Fabric A or B slot Steps 1 Align and insert the blank in the empty slot 2 Push the blank until it locks into place Installing and removing system components 41 ...

Страница 42: ...fety instructions 2 Disconnect the cables that are connected to the modules Steps 1 Press the orange release button on the module to open the release levers 2 Hold the release levers and pull the module out of the enclosure NOTE Ensure that you install an IOM blank if you are removing a module permanently 42 Installing and removing system components ...

Страница 43: ...A or B slot or a blank Installing a module in Fabric A or B slot Prerequisite 1 Follow the safety guidelines listed in Safety instructions Steps 1 Align and push the I O module into the enclosure 2 Close the release lever to lock the module in place Installing and removing system components 43 ...

Страница 44: ... to the module Removing a blank from Fabric C slot Steps 1 Press the release button to release the blank 2 Pull the blank out of the enclosure NOTE To maintain proper airflow ensure that the blanks are installed if the IOMs is not installed 44 Installing and removing system components ...

Страница 45: ...r a blank Installing a blank in Fabric C slot Prerequisites 1 Follow the safety guidelines listed in Safety instructions 2 Remove the module from Fabric C slot Steps 1 Align and insert the blank in the empty slot 2 Push the blank until it locks into place Installing and removing system components 45 ...

Страница 46: ...nstructions 2 Disconnect the cables that are connected to the modules Steps 1 Press the orange release button on the module to open the release lever 2 Hold the release lever and pull the I O module out of the enclosure NOTE Ensure that you install an IOM blank if you are removing a module permanently 46 Installing and removing system components ...

Страница 47: ...ank 2 Connect the cables to the module Installing a module into Fabric C slot Prerequisite 1 Follow the safety guidelines listed in Safety instructions Steps 1 Align and push the I O module into the enclosure 2 Close the release lever to lock the module in place Installing and removing system components 47 ...

Страница 48: ...terface allows you to view the firmware details For more information see OpenManage Enterprise Modular User s Guide Removing a management module blank Steps 1 Press the release button to release the blank 2 Pull the blank out of the enclosure NOTE To maintain proper airflow ensure that the blanks are installed if the management module is not installed 48 Installing and removing system components ...

Страница 49: ... blank Installing a management module blank Prerequisites 1 Follow the safety guidelines listed in Safety instructions 2 Remove the management module Steps 1 Align and insert the blank in the empty slot 2 Insert and push the blank until it locks into place Installing and removing system components 49 ...

Страница 50: ...tions 2 Disconnect the cables that are connected to the modules Steps 1 Press the orange release button on the module to open the release lever 2 Hold the release lever and pull the management module out of the enclosure NOTE Ensure that you install a IOM blank if you are removing a module permanently 50 Installing and removing system components ...

Страница 51: ... may only be done by a certified service technician You should only perform troubleshooting and simple repairs as authorized in your product documentation or as directed by the online or telephone service and support team Damage due to servicing that is not authorized by Dell is not covered by your warranty Read and follow the safety instructions that are shipped with your product Steps 1 Power of...

Страница 52: ... and turn on the system including any attached peripherals 6 Power off the system including any attached peripherals and disconnect the system from the electrical outlet 7 Remove the Management Module 8 Move the jumper on the Management Module from pins 1 and 2 to pins 2 and 3 9 Replace the Management Module 10 Reconnect the system to its electrical outlet and turn on the system including any atta...

Страница 53: ...Figure 40 Installing a management module Next step 1 Reconnect the network cables to the management module Installing and removing system components 53 ...

Страница 54: ...its The number of power supply units that are required is dependent upon system configuration and the required redundancy mode The minimum quantity must be 2 For grid redundancy power supply units must be populated in the following order 1 4 2 5 3 6 Power cable One C21 C20 power cable must be connected to the C22 plug corresponding to each populated PSU Management module A Management module must b...

Страница 55: ...umber of PSUs to support the installed configuration Grid redundancy This mode provides for PSU redundancy at the grid or branch level For grid redundancy PSUs should be populated in the following order 1 4 2 5 3 6 Supported configurations for this mode include 1 1 2 2 and 3 3 PSU redundancy This mode provides for redundancy at the PSU level The supported configurations for this mode include 1 1 2...

Страница 56: ...ensions Figure 41 Dimensions of the PowerEdge MX7000 Table 12 Dimensions of the PowerEdge MX7000 Description Dimension Xa 482 mm 18 98 inches Xb 445 mm 17 52 inches Y 307 4 mm 12 11 inches Zb 816 6 mm 32 15 inches Zc 811 6 mm 31 96 inches 56 Technical specifications ...

Страница 57: ... PSUs Table 15 PSU specifications Description Specification PSU 6 x 3000 W AC Class Platinum Heat dissipation maximum 1205 BTU hr Frequency 50 60 Hz Voltage 100 240 V AC autoranging Current 6 x 16 A Inrush current 120 A per power supply for 10 ms or less Connector C22 AC power connector CAUTION Mixed high line and low line AC inputs in the same enclosure is not supported If this occurs the enclosu...

Страница 58: ...SB 3 0 compliant port on the front of the sled One USB 3 0 compliant internal port One micro USB 2 0 compliant port for iDRAC Direct on the front of the sled NOTE The micro USB 2 0 compliant port on the front of the sled can only be used as an iDRAC Direct port PowerEdge MX840c Table 17 PowerEdge MX840c externally accessible connectors Connector Description USB ports One USB 3 0 compliant port on ...

Страница 59: ... for uplinks 8 x 10 GbE or 8 x 25 GbE ports for rack servers 2 QSFP28 uplink ports that can be configured as 1 x 40 GbE 1 x 100 GbE 2 x 50 GbE 4 x 10 GbE 4 x 25 GbE 2 QSFP28 unified ports that can be configured as 1 x 40 GbE 1 x 100 GbE 2 x 50 GbE 4 x 10 GbE 4 x 25 GbE 8 x 8 16 32 GbE Fibre Channel mode PowerEdge MX5108n Table 20 PowerEdge MX5108n externally accessible connectors Connector Descrip...

Страница 60: ...s PowerEdge MX 25 Gb Ethernet Pass Through Module Table 23 PowerEdge MX 25 Gb Ethernet Pass Through Module externally accessible connectors Connector Description Fibre Channel transceiver 16 external ports supporting 25 GbE connections Video specifications The management module supports an integrated Matrox G200eW3 graphics controller with a 16 MB video frame buffer Table 24 Supported video resolu...

Страница 61: ... Atmosphere must be noncondensing always Operating 10 to 80 RH with 29 C 84 2 F maximum dew point Table 27 Maximum vibration specifications Maximum vibration Specifications Operating 0 26 Grms at 5 Hz to 350 Hz all axis Storage 1 88 Grms at 10 Hz to 500 Hz vertical axis Table 28 Maximum shock pulse specifications Maximum shock pulse Specifications Operating Shock pulses in the positive and negativ...

Страница 62: ...9 C dew point NOTE Outside the standard operating temperature 10 C to 35 C the system can operate continuously in temperatures as low as 5 C and as high as 40 C For temperatures 35 C to 40 C derate maximum allowable temperature by 1 C per 175 m 1 F per 319 ft above 950 m 3 1171 ft 1 of annual operating hours 5 C to 45 C at 5 to 90 RH with 29 C dew point NOTE Outside the standard operating temperat...

Страница 63: ...ollution exceed the specified limitations and result in equipment damage or failure you may need to rectify the environmental conditions Remediation of environmental conditions is the responsibility of the customer Table 34 Particulate contamination specifications Particulate contamination Specifications Air Filtration Data center air filtration defines that ISO Class 8 per ISO 14644 1 with a 95 u...

Страница 64: ...tion Specifications Copper Coupon Corrosion 300 Å month per Class G1 defines that ANSI ISA71 04 1985 Silver Coupon Corrosion 200 Å month defines that AHSRAE TC9 9 NOTE Maximum corrosive contaminant levels measured at 50 relative humidity 64 Technical specifications ...

Страница 65: ...port page that lists the various support categories is displayed 4 For general support a Select your product category b Select your product segment c Select your product The support page that lists the various support categories is displayed 5 For contact details of Dell EMC Global Technical Support a Click Global Technical Support b The Contact Technical Support page is displayed with details to ...

Страница 66: ...orage and networking devices By installing and setting up a SupportAssist application in your IT environment you can receive the following benefits Automated issue detection SupportAssist monitors your Dell EMC devices and automatically detects hardware issues both proactively and predictively Automated case creation When an issue is detected SupportAssist automatically opens a support case with D...

Страница 67: ...ution For information about setting up your system see the Getting Started Guide document that is shipped with your system Dell com poweredgemanuals Configuring your system For information about the iDRAC features configuring and logging in to iDRAC and managing your system remotely see the Integrated Dell Remote Access Controller User s Guide For information about understanding Remote Access Cont...

Страница 68: ...Dell SupportAssist see the Dell EMC SupportAssist Enterprise User s Guide Dell com serviceabilitytools For information about partner programs enterprise systems management see the OpenManage Connections Enterprise Systems Management documents Dell com openmanagemanuals Working with the Dell PowerEdge RAID controllers For information about understanding the features of the Dell PowerEdge RAID contr...

Отзывы: