


CAUTION:
Do not attempt to remove the TPM plug-in module from the system board. Once the TPM plug-in
module is installed, it is cryptographically bound to that specific system board. Any attempt to remove an
installed TPM plug-in module breaks the cryptographic binding, and it cannot be re-installed or installed on
another system board.
1. Follow the safety guidelines listed in
on page 23.
2. Follow the procedure listed in
Before working inside your system
3. Remove the following:
a.
on page 29
b.
Removing an expansion card riser
c.
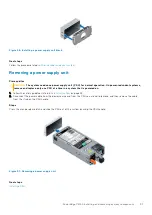
Removing the power supply unit
d.
Replacing the optional internal USB memory key
on page 63
e. Removing PCH air shroud.
f.
Removing a processor and heat sink module
on page 54
g. Processors blanks (if applicable)
CAUTION:
To prevent damage to the processor socket when replacing a faulty system board, ensure that
you cover the processor socket with the processor dust cover.
h.
on page 44
i.
Removing the network daughter card
on page 60
Steps
1. Disconnect all cables from the system board.
CAUTION:
Take care not to damage the system identification button while removing the system board from
the chassis.
CAUTION:
Do not lift the system board by holding a memory module, processor, or other components.
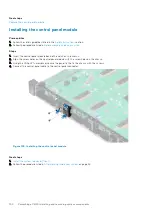
2. Using a Phillips #2 screwdriver, remove the ten screws securing the cable guides, PCIe guide, NDC guide, and PCH shroud
base.
3. Remove both the cable guides, NDC guide, PCIe guide, and PCH shroud base.
Figure 99. Remove the cable guides, NDC guide, PCIe guide, and PCH shroud base
4. Using Phillips #2 screwdriver, remove the seven screws securing the system board to the chassis.
PowerEdge C4140 installing and removing system components
93


