Dell D1920 Скачать руководство пользователя страница 4

- 2 -

GETTING STARTED

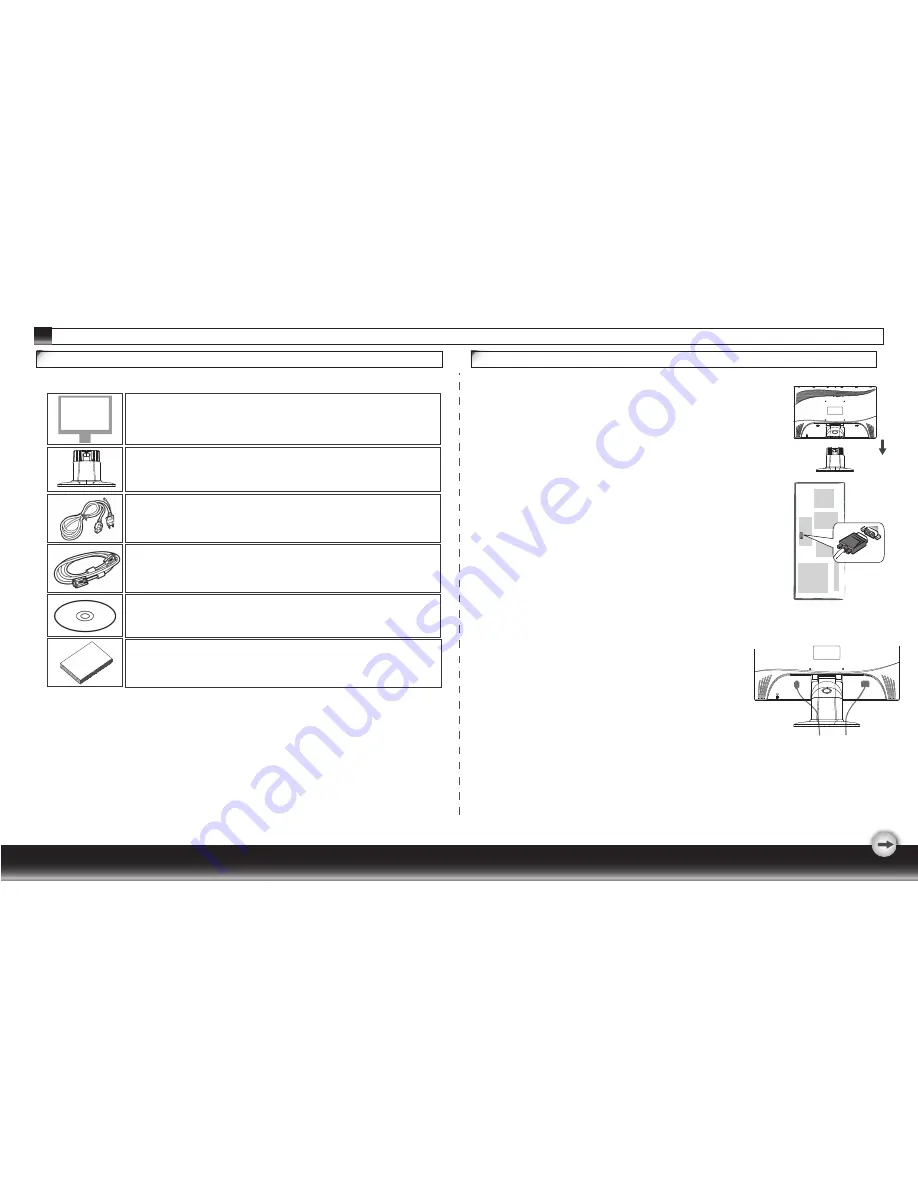
1.Setting up the monitor
   1.1 Take out the monitor, stand and monitor base from the package.

   1.2 Place the monitor base on the desk and then slide the neck 

         into the slots of base. (Make sure the direction of the neck is 

         correct.)

   1.3 Hold the monitor and then slide the monitor into the neck. (Make 

         sure the direction of the neck is correct)

2.Connecting signal cable
   2.1 Switch off your computer   
   2.2 Connect the signal cable to the D-SUB port at the rear of 
         the monitor and tighten the connector screws
   2.3 Connect the other end of signal cable to the computer's
         VGA port and tighten the connector screws.
   2.4 Note: Ensure the display setting does not exceed
         1366 X 768 @ 60Hz.   

Monitor installation

Package contents

Before beginning, ensure that the carton contains the following items:

1. LCD Monitor

2. Monitor Base and Neck

(the shape of base may vary according to the monitor model)

3. Power Cord

(plug may vary according to the electrical standards

     for your area)

4. Analog Signal Cable

3.Connecting power

   Connect one end of the power cable to the monitor and 

   the other end to a power outlet.

         
4.Switching on

    Switch on your computer.

You should now be able to see the picture. If not, see the 

troubleshooting section of this guide.

5. CD-ROM

(contains user manual)

6 .Quick Installation Guide

POWER

D-SUB

Содержание D1920

Страница 1: ...Dell D1920 monitor User Manual English Deutsch Français Italiano Español 简体中文 Pyccкий Svenska Suomi Dansk Polski Nederlands Norsk 日本语 Portuquês 한국어 繁體中文 TM Model D1920f ...

Страница 2: ...ection 1 Maintenance 1 Transporting the monitor 1 GETTING STARTED Package contents 2 Monitor installation 2 Identifying parts and controls 3 Customizing Your Monitor 3 3 Hotkeys 4 OSD Icon List 5 Troubleshooting 6 Technical Features and Specifications Function Keys Operation 4 Working with OSD Group 7 ...

Страница 3: ...ive items such as pens or screwdrivers as the screen may scratch 3 Do not insert objects or spill liquids into the ventilation ports on the monitor s rear as fire electric shock and or unit failure may result Installation 1 Do not cover or block the ventilation ports on the rear of the monitor 2 Do not install the monitor close to heat sources such as radiators or air ducts or in a location expose...

Страница 4: ...al cable to the computer s VGA port and tighten the connector screws 2 4 Note Ensure the display setting does not exceed 1366 X 768 60Hz Monitor installation Package contents Before beginning ensure that the carton contains the following items 1 LCD Monitor 2 Monitor Base and Neck the shape of base may vary according to the monitor model 3 Power Cord plug may vary according to the electrical stand...

Страница 5: ...Customizing Your Monitor Important Important The On Screen Display OSD system provides a full range of customizable tools to optimize your display Although you could perform comprehensive customization we strongly recommend that you use the AUTO ADJUSTMENT function It can utilize the default values to thoroughly optimize the performance of the display Activate the OSD munu Select the first button ...

Страница 6: ...igate through the OSD menu 1 Activate the OSD main menu Under the energized condition press any function key to execute the function 2 Confirm the selection Press the button 3 Browse the previous or next option Press and 4 Adjust the option value Press and to adjust the value E 5 Return to the higher level menu Press to return to the higher level 6 Exit Press to exit OSD menu Or if you do not pres...

Страница 7: ...t the mechanical specifications regarding the display White Balance Clock Phase DDC CI DCR DEMO Horizontal Position Vertical Position Information SYSTEM Select the setting of screen color Cool Warm or User Cool Select the setting of screen color to be bluish white Warm Select the setting of screen color to be reddish white Adjust the balance of the input signal WHITE BALANCE Show the frequency res...

Страница 8: ...ess a key on the keyboard to wake up the computer 3 Check if the video signal cable is properly connected to the monitor and computer Symptom Check Items 1 Check if your computer is turned on 2 Check if the video signal cable is properly connected to the monitor and computer 1 Ensure that the resolution and or refresh rate is set correctly 1 No picture 2 LED indicator is not lit 1 No picture 2 LED...

Страница 9: ...t 440 4 W x 353 6 H x 200 0 D mm AC Consumption AC 100 240V 50Hz 60Hz 1 2A Temperature Humidity Altitude Temperature Humidity Altitude Active 25W Standby 1W 0 C to 40 C 20 C to 60 C 10 to 90 No Condensation 0 10 000 ft 10 to 90 No Condensation 0 40 000 ft Panel Display Size Pixel Pitch Connector Tilt Weight Power Dimensions W x H x D Item Description Interface Frequency Horizontal Vertical ...

Отзывы: