background image

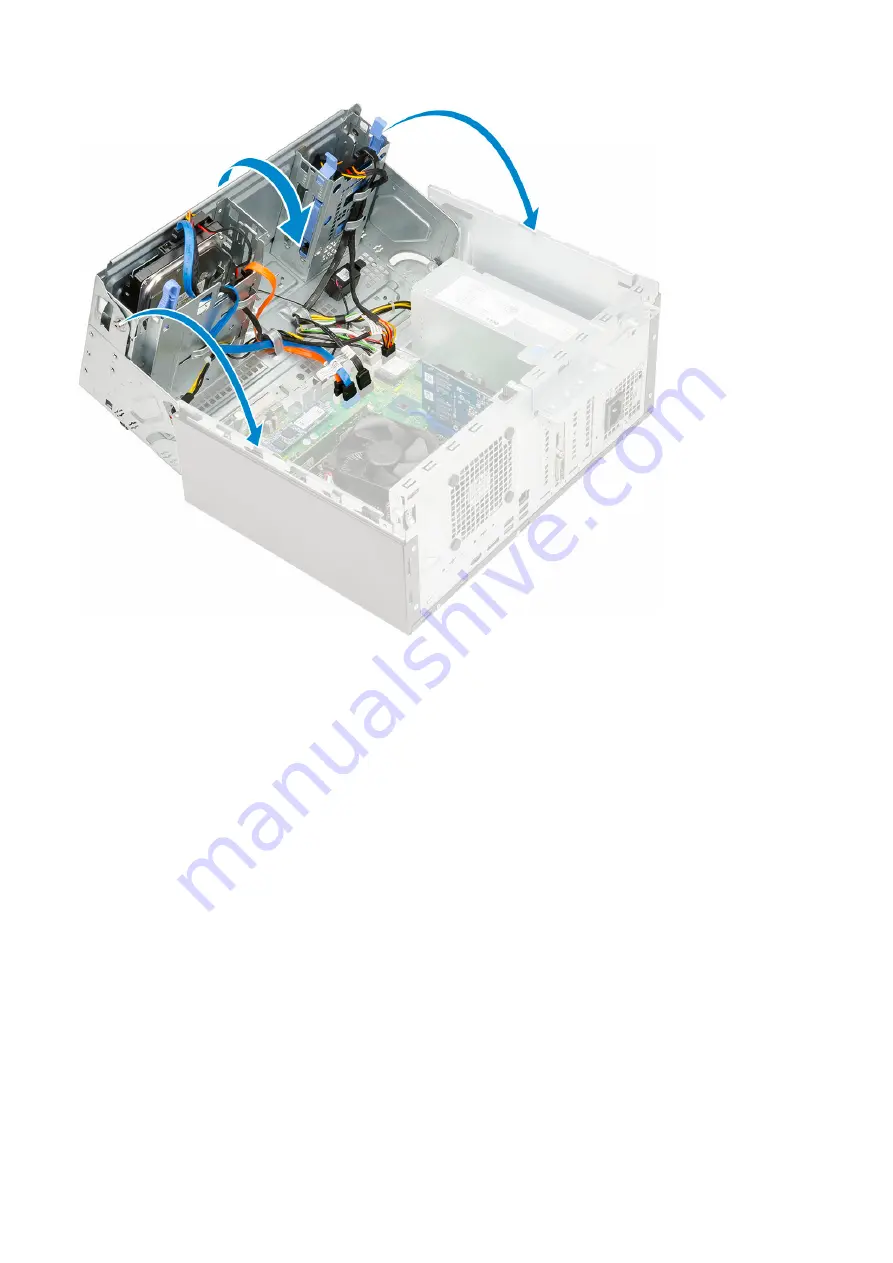
2. Install the:

a.

Front bezel

b.

Side cover

3. Follow the procedure in 

After working inside your computer

.

Hard drive assembly—3.5-inch and 2.5-inch

Removing 3.5–inch hard drive

1. Follow the procedure in 

Before working inside your computer

.

2. Remove the:

a.

Side cover

b.

Front bezel

3. To remove the hard drive:

a. Disconnect the SATA cable and the power cable from the connectors on the hard drive [1].
b. Remove the four screws that secure the 3.5 inch HDD to the front panel door [2].
c. Open the front panel door [3].

22

Removing and installing components

Содержание D10U

Страница 1: ...OptiPlex 3070 Tower Service Manual 1 Regulatory Model D10U Regulatory Type D10U003 March 2021 Rev A01 ...

Страница 2: ...tial damage to hardware or loss of data and tells you how to avoid the problem WARNING A WARNING indicates a potential for property damage personal injury or death 2019 2020 Dell Inc or its subsidiaries All rights reserved Dell EMC and other trademarks are trademarks of Dell Inc or its subsidiaries Other trademarks may be trademarks of their respective owners ...

Страница 3: ...l Optane memory 13 Enabling Intel Optane memory 14 Disabling Intel Optane memory 14 Chapter 3 Major components of your system 15 Chapter 4 Removing and installing components 17 Disassembly and reassembly 17 Side cover 17 Bezel 18 Front panel door 20 Hard drive assembly 3 5 inch and 2 5 inch 22 Optical drive 29 M 2 PCIe SSD 33 SD card reader 35 Memory module 37 Expansion card 39 Optional VGA module...

Страница 4: ...ostics 74 Running the SupportAssist Pre Boot System Performance Check 74 Diagnostics 74 Diagnostic error messages 76 System error messages 79 Recovering the operating system 80 Backup media and recovery options 80 WiFi power cycle 80 Chapter 6 Getting help 81 Contacting Dell 81 4 Contents ...

Страница 5: ...contacts on a card Hold a card by its edges or by its metal mounting bracket Hold a component such as a processor by its edges not by its pins CAUTION When you disconnect a cable pull on its connector or on its pull tab not on the cable itself Some cables have connectors with locking tabs if you are disconnecting this type of cable press in on the locking tabs before you disconnect the cable As yo...

Страница 6: ...ern when you handle electronic components especially sensitive components such as expansion cards processors memory DIMMs and system boards Very slight charges can damage circuits in ways that may not be obvious such as intermittent problems or a shortened product life span As the industry pushes for lower power requirements and increased density ESD protection is an increasing concern Due to the ...

Страница 7: ...ional office to find out if they have one To perform the test plug the wrist strap s bonding wire into the tester while it is strapped to your wrist and push the button to test A green LED is lit if the test is successful a red LED is lit and an alarm sounds if the test fails Insulator Elements It is critical to keep ESD sensitive devices such as plastic heat sink casings away from internal parts ...

Страница 8: ...t your back 4 Keep the load close The closer it is to your spine the less force it exerts on your back 5 Keep your back upright whether lifting or setting down the load Do not add the weight of your body to the load Avoid twisting your body and back 6 Follow the same techniques in reverse to set the load down After working inside your computer NOTE Leaving stray or loose screws inside your compute...

Страница 9: ...ed to DDR3 which requires 1 5 volts of electrical power to operate DDR4 also supports a new deep power down mode that allows the host device to go into standby without needing to refresh its memory Deep power down mode is expected to reduce standby power consumption by 40 to 50 percent DDR4 Details There are subtle differences between DDR3 and DDR4 memory modules as listed below Key notch differen...

Страница 10: ...rs and peripheral devices like mice keyboards external drivers and printers Table 1 USB evolution Type Data Transfer Rate Category Introduction Year USB 2 0 480 Mbps High Speed 2000 USB 3 0 USB 3 1 Gen 1 5 Gbps SuperSpeed 2010 USB 3 1 Gen 2 10 Gbps SuperSpeed 2013 USB 3 0 USB 3 1 Gen 1 SuperSpeed USB For years the USB 2 0 has been firmly entrenched as the de facto interface standard in the PC worl...

Страница 11: ...oretical bandwidth With today s ever increasing demands placed on data transfers with high definition video content terabyte storage devices high megapixel count digital cameras etc USB 2 0 may not be fast enough Furthermore no USB 2 0 connection could ever come close to the 480Mbps theoretical maximum throughput making data transfer at around 320 Mbps 40 MB s the actual real world maximum Similar...

Страница 12: ...bile devices often use a USB connection to charge A USB 2 0 connection provides up to 2 5 watts of power that ll charge your phone but that s about it A laptop might require up to 60 watts for example The USB Power Delivery specification ups this power delivery to 100 watts It s bi directional so a device can either send or receive power And this power can be transferred at the same time the devic...

Страница 13: ...support for additional color models used in digital photography and computer graphics 4K Support Enables video resolutions far beyond 1080p supporting next generation displays that will rival the Digital Cinema systems used in many commercial movie theaters HDMI Micro Connector A new smaller connector for phones and other portable devices supporting video resolutions up to 1080p Automotive Connect...

Страница 14: ... up to three subsequent launches after enablement to see the full performance benefits Disabling Intel Optane memory CAUTION After disabling Intel Optane memory do not uninstall the driver for Intel Rapid Storage Technology as it will result in a blue screen error The Intel Rapid Storage Technology user interface can be removed without uninstalling the driver NOTE Disabling Intel Optane memory is ...

Страница 15: ...y 3 5 inch 3 Optical drive 4 Heatsink fan assembly 5 Processor 6 Memory module 7 M 2 PCIe SSD 8 Power button 9 System board 10 Front panel door 11 Bezel 12 Hard drive assembly 2 5 inch 13 Speaker 14 System fan 15 Power supply unit 3 Major components of your system 15 ...

Страница 16: ...their part numbers for the original system configuration purchased These parts are available according to warranty coverages purchased by the customer Contact your Dell sales representative for purchase options 16 Major components of your system ...

Страница 17: ...assembly and reassembly Disassembly and reassembly Side cover Removing side cover 1 Follow the procedure in Before working inside your computer 2 To remove the cover a Loosen the captive screws that secure the cover to the computer 1 b Slide the cover towards the back of the system and lift it from the system 2 4 Removing and installing components 17 ...

Страница 18: ...e in After working inside your computer Bezel Removing front bezel 1 Follow the procedure in Before working inside your computer 2 Remove the Side cover 3 To remove the front bezel a Pry the retention tabs to release the front bezel from the system 1 b Rotate the front bezel away from the computer 2 and pull to release the hooks on the front bezel from the front panel slots 3 18 Removing and insta...

Страница 19: ...ront bezel 1 To install the front bezel a Position the bezel to align the tab holders with the slots on the system chassis 1 b Press the bezel until the tabs click into place 2 Removing and installing components 19 ...

Страница 20: ... door 1 Follow the procedure in Before working inside your computer 2 Remove the a Side cover b Front bezel CAUTION The front panel door opens only to a limited extent See the printed image on the front panel door for the maximum permissible level 3 Pull the front panel door to open it 20 Removing and installing components ...

Страница 21: ...Closing front panel door 1 Turn the front panel door to close it Removing and installing components 21 ...

Страница 22: ...rive 1 Follow the procedure in Before working inside your computer 2 Remove the a Side cover b Front bezel 3 To remove the hard drive a Disconnect the SATA cable and the power cable from the connectors on the hard drive 1 b Remove the four screws that secure the 3 5 inch HDD to the front panel door 2 c Open the front panel door 3 22 Removing and installing components ...

Страница 23: ...d Remove the 3 5 inch hard drive out of the system Removing and installing components 23 ...

Страница 24: ...Installing 3 5 inch hard drive 1 Insert the 3 5 inch hard drive into the system 24 Removing and installing components ...

Страница 25: ...2 Close the front panel door 1 and replace the four screws 2 3 Connect the SATA cable and the power cable to the connectors on the hard drive 3 Removing and installing components 25 ...

Страница 26: ... working inside your computer 2 Remove the a Side cover b Front bezel 3 Open the front panel door 4 To remove the hard drive assembly a Disconnect the hard drive data and power cables from the connectors on the 2 5 inch hard drive 1 b Press the blue tabs of the assembly on both sides 2 and pull the hard drive assembly out of the system 3 26 Removing and installing components ...

Страница 27: ... Remove the a Side cover b Front bezel c 2 5 inch hard drive assembly 3 To remove the drive a Pull one side of the drive bracket to disengage the pins on the bracket from the slots on the drive 1 b Lift the drive out of the drive bracket 2 c Remove the drive from the bracket 3 Removing and installing components 27 ...

Страница 28: ...ert the hard drive into the hard drive bracket until it clicks into place 2 2 Install the a 2 5 inch hard drive assembly b Front bezel c Side cover 3 Follow the procedure in After working inside your computer Installing the 2 5 inch drive assembly 1 To install the hard drive a b Insert the hard drive assembly into the slot on the system 1 until the hard drive bracket clicks into place 2 c Connect ...

Страница 29: ...r computer 2 Remove the a Side cover b Front bezel 3 Open the front panel door 4 To remove the optical drive assembly a Disconnect the optical drive data cable and power cable from the connectors on the optical drive 1 NOTE You may need to unroute the cables from the tabs under the drive cage to allow you to disconnect the cables from the connectors b Close the front panel door 2 Removing and inst...

Страница 30: ...c Press the blue release tab 1 and slide the optical drive out of the system 2 30 Removing and installing components ...

Страница 31: ...Installing optical drive 1 To install the optical drive a Insert the optical drive into the optical drive bay until it clicks into place Removing and installing components 31 ...

Страница 32: ... Open the front panel door 1 c Route the cables under the drive cage d Connect the optical drive data cable and power cable to the connectors on the optical drive 2 32 Removing and installing components ...

Страница 33: ...2 SSD 1 Follow the procedure in Before working inside your computer 2 Remove the a Side cover b Front bezel 3 Open the front panel door 4 To remove the M 2 SSD a Remove the single screw that secures the SSD to the system board 1 b Slide the M 2 SSD from the connector on the system board 2 Removing and installing components 33 ...

Страница 34: ...Installing M 2 SSD 1 Insert the M 2 SSD to the connector on the system board 1 2 Replace the single screw to secure the SSD to the system board 2 34 Removing and installing components ...

Страница 35: ...rocedure in Before working inside your computer 2 Remove the a Side cover b Front bezel 3 Open the front panel door 4 To remove the SD card reader a Disconnect the SD card reader cable from the connector on the system board 1 b Remove the screw that secures the SD card reader to the front panel door 2 c Lift the SD card reader out of the system 3 Removing and installing components 35 ...

Страница 36: ...er a Insert the SD card reader into the slot on the front panel door 1 b Replace the screw to secure the SD card reader to the front panel door 2 c Connect the SD card reader cable to the connector on the system board 3 36 Removing and installing components ...

Страница 37: ...emoving memory module 1 Follow the procedure in Before working inside your computer 2 Remove the a Side cover b Front bezel 3 Open the front panel door 4 To remove the memory module a Pull the clips securing the memory module until the memory module pops up 1 b Remove the memory module from the system board 2 Removing and installing components 37 ...

Страница 38: ...lign the notch on the memory module with the tab on the memory module connector b Insert the memory module into the memory module socket 1 c Press the memory module until the memory module retention tabs click into place 2 38 Removing and installing components ...

Страница 39: ...puter 2 Remove the a Side cover b Front bezel 3 Open the front panel door 4 To remove the PCIe expansion card a Pull the release latch to unlock the PCIe expansion card 1 b Push the card retention latch 2 and lift the PCIe expansion card out of the computer 3 NOTE This step is applicable only for the connector with card retention latch otherwise lift the PCIe expansion card out of the system Remov...

Страница 40: ...y from your computer Insert a screwdriver in the hole of a PCIe bracket and push hard to release the bracket 4 and then lift the bracket out from your computer b Insert the PCIe expansion card to the connector on the system board 1 c Secure the PCIe expansion card by pushing the card retention latch until it clicks into place 2 NOTE This step is applicable only for the connector with card retentio...

Страница 41: ...dure in After working inside your computer Optional VGA module Removing optional VGA module 1 Follow the procedure in Before working inside your computer 2 Remove the a Side cover b Front bezel 3 Open the front panel door 4 Remove the system fan 5 To remove the optional VGA module a Remove the two M3X3 screws that secure the optional VGA module to the system Removing and installing components 41 ...

Страница 42: ... the system 2 Installing optional VGA module 1 Insert the VGA module into its slot from the inside of your computer 1 and connect the VGA cable to the connector on the system board 2 2 Replace the two M3X3 screws to secure the optional VGA module to the system 42 Removing and installing components ...

Страница 43: ...unit or PSU 1 Follow the procedure in Before working inside your computer 2 Remove the a Side cover b Front bezel 3 Open the front panel door 4 To release the PSU a Disconnect the PSU cables from the connectors on the system board 1 b Unroute the PSU cables from the retention clips 2 3 4 5 c Disconnect the PSU cables from the connectors on the system board 6 Removing and installing components 43 ...

Страница 44: ...5 To remove the PSU a Remove the 3 screws that secure the PSU to the system 1 b Press the release tab 2 c Slide and lift the PSU away from the computer 3 44 Removing and installing components ...

Страница 45: ...o install the PSU a Insert the PSU into the PSU slot and slide it towards the back of the system 1 until the release tab clicks into place 2 b Replace the three screws to secure the PSU to the computer 3 Removing and installing components 45 ...

Страница 46: ...he PSU cables to the connectors on the system board 1 d Route the PSU cables through the retention clips 2 3 4 5 e Connect the PSU cable to the connector on the system board 6 46 Removing and installing components ...

Страница 47: ...ure in Before working inside your computer 2 Remove the a Side cover b Front bezel 3 Open the front panel door 4 To remove the intrusion switch a Disconnect the intrusion switch cable from the connector on the system board 1 b Unroute the intrusion switch cable from the fan grommets 2 c Slide the intrusion switch and push it to remove from the computer 3 Removing and installing components 47 ...

Страница 48: ...Insert the intrusion switch into the slot on the system 1 2 Route the intrusion switch cable through the fan grommet 2 3 Connect the intrusion switch cable to the connector on the system board 3 48 Removing and installing components ...

Страница 49: ...e your computer 2 Remove the a Side cover b Front bezel 3 Open the front panel door 4 To release the power button a Disconnect the power button cable from the system board 1 b Unroute the power button cable through the retention clip 2 c Press the release tabs using a plastic scribe and slide the power button out from the front of the system 3 d Close the front panel door 4 Removing and installing...

Страница 50: ...5 Pull the power button out from the computer 50 Removing and installing components ...

Страница 51: ...Installing power button 1 Insert the power switch into the slot from the front of the computer and press it until it clicks into place Removing and installing components 51 ...

Страница 52: ...anel door 1 3 Route the power switch cable from the power button through the retention clip 2 3 4 Align the cable with the pins on the connector and connect the power button cable 4 52 Removing and installing components ...

Страница 53: ...r Removing speaker 1 Follow the procedure in Before working inside your computer 2 Remove the a Side cover b Front bezel 3 Open the front panel door 4 To remove the speaker a Disconnect the speaker cable from the connector on the system board 1 b Lift the tab 2 and slide the speaker out of the slot 3 Removing and installing components 53 ...

Страница 54: ...nstalling speaker 1 Insert the speaker into the slot and press it until it clicks into place 1 2 2 Connect the speaker cable to the connector on the system board 2 3 54 Removing and installing components ...

Страница 55: ...g coin cell battery 1 Follow the procedure in Before working inside your computer 2 Remove the a Side cover b Front bezel 3 Open the front panel door 4 To remove the coin cell battery a Press the release latch until the coin cell battery pops out 1 b Remove the coin cell battery from the connector on the system board 2 Removing and installing components 55 ...

Страница 56: ...tings Installing the coin cell battery 1 Hold the coin cell battery with the sign facing up and slide it under the securing tabs at the positive side of the connector 1 2 Press the battery into the connector until it locks into place 2 56 Removing and installing components ...

Страница 57: ...uter 2 Remove the a Side cover b Front bezel 3 Open the front panel door 4 To remove the heatsink fan assembly a Disconnect the heatsink fan assembly cable from the connector on the system board 1 b Remove the screws that secure the fan to the heat sink 2 NOTE Ensure to insert the Torx screw driver from top screw hole to remove the screws c Lift the heatsink fan away from the computer 3 Removing a...

Страница 58: ...Place the fan on the heatsink assembly 1 2 Tighten the screws 4 to secure the fan to the heatsink assembly 2 3 Connect the heatsink fan assembly cable to the connector on the system board 3 58 Removing and installing components ...

Страница 59: ...ove the a Side cover b Front bezel 3 Open the front panel door 4 To remove the heatsink assembly a Disconnect the heatsink fan assembly cable from the connector on the system board 1 b Loosen the captive screws 4 that secure the heatsink assembly to the system board 2 NOTE Remove the screw in the sequential order 1 2 3 4 as printed on the system board c Lift the heatsink assembly away from the com...

Страница 60: ...heatsink assembly on the processor 1 2 Tighten the captive screws to secure the heatsink assembly to the system board 2 NOTE Tighten the screws in a sequential order 1 2 3 4 as printed on the system board 3 Connect the heatsink fan assembly cable from the connector on the system board 3 60 Removing and installing components ...

Страница 61: ...working inside your computer 2 Remove the a Side cover b Front bezel 3 Open the front panel door 4 Remove the heatsink assembly 5 To remove the processor a Release the socket lever by pushing the lever down and out from under the tab on the processor shield 1 b Lift the lever upward and lift the processor shield 2 c Lift the processor out of the socket 3 Removing and installing components 61 ...

Страница 62: ... processor 1 Place the processor on the socket such that the slots on the processor align with the socket keys 1 CAUTION Do not use force to seat the processor When the processor is positioned correctly it engages easily into the socket 2 Close the processor shield by sliding it under the retention screw 2 3 Lower the socket lever and push it under the tab to lock it 3 62 Removing and installing c...

Страница 63: ...ystem fan Removing system fan 1 Follow the procedure in Before working inside your computer 2 Remove the a Side cover b Front bezel 3 Open the front panel door 4 To remove the system fan a Disconnect the intrusion switch cable from the connector on the system board 1 b Unroute the intrusion switch cable from the fan grommet 2 Removing and installing components 63 ...

Страница 64: ...m fan cable from the connector on the system board 1 d Stretch the grommets securing the fan to the computer to ease the removal of the fan 2 e Slide the system fan out of the computer 3 64 Removing and installing components ...

Страница 65: ...s of the system fan with the grommets on the chassis wall 4 Pass the grommets through the corresponding grooves on the system fan 1 5 Stretch the grommets and slide the system fan toward the computer until it locks into place 2 NOTE Install the lower two grommets first 6 Connect the system fan cable to the connector on the system board 3 Removing and installing components 65 ...

Страница 66: ...7 Route the intrusion switch cable through the fan grommet 2 8 Insert the intrusion switch cable into the system board 1 66 Removing and installing components ...

Страница 67: ... board 1 Follow the procedure in Before working inside your computer 2 Remove the a Side cover b Front bezel 3 Open the front panel door 4 Remove the a Heatsink assembly b Processor c Expansion card d M 2 SSD e SD card reader f Memory module g Heatsink fan 5 Disconnect the following cables a Intrusion switch b Power switch Removing and installing components 67 ...

Страница 68: ...e system board a CPU power 1 b Hard drive data and optical drive data 2 c Speaker 3 d System power 4 e SATA 5 7 To remove the system board a Remove the screws that secure the system board to the computer 1 68 Removing and installing components ...

Страница 69: ...b Slide and lift the system board away from the computer 1 2 Removing and installing components 69 ...

Страница 70: ...rds the back of the computer 2 Lower the system board into the computer until the connectors at the back of the system board align with the slots on the chassis and the screw holes on the system board align with the standoffs on the computer 1 2 70 Removing and installing components ...

Страница 71: ...3 Replace the screws to secure the system board to the computer 1 Removing and installing components 71 ...

Страница 72: ... Align the cables with the pins on connectors on the system board and connect the following cables to the system board a SATA 1 b System power 2 c Speaker 3 d Hard drive data and optical drive data 4 e CPU power 5 72 Removing and installing components ...

Страница 73: ...ader e Processor f Heatsink assembly 7 Connect the following cables a Power switch b Intrusion switch 8 Close the front panel door 9 Install the a Front bezel b Side cover 10 Follow the procedure in After working inside your computer Removing and installing components 73 ...

Страница 74: ...ered during testing NOTE Some tests for specific devices require user interaction Always ensure that you are present at the computer terminal when the diagnostic tests are performed For more information see https www dell com support kbdoc 000180971 Running the SupportAssist Pre Boot System Performance Check 1 Turn on your computer 2 As the computer boots press the F12 key as the Dell logo appears...

Страница 75: ...supply is normal A device might be malfunctioning or incorrectly installed Refer to the table below for Amber Blinking Pattern diagnostics suggestion and possible failures Steady Off S0 no PWRGD_PS Code fetch 0 Boot Failure This is a system fault error condition including the power supply Only the 5VSB rail on the power supply is working correctly Off Steady S0 no PWRGD_PS Code fetch 1 This indica...

Страница 76: ...tern 1000 MEM config no memory detected 3 4 BIOS state 7 BIOS Post code Old LED pattern 1001 Fatal Motherboard error 3 5 BIOS state 8 BIOS Post code Old LED pattern 1010 Mem config modules incompatible or invalid config 3 6 BIOS state 9 BIOS Post code Old LED pattern 1011 combine Other pre video activity and resource configuration codes BIOS to eliminate 1100 code 3 7 BIOS state 10 BIOS Post code ...

Страница 77: ...A20 FAILURE A memory module may be loose Reinstall the memory module or if necessary replace it GENERAL FAILURE The operating system is unable to carry out the command The message is usually followed by specific information For example Printer out of paper Take the appropriate action HARD DISK DRIVE CONFIGURATION ERROR The computer cannot identify the drive type Shut down the computer remove the h...

Страница 78: ...ory module or if necessary replace it MEMORY ALLOCATION ERROR The software you are attempting to run is conflicting with the operating system another program or a utility Shut down the computer wait for 30 seconds and then restart it Run the program again If the error message still appears see the software documentation MEMORY DOUBLE WORD LOGIC FAILURE AT ADDRESS READ VALUE EXPECTING VALUE A memor...

Страница 79: ...system setup program does not match the system clock Correct the settings for the Date and Time options TIMER CHIP COUNTER 2 FAILED A chip on the system board may be malfunctioning Run the System Set tests in Dell Diagnostics UNEXPECTED INTERRUPT IN PROTECTED MODE The keyboard controller may be malfunctioning or a memory module may be loose Run the System Memory tests and the Keyboard Controller t...

Страница 80: ... enables you to diagnose hardware issues repair your computer back up your files or restore your computer to its factory state You can also download it from the Dell Support website to troubleshoot and fix your computer when it fails to boot into their primary operating system due to software or hardware failures For more information about the Dell SupportAssist OS Recovery see Dell SupportAssist ...

Страница 81: ...ne based support and service options Availability varies by country and product and some services may not be available in your area To contact Dell for sales technical support or customer service issues 1 Go to Dell com support 2 Select your support category 3 Verify your country or region in the Choose a Country Region drop down list at the bottom of the page 4 Select the appropriate service or s...

Отзывы: