background image

3.

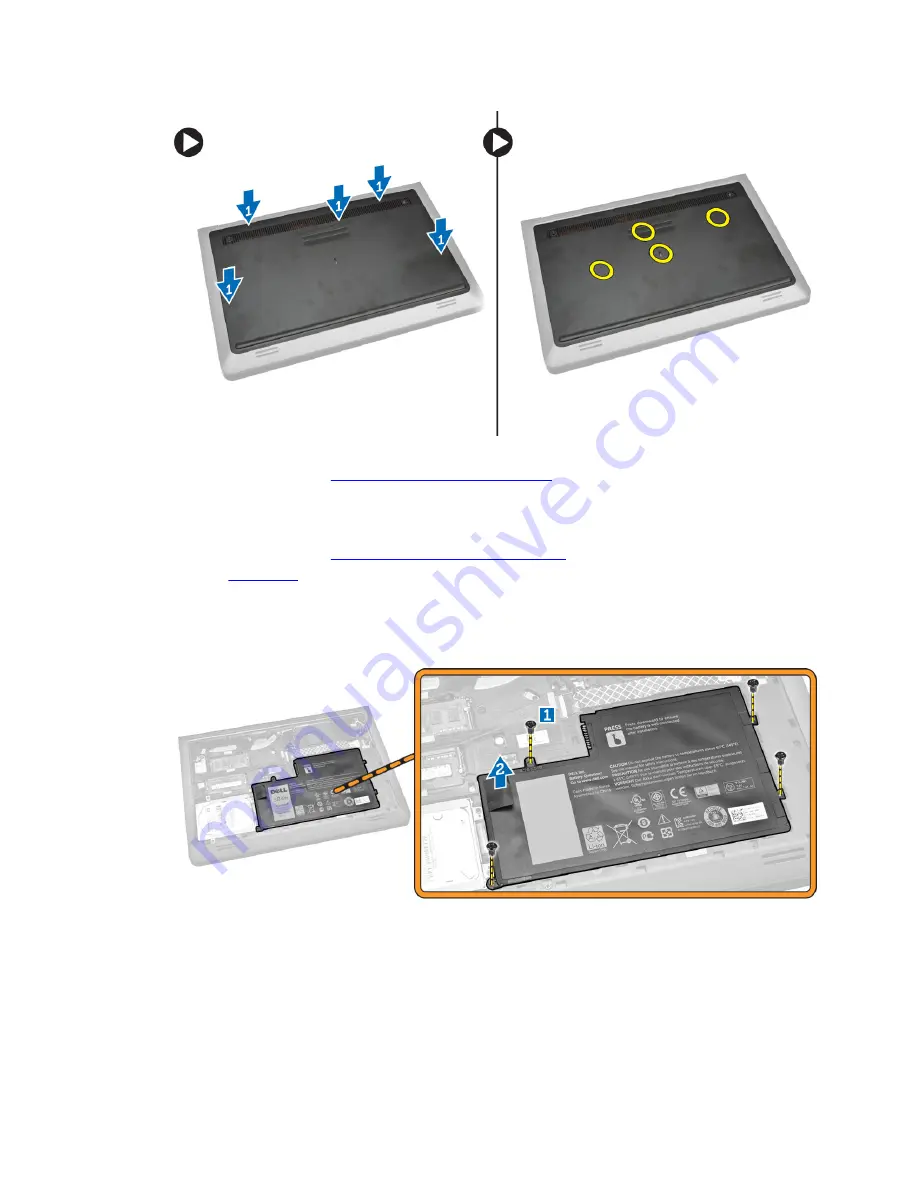
Tighten the screws that secure the base cover to the computer.

4.

Follow the procedures in 

After Working Inside Your computer

.

Removing the Battery

1.

Follow the procedures in 

Before Working Inside Your Computer

..

2.

Remove 

Base Cover

3.

Perform the following steps as shown in the illustration:
a. Loosen the screw that secures the battery to the computer [1].
b. Lift the battery [2].

Installing the Battery

1.

Place the battery in its slots.

2.

Press the location indicated in the picture to ensure proper connection after installation.

10

Содержание :atitude 3550

Страница 1: ...Dell Latitude 3550 Owner s Manual Regulatory Model P38F Regulatory Type P38F001 ...

Страница 2: ...problem WARNING A WARNING indicates a potential for property damage personal injury or death Copyright 2014 Dell Inc All rights reserved This product is protected by U S and international copyright and intellectual property laws Dell and the Dell logo are trademarks of Dell Inc in the United States and or other jurisdictions All other marks and names mentioned herein may be trademarks of their res...

Страница 3: ...Installing the System Fan 15 Removing the Keyboard 15 Installing the Keyboard 17 Removing the Back Cover 21 Installing the Back Cover 22 Removing the Heatsink 23 Installing the Heatsink 23 Removing the I O Board 24 Installing the I O Board 24 Removing the Coin Cell Battery 25 Installing the Coin Cell Battery 25 Removing the Display Assembly 26 Installing the Display Assembly 27 Removing the Displa...

Страница 4: ...ence 38 Navigation Keys 38 System Setup Options 39 Updating the BIOS 47 System and Setup Password 48 Assigning a System Password and Setup Password 48 Deleting or Changing an Existing System and or Setup Password 49 4 Diagnostics 50 Enhanced Pre Boot System Assessment ePSA Diagnostics 50 Device Status Lights 51 Battery Status Lights 51 5 Specifications 52 6 Contacting Dell 57 ...

Страница 5: ...ge due to servicing that is not authorized by Dell is not covered by your warranty Read and follow the safety instructions that came with the product CAUTION To avoid electrostatic discharge ground yourself by using a wrist grounding strap or by periodically touching an unpainted metal surface such as a connector on the back of the computer CAUTION Handle components and cards with care Do not touc...

Страница 6: ...display CAUTION Before touching anything inside your computer ground yourself by touching an unpainted metal surface such as the metal at the back of the computer While you work periodically touch an unpainted metal surface to dissipate static electricity which could harm internal components 11 Remove any installed ExpressCards or Smart Cards from the appropriate slots Turning Off Your Computer CA...

Страница 7: ...ocedure ensure you connect any external devices cards and cables before turning on your computer CAUTION To avoid damage to the computer use only the battery designed for this particular Dell computer Do not use batteries designed for other Dell computers 1 Connect any external devices such as a port replicator or media base and replace any cards such as an ExpressCard 2 Connect any telephone or n...

Страница 8: ...r 1 Phillips screwdriver Small plastic scribe Removing the Base Cover 1 Follow the procedures in Before Working Inside Your Computer 2 Perform the following steps as shown in the illustration a Loosen the captive screws that secure the base cover to the computer 1 b Pry the base cover along the edges to loosen it 2 3 Perform the following steps as shown in the illustration a Lift the base cover pa...

Страница 9: ...shown in the illustration a Align the base cover on the computer 1 b Lower the base cover towards the computer in the direction indicated 2 2 Starting from the sides press on the locations indicated by the arrows This will snap the base cover to the computer 9 ...

Страница 10: ...rocedures in Before Working Inside Your Computer 2 Remove Base Cover 3 Perform the following steps as shown in the illustration a Loosen the screw that secures the battery to the computer 1 b Lift the battery 2 Installing the Battery 1 Place the battery in its slots 2 Press the location indicated in the picture to ensure proper connection after installation 10 ...

Страница 11: ...de Your Computer 2 Remove a Base Cover b Battery 3 Perform the following steps as shown in the illustration a Loosen the screw that secures the hard drive to the computer 1 b Lift the hard drive partially at a 45 degree angle 2 c Slide the hard drive 3 4 Perform the following steps as shown in the illustration a Disconnect the hard drive cable and slide the hard drive 1 b Lift the hard drive from ...

Страница 12: ...he procedures in After Working Inside Your computer Removing the WLAN Card 1 Follow the procedures in Before Working Inside Your Computer 2 Remove a Base Cover b Battery 3 Perform the following steps as shown in the illustration a Loosen the screw that secures the WLAN card to the computer 1 b Lift the tab in the direction indicated 2 c Disconnect the cables that connect the WLAN card to the compu...

Страница 13: ...N antenna cables to their connectors on the WLAN Card 3 Press the locking tab 4 Tighten the screw that secures the WLAN card to the computer 5 Install a Battery b Base Cover 6 Follow the procedures in After Working Inside Your computer Removing the System Fan 1 Follow the procedures in Before Working Inside Your Computer 2 Remove 13 ...

Страница 14: ... 2 c Lift the tape that secures the system fan 3 4 Perform the following steps as shown in the illustration a Disconnect the fan cable from the computer 1 b Unroute the cable from the slot 2 5 Perform the following steps as shown in the illustration a Loosen the scew that secures the system fan to the computer 1 b Lift the system fan from the computer 2 14 ...

Страница 15: ...4 Connect the fan cable to the computer 5 Affix the adhesive tape 6 Press the locking tab 7 Install a Battery b Base Cover 8 Follow the procedures in After Working Inside Your computer Removing the Keyboard 1 Follow the procedures in Before Working Inside Your Computer 2 Remove a Base Cover b Battery 3 Release the keyboard by prying the tabs on the palmrest assembly 15 ...

Страница 16: ...the keyboard from the computer 1 b Flip the keyboard to access the keyboard cable 2 5 Perform the following steps as shown in the illustration a Lift the locking tab 1 b Disconnect the cable from the locking tab 2 c Disconnect the keyboard cable from the computer 3 16 ...

Страница 17: ...e the cables 2 Turn the keyboard over slide the tabs on the keyboard into the slots on the palm rest assembly and snap the keyboard into place CAUTION Do not apply excess pressure while folding the cables The cables on the keyboard are not folded when you receive a replacement keyboard Follow these instructions to fold the cables on the replacement keyboard the same way they are folded on the old ...

Страница 18: ... keyboard 2 keyboard backlight cable 3 keyboard cable CAUTION Do not apply excess pressure while folding the cables 2 Lift the keyboard cable 3 Gently fold the keyboard backlight cable at the fold line 18 ...

Страница 19: ...acklight cable underneath the keyboard connector cable as indicated 5 Connect the keyboard cable to its connector on the system board 6 Align the keyboard to the palmrest as indicated and press down to snap it into place 19 ...

Страница 20: ...7 Press on the sides of the keyboard followed by the locations marked in the picture to firmly seat it 8 Press the locations indicated in the picture to complete the keyboard installation 9 Install 20 ...

Страница 21: ...Flip the computer and remove the screw that secures the palmrest assembly to the system board 4 Perform the following steps as shown in the illustration a Remove the screw that secures the display cable to the computer 1 b Lift the tab that secures the display cable to the computer 2 c Peel the tape the secures the hard drive connector 3 d Disconnect the hard drive connector 4 21 ...

Страница 22: ...ustration a Remove the screw that secures bottom cover to the computer 1 b Pry the edges of the back cover 2 c Lift the back cover 3 Installing the Back Cover 1 Place the back cover on the computer 2 Tighten the screw to secure the back cover to the computer 3 Route the display cable to the slot 4 Connect the display cable 5 Press the tab until the display cable is secured 22 ...

Страница 23: ...dures in Before Working Inside Your Computer 2 Remove a Base Cover b Battery c Hard Drive d WLAN Card e System Fan f Keyboard g Back Cover 3 Perform the following steps as shown in the illustration a Loosen the screws that secure the heatsink to the computer 1 b Lift the heatsink from the computer 2 Installing the Heatsink 1 Place the heatsink in its slot on the computer 2 Tighten the screws to se...

Страница 24: ...ttery c Hard Drive d WLAN Card e System Fan f Keyboard g Back Cover 3 Perform the following steps as shown in the illustration a Remove the screw that secures the I O board to the system board 1 b Lift the I O board from the system board 2 Installing the I O Board 1 Place the I O board on the computer 2 Tighten the screw to secure the I O board to the computer 3 Install a Back Cover b Keyboard c S...

Страница 25: ...Back Cover 3 Perform the following steps as shown in the illustration a Disconnect the coin cell cable from the computer 1 b Lift the coin cell battery from the computer 2 Installing the Coin Cell Battery 1 Place the Coin cell battery on the computer 2 Connect the coin cell battery cable to the computer 3 Install a Back Cover b Keyboard c System Fan d WLAN Card e Hard Drive f Battery g Base Cover ...

Страница 26: ... Drive d WLAN Card e System Fan f Keyboard g Back Cover 3 Perform the following steps as shown in the illustration a Peel the tape that secures antenna cables from the computer 1 b Loosen the screw that secures the display assembly 2 c Lift the display assembly from the computer 3 4 Remove the display assembly from the computer 26 ...

Страница 27: ...stem Fan d WLAN Card e Hard Drive f Battery g Base Cover 5 Follow the procedures in After Working Inside Your computer Removing the Display Bezel 1 Follow the procedures in Before Working Inside Your Computer 2 Remove a Base Cover b Battery c Hard Drive d WLAN Card e System Fan f Keyboard g Display Assembly 3 Perform the following steps as shown in the illustration a Pry the edges of the display b...

Страница 28: ...rd d System Fan e WLAN Card f Hard Drive g Battery h Base Cover 4 Follow the procedures in After Working Inside Your computer Removing the Display Panel 1 Follow the procedures in Before Working Inside Your Computer 2 Remove a Base Cover b Battery c Hard Drive d WLAN Card e System Fan f Keyboard g Display Assembly h Display Bezel 3 Perform the following steps as shown in the illustration 28 ...

Страница 29: ...play panel 2 4 Perform the following steps as shown in the illustration a Remove the tape that secures the display panel 1 b Lift the tab 2 5 Perform the following steps as shown in the illustration a Disconnect the display panel cable 1 b Lift the display panel 2 29 ...

Страница 30: ...play panel to the display assembly 5 Install a Display Bezel b Display Assembly c Back Cover d Keyboard e System Fan f WLAN Card g Hard Drive h Battery i Base Cover 6 Follow the procedures in After Working Inside Your computer Removing the Display Hinge 1 Follow the procedures in Before Working Inside Your Computer 2 Remove a Base Cover b Battery c Hard Drive d WLAN Card e System Fan f Keyboard g ...

Страница 31: ...ce the display hinges in its place 2 Tighten the screws to secure the display hinges to the display assembly 3 Install a Display Panel b Display Bezel c Display Assembly d Back Cover e Keyboard f System Fan g WLAN Card h Hard Drive i Battery j Base Cover 4 Follow the procedures in After Working Inside Your computer Removing the Camera 1 Follow the procedures in Before Working Inside Your Computer ...

Страница 32: ...dule 2 Align the camera module in its position on the computer 3 Install a Display Bezel b Battery c Base Cover 4 Follow the procedures in After Working Inside Your computer Removing the System Board 1 Follow the procedures in Before Working Inside Your Computer 2 Remove a Base Cover b Battery c Hard Drive d WLAN Card e System Fan f Keyboard g Back Cover h Heatsink 3 Perform the following steps as...

Страница 33: ...n the illustration a Disconnect the speaker cable 1 b Disconnect the power connector 2 5 Perform the following steps as shown in the illustration a Remove the screw that secures the system board to the computer 1 b Lift the system board 2 33 ...

Страница 34: ...king tab 7 Install a Heatsink b Back Cover c Keyboard d System Fan e WLAN Card f Hard Drive g Battery h Base Cover 8 Follow the procedures in After Working Inside Your computer Removing the Speakers 1 Follow the procedures in Before Working Inside Your Computer 2 Remove a Base Cover b Battery c Hard Drive d System Fan e Keyboard f Back Cover 3 Perform the following steps as shown in the illustrati...

Страница 35: ...uter Installing the Speakers 1 Place the speaker in the computer 2 Route the speaker cables 3 Connect the speaker cables 4 Install a Back Cover b Keyboard c System Fan d Hard Drive e Battery f Base Cover 5 Follow the procedures in After Working Inside Your computer 35 ...

Страница 36: ...emove a Base Cover b Battery c Hard Drive d WLAN Card e System Fan f Keyboard g Back Cover h Display Assembly i System Board 3 Perform the following steps as shown in the illustration a Disconnect the power connector cable 1 b Unroute the cable 2 4 Remove the power connector from the computer 36 ...

Страница 37: ... computer 2 Route the power cable 3 Connect the power connector cable 4 Install a System Board b Display Assembly c Back Cover d Keyboard e System Fan f WLAN Card g Hard Drive h Battery i Base Cover 5 Follow the procedures in After Working Inside Your computer 37 ...

Страница 38: ...on Self Test POST when the Dell logo appears you can Access System Setup by pressing F2 key Bring up the one time boot menu by pressing F12 key The one time boot menu displays the devices that you can boot from including the diagnostic option The boot menu options are Removable Drive if available STXXXX Drive NOTE XXX denotes the SATA drive number Optical Drive Diagnostics NOTE Choosing Diagnostic...

Страница 39: ...f your computer System Information Displays BIOS Version Service Tag Asset Tag Ownership Tag Ownership Date Manufacture Date and the Express Service Code Memory Information Displays Memory Installed Memory Available Memory Speed Memory Channels Mode Memory Technology DIMM A Size DIMM B Size Processor Information Displays Processor Type Core Count Processor ID Current Clock Speed Minimum Clock Spee...

Страница 40: ...This option is enabled by default Drives Allows you to configure the SATA drives on board All drives are enabled by default The options are SATA 0 This option is selected by default SMART Reporting This field controls whether hard drive errors for integrated drives are reported during system startup This technology is part of the SMART Self Monitoring Analysis and Reporting Technology specificatio...

Страница 41: ...t the various illumination levels This field has an effect when the backlight is enabled Keyboard Backlight with AC This option is disabled by default Unobtrusive Mode This option when enabled pressing Fn F7 turns off all light and sound emissions in the system To resume normal operation press Fn F7 again This option is disabled by default Miscellaneous Devices Allows you to enable or disable the ...

Страница 42: ...etting Enable Strong Password is not selected NOTE If Strong Password is enabled Admin and System passwords must contain at least one uppercase character one lowercase character and be at least 8 characters long Password Configuration Allows you to determine the minimum and maximum length of Administrator and System passwords Password Bypass Allows you to enable or disable the permission to bypass...

Страница 43: ...d Enabled Default Setting The option is enabled Expert Key Management Allows you to manipulate the security key databases only if the system is in Custom Mode The Enable Custom Mode option is disabled by default The options are PK KEK db dbx If you enable the Custom Mode the relevant options for PK KEK db and dbx appear The options are Save to File Saves the key to a user selected file Replace fro...

Страница 44: ...tep Default Setting The option is enabled C States Control Allows you to enable or disable the additional processor sleep states C states Default Setting The option is enabled Intel TurboBoost Allows you to enable or disable the Intel TurboBoost mode of the processor Enable Intel TurboBoost Default Setting The option is enabled Hyper Thread Control Allows you to enable or disable the HyperThreadin...

Страница 45: ...n lets you block entering to sleep S3 state in Operating System environment Block Sleep S3 state This option is disabled by default Peak Shift This option enables you to minimize the AC power consumption during the peak power times of day After you enable this option your system runs only in battery even if the AC is attached Advanced Battery Charge Configuration This option enables you to maximiz...

Страница 46: ...ork This option is enabled by default Fn Key Emulation Allows you to set the option where the Scroll Lock key is used to simulate the Fn key feature Enable Fn Key Emulation default Fn Lock Hot Key Allows the hot key combination Fn Esc toggle the primary behavior of F1 F12 between the standard and secondary functions Lock Mode Disable Standard This option is enabled by default Lock Mode Enable Seco...

Страница 47: ... asset tag if an asset tag is not already set This option is not set by default Table 13 System Logs Option Description BIOS Events Allows you to view and clear the System Setup BIOS POST events Thermal Events Allows you to view and clear the System Setup Thermal events Power Events Allows you to view and clear the System Setup Power events Updating the BIOS It is recommended to update your BIOS s...

Страница 48: ...d to secure your computer Password Type Description System password Password that you must enter to log on to your system Setup password Password that you must enter to access and make changes to the BIOS settings of your computer CAUTION The password features provide a basic level of security for the data on your computer CAUTION Anyone can access the data stored on your computer if it is not loc...

Страница 49: ... Unlocked in the System Setup before attempting to delete or change the existing System and or Setup password You cannot delete or change an existing System or Setup password if the Password Status is Locked To enter the System Setup press F2 immediately after a power on or reboot 1 In the System BIOS or System Setup screen select System Security and press Enter The System Security screen is displ...

Страница 50: ... provide extra information about the failed device s View status messages that inform you if tests are completed successfully View error messages that inform you of problems encountered during testing CAUTION Use the system diagnostics to test only your computer Using this program with other computers may cause invalid results or error messages NOTE Some tests for specific devices require user int...

Страница 51: ...e battery light operates as follows Alternately blinking amber light and white light An unauthenticated or unsupported non Dell AC adapter is attached to your laptop Alternately blinking amber light with steady white light Temporary battery failure with AC adapter present Constantly blinking amber light Fatal battery failure with AC adapter present Light off Battery in full charge mode with AC ada...

Страница 52: ...ture Description Type Intel Core i3 and i5 L1 cache 64 KB L2 cache 256 KB L3 cache Up to 4 MB Table 16 Memory Feature Description Memory connector two internally accessible DDR3L connectors Memory capacity 2 GB 4 GB and 8 GB Memory type 1600 MHz dual channel DDR3L configuration Minimum memory 2 GB Maximum memory 16 GB 8x2 GB Table 17 Audio Feature Description Type 4 channel high definition audio C...

Страница 53: ...64 bits Table 19 Camera Feature Description Camera resolution 0 92 megapixels Video resolution maximum 1280 x 720 HD at 30 fps maximum Diagonal viewing angle 66 Table 20 Communication Feature Description Network adapter 10 100 1000 Mbps Ethernet LAN on Motherboard LOM Wireless Wi Fi 802 11 b g n and 802 11a b g n ac Bluetooth 4 0 Table 21 Ports and Connectors Feature Description Audio one headphon...

Страница 54: ...ght 205 60 mm 360 mm Width 320 90 mm 224 3 mm Diagonal 14 0 inches 15 6 inches Active area X Y 309 40 mm x 173 95 mm 12 18 inches x 6 85 inches 344 23 x 193 54 mm 13 55 inches x 7 61 inches Maximum resolution 1366 x 768 pixels 1366 x 768 pixels Maximum brightness 200 nits 200 nits Operating angle 0 closed to Min 135 0 closed to Min 135 Refresh rate 60 Hz 60 Hz Minimum viewing angles Horizontal 40 ...

Страница 55: ...l 208 25 mm Weight 3 cell 283 g 4 cell 350 g Lifespan 300 discharge charge cycles Voltage 3 cell 11 1 VDC 4 cell 7 4 VDC Temperature range Operating 0 C to 50 C 32 F to 122 F Non Operating 20 C to 65 C 4 F to 149 F Coin cell battery 3 V CR2032 lithium ion Table 26 AC Adapter Feature Description Type 65 W and 90 W Input voltage 100 VAC to 240 VAC Input current maximum 1 50 A 1 60 A 1 70 A 2 50 A In...

Страница 56: ... touchscreen 342 mm 13 46 inches 380 4 mm 14 98 inches Touchscreen 342 mm 13 46 inches 380 4 mm 14 98 inches Weight minimum Non touchscreen 1 89 kg 4 18 lb 2 15 kg 4 75 lb Touchscreen 2 04 kg 4 51 lb 2 36 kg 5 21 lb Table 28 Environmental Feature Description Temperature Operating 0 C to 35 C 32 F to 95 F Storage 40 C to 65 C 40 F to 149 F Relative humidity maximum Operating 10 to 90 non condensing...

Страница 57: ...upport and service options Availability varies by country and product and some services may not be available in your area To contact Dell for sales technical support or customer service issues 1 Go to dell com support 2 Select your support category 3 Verify your country or region in the Choose a Country Region drop down list at the bottom of the page 4 Select the appropriate service or support lin...

Отзывы: