Removing the solid-state drive/Intel Optane memory
module
You need to disable the Intel Optane memory before removing Intel Optane memory module from your computer. For more
information about disabling the Intel Optane memory, see
WARNING: Before working inside your computer, read the safety information that shipped with your computer and
follow the steps in
Before working inside your computer
. After working inside your computer, follow the instructions
After working inside your computer
. For more safety best practices, see the Regulatory Compliance home page at
www.dell.com/regulatory_compliance
Prerequisites
Remove the
Procedure to remove M.2 2230 solid-state drive
NOTE: This procedure applies only to systems shipped with a M.2 2230 solid-state drive installed.
NOTE: Depending on the configuration ordered the system may have up to two M.2 solid-state drives installed.
Supported solid-state drive configurations per M.2 card slot:
•
M.2 2230 solid-state drive + solid-state drive bracket
•
M.2 2280 solid-state drive
•
M.2 2280 Intel Optane
NOTE: For solid-state drives above 512 GB or Intel Optane above 118 GB a thermal shield is required for optimal
heat dissipation and is installed in the computer when these configurations are ordered. If these configurations are
installed After Point-of-Sale (APOS), contact Dell support for the thermal shield.
NOTE: Depending on the number of M.2 solid-state drives installed at Point-of-Sale, the thermal shield installed in
the computer may be a full shield or a half shield. If two M.2 solid-state drives are installed After Point-of-Sale
(APOS) contact Dell support for the full thermal shield.
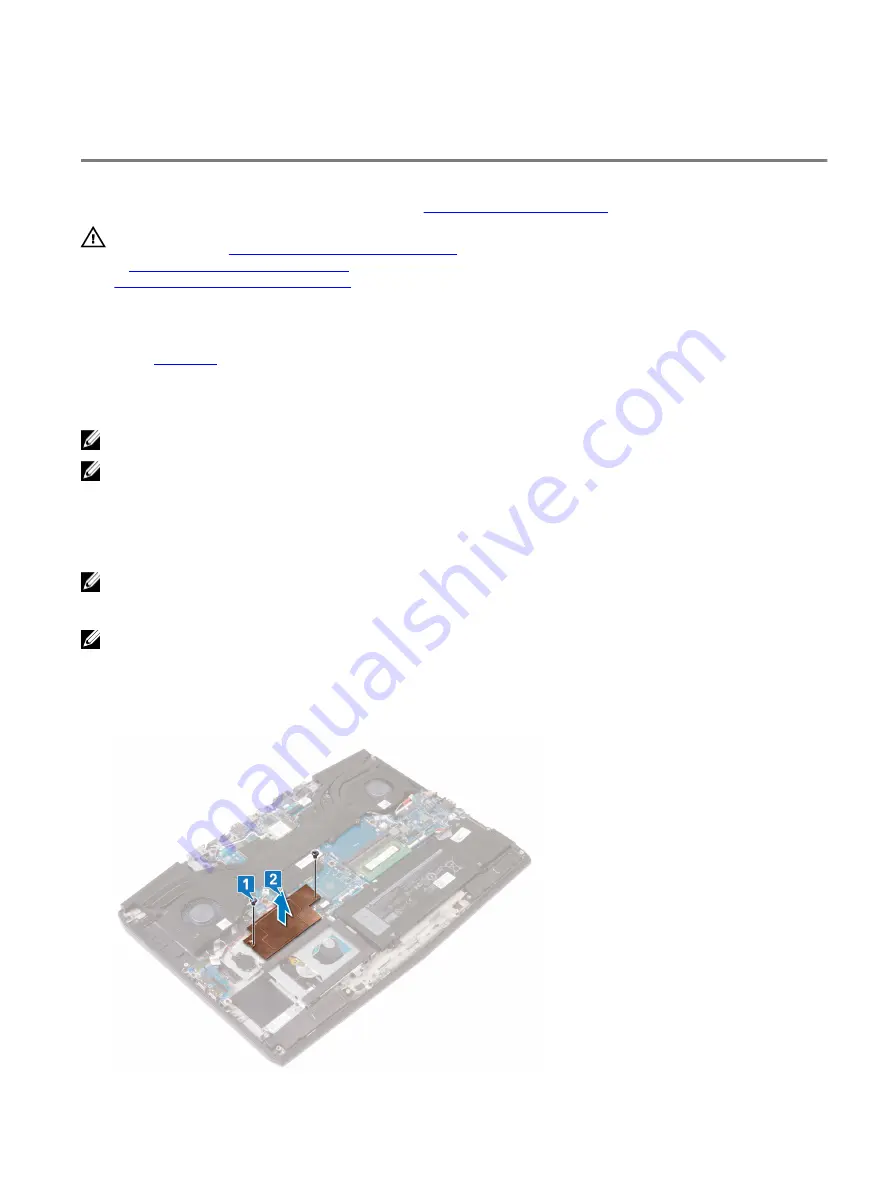
1
Remove the two screws (M2x3) that secure the M.2 thermal shield to the palm-rest assembly and system board.
2 Lift the M.2 thermal shield from the palm-rest assembly and system board.
46
Содержание Alienware m15
Страница 17: ...5 Rotate the base cover from front to back and remove the base cover off the palm rest assembly 17 ...
Страница 21: ...5 Replace the two screws M2 5x10 in the back that secure the base cover to the palm rest assembly 21 ...
Страница 30: ...Post requisites Replace the base cover 30 ...
Страница 32: ...3 Remove the memory modules from the memory module slot 32 ...
Страница 35: ...6 Lift the heat sink assembly off the system board 7 Remove the fans 35 ...
Страница 37: ...7 Connect the right fan cable to the system board Post requisites Replace the base cover 37 ...
Страница 39: ...5 Lift the fans off the heat sink 39 ...
Страница 43: ...5 Disconnect the antenna cables from the wireless card 43 ...
Страница 54: ...4 Lift the I O board off the palm rest assembly 54 ...
Страница 56: ...4 Adhere the tape that secures the I O board cable to the I O board Post requisites Replace the base cover 56 ...
Страница 67: ...5 Remove the two screws M2 5x2 5 that secures the hinges to the palm rest assembly 67 ...
Страница 68: ...6 Rotate the display assembly inward and lift up and away from the palm rest assembly 68 ...
Страница 75: ...13 Lift the system board off the palm rest assembly 75 ...
Страница 85: ...4 Peel the left black Mylar along with the blue Mylar from the clear release paper 85 ...
Страница 86: ...5 Using the alignment holes adhere the keyboard Mylar on the left side of the keyboard bracket 86 ...
Страница 87: ...6 Peel the right black Mylar along with the blue Mylar from the clear release paper 87 ...
Страница 88: ...7 Using the alignment holes adhere the keyboard Mylar on the right side of the keyboard bracket 88 ...
Страница 89: ...8 Peel the blue Mylar from both the sides 89 ...
Страница 92: ...92 ...


