Replacing the power-supply unit
WARNING: Before working inside your computer, read the safety information that shipped with your computer and
follow the steps in
Before working inside your computer
. After working inside your computer, follow the instructions
After working inside your computer
. For more safety best practices, see the Regulatory Compliance home page at
www.dell.com/regulatory_compliance
Procedure
1
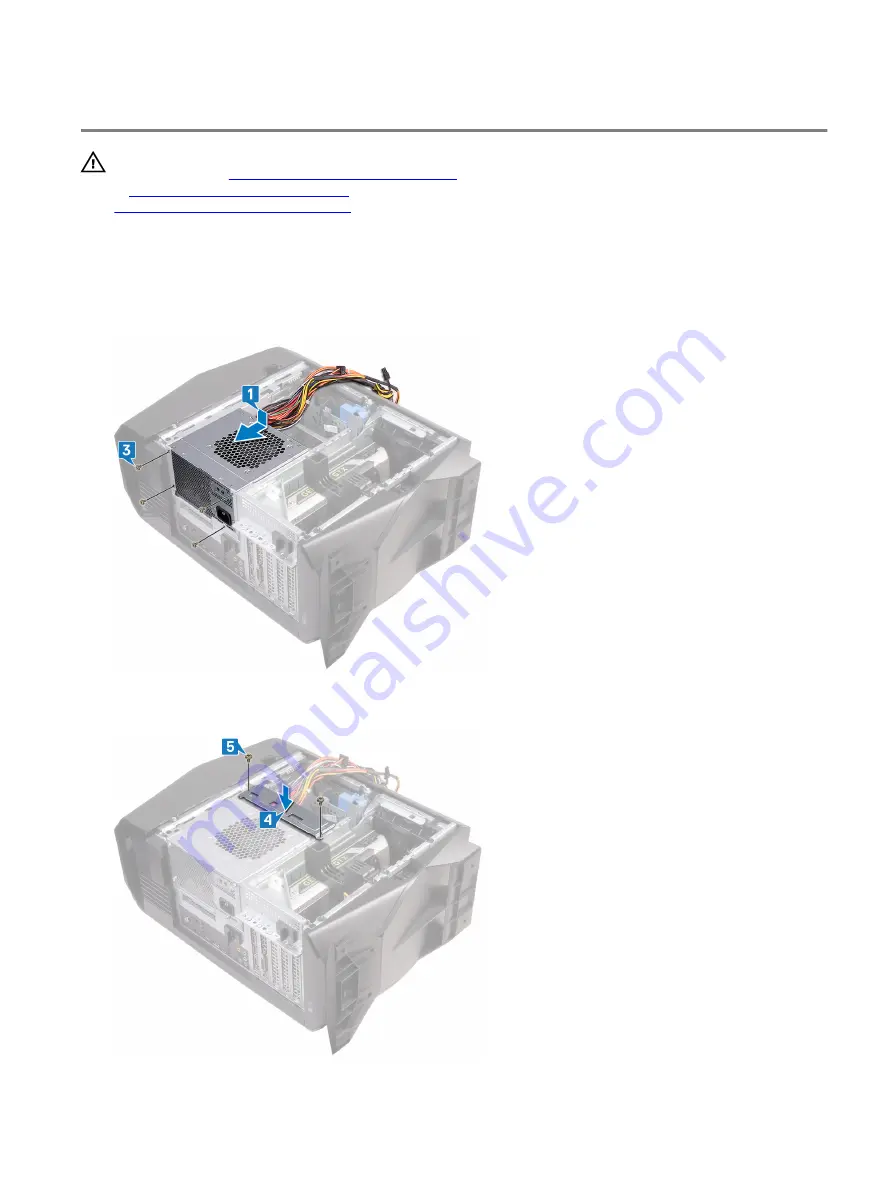
Place the power supply on the chassis.
2 Align the screw holes on the power-supply unit with the screw holes on the chassis.
3 Replace the four screws (#6-32 X 1/4") that secure the power-supply unit to the chassis.
4 Align the screw holes on the power-supply unit bracket with the screw holes on the power-supply unit cage.
5 Replace the two screws (#6-32 X 1/4") that secure the power-supply unit bracket to the power-supply unit cage.
49
Содержание Alienware Aurora R8
Страница 21: ...3 Replace the screw 6 32 X 1 4 BLK that secures the side panel release latch to the chassis 21 ...
Страница 23: ...3 Lift the right side cover off the chassis 23 ...
Страница 25: ...3 Rotate the right side cover towards the chassis until it snaps into place 25 ...
Страница 28: ...7 Lift the top cover from the top bezel 8 You are left with top bezel and top cover 28 ...
Страница 31: ...Post requisites 1 Replace the right side cover 2 Replace the left side cover 31 ...
Страница 33: ...4 Lift the bottom cover from the chassis 5 Turn the computer back to the upright position 33 ...
Страница 38: ...4 Connect the data and power cables to the hard drive Post requisites Replace the left side cover 38 ...
Страница 42: ...4 Connect the data cable and power cable to the hard drive Post requisites Replace the left side cover 42 ...
Страница 48: ...12 Lift the power supply unit along with the cables off the chassis 48 ...
Страница 77: ...4 Pry the antenna off the chassis 77 ...
Страница 85: ...6 Lift the top chassis fan off the top chassis fan bracket 85 ...


