background image

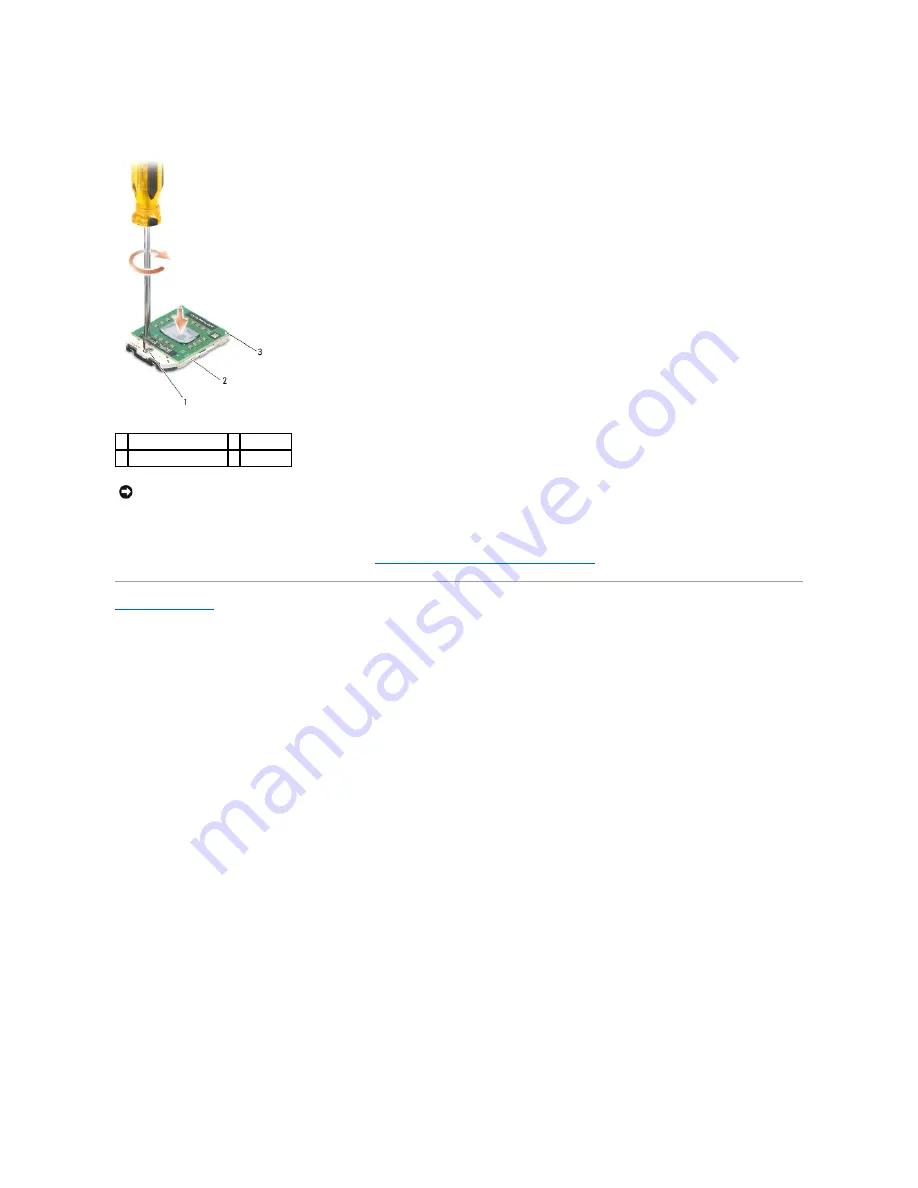
When the processor module is properly seated, all four corners are aligned at the same height. If one or more corners of the module are higher than the 
others, the module is not seated properly. 


2.

Tighten the ZIF socket by turning the cam screw clockwise to secure the processor module to the system board.  


3.

Replace the processor thermal-cooling assembly (see 

Replacing the Processor Thermal-Cooling Assembly

).  


Back to Contents Page


1  ZIF-socket cam screw  2  ZIF socket 

3  pin-1 corner 


NOTICE: 

To avoid damage to the processor, hold the screwdriver so that it is perpendicular to the processor when turning the cam screw.

Содержание 1525 - Inspiron - Pentium Dual Core 1.86 GHz

Страница 1: ...isclaims any proprietary interest in trademarks and trade names other than its own Model PP29L January 2008 Rev A00 Before You Begin Subscriber Identity Module Optional ExpressCards Using the Memory Card Reader Optical Drive Hard Drive Center Control Cover Internal Card With Bluetooth Wireless Technology Keyboard Button Board Memory Display Speaker Assembly Palm Rest ExpressCard Cage Processor The...

Страница 2: ...rently than shown in this document CAUTION Before you begin any of the procedures in this section follow the safety instructions in the Product Information Guide NOTICE Only a certified service technician should perform repairs on your computer Damage due to servicing that is not authorized by Dell is not covered by your warranty NOTICE To avoid electrostatic discharge ground yourself by using a w...

Страница 3: ...ch until they click into place 8 Slide the battery out of the battery bay 9 Turn the computer top side up open the display and press the power button to ground the system board Back to Contents Page 1 battery 2 battery release latch ...

Страница 4: ...roperly installed and a network cable is attached 2 Turn on the computer 3 Locate the latest BIOS update file for your computer at support dell com 4 Click Download Now to download the file 5 If the Export Compliance Disclaimer window appears click Yes I Accept this Agreement The File Download window appears 6 Click Save this program to disk and then click OK The Save In window appears 7 Click the...

Страница 5: ...9 Double click the file icon on the desktop and follow the instructions on the screen Back to Contents Page ...

Страница 6: ...logy 1 Connect the cable to the card 2 Slide the card at an angle into the card compartment and replace the securing screw 3 Replace the center control cover see Replacing the Center Control Cover Back to Contents Page CAUTION Before you begin any of the procedures in this section follow the safety instructions in the Product Information Guide NOTICE To avoid electrostatic discharge ground yoursel...

Страница 7: ...system board 3 Place the button board in position and gently press until the button board secures within the tabs 4 Replace the keyboard see Replacing the Keyboard 5 Replace the center control cover see Replacing the Center Control Cover Back to Contents Page CAUTION Before you begin any of the procedures in this section follow the safety instructions in the Product Information Guide NOTICE To avo...

Страница 8: ...nto the slot until the card is completely seated in its connector If you encounter too much resistance do not force the card Check the card orientation and try again The computer recognizes the memory card and automatically loads the appropriate device driver If the configuration program tells you to load the manufacturer s drivers use the media that came with the memory card if applicable Back to...

Страница 9: ...ws at the top of the keyboard CAUTION Before you begin any of the procedures in this section follow the safety instructions in the Product Information Guide NOTICE To avoid electrostatic discharge ground yourself by using a wrist grounding strap or by periodically touching an unpainted metal surface such as a connector on the back of the computer NOTICE To help prevent damage to the system board y...

Страница 10: ...to snap the keyboard into place 4 Replace the two screws on the top of the keyboard 5 Reconnect the media control buttons connector to the center control cover 6 Insert the left edge of the center control cover 7 Press from left to right until the cover snaps into place 8 In the battery bay replace the two screws that secure the center control cover Back to Contents Page NOTICE The key caps on the...

Страница 11: ...play assembly see Removing the Display Assembly 9 Remove the internal card with Bluetooth wireless technology if installed see Removing the Internal Card With Bluetooth Wireless Technology 10 Remove the palm rest see Removing the Palm Rest 11 Remove the ExpressCard cage see Removing the ExpressCard Cage 12 Remove the processor thermal cooling assembly see Removing the Processor Thermal Cooling Ass...

Страница 12: ...ide the coin cell battery into the slot and gently press until it snaps to the slot 3 Follow the steps in Removing the Coin Cell Battery in the reverse order Back to Contents Page CAUTION Before you begin the following procedure follow the safety instructions in the Product Information Guide ...

Страница 13: ...bly The oils in your skin can reduce the heat transfer capability of the thermal pads NOTICE When removing the processor module pull the module straight up Be careful not to bend the pins on the processor module CAUTION Before you begin the following procedure follow the safety instructions in the Product Information Guide NOTICE Do not touch the processor die Press and hold the processor down on ...

Страница 14: ... ZIF socket by turning the cam screw clockwise to secure the processor module to the system board 3 Replace the processor thermal cooling assembly see Replacing the Processor Thermal Cooling Assembly Back to Contents Page 1 ZIF socket cam screw 2 ZIF socket 3 pin 1 corner NOTICE To avoid damage to the processor hold the screwdriver so that it is perpendicular to the processor when turning the cam ...

Страница 15: ...d remove the module cover 4 In sequential order loosen the five captive screws securing the processor thermal cooling assembly to the system board then carefully lift the processor thermal cooling assembly out of the computer Replacing the Processor Thermal Cooling Assembly CAUTION Before you begin the following procedure follow the safety instructions in the Product Information Guide 1 module cov...

Страница 16: ...In sequential order tighten the five captive screws to secure the processor thermal cooling assembly to the system board 3 Replace the module cover and tighten the eight captive screws Back to Contents Page CAUTION Before you begin the following procedure follow the safety instructions in the Product Information Guide ...

Страница 17: ...he cover 3 Disconnect the antenna cables from the mini cards 4 Lift the antenna cables from the securing tabs and release them from the routing channel 5 Remove the two screws securing the display assembly from the bottom of the computer 6 Remove the center control cover see Removing the Center Control Cover 7 Remove the keyboard see Removing the Keyboard CAUTION Before you begin the following pro...

Страница 18: ... Begin 2 Align the display hinges with the holes in the base of the computer then lower the display into place 3 Replace and tighten the four display assembly hinge screws 4 Slide the antenna cables through the routing hole to the base of the computer 5 Replace the display cable camera cable and antenna cables in their proper routing guides 1 display cable 2 camera cable 1 display assembly 2 anten...

Страница 19: ...moving the Center Control Cover 3 Remove the keyboard see Removing the Keyboard 4 Remove the display assembly see Removing the Display Assembly 5 Remove the six rubber display bumpers from around the display bezel 6 Remove the captive screw and five shoulder screws from around the display bezel 7 Starting from the bottom corner of the display panel use your fingers to pry the bezel from the top co...

Страница 20: ...Follow the instructions in Before You Begin 2 Remove the center control cover see Removing the Center Control Cover 3 Remove the keyboard see Removing the Keyboard 4 Remove the display assembly see Removing the Display Assembly 5 Remove the display bezel see Removing the Display Bezel 6 Remove the two screws securing the display panel to the cover 7 Lift the display panel out of the display cover ...

Страница 21: ...nel with the corresponding screw holes and guide pins on the top cover 5 Gently lower the display panel into place and replace the two screws that secure the display panel to the cover 6 Replace the eight screws four on each side of the display panel to secure the display brackets to the display panel 7 Replace the display bezel see Replacing the Display Bezel 8 Replace the display assembly see Re...

Страница 22: ...isplay Panel 7 Disconnect the camera cable connector from the camera and microphone asssembly 8 Lift the camera and microphone assembly out of the display cover Replacing the Camera and Microphone Assembly 1 Follow the instructions in Before You Begin 2 Place the camera microphone assembly on the display cover 3 Connect the camera cable connector to the camera microphone assembly Back to Contents ...

Страница 23: ...omputer base 8 Lift the ExpressCard cage gently out of its system board connector and remove it Replacing the ExpressCard Cage 1 Replace the three screws securing the ExpressCard cage 2 Connect the ExpressCard cable connector to the system board 3 Replace the palm rest see Replacing the Palm Rest 4 Replace the speakers see Replacing the Speaker Assembly 5 Replace the display assembly see Replacing...

Страница 24: ......

Страница 25: ...ION Before you begin any of the procedures in this section follow the safety instructions in the Product Information Guide CAUTION Do not touch the metal housing of the hard drive if you remove the hard drive from the computer while the drive is hot NOTICE To prevent data loss turn off your computer before removing the hard drive Do not remove the hard drive while the computer is on or in Sleep st...

Страница 26: ...in your Owner s Manual 5 Install the drivers and utilities for your computer as needed see Reinstalling Drivers and Utilities in your Owner s Manual Back to Contents Page 1 hard drive cover 2 screws 2 3 hard drive CAUTION Before you begin any of the procedures in this section follow the safety instructions in the Product Information Guide NOTICE Hard drives are extremely fragile Exercise care when...

Страница 27: ...tabs along the bottom of the keyboard and slide them under the palm rest 4 Press on the right edge near the top to snap the keyboard into place 5 Replace the two screws on the top of the keyboard Back to Contents Page CAUTION Before you begin any of the procedures in this section follow the safety instructions in the Product Information Guide NOTICE To avoid electrostatic discharge ground yourself...

Страница 28: ......

Страница 29: ...embly see Removing the Display Assembly 9 Remove the internal card with Bluetooth wireless technology if installed see Removing the Internal Card With Bluetooth Wireless Technology 10 Remove the palm rest see Removing the Palm Rest 11 Remove the ExpressCard cage see Removing the ExpressCard Cage 12 Remove the processor thermal cooling assembly see Removing the Processor Thermal Cooling Assembly 13...

Страница 30: ...he reverse order Back to Contents Page 1 plastic grip 2 battery latch assembly 3 spring NOTICE Before you remove the battery release button observe the orientation of the button to ensure proper installation when the button is replaced CAUTION Before you begin the following procedure follow the safety instructions in the Product Information Guide NOTICE Ensure the battery latch assembly is properl...

Страница 31: ...se your fingertips to carefully spread apart the securing clips on each end of the memory module connector until the module pops up 4 Remove the module from the connector CAUTION Before you begin any of the procedures in this section follow the safety instructions in the Product Information Guide NOTE Memory modules purchased from Dell are covered under your computer warranty NOTICE If you need to...

Страница 32: ...ional memory and automatically updates the system configuration information To confirm the amount of memory installed in the computer click Start Help and Support Dell System Information Back to Contents Page 1 securing clips 2 2 memory module NOTICE To avoid electrostatic discharge ground yourself by using a wrist grounding strap or by periodically touching an unpainted metal surface such as a co...

Страница 33: ...ollow the procedures in Before You Begin 2 Turn the computer over 3 Loosen the eight captive screws securing the back and remove the cover 4 Disconnect the antenna cables from the Mini card CAUTION Before you begin any of the procedures in this section follow the safety instructions in the Product Information Guide NOTICE To help prevent damage to the system board you must remove the battery from ...

Страница 34: ...ring that you route the cables correctly 5 Secure unused antenna cables in the protective mylar sleeve 6 Replace the cover and tighten the eight captive screws 1 antenna cable connectors 2 securing screw 1 Mini card NOTICE The connectors are keyed to ensure correct insertion If you feel resistance check the connectors on the card and on the system board and realign the card NOTICE To avoid damage ...

Страница 35: ...tor Replacing the FCM 1 Insert the FCM connector at a 45 degree angle into the system board connector labeled FCM 2 Press the other end of the FCM down into the slot on the system board until the card clicks into place 3 Replace the M2 x 3 mm securing screw Back to Contents Page NOTE If you leave the area ground yourself again when you return to the computer 1 FCM Card 2 M2 x 3 mm securing screw N...

Страница 36: ...er over 3 Remove the locking screw from the optical drive 4 Using a plastic scribe or screw driver push the notch to release the optical drive from the bay 5 Slide the optical drive out of the bay Replacing the Optical Drive 1 Slide the optical drive into the bay 2 Replace and tighten the locking screw Back to Contents Page 1 locking screw 2 notch 3 optical drive ...

Страница 37: ...Assembly 8 Remove the nine screws from the bottom of the computer 9 Turn the computer over and remove the two screws securing the top of the palm rest 10 Disconnect the touch pad connector and the device status lights LED connector from the system board CAUTION Before you begin the following procedure follow the safety instructions in the Product Information Guide NOTE It is not necessary to remov...

Страница 38: ...e touch pad connector and the device status lights LED connector to the system board 3 Replace the two screws on the top of the palm rest 4 Turn the computer over and replace the nine screws on the bottom of the computer to secure the palm rest Back to Contents Page 1 screws 2 2 palm rest 3 touch pad connector 4 device status lights LED connector 5 display hinge screw CAUTION Before you begin the ...

Страница 39: ...tation is not clear see the documentation that came with the card To install an ExpressCard 1 Hold the card with the top side of the card facing up 2 Slide the card into the slot until the card is completely seated in its connector If you encounter too much resistance do not force the card Check the card orientation and try again The computer recognizes the ExpressCard and automatically loads the ...

Страница 40: ...Video Connector S Video TV Out Connector 1394 Connector HDMI Connector USB Connector Video Connector S Video TV Out Connector Pin Signal 1 USB5V 2 USBP 3 USBP 4 GND Pin Signal Pin Signal 1 CRT_R 9 5V 2 CRT_G 10 GND 3 CRT_B 11 MONITOR_DETECT 4 NC 12 DDC_DATA 5 GND 13 CRT_HS 6 GND 14 CRT_VS 7 GND 15 DDC_CLK 8 GND ...

Страница 41: ...ignal 1 TPB 2 TPB 3 TPA 4 TPA Pin Signal Pin Signal 1 TMDS Data 2 11 TMDS Clock Shield 2 TMDS Data 2 Shield 12 TMDS Clock 3 TMDS Data 2 13 CEC 4 TMDS Data 1 14 No Connect 5 TMDS Data 1 Shield 15 DDC Clock 6 TMDS Data 1 16 DDC Data 7 TMDS Data 0 17 Ground 8 TMDS Data 0 Shield 18 5V Power ...

Страница 42: ...Back to Contents Page 9 TMDS Data 0 19 Hot Plug Detect 10 TMDS Clock 20 SHELL ...

Страница 43: ...battery bay slide the SIM into the compartment with the cut off corner of the card facing away from the compartment Removing the SIM Press the SIM into the slot to release it When it is partially ejected remove the SIM from the battery bay Back to Contents Page CAUTION Before you begin any of the procedures in this section follow the safety instructions in the Product Information Guide NOTE Only G...

Страница 44: ...ide holdes in the speaker assembly with the guide posts on the base of the computer then lower the assembly into place 2 Replace the four securing screws 3 Route the speaker cables carefully through the routing channel 4 Connect the speaker cable to the system board 5 Replace the display assembly see Replacing the Display Assembly 6 Replace the keyboard see Replacing the Keyboard 7 Replace the cen...

Страница 45: ......

Страница 46: ...e center control cover see Removing the Center Control Cover 7 Remove the keyboard see Removing the Keyboard 8 Remove the display assembly see Removing the Display Assembly 9 Remove the internal card with Bluetooth wireless technology if installed see Removing the Internal Card With Bluetooth Wireless Technology 10 Remove the palm rest see Removing the Palm Rest 11 Remove the ExpressCard cage see ...

Страница 47: ...place 2 Replace the four screws on the top of the system board 3 Follow the steps in Removing the System Board Assembly in reverse order S Video Board 1 processor heat sink fan cable connector 2 button board cable connector 3 speaker cable connector 4 wireless sniffer board connector 5 system board NOTE Depending on your system configuration the number of screws shown may be greater than the numbe...

Страница 48: ...ee Removing the Processor Thermal Cooling Assembly 13 Remove the processor see Removing the Processor Module 14 Remove the system board see Removing the System Board Assembly 15 Remove the screw securing the S Video board to the system board assembly 16 Carefully disconnect the S Video connector from the system board and seperate the S Video board from the system board assembly Replacing the S Vid...

Страница 49: ...rnal Card With Bluetooth Wireless Technology 10 Remove the palm rest see Removing the Palm Rest 11 Remove the ExpressCard cage see Removing the ExpressCard Cage 12 Remove the processor thermal cooling assembly see Removing the Processor Thermal Cooling Assembly 13 Remove the processor see Removing the Processor Module 14 Remove the system board see Removing the System Board Assembly 15 Remove the ...

Страница 50: ... charger board connector to the system board 2 Replace the two screws securing the charger board to the system board assembly 3 Follow the steps in Removing the Charger Board in the reverse order Back to Contents Page CAUTION Before you begin the following procedure follow the safety instructions in the Product Information Guide ...

Страница 51: ...s of Microsoft Corporation in the United States and or other countries Other trademarks and trade names may be used in this document to refer to either the entities claiming the marks and names or their products Dell Inc disclaims any proprietary interest in trademarks and trade names other than its own January 2008 Rev A00 Back to Contents Page NOTE A NOTE indicates important information that hel...

Отзывы: