background image

Manual

Article No.: 846010

05.12.2017

Importer

Auf der Hub 2

D-76307 Karlsbad

Tel.: +49 7248 / 92 71 500

Fax: +49 7248 / 92 71 550

Web: www.deko-light.com

Mail: [email protected]

The product is CE compliant and meets all the essential requirements of Directive 1999/5/EC R&TTE.

The CE Declaration of Conformity for this product can be obtained at the following address.

http://deko-light.com/?page_id=4263

7. LED Controller

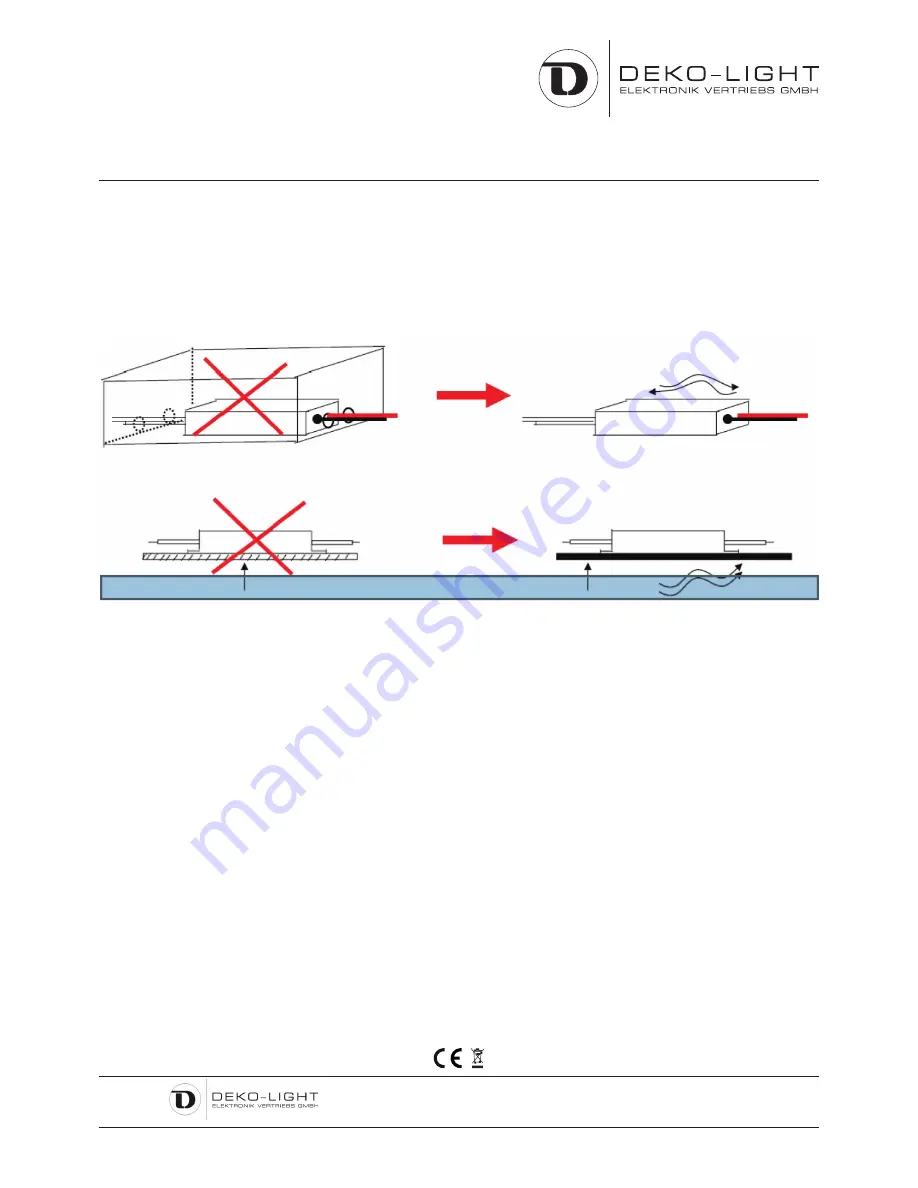
1.  LED Controller - mounting instructions

To derive the heat, we recommend the installation to allow sufficient space for the air to circulate and the driver will not be overheated. Make 

sure that all connections are tight. The signal line should be as far away from the power line (230V).

2.  „Connect“ Touch-Remote with LED Controller

1.  Switch on the Power of the RF Controller and wait ca. 1s and then push the “ON” button on the Touch-Controller,  


after that the LED flashes up 3 times, then the Touch-Controller and the Controller are connected.

2.  If this step isn’t working please try again.

3.  „Disconnect“ Touch-Remote with LED Controller

1. 

Switch on the LED stripe and wait ca. 1s and then hold the S+ button again till the stripe flashes up 9 times,  


then the Touch-Controller and the bulb are disconnected. 

2.  Now you can address the stripe again with the same or another Touch-Controller.  

4.  Programs

1.  Fade in Fade out 
2.  Strobe Warm White
3.  Ramp up   
4.  Stribe Neutral White
5.  Ramp down 


6.  Strobe Cold White
7.  Random  
8.  Fade Color
9.  Strope 3 Color 

Содержание 846010

Страница 1: ...Artikel Nr 846010 LED Mixit Set RF White 2 5 m 1 05 12 2017 Bedienungsanleitung ...

Страница 2: ...5 12 2017 Inhaltsverzeichnis 1 Sicherheitshinweise Seite 3 2 Einleitung Seite 4 3 Lieferumfang Seite 4 4 Technische Daten Seite 4 5 LED Stripe Sicherheits und Montagehinweise Seite 5 6 LED Stripe Profilmontage Seite 6 7 LED Controller Seite 7 ...

Страница 3: ...gkeiten auf oder in die Nähe des Gerätes Stellen Sie das Gerät immer auf festen Untergrund und vermeiden Sie Vibrationen Benutzen Sie keine chemischen Mittel zur Reinigung Trennen Sie die Spannungsversorgung bevor Sie das Gerät säubern Der Benutzer sollte nicht versuchen das Gerät eigenständig zu warten Alle Reparaturen und Servicearbeiten sollten von einem qualifizierten Techniker durchgeführt we...

Страница 4: ...Wandhalterung Steckernetzteil Bedienungsanleitung 4 Technische Daten 1 LED Stripe Maße L x B x H 2500 x 8 x 3 mm Farbtemperatur 2700 6500 K Eingangsspannung 12V DC Leistung 13 00 W LED Anzahl 300 LED Bauform 3528 Schnittmöglichkeit 50 mm 6 LED Schutzklasse IP 33 Betriebstemperatur 5 40 C 2 Touch Fernbedienung RF Single Maße L x B x H 110 x 52 x 21 mm Betrieb 2x AAA Batterien Reichweite ca 20 m Fre...

Страница 5: ... a Wir empfehlen für die Montage des Stripe in einem Aluminiumprofi b Der Stripe darf nicht an die Versorgungsspannung angeschlossen werden wenn dieser noch in der Verpackung oder auf einer Spule aufgerollt ist c Den Stripe nicht verwenden wenn er abgedeckt oder in einer Oberfläche eingelassen ist Außer in dafür vorgesehenen Aluminumprofilen d Das Produkt darf nicht mit dem Produkt eines anderen H...

Страница 6: ...Bedienungsanleitung Artikel Nr 846010 6 05 12 2017 6 LED Stripe Profilmontage 1 2 3 4 5 6 7 8 9 11 12 13 Biegeradius max r 10 mm ...

Страница 7: ... Stromleitung 230V liegen 2 Fernbedienung mit LED Controller verbinden 1 RF Controller einschalten und nach ca 1 Sekunde die Taste Ein Touch Fernbedienung gedrückt halten anschließend blinken die LED 3 mal weiß auf dass ist das Zeichen dafür dass die Touch Fernbedienung mit dem RF Controller verbunden ist 2 Sollte dies nicht beim ersten Versuch funktionieren führen Sie den Punkt a nochmals durch 3...

Страница 8: ...Manual Article No 846010 LED Mixit Set RF White 2 5 m 1 05 12 2017 ...

Страница 9: ...Contents 1 Security instructions page 3 2 Introduction page 4 3 Purachased parts package page 4 4 Technical specification page 4 5 LED Instructions for mounting and safety page 5 6 LED Stripe Profile mounting page 6 7 LED Controller page 7 ...

Страница 10: ...s Always operate on solid ground and avoid vibrations Do not use chemical cleaning agents Before cleaning the product must be cut off from every power connection de energize The user should not try to repair the product by itself All repairs and services should be handled by a qualified technician Caution Guarantee claims expire when damage is caused disregarding the user manual The producer and i...

Страница 11: ...Manual 4 Technical specification 1 LED Stripe Dimensions L x B x H 2500 x 8 x 3 mm Color temperature 2700 6000 K Input voltage 12V DC Power 13 00 W LED quantity 300 LED type 3528 Cutting possibility each 50 mm 6 LED IP Code IP 33 Working temperature 5 40 C 2 Touch remote RF Single Dimensions L x B x H 110 x 52 x 21 mm Power supply 2x AAA Batteries Range ca 20 m Frequency 2 4 GHz Taste O On Off Tas...

Страница 12: ...ructions for mounting and safety a We recommend installing the stripe in an aluminum profile b The stripe must not be connected to the supply voltage when it is in the package or rolled up on a reel c Do not use the stripe when it is covered or set in a surface Exception aluminum profiles provided for this purpose d The product is not compatible with the products of another manufacturer e For conn...

Страница 13: ...Manual Article No 846010 6 05 12 2017 6 LED Stripe Profile mounting 1 2 3 4 5 6 7 8 9 11 12 13 Bending Radius max r 10 mm ...

Страница 14: ...s are tight The signal line should be as far away from the power line 230V 2 Connect Touch Remote with LED Controller 1 Switch on the Power of the RF Controller and wait ca 1s and then push the ON button on the Touch Controller after that the LED flashes up 3 times then the Touch Controller and the Controller are connected 2 If this step isn t working please try again 3 Disconnect Touch Remote wit...

Страница 15: ... gewechselt werden es besteht Verbrennungsgefahr Vor dem Wechsel muss die Spannungsversorgung getrennt werden Der An und Einbau in der Nähe von brennbaren Materialen ist verboten Sollten Beschädigungen z B defekte Netzleitung oder Funktionsstörungen vorhanden sein trennen Sie die Spannungsversorgung und kontaktieren Sie Ihren Lieferant Defekte Teile dürfen nur von Fachpersonal und durch originale ...

Страница 16: ...nected The mounting and installation close to flammable materials is prohibited If damage eg faulty power line or a malfunction may be present disconnect the power supply and contact your supplier Defective parts may be replaced only by qualified staff and with original spare parts Caution The package may contain any small parts packaging materials which can be swallowed by children The product sh...

Страница 17: ...ure Avant de changer une lampe l alimentation doit être impérativement déconnectée Le montage et l installation à proximité de matériaux inflammables est interdite En cas de problème déconnectez l alimentation et contactez votre revendeur Les pièces détachées doivent être strictement d origine Leur remplacement doit être fait par un technicien qualifié Attention L emballage peut contenir de petite...

Отзывы: