background image

BEFORE FIRST USE

1.

Remove all packaging materials. Locate all included parts 
before discarding the box. 

2.

Clean the inner bowl, fryer lid and fry baskets by placing 
in the dishwasher. 

3.

Clean the electric box and heating element with a damp 
cloth and mild dishwashing soap. 

4.

Wipe the outside of the unit with a soft cloth. 

USING THE APPLIANCE 

1.

Place the unit on a level surface. Attach the cord to the 
the unit. Note: It is a magnetic power head.

2.

Fill the inner bowl with oil. Note: The minimum amount 
of oil is 3.2QT and the maximum is 4.2QT.

3.

Plug cord into an electrical outlet. Note: If the micro 
switch on the electric box is not connected to the unit, it 
will not turn on. Ensure it is properly assembled.

4.

Select the desired temperature and time.

5.

The green power light will illuminate. The red ready light 
will then illuminate when the desired temperature is 
reached. This should take 8 to 12 minutes to heat up. 
Note: The red ready light will intermittently go on and off 
during the cooking process.

6.

Once the red ready light is illuminate, fill the basket with 
food and lower into the inner bowl.  Place the lid on the 
unit. 

7.

When cooking time is complete the unit will ding 
indicating the selected time has elapsed. Use extreme 
caution when lifting the lid as the unit and contents 
inside are extremely hot.

8.

Carefully lift the basket out of the unit and drain food of 
excess oil prior to serving. Unplug unit.

6

Содержание SH-ST40D

Страница 1: ...1 4 2QT DEEP FRYER Instruction Manual MODEL SH ST40D ...

Страница 2: ...walls and cupboards Do not let the cord hang over the edge of a table or counter or touch hot surfaces Close supervision is necessary when any appliance is used by or near children Do not move the appliance during cooking If you are using plastic utensils do not leave them inside the appliance when hot Do not touch hot surfaces Do not use the unit near or under surfaces that are heat sensitive or ...

Страница 3: ...ock this plug is intended to fit into a polarized outlet only one way If the plug does not fit fully into the outlet reverse the plug If it still does not fit contact a qualified electrician Do not attempt to modify the plug in any way The unit is equipped with an automated safety switch This unit will shut off if it overheats See page 5 for how to reactivate the machine Do not use outdoors SAVE T...

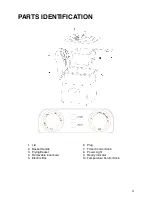
Страница 4: ...PARTS IDENTIFICATION 4 1 Lid 2 Basket Handle 3 Frying Basket 4 Removable inner bowl 5 Electric Box 6 Plug 7 TImer Control Knob 8 Power Light 9 Ready indicator 10 Temperature Control Knob ...

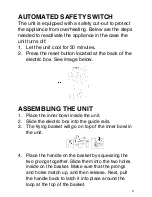
Страница 5: ... the electric box See image below ASSEMBLING THE UNIT 1 Place the inner bowl inside the unit 2 Slide the electric box into the guide rails 3 The frying basket will go on top of the inner bowl in the unit 4 Place the handle on the basket by squeezing the two prongs together Slide them into the two holes inside on the basket Make sure that the prongs and holes match up and then release Next pull the...

Страница 6: ... the electric box is not connected to the unit it will not turn on Ensure it is properly assembled 4 Select the desired temperature and time 5 The green power light will illuminate The red ready light will then illuminate when the desired temperature is reached This should take 8 to 12 minutes to heat up Note The red ready light will intermittently go on and off during the cooking process 6 Once t...

Страница 7: ... than two months Dispose of oil if there are signs of odor smoke or discoloration CLEANING Clean after every use 1 Ensure the unit is unplugged and let the unit completely cool for 30 minutes CAUTION To prevent injury or electric shock do not immerse cord electric box or unit in water or other liquid 2 Clean the inner bowl fryer lid and fry baskets by placing in the dishwasher 3 Clean the electric...

Страница 8: ...WITHIN THE UNITED STATES AND DOES NOT COVER Ordinary wear and tear including scratches dents or stains Heat discoloration minor imperfections and slight color variations in the ceramic coating metals or glass Damage caused by extreme temperatures changes such as pre heating cookware empty letting liquids boil dry or immersing a hot pot or lid into cold water Improper cleaning methods causing scrat...

Отзывы: