background image

34

CONTENTS

Warnings

 . . . . . . . . . . . . . . . . . . . . . . . . . . . . . . . . . . . . . . . . . . . . . . . . . . . . . . . . . . . . . . . . . . . . . . . . . . .33

Use 

- Cleaning the interior - Starting up and temperature regulation - Fresh food refrigeration . . . . . . . . . . . . .35

Use

- Food protection  . . . . . . . . . . . . . . . . . . . . . . . . . . . . . . . . . . . . . . . . . . . . . . . . . . . . . . . . . . . . . . . . . . . . . . .36

Use

- Control panel - Starting up and temperature regulation of freezer compartment - Quick-freezing  . . . . . .

Freezing fresh food - Storage of frozen food - Thawing  . . . . . . . . . . . . . . . . . . . . . . . . . . . . . . . . . . . . . . . . . . . . .37

Use

- Ice-cube production - Cold accumulator - Movable shelves  - Positioning the door shelves   . . . . . . . . . .

Air recycling . . . . . . . . . . . . . . . . . . . . . . . . . . . . . . . . . . . . . . . . . . . . . . . . . . . . . . . . . . . . . . . . . . . . . . . . . . . . . . .38

Hints 

- Hints for refrigeration - Hints for freezing - Hints for storage of frozen food . . . . . . . . . . . . . . . . . . . . . . . .39

Maintenance 

- Periods of non-operation - Periodic cleaning - Interior light    . . . . . . . . . . . . . . . . . . . . . . . .40

Maintenance 

- Defrosting - 

Customer service and spare parts

Technical information

 . . . . . . . . . . . .41

Installation

- Location - Shelf-holders - Electrical connection  . . . . . . . . . . . . . . . . . . . . . . . . . . . . . . . . . . .42

Installation

- Door reversibility  . . . . . . . . . . . . . . . . . . . . . . . . . . . . . . . . . . . . . . . . . . . . . . . . . . . . . . . . . . .43

Installation

- Building-in instructions . . . . . . . . . . . . . . . . . . . . . . . . . . . . . . . . . . . . . . . . . . . . . . . . . . . . . . .44

Do not place carbonated or fizzy drinks in the
freezer as it creates pressure on the container,
which may cause it to explode, resulting in
damage to the appliance. Do not use a
mechanical device or any artificial means to
speed up the thawing process other than those
recommended by the manufacturer. Never use
metal objects for cleaning your appliance as it
may get damaged.

Installation

•  During normal operation, the condenser and

compressor at the back of the appliance heat up
considerably. For safety reasons, minimum
ventilation must be as shown in the instructions.

Attention: keep ventilation openings clear of
obstruction.

•  Care must be taken to ensure that the appliance

does not stand on the electrical supply cable.

Important:

if the supply cord is damaged, it must

be replaced by a special cord or assembly availa-
ble from the manufacturer or its service agent.

•  If the appliance is transported horizontally, it is

possible that the oil contained in the compressor
flows in the refrigerant circuit. It is advisable to
wait at least two hours before connecting the
appliance to allow the oil to flow back in the
compressor.

•  There are working parts in this product which

heat up. Always ensure that there is adequate
ventilation as a failure to do this will result in
component failure and possible food loss. See
installation instructions.

•  Parts which heat up should not be exposed.

Wherever possible the back of the product should
be against a wall.

Environment Protection

This appliance does not contain gasses which
could damage the ozone layer, in either its
refrigerant circuit or insulation materials. The
appliance shall not be discarded together with
the urban refuse and rubbish. Avoid damaging
the cooling unit, especially at the rear near the
heat exchanger. Information on your local
disposal sites may be obtained from municipal
authorities. The materials used on this appliance
marked by the symbol  

are recyclable.

Disposal of old Appliances

The symbol 

on the product or on its packaging

indicates that this product may not be treated as
household waste. Instead it shall be handed over to
the applicable collection point for the recycling of
electrical and electronic equipment. By ensuring this
product is disposed of correctly, you will help prevent
potential negative consequences for the
environment and human health, which could
otherwise be caused by inappropriate waste
handling of this product. For more detailed
information about recycling of this product, please
contact your local city office, your household waste
disposal service or the shop where you purchased
the product.

Содержание DRC731JE

Страница 1: ...2223 347 91 REFRIGERADOR CONGELADOR FRIGOR FICO CONGELADOR FRIDGE FREEZER DRC731JE LES NOUVEAUX OBJETS DE VALEUR...

Страница 2: ......

Страница 3: ...r Las informaciones sobre los centros de recepci n son suministradas por las autoridades municipales Prestar la m xima atenci n durante las operaciones de desplazamiento para no da ar las partes del c...

Страница 4: ...u embalaje indica que este producto no se puede tratar como desperdicios normales del hogar Este producto se debe entregar al punto de recolecci n de equipos el ctricos y electr nicos para reciclaje A...

Страница 5: ...a est abierta La temperatura se regula automatic mente y puede ser aumentada menos fr o o bien se puede disminuir m s fr o gir ndolo hacia en el sentido de las agujas del reloj La temperatura interna...

Страница 6: ...con una temperatura de conservaci n inferior o igual a 4 C Indicador de temperatura Termostato a regular Temperatura correcta El indicador de temperatura consiente controlar el funcionamiento correcto...

Страница 7: ...ador Enchufar la clavija en la toma de corriente Girar en sentido horario hacia la derecha el mando del termostato B La luz testigo verde A se enciende Pulsar el mando de la congelaci n r pida D La lu...

Страница 8: ...poner los alimentos directamente sobre los estantes refrigerantes cuidando de que no se supere el l mite de carga situado en el lado del compartimiento superior si previsto Importante En caso de inte...

Страница 9: ...ntido de la flecha inasta cuando no est libre y volverla a colocar a la altura deseada P R X X X A Fig 1 Circulaci n de aire El compartimiento frigor fico est provisto de un ventilador especial D A C...

Страница 10: ...nca alimentos o liquidos calientes No llene demasiado les bolsitas o los contenedores con tapa de los alimentos por congelar No consuma ciertos productos apenas sacados del congelador cubitos de hielo...

Страница 11: ...rculaci n del aire a fin de evitar la formaci n de olores desagradables Limpieza peri dica Lavar el interior con agua tibia y bicarbonato s dico Enjuagar y secar cuidadosamente Limpiar el condensador...

Страница 12: ...omento de llamar proporcionar la referencia del modelo y el n mero de matr cula del aparato indicados en el certificado de garant a o en la tarjeta matr cula DATOS T CNICOS Los datos t cnicos se indic...

Страница 13: ...a una instalaci n de tierra conforme a las leyes en vigor consultando para ello con un t cnico especializado El fabricante declina toda responsabilidad en el caso que esta norma no sea respetada INSTA...

Страница 14: ...ealizar la instalaci n 1 Desenrosque el perno superior y retire el distanciador 2 Retire la puerta superior 3 Desmonte la bisagra intermedia y los escuadras del lado contrario y vuelva a montar la bis...

Страница 15: ...ntilaci n con estas medidas profundidad 50 mm ancho 540 mm PR01 540 50 3 2 1 50 mm min 200cm2 200cm 2 min D567 Introducir el aparato en el alojamiento apoy ndolo contra la pared interna correspondient...

Страница 16: ...n de los agujeros exteriores Una vez que se hayan hecho los agujeros fijar la gu a con los tornillos presentes en el equipo base Abrir la puerta del aparato y la del mueble a 90 aprox Introducir la es...

Страница 17: ...ectamente al mueble En este caso esperar que la empaquetadura se recobre en forma natural o bien acelerar dicho proceso calentando la parte interesada con un normal secador de cabellos D E D734 Ha 8mm...

Страница 18: ...ifica o da instala o el ctrica na casa do utilizador tiver de ser feita para tornar poss vel a instala o do aparelho deve esta ser efectuada por pessoal qualificado Este aparelho deve ser assistido po...

Страница 19: ...s de acordo com as disposi es em vigor para a protec o do melo ambiente Os materiais utilizados neste aparelho marcados com o simbolo s o recicl veis Indica es relativas remo o controlada O s mbolo no...

Страница 20: ...bargo si se quiere obtener una congelaci n m s r pida de los alimentos girar el mando del termostato hacia la posici n de fr o m ximo Con el mando en dicha posici n la temperatura del compartimento re...

Страница 21: ...for associada a uma temperatura de conserva o inferior ou igual a 4 C Indicador de temperatura Termostato para regular Temperatura correta O indicador de temperatura permite de controlar o bom funcion...

Страница 22: ...temperatura do compartimento de congela o Inserir a ficha na tomada da corrente Girar em sentido hor rio o bot o do term stato B A luz de aviso verde A se acende Pulsar o bot o da congela o r pida D...

Страница 23: ...o do compartimento superior onde for previsto Importante Cuando se corta la corriente el ctrica no tiene que abrirse la puerta del congelador Si el corte es de breve duraci n de 6 a 8 horas y el conge...

Страница 24: ...a o do espa o pode sobreporse as meias prateleiras anteriores s meias prateleiras posteriores P R X X X Recircula o de ar O compartimento geladeira dotado de uma ventoinha especial D A C Dynamic Air C...

Страница 25: ...alimentar Feche cuidadosamente os pacotes eliminando as bolsas de ar evite introduzir os produtos a congelar em contacto com os j congelados isto vai evitar o aumento da temperatura destes ltimos cons...

Страница 26: ...n a de energia Paragem prolongada No caso de se ausentar por um per odo prolongado desligue a tomada de corrente esvazie degele e limpe o aparelho Mantenha as portas entre abertas durante toda a n o u...

Страница 27: ...os pontiagudos para retirar o gelo pois pode danificar o congelador ASSIST NCIA T CNICA E PE AS DE SUBSTITUI O Se o aparelho n o funcionar verifique Se a ficha est bem introduzida na tomada e se h cor...

Страница 28: ...cando se possam fechar no aparelho o que seria altamente perigoso Coloca o Coloque o aparelho longe de qualquer fonte de calor aquecimento fog es ou raios solares demasiado intensos O aparelho deve po...

Страница 29: ...efetuar a instala o 1 Desaparafuse o parafuso superior e retire o espa ador 2 Retire a porta superior 3 Desaparafuse a dobradi a interm dia e as tampinhas tapa furos voltando a mont las na parte opos...

Страница 30: ...erturas para a ventila o livres de qualquer obstru o PR01 540 50 3 2 1 50 mm min 200cm2 200cm 2 min D567 Introduzir o aparelho no compartimento apoiando o na parede interna correspondente ao lado de a...

Страница 31: ...o dos furos externos Uma vez preparados os furos fixe a guia com os parafusos anexos B E C D PR266 Ha Hb Hc Hd 21 mm 21 mm ca 50 mm 90 90 ca 50 mm Engate a cobertura Hc na guia Ha Abra a porta do apa...

Страница 32: ...da ao m vel Nesse caso pode esperar pela natural recupera o da veda o ou tornar mais r pido esse processo aquecendo a parte interessada com um normal secador de cabelos D E D734 Para a eventual opera...

Страница 33: ...such as ice cream makers inside of refrigerating appliances Service Repair Any electrical work required to install this appliance should be carried out by a qualified electrician or competent person...

Страница 34: ...y availa ble from the manufacturer or its service agent If the appliance is transported horizontally it is possible that the oil contained in the compressor flows in the refrigerant circuit It is advi...

Страница 35: ...g is switched on The temperature is automatically regulated and can be increased to achieve a higher temperature warmer by rotating the thermostat knob toward lower settings or reduced colder rotating...

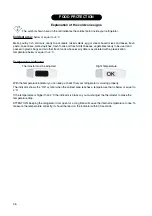
Страница 36: ...eservation temperature below or equal to 4 C Temperatur indicator Thermostat must be adjusted Right Temperature With the temperature indicator you can keep a check that your refrigerator is working pr...

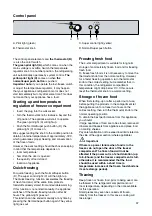
Страница 37: ...t goes out This function can be ended manually at any time by pressing the Normal Super button again The yellow light goes out AUTO FREEZE C Super control light yellow D Normal Super push button Freez...

Страница 38: ...hts To make these adjustments proceed as follows Gradually pull the shelf in the direction of the arrows until it comes free then reposition as required P R X X X Cold accumulator The appliance is equ...

Страница 39: ...wrap up the food in aluminium foil or polythene and make sure that the packages are airtight do not allow fresh unfrozen food to touch food which is already frozen thus avoiding a rise in temperature...

Страница 40: ...its cooling unit maintenance and recharging must therefore only be carried out by authorized technicians Periodic cleaning Clean the inside with warm water and bicarbonate of soda Rinse and dry thoro...

Страница 41: ...eft side of the appliance Defrosting Refrigerator Frost is automatically eliminated from the evaporator of the refrigerator compartment every time the motor compressor stops during normal use The defr...

Страница 42: ...ions consulting a specialist technician The Manufacturer declines all responsibility if the above safety precautions are not observed This appliance complies with the following E E C Directives 87 308...

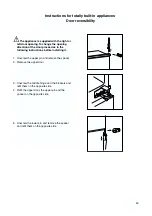
Страница 43: ...or proceed as in the following instructions before installing it 1 Unscrew the upper pin and remove the spacer 2 Remove the upper door 3 Unscrew the middle hinge and the brackets and refit them on the...

Страница 44: ...0 mm 50 mm min 200cm2 200cm 2 min D567 Fit the appliance in the niche by making sure that it stands against the interior surface of the unit on the side where the door hinges of the appliances are fit...

Страница 45: ...as shown in the figure and mark the position of external holes After having drilled holes fix the guide with the screws supplied 21 mm 21 mm ca 50 mm 90 90 ca 50 mm B E C D Fix cover Hc on guide Ha u...

Страница 46: ...fit perfectly to the cabinet In that case wait for the natural fitting of the gasket or accelerate this process by heating up the part involved with a normal hairdrier D E D734 PR168 Hb PR167 1 Hd Hb...

Страница 47: ...4 Marketing and Home Economist fax 01256 325 888 Distributor in Ireland Quality Electrical Distributors Ltd 143b Slaney Close Dublin Industrial Estate Glasnevin Dublin 11 Sales telephone 01 878 1996 S...

Страница 48: ...ir d un poste fixe Tarif en vigueur au 1 avril 2004 Service fourni par Brandt Customer Services soci t par actions simplifi e au capital de 2 500 000 euros 5 7 avenue des B thunes 95310 Saint Ouen l A...

Отзывы: